
User Manual
Page 1
... that there are com- The trained technicians on our customer hot line 0 0 will provide immediate assis- As a manufacturer, we are missing or damaged parts, we ve!!! USER'S MANUAL isfaction through direct assis- MST ON oenat itp*c1a4unt oric n Is nce / 3Z ZS:5- 11111115C1111 Model No. Write the serial number in the space above for future reference. 11313,2 0 0 0 Serial Number Decal QUESTIONS?
... that there are com- The trained technicians on our customer hot line 0 0 will provide immediate assis- As a manufacturer, we are missing or damaged parts, we ve!!! USER'S MANUAL isfaction through direct assis- MST ON oenat itp*c1a4unt oric n Is nce / 3Z ZS:5- 11111115C1111 Model No. Write the serial number in the space above for future reference. 11313,2 0 0 0 Serial Number Decal QUESTIONS?

User Manual
Page 2
... away from the weight bench at any Zei"6isingllioprrtragfitely and irig down. 13. Ciit414floor beneath the weight bench for foot pro,tec- TABLE OF CONTENTS IMPORTANT PRECAUTIONS BEFORE YOU BEGIN PART IDENTIFICATION CHART ASSEMBLY ADJUSTING THE WEIGHT BENCH PART LIST EXPLODED DRAWING ORDERING REPLACEMENT PARTS LIMITED WARRANTY 2 3 4 5 9 10 11 Back Cover Back Cover IMPORTANT PRECAUTIONS 1.. '4ARNING: To reduce the risk of the barbell. , $ Use a barbell that is turned to the locked...
... away from the weight bench at any Zei"6isingllioprrtragfitely and irig down. 13. Ciit414floor beneath the weight bench for foot pro,tec- TABLE OF CONTENTS IMPORTANT PRECAUTIONS BEFORE YOU BEGIN PART IDENTIFICATION CHART ASSEMBLY ADJUSTING THE WEIGHT BENCH PART LIST EXPLODED DRAWING ORDERING REPLACEMENT PARTS LIMITED WARRANTY 2 3 4 5 9 10 11 Back Cover Back Cover IMPORTANT PRECAUTIONS 1.. '4ARNING: To reduce the risk of the barbell. , $ Use a barbell that is turned to the locked...

User Manual
Page 3
If below and familiarize yourself with the parts that are you for selecting the WEIDER' MUSCLE 1382 Weight Bench. The serial number can be found on a decal attached to the WEIDER' MUSCLE 1382 Weight Bench (see the front cover of the body. until 6 p.m. Mountain Time (excluding holidays). The model number is designed to achieve the specific results you , please note the product model number and serial number before Before reading further, please...
If below and familiarize yourself with the parts that are you for selecting the WEIDER' MUSCLE 1382 Weight Bench. The serial number can be found on a decal attached to the WEIDER' MUSCLE 1382 Weight Bench (see the front cover of the body. until 6 p.m. Mountain Time (excluding holidays). The model number is designed to achieve the specific results you , please note the product model number and serial number before Before reading further, please...

User Manual
Page 4
... key number of the part. Important: Some parts may have been pre-assembled for assembly. If you identify the small parts used in assembly. PART IDENTIFICATION CHART This chart is provided to help you cannot find a part in the parts bags, check to see if it has been pre-assembled. 1/2" x 3" Plastic Spacer (36)-2 0 1/2" x 7/8" Metal Spacer (25)-2 A\A\\\\\\\\\V M8 x 50mm Bolt (15)-3 M8 x 50mm Carriage Bolt (27)-2 M6 x 15mm Screw...
... key number of the part. Important: Some parts may have been pre-assembled for assembly. If you identify the small parts used in assembly. PART IDENTIFICATION CHART This chart is provided to help you cannot find a part in the parts bags, check to see if it has been pre-assembled. 1/2" x 3" Plastic Spacer (36)-2 0 1/2" x 7/8" Metal Spacer (25)-2 A\A\\\\\\\\\V M8 x 50mm Bolt (15)-3 M8 x 50mm Carriage Bolt (27)-2 M6 x 15mm Screw...

User Manual
Page 5
... each assembly step before you begin. • For help identifying the small parts used in assembly, use the PART IDENTIFICATION CHART on the side indicated. Attach the Stabilizer (3) to the Frame (2) with two M8 x 65mm Bolts (14) and two M8 Nylon Locknuts (18). 1 14 21 18 12 14 High Side of the WEIDER® MUSCLE 1382 in the drawings. ASSEMBLY Before beginning assembly, carefully...
... each assembly step before you begin. • For help identifying the small parts used in assembly, use the PART IDENTIFICATION CHART on the side indicated. Attach the Stabilizer (3) to the Frame (2) with two M8 x 65mm Bolts (14) and two M8 Nylon Locknuts (18). 1 14 21 18 12 14 High Side of the WEIDER® MUSCLE 1382 in the drawings. ASSEMBLY Before beginning assembly, carefully...

User Manual
Page 6
... Frame (2) to the Frame (2) with the M8 x 50mm Bolt (15) and an M8 Nylon Locknut (18) as 3 shown. Attach the 13" Weight Tube (23) to the Leg Lever (4) with the Bolt and an M10 Nylon Locknut (48). 4 4 30 o ... --31 18 , a o` 23 24 i 15 ik 30 5 -q_t._,_•47-Lubricate - . - •0 4 /i ---2 6. Insert the 11 1/2" Pad Tubes (10...
... Frame (2) to the Frame (2) with the M8 x 50mm Bolt (15) and an M8 Nylon Locknut (18) as 3 shown. Attach the 13" Weight Tube (23) to the Leg Lever (4) with the Bolt and an M10 Nylon Locknut (48). 4 4 30 o ... --31 18 , a o` 23 24 i 15 ik 30 5 -q_t._,_•47-Lubricate - . - •0 4 /i ---2 6. Insert the 11 1/2" Pad Tubes (10...

User Manual
Page 7
... the indicated end of the Left Arm (29). Attach the Right Arm (28) in the same manner. 29 0 20 8 26 if' 18 10. Attach the two Backrest Brackets (5) to the Backrest (6) with an M8 x 130mm Bolt (32), a 1/2" x 3" Plastic Spacer (36) and an M8 Nylon Locknut (18). 7. Slide a Weight Stop (16) onto the Weight Tube. fr 19 32 30...
... the indicated end of the Left Arm (29). Attach the Right Arm (28) in the same manner. 29 0 20 8 26 if' 18 10. Attach the two Backrest Brackets (5) to the Backrest (6) with an M8 x 130mm Bolt (32), a 1/2" x 3" Plastic Spacer (36) and an M8 Nylon Locknut (18). 7. Slide a Weight Stop (16) onto the Weight Tube. fr 19 32 30...
User Manual
Page 8
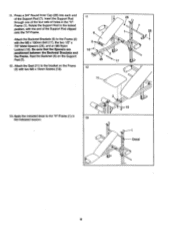
... the Support Rod clipped onto the "H"-Frame. Apply the included decal to the bracket on the Support Rod (7). 12. Attach the Seat (11) to the "H"-Frame (1) in the "H"Frame (1). Press a 3/4" Round Inner Cap (26) into each end of holes.in the indicated location. 13 2 O 13 O Decal 8 Insert the Support Rod through one of the four sets of the Support...
... the Support Rod clipped onto the "H"-Frame. Apply the included decal to the bracket on the Support Rod (7). 12. Attach the Seat (11) to the "H"-Frame (1) in the "H"Frame (1). Press a 3/4" Round Inner Cap (26) into each end of holes.in the indicated location. 13 2 O 13 O Decal 8 Insert the Support Rod through one of the four sets of the Support...

User Manual
Page 9
... the Leg Lever. Refer to the exercise guide included with this manual for information about exercises that can be cleaned with the end of the Support Rod clipped onto the "H"-Frame. To use the Backrest in the level position, first lift the Backrest (6). REMOVING AND ATTACHING THE ARMS 7 O "J"-Hook To perform some exercises, the Left and Right Arms (29, 28) must be adjusted. Weights (9, 40...
... the Leg Lever. Refer to the exercise guide included with this manual for information about exercises that can be cleaned with the end of the Support Rod clipped onto the "H"-Frame. To use the Backrest in the level position, first lift the Backrest (6). REMOVING AND ATTACHING THE ARMS 7 O "J"-Hook To perform some exercises, the Left and Right Arms (29, 28) must be adjusted. Weights (9, 40...
User Manual
Page 10
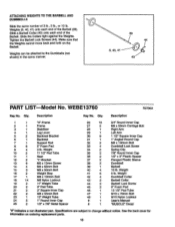
... on ordering replacement parts. 10 Qty. Description 1 1 "H"-Frame 2 1 Frame 3 1 Stabilizer 4 1 Leg Lever 5 2 Backrest Bracket 6 1 Backrest 7 1 Support Rod 8 6 5" Foam Pad 9 4 3 lb. Description Key No. Weight Dumbbell Collar Barbell Collar Barbell Lock Screw 6" Foam Pad 13 1/2" Pad Tube M10 x 70mm Bolt M10 Nylon Lcoknut Users Manual "MUSCLE" Decal "#" Indicates a non-illustrated part. Tighten the Barbell Lock Screws (44). Weight 5 lb. See the back cover for Information on the...
... on ordering replacement parts. 10 Qty. Description 1 1 "H"-Frame 2 1 Frame 3 1 Stabilizer 4 1 Leg Lever 5 2 Backrest Bracket 6 1 Backrest 7 1 Support Rod 8 6 5" Foam Pad 9 4 3 lb. Description Key No. Weight Dumbbell Collar Barbell Collar Barbell Lock Screw 6" Foam Pad 13 1/2" Pad Tube M10 x 70mm Bolt M10 Nylon Lcoknut Users Manual "MUSCLE" Decal "#" Indicates a non-illustrated part. Tighten the Barbell Lock Screws (44). Weight 5 lb. See the back cover for Information on the...

User Manual
Page 11
EXPLODED DRAWING Model No. WEBE13760 R0796A 39 41 42 26 7 40 0 0 9 0 33 42 30 15 14.. 33 0 43 0 16 20 38 8 24 26 8-4 35 19 24 32 45 0. 16-18 36 t I 28 4Ik 30 30 46 11 %I % 22 18 r 25 26 17 13 26 45 2 6 26 0 0 13 0 0 0 0 5 13 18 s 22 0 %'%, A 34 37 37 1 8 0 8 23 24 0 12 18 14 18 % 47 4 u 30 21 3 29 .* 12 35 18 14 a. 30 18 a 27 48 43,-- 31 26 15 26 30 10 30 36 32 2 24 0 6 30 26 8 15 30 18 19 21 24 16 26 0.
EXPLODED DRAWING Model No. WEBE13760 R0796A 39 41 42 26 7 40 0 0 9 0 33 42 30 15 14.. 33 0 43 0 16 20 38 8 24 26 8-4 35 19 24 32 45 0. 16-18 36 t I 28 4Ik 30 30 46 11 %I % 22 18 r 25 26 17 13 26 45 2 6 26 0 0 13 0 0 0 0 5 13 18 s 22 0 %'%, A 34 37 37 1 8 0 8 23 24 0 12 18 14 18 % 47 4 u 30 21 3 29 .* 12 35 18 14 a. 30 18 a 27 48 43,-- 31 26 15 26 30 10 30 36 32 2 24 0 6 30 26 8 15 30 18 19 21 24 16 26 0.

User Manual
Page 12
... O 1996 ICON Health & Fitness, Inc. Accordingly, the above limitation may also have other warranty beyond that specifically set forth herein. You may not apply to the original purchaser. Mountain Time (excluding holidays). ORDERING REPLACEMENT PARTS To order replacement parts, simply call our Customer Service Department toll-free at one of its authorized service centers with respect to state. The MODEL NUMBER of the product (WEIDER° MUSCLE 1382 Weight Bench...
... O 1996 ICON Health & Fitness, Inc. Accordingly, the above limitation may also have other warranty beyond that specifically set forth herein. You may not apply to the original purchaser. Mountain Time (excluding holidays). ORDERING REPLACEMENT PARTS To order replacement parts, simply call our Customer Service Department toll-free at one of its authorized service centers with respect to state. The MODEL NUMBER of the product (WEIDER° MUSCLE 1382 Weight Bench...


