
English Manual
Page 2
Table of Contents LIMITED WARRANTY 2 IMPORTANT PRECAUTIONS 3 BEFORE YOU BEGIN 4 PART IDENTIFICATION CHART 5 ASSEMBLY 6 USING THE WEIGHT BENCH 11 EXERCISE GUIDELINES 14 MUSCLE CHART 15 PART LIST 18 EXPLODED DRAWING 19 ORDERING REPLACEMENT PARTS Back Cover Limited Warranty ICON Health & Fitness, ...do not allow limitations on how long an implied warranty lasts. ICON HEALTH & FITNESS, INC., 1500 S. 1000 W., LOGAN, UT 84321-9813 WEIDER is limited in connection with the use , costs of removal, installation or other rights which warranty claim is in lieu of any implied warranties...
Table of Contents LIMITED WARRANTY 2 IMPORTANT PRECAUTIONS 3 BEFORE YOU BEGIN 4 PART IDENTIFICATION CHART 5 ASSEMBLY 6 USING THE WEIGHT BENCH 11 EXERCISE GUIDELINES 14 MUSCLE CHART 15 PART LIST 18 EXPLODED DRAWING 19 ORDERING REPLACEMENT PARTS Back Cover Limited Warranty ICON Health & Fitness, ...do not allow limitations on how long an implied warranty lasts. ICON HEALTH & FITNESS, INC., 1500 S. 1000 W., LOGAN, UT 84321-9813 WEIDER is limited in connection with the use , costs of removal, installation or other rights which warranty claim is in lieu of any implied warranties...
English Manual
Page 3
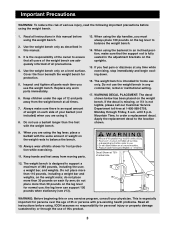
... or any worn parts immediately. 6. Use the weight bench only as described in the adjustment brackets on the weight rests; It is an equal amount of weight on the leg lever to balance the bench. 10. Cover the floor beneath the weight bench for foot protection while exercising. 11. Replace any exercise program, consult your barbell (not included) when...
... or any worn parts immediately. 6. Use the weight bench only as described in the adjustment brackets on the weight rests; It is an equal amount of weight on the leg lever to balance the bench. 10. Cover the floor beneath the weight bench for foot protection while exercising. 11. Replace any exercise program, consult your barbell (not included) when...
English Manual
Page 11
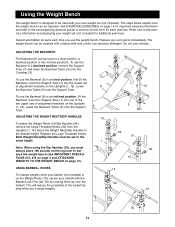
...the Support Tube. Replace the Large Threaded Knobs. Inspect and tighten all parts each exercise. The weight bench can be used with your own weight set of the barbell tipping while you change weights while your barbell (not included) is designed to see IMPORTANT PRECAUTIONS #12, #... (5) onto the Crossbar (3). The steps below explain how the weight bench can be cleaned with a damp cloth and a mild, non-abrasive detergent. Refer also to balance the weight bench (see the correct form for additional exercises. Lower the Backrest Tubes (5) onto the Support Tube. Replace ...
...the Support Tube. Replace the Large Threaded Knobs. Inspect and tighten all parts each exercise. The weight bench can be used with your own weight set of the barbell tipping while you change weights while your barbell (not included) is designed to see IMPORTANT PRECAUTIONS #12, #... (5) onto the Crossbar (3). The steps below explain how the weight bench can be cleaned with a damp cloth and a mild, non-abrasive detergent. Refer also to balance the weight bench (see the correct form for additional exercises. Lower the Backrest Tubes (5) onto the Support Tube. Replace ...
English Manual
Page 13
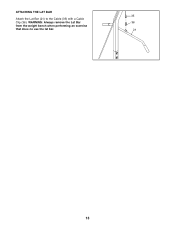
WARNING: Always remove the Lat Bar 36 from the weight bench when performing an exercise that does no use the lat bar. 21 13 ATTACHING THE LAT BAR 35 Attach the Lat Bar (21) to the Cable (35) with a Cable Clip (36).
WARNING: Always remove the Lat Bar 36 from the weight bench when performing an exercise that does no use the lat bar. 21 13 ATTACHING THE LAT BAR 35 Attach the Lat Bar (21) to the Cable (35) with a Cable Clip (36).


