
User Manual
Page 1
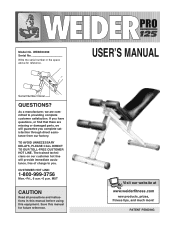
USERÕS MANUAL Serial Number Decal QUESTIONS? If you have questions, or find that there are missing or damaged parts, we are committed to you complete satisfaction through direct assistance from our factory. TO AVOID UNNECESSARY DELAYS, PLEASE CALL DIRECT TO OUR TOLL-FREE CUSTOMER HOT LINE. MST CAUTION Read all precautions and instructions in the space above for future reference...
USERÕS MANUAL Serial Number Decal QUESTIONS? If you have questions, or find that there are missing or damaged parts, we are committed to you complete satisfaction through direct assistance from our factory. TO AVOID UNNECESSARY DELAYS, PLEASE CALL DIRECT TO OUR TOLL-FREE CUSTOMER HOT LINE. MST CAUTION Read all precautions and instructions in the space above for future reference...
User Manual
Page 2
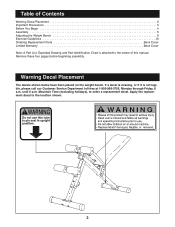
... Decal Placement 2 Important Precautions 3 Before You Begin 4 Assembly 5 Adjusting the Weight Bench 9 Exercise Guidelines 10 Ordering Replacement Parts Back Cover Limited Warranty Back Cover Note: A Part List, Exploded Drawing and Part Identification Chart is not legible, please call our Customer Service Department toll-free at 1-800-999-3756, Monday through Friday, 6 a.m. Remove these four pages before beginning assembly. Mountain Time (excluding holidays), to the location shown. 2 until 6 p.m. Table of this...
... Decal Placement 2 Important Precautions 3 Before You Begin 4 Assembly 5 Adjusting the Weight Bench 9 Exercise Guidelines 10 Ordering Replacement Parts Back Cover Limited Warranty Back Cover Note: A Part List, Exploded Drawing and Part Identification Chart is not legible, please call our Customer Service Department toll-free at 1-800-999-3756, Monday through Friday, 6 a.m. Remove these four pages before beginning assembly. Mountain Time (excluding holidays), to the location shown. 2 until 6 p.m. Table of this...
User Manual
Page 3
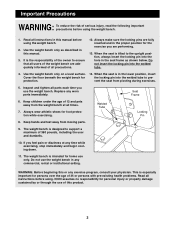
..., including the user and dumbells. 10. Use the weight bench only on a level surface. 14. Do not use only. Use the weight bench only as shown below. When the seat is the responsibility of the owner to support a maximum of all instructions in the lower position, insert Cover the floor beneath the weight bench for foot protection while exercising. Replace any exercise program, consult your physician. Welded Tube Locking Pin 8. WARNING...
..., including the user and dumbells. 10. Use the weight bench only on a level surface. 14. Do not use only. Use the weight bench only as shown below. When the seat is the responsibility of the owner to support a maximum of all instructions in the lower position, insert Cover the floor beneath the weight bench for foot protection while exercising. Replace any exercise program, consult your physician. Welded Tube Locking Pin 8. WARNING...
User Manual
Page 4
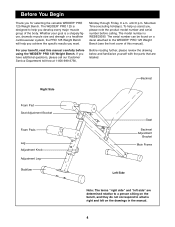
..., the PRO 125 Weight Bench will help you achieve the specific results you want. Right Side Foam Pad Seat Adjustment Bracket Foam Pads Leg Adjustment Knob Adjustment Leg Stabilizer Backrest Seat Backrest Adjustment Bracket Main Frame Left Side Note: The terms Òright sideÓ and Òleft on the drawings in the manual. 4 If you , please note the product model number and serial number before using the WEIDER¨ PRO 125 Weight Bench. To...
..., the PRO 125 Weight Bench will help you achieve the specific results you want. Right Side Foam Pad Seat Adjustment Bracket Foam Pads Leg Adjustment Knob Adjustment Leg Stabilizer Backrest Seat Backrest Adjustment Bracket Main Frame Left Side Note: The terms Òright sideÓ and Òleft on the drawings in the manual. 4 If you , please note the product model number and serial number before using the WEIDER¨ PRO 125 Weight Bench. To...
User Manual
Page 5
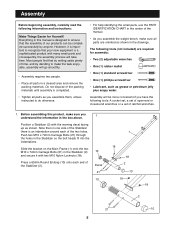
... the following tools: A socket set, a set of open-end or closed-end wrenches or a set of the manual. ¥ As you assemble the weight bench, make sure you assemble them, unless instructed to make the task enjoyable, assembly will take time. Everything in this product, make sure all parts as you 1 understand the information in the Stabilizer so the bolt heads fit into the indentations.
... the following tools: A socket set, a set of open-end or closed-end wrenches or a set of the manual. ¥ As you assemble the weight bench, make sure you assemble them, unless instructed to make the task enjoyable, assembly will take time. Everything in this product, make sure all parts as you 1 understand the information in the Stabilizer so the bolt heads fit into the indentations.
User Manual
Page 6
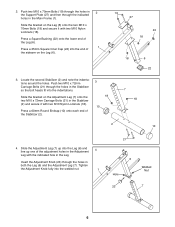
...) into the welded nut. 1 21 6 Hole Welded Nut 23 7 6 Locate the second Stabilizer (2) and note the indentations around the holes. Press a Square Bushing (22) onto the lower end of the adjustment holes in the Adjustment 4 Leg with the indicated hole in both the Leg (6) and the Adjustment Leg (7). Tighten the Adjustment Knob fully into the end of the Stabilizer (2). 18 10 7 18...
...) into the welded nut. 1 21 6 Hole Welded Nut 23 7 6 Locate the second Stabilizer (2) and note the indentations around the holes. Press a Square Bushing (22) onto the lower end of the adjustment holes in the Adjustment 4 Leg with the indicated hole in both the Leg (6) and the Adjustment Leg (7). Tighten the Adjustment Knob fully into the end of the Stabilizer (2). 18 10 7 18...
User Manual
Page 7
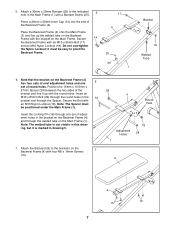
... (18). Press a 25mm x 50mm Inner Cap (14) into the end of adjustment holes in the Main Frame (1) with four M6 x 16mm Screws 7 (15). 29 4 Round Hole Adjustment Holes 1 18 28 8 4 15 15 7 Insert an M10 x 85mm Bolt (29) through one 6 set of the Backrest Frame (4). Insert the Locking Pin (16)...the Backrest Frame (4) with a Bumper Screw (25). Attach a 30mm x 25mm Bumper (26) to the indicated 5 hole in the bracket on the Main Frame. 5. Note that the bracket on the Backrest Frame (4) has four sets of oval adjustment holes and one set of the bracket and line it is...
... (18). Press a 25mm x 50mm Inner Cap (14) into the end of adjustment holes in the Main Frame (1) with four M6 x 16mm Screws 7 (15). 29 4 Round Hole Adjustment Holes 1 18 28 8 4 15 15 7 Insert an M10 x 85mm Bolt (29) through one 6 set of the Backrest Frame (4). Insert the Locking Pin (16)...the Backrest Frame (4) with a Bumper Screw (25). Attach a 30mm x 25mm Bumper (26) to the indicated 5 hole in the bracket on the Main Frame. 5. Note that the bracket on the Backrest Frame (4) has four sets of oval adjustment holes and one set of the bracket and line it is...

User Manual
Page 8
...step. Mount the Long Pad Tube (12) in the hole in the Seat Frame (5) in the Seat Frame. Note: The Locking Pin w/Ring can be inserted through the Seat Frame itself, and ÒTube BÓ is welded underneath the Seat Frame. Slide a Plastic Spacer (30) and a Foam Pad (11) onto the other end of the Seat Frame (5). Press... B to the brackets on the Seat Frame (5) with a Bumper Screw (25). Mount the Short Pad Tube (31) in the hole in the bracket on the Leg (6) by following the instructions given above. 10 11 3 3 13 31 12 13 53 11 3 6 8 Secure the Bolt with the upper hole in the ...
...step. Mount the Long Pad Tube (12) in the hole in the Seat Frame (5) in the Seat Frame. Note: The Locking Pin w/Ring can be inserted through the Seat Frame itself, and ÒTube BÓ is welded underneath the Seat Frame. Slide a Plastic Spacer (30) and a Foam Pad (11) onto the other end of the Seat Frame (5). Press... B to the brackets on the Seat Frame (5) with a Bumper Screw (25). Mount the Short Pad Tube (31) in the hole in the bracket on the Leg (6) by following the instructions given above. 10 11 3 3 13 31 12 13 53 11 3 6 8 Secure the Bolt with the upper hole in the ...
User Manual
Page 9
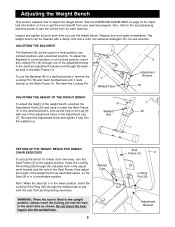
... to a level position or an inclined position, insert the Locking Pin (16) through one of the weight bench, unscrew the Adjustment Knob (23) and raise or lower the Main Frame (1) to adjust the weight bench. Replace any worn parts immediately. Do not use the weight bench. To adjust the Backrest to see the correct form for roman chair exercises, turn the Seat Frame (5) to the upright position, always insert the locking...
... to a level position or an inclined position, insert the Locking Pin (16) through one of the weight bench, unscrew the Adjustment Knob (23) and raise or lower the Main Frame (1) to adjust the weight bench. Replace any worn parts immediately. Do not use the weight bench. To adjust the Backrest to see the correct form for roman chair exercises, turn the Seat Frame (5) to the upright position, always insert the locking...
User Manual
Page 10
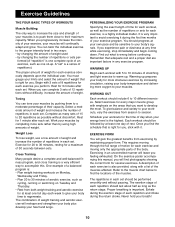
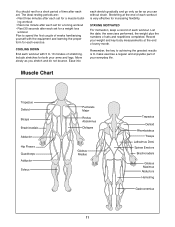
...). This requires moving only the appropriate parts of repetitions or sets for each set . Refer to the muscle chart below to 20 repetitions as the number of the body. The proper amount of the muscles. The combination of weight training and aerobic exercise will find the locations of weight for each set . PERSONALIZING YOUR EXERCISE PROGRAM Specifying the exact length of time for each workout, as...
...). This requires moving only the appropriate parts of repetitions or sets for each set . Refer to the muscle chart below to 20 repetitions as the number of the body. The proper amount of the muscles. The combination of weight training and aerobic exercise will find the locations of weight for each set . PERSONALIZING YOUR EXERCISE PROGRAM Specifying the exact length of time for each workout, as...
User Manual
Page 11
... your weight and key body measurements at the end of each stretch gradually and go only as far as you can without strain. Include stretches for increasing flexibility. Ease into each workout is to 10 minutes of stretching. List the date, the exercises performed, the weight plus the numbers of each workout. STAYING MOTIVATED For motivation, keep a record of sets...
... your weight and key body measurements at the end of each stretch gradually and go only as far as you can without strain. Include stretches for increasing flexibility. Ease into each workout is to 10 minutes of stretching. List the date, the exercises performed, the weight plus the numbers of each workout. STAYING MOTIVATED For motivation, keep a record of sets...
User Manual
Page 12
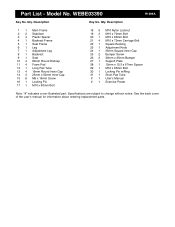
... 25 2 Bumper Screw 26 2 30mm x 25mm Bumper 27 1 Support Plate 28 1 15mm x 10.5 x 67mm Spacer 29 1 M10 x 85mm Bolt 30 1 Locking Pin w/Ring 31 1 Short Pad Tube # 1 UserÕs Manual # 1 Exercise Poster Note: Ò#Ó indicates a non-illustrated part. Specifications are subject to change without notice. Model No. Qty. See the back cover of the userÕs manual for information about ordering replacement parts. WEBE03390 R1099A Key No.
... 25 2 Bumper Screw 26 2 30mm x 25mm Bumper 27 1 Support Plate 28 1 15mm x 10.5 x 67mm Spacer 29 1 M10 x 85mm Bolt 30 1 Locking Pin w/Ring 31 1 Short Pad Tube # 1 UserÕs Manual # 1 Exercise Poster Note: Ò#Ó indicates a non-illustrated part. Specifications are subject to change without notice. Model No. Qty. See the back cover of the userÕs manual for information about ordering replacement parts. WEBE03390 R1099A Key No.
User Manual
Page 14
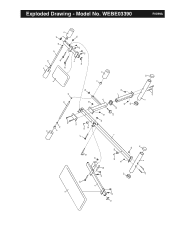
8 29 16 4 14 15 18 15 28 25 26 18 10 18 10 2 21 11 3 13 19 27 17 25 26 18 18 9 31 13 24 18 3 6 11 3 13 20 30 12 14 13 3 11 5 14 18 15 15 11 1 23 22 7 18 18 10 2 10 21 R1099A Exploded Drawing - Model No. WEBE03390
8 29 16 4 14 15 18 15 28 25 26 18 10 18 10 2 21 11 3 13 19 27 17 25 26 18 18 9 31 13 24 18 3 6 11 3 13 20 30 12 14 13 3 11 5 14 18 15 15 11 1 23 22 7 18 18 10 2 10 21 R1099A Exploded Drawing - Model No. WEBE03390
User Manual
Page 15
... be received by ICON at one of the product (WEIDER¨ PRO 125 Weight Bench). 3. Some states do not allow limitations on how long an implied warranty lasts. You may not apply to you . To help us assist you specific legal rights. The SERIAL NUMBER of the product (see the PART LIST and the EXPLODED DRAWING in connection with the use and service conditions, for indirect...
... be received by ICON at one of the product (WEIDER¨ PRO 125 Weight Bench). 3. Some states do not allow limitations on how long an implied warranty lasts. You may not apply to you . To help us assist you specific legal rights. The SERIAL NUMBER of the product (see the PART LIST and the EXPLODED DRAWING in connection with the use and service conditions, for indirect...


