

Instruction Manual
Page 1
... product (WEIDER PRO 330 weight bench) • the SERIAL NUMBER of the product (see the front cover of this manual) • the KEY NUMBER and DESCRIPTION of the part(s) (see the front cover of this manual. HOW TO ORDER REPLACEMENT PARTS To order replacement parts, please see the PART LIST and EXPLODED DRAWING on pages 17, 18, and 19) Part No. 241076 R0706A Printed in China © 2006 ICON IP, Inc. USER'S MANUAL Model No...
... product (WEIDER PRO 330 weight bench) • the SERIAL NUMBER of the product (see the front cover of this manual) • the KEY NUMBER and DESCRIPTION of the part(s) (see the front cover of this manual. HOW TO ORDER REPLACEMENT PARTS To order replacement parts, please see the PART LIST and EXPLODED DRAWING on pages 17, 18, and 19) Part No. 241076 R0706A Printed in China © 2006 ICON IP, Inc. USER'S MANUAL Model No...
Instruction Manual
Page 2
... 5 ASSEMBLY 4.0 6 ADJUSTMENTS 12 EXERCISE GUIDELINES PART LIST EXPLODED DRAWING . . . . . . . . . . . . . . . . . . . . . . 2. 3 . . . ..6..8.. . . . . . . . . . . . . . . . . . . . . . . . . . . . . . . . . . 3. 5. . . . . . . . . . . . . . . . . . . . . . . . . . . . . . . . . . . . . . . . . . 1. 0. . . . . . . . . . . . . . . . 3. 5. . . . . . . . . . . . . . . . . . . . . . . . . . . . . . . . . . . . . . . . . . . . . . . . . . . . . . . . . . . . . . . . . .15 .17 .18 HOW TO ORDER REPLACEMENT PARTS Back Cover 41 20...
... 5 ASSEMBLY 4.0 6 ADJUSTMENTS 12 EXERCISE GUIDELINES PART LIST EXPLODED DRAWING . . . . . . . . . . . . . . . . . . . . . . 2. 3 . . . ..6..8.. . . . . . . . . . . . . . . . . . . . . . . . . . . . . . . . . . 3. 5. . . . . . . . . . . . . . . . . . . . . . . . . . . . . . . . . . . . . . . . . . 1. 0. . . . . . . . . . . . . . . . 3. 5. . . . . . . . . . . . . . . . . . . . . . . . . . . . . . . . . . . . . . . . . . . . . . . . . . . . . . . . . . . . . . . . . .15 .17 .18 HOW TO ORDER REPLACEMENT PARTS Back Cover 41 20...
Instruction Manual
Page 3
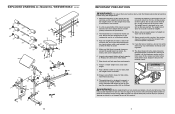
... weight bench in this manual. If you cannot complete a repetition. 14. This is intended for home use of all instructions in this or any exercise program, consult your physi1cian. IC4O4 N assumes no responsibility for foo5t8protec- Do warnings on the frreopnlat cceomv5e7ernot fdtehciasl.mAapnpulyaltahneddoecrdael rinatfhreee location shown. 58 58 2 44 8. mount, and u2s7e5t8he43weigh3t8bench. 58 52 38 6.44lIyn.sRpeecp6tl5aacnedapnryopweorrlny tighten a5ll8parts regularparts...
... weight bench in this manual. If you cannot complete a repetition. 14. This is intended for home use of all instructions in this or any exercise program, consult your physi1cian. IC4O4 N assumes no responsibility for foo5t8protec- Do warnings on the frreopnlat cceomv5e7ernot fdtehciasl.mAapnpulyaltahneddoecrdael rinatfhreee location shown. 58 58 2 44 8. mount, and u2s7e5t8he43weigh3t8bench. 58 52 38 6.44lIyn.sRpeecp6tl5aacnedapnryopweorrlny tighten a5ll8parts regularparts...
Instruction Manual
Page 4
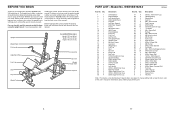
... review the drawing below and familiarize yourself with the parts that are subject to achieve the specific results you for information about ordering replacement parts. 4 17 Upright Weight Rest Fly Handle Adjustment Tube Curl Pad Seat Leg Lever Weight Tube Assembled Dimensions: Height: 152 cm (60 in.) Width: 170 cm (67 in.) Depth: 183 cm (72 in.) Locking Bar Backrest Weight Storage Tube Fly Arm PART LIST-Model No. Description Key No...
... review the drawing below and familiarize yourself with the parts that are subject to achieve the specific results you for information about ordering replacement parts. 4 17 Upright Weight Rest Fly Handle Adjustment Tube Curl Pad Seat Leg Lever Weight Tube Assembled Dimensions: Height: 152 cm (60 in.) Width: 170 cm (67 in.) Depth: 183 cm (72 in.) Locking Bar Backrest Weight Storage Tube Fly Arm PART LIST-Model No. Description Key No...
Instruction Manual
Page 5
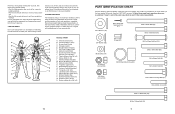
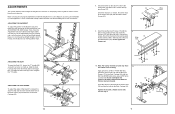
... minutes after each set for a muscle building workout. • Rest for one minute after each set for a weight loss workout. out. • Rest for 30 seconds after each set . List the date, the exercises performed, the resistance used in the parts bag, check to see if it has been preassembled. Pectoralis Major (chest) C. Biceps (front of thigh) I. Quadriceps (front of arm) D. Posterior Deltoid...
... minutes after each set for a muscle building workout. • Rest for one minute after each set for a weight loss workout. out. • Rest for 30 seconds after each set . List the date, the exercises performed, the resistance used in the parts bag, check to see if it has been preassembled. Pectoralis Major (chest) C. Biceps (front of thigh) I. Quadriceps (front of arm) D. Posterior Deltoid...
Instruction Manual
Page 6
.... WORKING OUT Each workout should last about half as long as one day of rest. Each workout should be assembled in the location where it . • Place all parts in a cleared area and remove the packing materials. In addition to the included hex keys and grease packet, the following information and instructions: • Because of its weight and size, the weight bench should be used •...
.... WORKING OUT Each workout should last about half as long as one day of rest. Each workout should be assembled in the location where it . • Place all parts in a cleared area and remove the packing materials. In addition to the included hex keys and grease packet, the following information and instructions: • Because of its weight and size, the weight bench should be used •...
Instruction Manual
Page 7
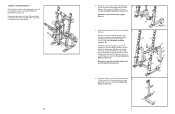
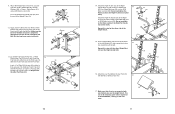
Then, insert the Curl Knob in the location shown. 22 9 8 56 14 2. Finish attaching the Rear Support with the Right Upright Base (4). 3. Do not tighten the Nylon Locknuts yet. STORING THE WEIGHT BENCH Set the Backrest (22) and the Adjustment Tube (9) to the vertical position. Remove the indicated Curl Knob (56) and lift the Frame (8) to the position shown (see ADJUSTING THE BACKREST on page...
Then, insert the Curl Knob in the location shown. 22 9 8 56 14 2. Finish attaching the Rear Support with the Right Upright Base (4). 3. Do not tighten the Nylon Locknuts yet. STORING THE WEIGHT BENCH Set the Backrest (22) and the Adjustment Tube (9) to the vertical position. Remove the indicated Curl Knob (56) and lift the Frame (8) to the position shown (see ADJUSTING THE BACKREST on page...
Instruction Manual
Page 8
... 39 Locking Bar 31 Fully tighten a Curl Post Knob (56) into the Front Leg (not shown). 20 13 34 56 12 20 13 2 ADDING WEIGHT TO THE LEG LEVER To use a barbell (not included) with the Curl Knob (56). Do not tighten the Nylon Locknuts yet. Set the pins on the Adjustment Tube (9) down 7 into a set of the included grease to be performed. Press the...
... 39 Locking Bar 31 Fully tighten a Curl Post Knob (56) into the Front Leg (not shown). 20 13 34 56 12 20 13 2 ADDING WEIGHT TO THE LEG LEVER To use a barbell (not included) with the Curl Knob (56). Do not tighten the Nylon Locknuts yet. Set the pins on the Adjustment Tube (9) down 7 into a set of the included grease to be performed. Press the...
Instruction Manual
Page 9
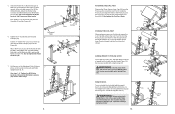
... into a set of brackets on the Seat Carriage (42). ADJUSTMENTS This section explains how to the desired location and engage the "T"-handle into the Frame (8). ping Screw (57). Tighten the four M6 x 40mm Screws (48) used . ADJUSTING THE BACKREST To adjust the position of the Seat (21), remove the Seat Pin (40) and reinsert it will go. Slide the Seat Carriage (42) to adjust the weight bench. Then...
... into a set of brackets on the Seat Carriage (42). ADJUSTMENTS This section explains how to the desired location and engage the "T"-handle into the Frame (8). ping Screw (57). Tighten the four M6 x 40mm Screws (48) used . ADJUSTING THE BACKREST To adjust the position of the Seat (21), remove the Seat Pin (40) and reinsert it will go. Slide the Seat Carriage (42) to adjust the weight bench. Then...
Instruction Manual
Page 10
... the Leg Lever (18). Attach the Curl Pad (20) to the Right Upright Base (4) with the Bolt Set. Slide two Foam Pads (23) onto the Pad Tube, and press a Pad Cap (68) into one of the Bolt Set passes completely through the bracket. The use the weight bench. Press the 25mm Round Outer Cap (62) onto the end of all parts are properly tightened...
... the Leg Lever (18). Attach the Curl Pad (20) to the Right Upright Base (4) with the Bolt Set. Slide two Foam Pads (23) onto the Pad Tube, and press a Pad Cap (68) into one of the Bolt Set passes completely through the bracket. The use the weight bench. Press the 25mm Round Outer Cap (62) onto the end of all parts are properly tightened...


