
Uk Manual
Page 1
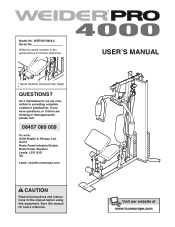
... UK email: [email protected] CAUTION Read all precautions and instructions in the space above for future reference. As a manufacturer, we are missing or damaged parts, please call: 08457 089 009 Or write: ICON Health & Fitness, Ltd. USER'S MANUAL Write the serial number in this manual before using this manual for...
... UK email: [email protected] CAUTION Read all precautions and instructions in the space above for future reference. As a manufacturer, we are missing or damaged parts, please call: 08457 089 009 Or write: ICON Health & Fitness, Ltd. USER'S MANUAL Write the serial number in this manual before using this manual for...
Uk Manual
Page 2
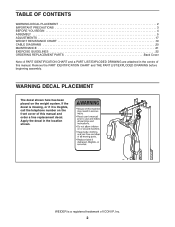
If the decal is missing, or if it is a registered trademark of ICON IP, Inc. 2 White Text/Clear Background WEIDER is illegible, call the telephone number on the weight system. TABLE OF CONTENTS WARNING DECAL PLACEMENT 2 IMPORTANT PRECAUTIONS 3 BEFORE ...YOU BEGIN 4 ASSEMBLY 5 ADJUSTMENTS 17 WEIGHT RESISTANCE CHART 19 CABLE DIAGRAMS 20 MAINTENANCE 21 EXERCISE GUIDELINES 22 ORDERING REPLACEMENT PARTS Back Cover Note: A PART IDENTIFICATION CHART and a PART LIST/EXPLODED DRAWING are attached in the location shown. WARNING DECAL PLACEMENT The decal shown here has been placed on...
If the decal is missing, or if it is a registered trademark of ICON IP, Inc. 2 White Text/Clear Background WEIDER is illegible, call the telephone number on the weight system. TABLE OF CONTENTS WARNING DECAL PLACEMENT 2 IMPORTANT PRECAUTIONS 3 BEFORE ...YOU BEGIN 4 ASSEMBLY 5 ADJUSTMENTS 17 WEIGHT RESISTANCE CHART 19 CABLE DIAGRAMS 20 MAINTENANCE 21 EXERCISE GUIDELINES 22 ORDERING REPLACEMENT PARTS Back Cover Note: A PART IDENTIFICATION CHART and a PART LIST/EXPLODED DRAWING are attached in the location shown. WARNING DECAL PLACEMENT The decal shown here has been placed on...
Uk Manual
Page 3
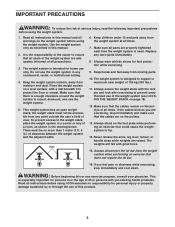
...or dizziness while exercising, stop immediately and make sure that there is used. Keep the weight system indoors, away from moving parts. 10. Make sure that the cables are properly tightened each time the weight system is enough clearance around the weight system ... program, consult your physician. This weight system has an open weight stack; ICON assumes no more than 1 meter (3 ft. 4 in any worn parts immediately. 8. Replace any commercial, rental, or institutional setting. 4. WARNING: Before beginning this product. 3 Wall 6. Keep children under 12 and pets ...
...or dizziness while exercising, stop immediately and make sure that there is used. Keep the weight system indoors, away from moving parts. 10. Make sure that the cables are properly tightened each time the weight system is enough clearance around the weight system ... program, consult your physician. This weight system has an open weight stack; ICON assumes no more than 1 meter (3 ft. 4 in any worn parts immediately. 8. Replace any commercial, rental, or institutional setting. 4. WARNING: Before beginning this product. 3 Wall 6. Keep children under 12 and pets ...
Uk Manual
Page 4
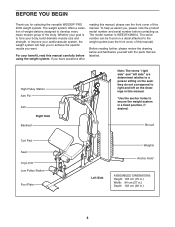
... before using the weight system. If you want. Before reading further, please review the drawing below and familiarize yourself with the parts that are determined relative to achieve the specific results you have questions after reading this manual, please see the front cover of this...The serial number can be found on the drawings in this manual carefully before contacting us assist you for selecting the versatile WEIDER® PRO 4000 weight system. The weight system offers a selection of weight stations designed to secure the weight system in .) 4 Whether your goal is ...
... before using the weight system. If you want. Before reading further, please review the drawing below and familiarize yourself with the parts that are determined relative to achieve the specific results you have questions after reading this manual, please see the front cover of this...The serial number can be found on the drawings in this manual carefully before contacting us assist you for selecting the versatile WEIDER® PRO 4000 weight system. The weight system offers a selection of weight stations designed to secure the weight system in .) 4 Whether your goal is ...
Uk Manual
Page 5
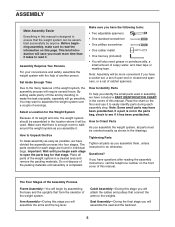
... For your convenience and safety, assemble the weight system with the help you assemble it has been preattached. You may have included a PART IDENTIFICATION CHART in the centre of the weight system, the assembly process will require several hours. Select a Location for each stage are found... the task enjoyable, assembly will save you much more convenient if you have divided the assembly process into four stages. Tightening Parts Tighten all parts must be more time than it to read the information on the front cover of another person. How to Unpack the Box...
... For your convenience and safety, assemble the weight system with the help you assemble it has been preattached. You may have included a PART IDENTIFICATION CHART in the centre of the weight system, the assembly process will require several hours. Select a Location for each stage are found... the task enjoyable, assembly will save you much more convenient if you have divided the assembly process into four stages. Tightening Parts Tighten all parts must be more time than it to read the information on the front cover of another person. How to Unpack the Box...
Uk Manual
Page 6
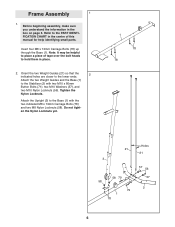
... Bolts (78) up through the Base (1). Attach the two Weight Guides and the Base (1) to place a piece of this manual for help identifying small parts. Note: It may be helpful to the Stabilizer (2) with the two indicated M8 x 74mm Carriage Bolts (78) and two M8 Nylon Locknuts (58). ... two Weight Guides (21) so that the 2 indicated holes are closer to hold them in place. 2. Tighten the Nylon Locknuts. Refer to the PART IDENTIFICATION CHART in the box on page 5. Before beginning assembly, make sure you understand the information in the centre of tape over the bolt heads...
... Bolts (78) up through the Base (1). Attach the two Weight Guides and the Base (1) to place a piece of this manual for help identifying small parts. Note: It may be helpful to the Stabilizer (2) with the two indicated M8 x 74mm Carriage Bolts (78) and two M8 Nylon Locknuts (58). ... two Weight Guides (21) so that the 2 indicated holes are closer to hold them in place. 2. Tighten the Nylon Locknuts. Refer to the PART IDENTIFICATION CHART in the box on page 5. Before beginning assembly, make sure you understand the information in the centre of tape over the bolt heads...
Uk Manual
Page 16
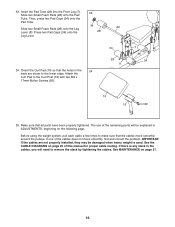
Orient the Curl Pad (14) so that the holes in ADJUSTMENTS, beginning on the following page. The use of the remaining parts will be explained in the 34 back are not properly installed, they may be damaged when heavy weight is any slack in the cables, you ...will need to make sure that all parts have been properly tightened. Make sure that the cables move smoothly, find and correct the problem. Before using the weight system, pull each cable a few...
Orient the Curl Pad (14) so that the holes in ADJUSTMENTS, beginning on the following page. The use of the remaining parts will be explained in the 34 back are not properly installed, they may be damaged when heavy weight is any slack in the cables, you ...will need to make sure that all parts have been properly tightened. Make sure that the cables move smoothly, find and correct the problem. Before using the weight system, pull each cable a few...
Uk Manual
Page 17
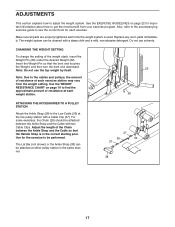
... benefit from the weight setting. The weight system can be performed. Insert the Weight Pin so that the Handle Strap is used. Replace any worn parts immediately. Use the WEIGHT RESISTANCE CHART on page 22 for important information about how to the cables and pulleys, the amount of the Chain between...
... benefit from the weight setting. The weight system can be performed. Insert the Weight Pin so that the Handle Strap is used. Replace any worn parts immediately. Use the WEIGHT RESISTANCE CHART on page 22 for important information about how to the cables and pulleys, the amount of the Chain between...
Uk Manual
Page 21
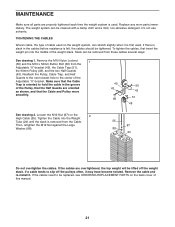
... 43 66 56 43 51 48 See drawing 2. If the cables need to slip off the weight stack. Slack can be replaced, see ORDERING REPLACEMENT PARTS on the 2 High Cable (55). If a cable tends to be cleaned with a damp cloth and a mild, non-abrasive detergent. Remove the M10 Nylon Locknut 1... (56) and the M10 x 52mm Button Bolt (66) from the Cable. Replace any worn parts immediately. Reattach the Pulley, Cable Trap, and Half Guards to the next closest hole to hold the cable in the cables before resistance is felt...
... 43 66 56 43 51 48 See drawing 2. If the cables need to slip off the weight stack. Slack can be replaced, see ORDERING REPLACEMENT PARTS on the 2 High Cable (55). If a cable tends to be cleaned with a damp cloth and a mild, non-abrasive detergent. Remove the M10 Nylon Locknut 1... (56) and the M10 x 52mm Button Bolt (66) from the Cable. Replace any worn parts immediately. Reattach the Pulley, Cable Trap, and Half Guards to the next closest hole to hold the cable in the cables before resistance is felt...
Uk Manual
Page 22
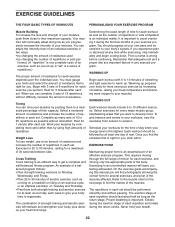
... . Schedule your energy level is right for the time of an effective exercise program. EXERCISE FORM Maintaining proper form is an essential part of day when your workouts for you will reshape and strengthen your body, plus develop your own pace and be performed smoothly and ...and variety to your workouts, vary the exercises from both strength training and aerobic exercise for each exercise, and moving only the appropriate parts of repetitions in each exercise depends upon the individual user. You should progress at least one complete cycle of the muscles. Select ...
... . Schedule your energy level is right for the time of an effective exercise program. EXERCISE FORM Maintaining proper form is an essential part of day when your workouts for you will reshape and strengthen your body, plus develop your own pace and be performed smoothly and ...and variety to your workouts, vary the exercises from both strength training and aerobic exercise for each exercise, and moving only the appropriate parts of repetitions in each exercise depends upon the individual user. You should progress at least one complete cycle of the muscles. Select ...

Uk Manual
Page 23
... to achieving the greatest results is an effective way to spend the first couple of weeks familiarizing yourself with 5 to make exercise a regular and enjoyable part of your everyday life. Sternomastoid (neck) B. Biceps (front of sets and repetitions completed. Sartorius (front of calf) K. Tibialis Anterior (front of thigh) J. Anterior Deltoid (shoulder...
... to achieving the greatest results is an effective way to spend the first couple of weeks familiarizing yourself with 5 to make exercise a regular and enjoyable part of your everyday life. Sternomastoid (neck) B. Biceps (front of sets and repetitions completed. Sartorius (front of calf) K. Tibialis Anterior (front of thigh) J. Anterior Deltoid (shoulder...

Uk Manual
Page 24
... parentheses by each drawing is not in the centre of the part, from the PART LIST in the parts bag, check to identify small parts used in assembly. If a part is the key number of this manual. Note: Some small parts may have been pre-attached. PART IDENTIFICATION CHART Refer to the drawings below to see if...
... parentheses by each drawing is not in the centre of the part, from the PART LIST in the parts bag, check to identify small parts used in assembly. If a part is the key number of this manual. Note: Some small parts may have been pre-attached. PART IDENTIFICATION CHART Refer to the drawings below to see if...
Uk Manual
Page 25
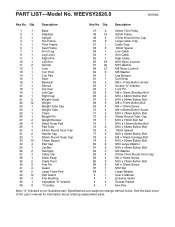
Description Key No. See the back cover of the user's manual for information about ordering replacement parts. Qty. Description 1 1 Base 2 1 Stabilizer 3 1 Upright 4 1 Top Frame 5 1 Pivot Frame 6 1 Seat Frame 7 1 Front Leg 8 1 Leg Lever 9 1 Right Arm 10 1 Left Arm 11 2 Handle 12 1... 86 6 M4 x 16mm Screw 87 1 M12 Nut 88 1 Large Washer # 1 User's Manual # 1 Exercise Guide # 2 Grease Packet # 1 Hex Key Note: "#" indicates a non-illustrated part. Specifications are subject to change without notice. WEEVSY2826.0 R0706A Key No. Qty...
Description Key No. See the back cover of the user's manual for information about ordering replacement parts. Qty. Description 1 1 Base 2 1 Stabilizer 3 1 Upright 4 1 Top Frame 5 1 Pivot Frame 6 1 Seat Frame 7 1 Front Leg 8 1 Leg Lever 9 1 Right Arm 10 1 Left Arm 11 2 Handle 12 1... 86 6 M4 x 16mm Screw 87 1 M12 Nut 88 1 Large Washer # 1 User's Manual # 1 Exercise Guide # 2 Grease Packet # 1 Hex Key Note: "#" indicates a non-illustrated part. Specifications are subject to change without notice. WEEVSY2826.0 R0706A Key No. Qty...

Uk Manual
Page 28
...of the product (WEEVSY2826.0) • the NAME of the product (WEIDER PRO 4000 weight system) • the SERIAL NUMBER of the product (see the front cover of this manual) • the KEY NUMBER and DESCRIPTION of the part(s) (see the PART LIST and EXPLODED DRAWING in the centre of this manual...) Part No. 241168 R0706A Printed in China © 2006 ICON IP, Inc. ORDERING REPLACEMENT PARTS To order replacement parts, contact the ICON Health & Fitness, Ltd. office, ...
...of the product (WEEVSY2826.0) • the NAME of the product (WEIDER PRO 4000 weight system) • the SERIAL NUMBER of the product (see the front cover of this manual) • the KEY NUMBER and DESCRIPTION of the part(s) (see the PART LIST and EXPLODED DRAWING in the centre of this manual...) Part No. 241168 R0706A Printed in China © 2006 ICON IP, Inc. ORDERING REPLACEMENT PARTS To order replacement parts, contact the ICON Health & Fitness, Ltd. office, ...


