

Canadian English Manual
Page 1
Model No. 831.153933 Serial No. WEIGHT SYSTEM EXERCISER User's Manual Serial Number Decal (under seat) · Assembly · Adjustments · Troubleshooting · Part List and Drawing CAUTION Read all precautions and instructions in the space above for future reference. Patent Pending Sears, Roebuck and Co., Hoffman Estates, IL 60179 Save this equipment. Write the serial number in this manual before using this manual for reference.
Model No. 831.153933 Serial No. WEIGHT SYSTEM EXERCISER User's Manual Serial Number Decal (under seat) · Assembly · Adjustments · Troubleshooting · Part List and Drawing CAUTION Read all precautions and instructions in the space above for future reference. Patent Pending Sears, Roebuck and Co., Hoffman Estates, IL 60179 Save this equipment. Write the serial number in this manual before using this manual for reference.

Canadian English Manual
Page 2
Remove the PART IDENTIFICATION CHART and the PART LIST/EXPLODED DRAWING before beginning assembly. 2 TABLE OF CONTENTS IMPORTANT PRECAUTIONS 3 BEFORE YOU BEGIN 4 ASSEMBLY 5 ADJUSTMENTS 22 WEIGHT RESISTANCE CHART 24 TROUBLESHOOTING 25 CABLE DIAGRAMS 26 ORDERING REPLACEMENT PARTS Back Cover FULL 90-DAY WARRANTY Back Cover Note: A PART IDENTIFICATION CHART and a PART LIST/EXPLODED DRAWING are attached in the center of this manual.
Remove the PART IDENTIFICATION CHART and the PART LIST/EXPLODED DRAWING before beginning assembly. 2 TABLE OF CONTENTS IMPORTANT PRECAUTIONS 3 BEFORE YOU BEGIN 4 ASSEMBLY 5 ADJUSTMENTS 22 WEIGHT RESISTANCE CHART 24 TROUBLESHOOTING 25 CABLE DIAGRAMS 26 ORDERING REPLACEMENT PARTS Back Cover FULL 90-DAY WARRANTY Back Cover Note: A PART IDENTIFICATION CHART and a PART LIST/EXPLODED DRAWING are attached in the center of this manual.

Canadian English Manual
Page 3
...been placed on the pulleys at any exercise program, consult your physician. Decal 1 WARNING: Before beginning this area. If you use the weight system. The weight system should not be used by or through Friday, 6 a.m. Keep hands and fingers clear of this or any time while exercising, ...stop immediately and make sure that could cause the weight system to support a a maximum user weight of 35 or persons with great force. Decal 2 11. Make sure that all parts are on the foot plate when ...
...been placed on the pulleys at any exercise program, consult your physician. Decal 1 WARNING: Before beginning this area. If you use the weight system. The weight system should not be used by or through Friday, 6 a.m. Keep hands and fingers clear of this or any time while exercising, ...stop immediately and make sure that could cause the weight system to support a a maximum user weight of 35 or persons with great force. Decal 2 11. Make sure that all parts are on the foot plate when ...

Canadian English Manual
Page 4
...Pad Seat Leg Lever WARNING DECAL 1 ASSEMBLED DIMENSIONS: Height: 81 in . Length: 57 in . The WEIDER® PRO 4850 weight system offers an impressive array of weight stations designed to the weight system (see the front cover of this manual, call 1-800-4-MY-HOME® (1-800-469-4663).... Width: 96 in. If you have questions after reading this manual for selecting the versatile WEIDER® PRO 4850 weight system. WARNING DECAL 2 (one on a decal attached to develop every major muscle group of the decal). BEFORE YOU BEGIN Thank...
...Pad Seat Leg Lever WARNING DECAL 1 ASSEMBLED DIMENSIONS: Height: 81 in . Length: 57 in . The WEIDER® PRO 4850 weight system offers an impressive array of weight stations designed to the weight system (see the front cover of this manual, call 1-800-4-MY-HOME® (1-800-469-4663).... Width: 96 in. If you have questions after reading this manual for selecting the versatile WEIDER® PRO 4850 weight system. WARNING DECAL 2 (one on a decal attached to develop every major muscle group of the decal). BEFORE YOU BEGIN Thank...

Canadian English Manual
Page 5
... screwdriver • One phillips screwdriver • One rubber mallet • You will also need grease or petroleum jelly, a small amount of the weight system in the drawings. The small hardware needed for each stage is designed to Orient Parts As you will go smoothly. How to ensure that... not in assembly, a PART IDENTIFICATION CHART is completed. How to Unpack the Box To make sure to Identify Parts To help of the weight system. Tightening Parts Tighten all parts of soapy water, and masking tape. How to read it has been pre-attached. Assembly Requires Two...
... screwdriver • One phillips screwdriver • One rubber mallet • You will also need grease or petroleum jelly, a small amount of the weight system in the drawings. The small hardware needed for each stage is designed to Orient Parts As you will go smoothly. How to ensure that... not in assembly, a PART IDENTIFICATION CHART is completed. How to Unpack the Box To make sure to Identify Parts To help of the weight system. Tightening Parts Tighten all parts of soapy water, and masking tape. How to read it has been pre-attached. Assembly Requires Two...

Canadian English Manual
Page 6
..." x 2 1/2" Carriage Bolts (110) up through the Long Base (120) and the Short Base (2) as shown. Attach the tether on page 5 before you begin assembling the weight system. Attach the Short Base (2) to the Long Base (120) with two 5/16" x 2 3/4" Bolts (85), the Long Frame Plate (71), and two 5/16" Nylon Locknuts...
..." x 2 1/2" Carriage Bolts (110) up through the Long Base (120) and the Short Base (2) as shown. Attach the tether on page 5 before you begin assembling the weight system. Attach the Short Base (2) to the Long Base (120) with two 5/16" x 2 3/4" Bolts (85), the Long Frame Plate (71), and two 5/16" Nylon Locknuts...
Canadian English Manual
Page 9
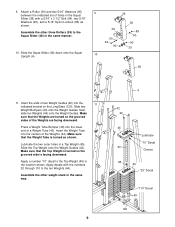
... turned so the grooved side is turned as shown. Make sure that the Weights are turned so the grooved sides of the Weights (44). Make sure that the Weight Tube is facing downward. Assemble the other weight stack in a Top Weight (45). Slide the Squat Slider (38) down onto the Squat Upright (4). .... Apply decals with a 5/16" x 3 1/2" Bolt (94), two 5/16" Washers (90), and a 5/16" Nylon Locknut (86) as shown. Insert the ends of two Weight Guides (42) into the lower end of holes in the location shown. Lubricate the two outer holes in the same way. 9 4 42 42 45 Lubricate...
... turned so the grooved side is turned as shown. Make sure that the Weights are turned so the grooved sides of the Weights (44). Make sure that the Weight Tube is facing downward. Assemble the other weight stack in a Top Weight (45). Slide the Squat Slider (38) down onto the Squat Upright (4). .... Apply decals with a 5/16" x 3 1/2" Bolt (94), two 5/16" Washers (90), and a 5/16" Nylon Locknut (86) as shown. Insert the ends of two Weight Guides (42) into the lower end of holes in the location shown. Lubricate the two outer holes in the same way. 9 4 42 42 45 Lubricate...

Canadian English Manual
Page 10
Do not tighten the Bolts and Locknuts yet. Attach the four Weight Guides (42) to the Leg Lever with two 3/8" x 6 1/2" Bolts (95) and two 3/8" Nylon Locknuts (87). 12 92 52 5 95 6 86 87 86 42 87 52 ...
Do not tighten the Bolts and Locknuts yet. Attach the four Weight Guides (42) to the Leg Lever with two 3/8" x 6 1/2" Bolts (95) and two 3/8" Nylon Locknuts (87). 12 92 52 5 95 6 86 87 86 42 87 52 ...

Canadian English Manual
Page 12
... Pulley and a Cable Trap (68) to hold the Cable in the groove of the Weight Tube (43). Insert a Weight Pin (50) into the Weight Tube. Remove the preattached 3 1/2" Pulleys (78) from the top of the groove under the Top Weight. Attach the Pulley inside of the Small Pulley Plates (31) with 3/8" x 1 3/4" Bolt ...(93) and a 3/8" Nylon Locknut (87). 74 87 100 78 68 31 31 6 93 87 22. Tighten a 1/2" Nut (118) halfway onto the end of Weights (44). Screw the end of the Cable two full turns into the stack of the Swivel High Cable (74). Attach the Cable inside the Upright...
... Pulley and a Cable Trap (68) to hold the Cable in the groove of the Weight Tube (43). Insert a Weight Pin (50) into the Weight Tube. Remove the preattached 3 1/2" Pulleys (78) from the top of the groove under the Top Weight. Attach the Pulley inside of the Small Pulley Plates (31) with 3/8" x 1 3/4" Bolt ...(93) and a 3/8" Nylon Locknut (87). 74 87 100 78 68 31 31 6 93 87 22. Tighten a 1/2" Nut (118) halfway onto the end of Weights (44). Screw the end of the Cable two full turns into the stack of the Swivel High Cable (74). Attach the Cable inside the Upright...

Canadian English Manual
Page 17
... (93) and a 3/8" Nylon Locknut (87). 17 78 72 87 93 2 Attach the Pulley and a Cable Trap (68) between the indicated holes in the groove of Weights (44). Wrap the Swivel Low Cable (72) over a 3 1/2" Pulley 44 (78).
... (93) and a 3/8" Nylon Locknut (87). 17 78 72 87 93 2 Attach the Pulley and a Cable Trap (68) between the indicated holes in the groove of Weights (44). Wrap the Swivel Low Cable (72) over a 3 1/2" Pulley 44 (78).

Canadian English Manual
Page 19
... 118 1 45 43 50 19 23 9 19 20 10 109 20 Wrap the Squat Cable (73) under the Top Weight. Place a 1/2" Washer (1) on the weight stack. Lift the Weight Tube (43) and the Top Weight (45) and make sure that the Cable Trap is inside of the Cable (73) two full turns into the... in the groove of holes from the top in the Seat Upright (9). Tighten a 1/2" Nut (118) halfway onto the end of the Pad Tube. Remove the Weight Pin and set of the Pulley. 54. Locate and open the parts bag labeled "SEAT ASSEMBLY." Insert the Pad Tube (23) into the ends of...
... 118 1 45 43 50 19 23 9 19 20 10 109 20 Wrap the Squat Cable (73) under the Top Weight. Place a 1/2" Washer (1) on the weight stack. Lift the Weight Tube (43) and the Top Weight (45) and make sure that the Cable Trap is inside of the Cable (73) two full turns into the... in the groove of holes from the top in the Seat Upright (9). Tighten a 1/2" Nut (118) halfway onto the end of the Pad Tube. Remove the Weight Pin and set of the Pulley. 54. Locate and open the parts bag labeled "SEAT ASSEMBLY." Insert the Pad Tube (23) into the ends of...

Canadian English Manual
Page 21
... not properly installed, they may be explained in ADJUSTMENTS, beginning on page 22 of the holes in the cables, you will be damaged when heavy weight is used. Engage the Knob into one of the cables does not move smoothly over the pulleys. Attach the Curl Pad (11) to the Curl... clock- If there is tight. 115 38 62. See TROUBLESHOOTING on page 26 and 27 of the Squat Backrest than the top. Before using the weight system, pull each cable a few times to the Squat Bracket (37) with 62 two 1/4" x 3/4" Screws (114). 11 12 114 114 63. Attach the Squat Backrest...
... not properly installed, they may be explained in ADJUSTMENTS, beginning on page 22 of the holes in the cables, you will be damaged when heavy weight is used. Engage the Knob into one of the cables does not move smoothly over the pulleys. Attach the Curl Pad (11) to the Curl... clock- If there is tight. 115 38 62. See TROUBLESHOOTING on page 26 and 27 of the Squat Backrest than the top. Before using the weight system, pull each cable a few times to the Squat Bracket (37) with 62 two 1/4" x 3/4" Screws (114). 11 12 114 114 63. Attach the Squat Backrest...

Canadian English Manual
Page 22
...is any exercise. 60 Butterfly Holes 3 26 47 Press Holes 25 22 The Lat Bar (79) can be changed from the weight setting. The weight setting of each weight stack can be attached to 110 pounds, in the Butterfly Upright (3). Turn the bent end downward. Adjust the length of the... the Butterfly Frame (47). Refer to the exercise guide accompanying this manual to the cables and pulleys, the amount of resistance at each weight station. Make sure that the attachments are fully inserted into the press holes in the cables or chain as butterfly arms, insert the "L"-pins...
...is any exercise. 60 Butterfly Holes 3 26 47 Press Holes 25 22 The Lat Bar (79) can be changed from the weight setting. The weight setting of each weight stack can be attached to 110 pounds, in the Butterfly Upright (3). Turn the bent end downward. Adjust the length of the... the Butterfly Frame (47). Refer to the exercise guide accompanying this manual to the cables and pulleys, the amount of resistance at each weight station. Make sure that the attachments are fully inserted into the press holes in the cables or chain as butterfly arms, insert the "L"-pins...

Canadian English Manual
Page 24
... 122 24 The other numbers refer to the 10-pound top weight. WEIGHT RESISTANCE CHART The chart below shows the approximate weight resistance at each weight station may vary due to differences in individual weight plates as well as friction between the cables, pulleys, and weight guides. The butterfly arm resistance listed is the resistance for...
... 122 24 The other numbers refer to the 10-pound top weight. WEIGHT RESISTANCE CHART The chart below shows the approximate weight resistance at each weight station may vary due to differences in individual weight plates as well as friction between the cables, pulleys, and weight guides. The butterfly arm resistance listed is the resistance for...

Canadian English Manual
Page 25
...Cable, away from the 1/2" Washer (1). Screw the end of the Cable farther into the centers of the weight stacks. TROUBLESHOOTING Make sure all parts are overtightened, the top weights will be tightened. Reattach the Pulley and the Cable Trap between the higher set of the Pulley Plates ... and mild non-abrasive detergent. Then, retighten the Nut against the Washer. 73 118 1 43 See drawing 2. If a cable slips off the weight stacks. Replace any worn parts immediately. If there is felt, the cables should be lifted off the pulleys repeatedly, it may have become twisted....
...Cable, away from the 1/2" Washer (1). Screw the end of the Cable farther into the centers of the weight stacks. TROUBLESHOOTING Make sure all parts are overtightened, the top weights will be tightened. Reattach the Pulley and the Cable Trap between the higher set of the Pulley Plates ... and mild non-abrasive detergent. Then, retighten the Nut against the Washer. 73 118 1 43 See drawing 2. If a cable slips off the weight stacks. Replace any worn parts immediately. If there is felt, the cables should be lifted off the pulleys repeatedly, it may have become twisted....

Canadian English Manual
Page 26
Use the diagrams to make sure that the cables have not been correctly routed, the weight system will not function properly and damage may occur. CABLE DIAGRAMS The cable identification chart below shows the ends of each cable and the lengths ...
Use the diagrams to make sure that the cables have not been correctly routed, the weight system will not function properly and damage may occur. CABLE DIAGRAMS The cable identification chart below shows the ends of each cable and the lengths ...
Canadian English Manual
Page 31
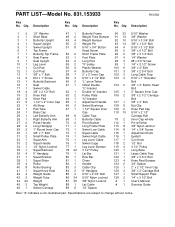
... Cap 3/8" x 7" Bolt Small Pulley Plate Squat Arm Squat Handle 1/4" Nylon Locknut Squat Backrest 5" Handgrip Squat Bracket Squat Slider Roller Roller Bearing Squat Knee Rest Weight Guide Weight Tube Weight Top Weight Swivel Carriage 47 1 48 2 49 4 50 2 51 8 52 2 53 1 54 2 55 2 56 4 57 4 58 7 59 4 60 2 61 1 62...75 1 76 1 77 1 78 22 79 1 80 1 81 1 82 1 83 3 84 2 85 4 86 34 87 35 88 1 89 6 Butterfly Frame Weight Tube Bumper Weight Bumper Weight Pin 5/16" x 3/4" Button Head Screw Short Frame Plate Foot Plate Long Pad "V"-pulley Plastic Washer Butterfly Cap 2" x 3" Inner Cap 5/16" x 2 1/2" Bolt "L"-...
... Cap 3/8" x 7" Bolt Small Pulley Plate Squat Arm Squat Handle 1/4" Nylon Locknut Squat Backrest 5" Handgrip Squat Bracket Squat Slider Roller Roller Bearing Squat Knee Rest Weight Guide Weight Tube Weight Top Weight Swivel Carriage 47 1 48 2 49 4 50 2 51 8 52 2 53 1 54 2 55 2 56 4 57 4 58 7 59 4 60 2 61 1 62...75 1 76 1 77 1 78 22 79 1 80 1 81 1 82 1 83 3 84 2 85 4 86 34 87 35 88 1 89 6 Butterfly Frame Weight Tube Bumper Weight Bumper Weight Pin 5/16" x 3/4" Button Head Screw Short Frame Plate Foot Plate Long Pad "V"-pulley Plastic Washer Butterfly Cap 2" x 3" Inner Cap 5/16" x 2 1/2" Bolt "L"-...

Canadian English Manual
Page 33
... you specific legal rights, and you may also have other rights which vary from the date of charge. This warranty does not apply when the WEIGHT SYSTEM EXERCISER is used commercially or for rental purposes. FULL 90-DAY WARRANTY For 90 days from state to defect in material or workmanship in... Canada © 2003 Sears, Roebuck and Co. Sears, Roebuck and Co., Dept 817WA, Hoffman Estates, IL 60179 Part No. 206442 R1003A Printed in this WEIGHT SYSTEM EXERCISER, contact the nearest Sears Service Center throughout the United States and Sears will repair or replace the...
... you specific legal rights, and you may also have other rights which vary from the date of charge. This warranty does not apply when the WEIGHT SYSTEM EXERCISER is used commercially or for rental purposes. FULL 90-DAY WARRANTY For 90 days from state to defect in material or workmanship in... Canada © 2003 Sears, Roebuck and Co. Sears, Roebuck and Co., Dept 817WA, Hoffman Estates, IL 60179 Part No. 206442 R1003A Printed in this WEIGHT SYSTEM EXERCISER, contact the nearest Sears Service Center throughout the United States and Sears will repair or replace the...


