

English Manual
Page 2
... PRECAUTIONS 2 BEFORE YOU BEGIN 3 ASSEMBLY 4 HOW TO USE THE HOME GYM SYSTEM 22 WEIGHT RESISTANCE CHART 24 TROUBLE-SHOOTING AND MAINTENANCE 25 CABLE DIAGRAMS 26 ORDERING REPLACEMENT PARTS Back Cover LIMITED WARRANTY Back Cover Note: A PART IDENTIFICATION CHART and a PART LIST/EXPLODED DRAWING are attached in the ... the PART LIST/EXPLODED DRAWING before using the leg press station, always be sure that the lock pin is fully inserted and that the cables are exercising, stop immediately and begin cooling down. 14. It is intended for persons over the age of the pulleys. 12. Place...
... PRECAUTIONS 2 BEFORE YOU BEGIN 3 ASSEMBLY 4 HOW TO USE THE HOME GYM SYSTEM 22 WEIGHT RESISTANCE CHART 24 TROUBLE-SHOOTING AND MAINTENANCE 25 CABLE DIAGRAMS 26 ORDERING REPLACEMENT PARTS Back Cover LIMITED WARRANTY Back Cover Note: A PART IDENTIFICATION CHART and a PART LIST/EXPLODED DRAWING are attached in the ... the PART LIST/EXPLODED DRAWING before using the leg press station, always be sure that the lock pin is fully inserted and that the cables are exercising, stop immediately and begin cooling down. 14. It is intended for persons over the age of the pulleys. 12. Place...
English Manual
Page 11
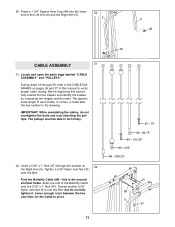
Insert a 5/16Ó x 1Ó Bolt (97) through 50, refer to the CABLE DIAGRAMS on 22 the Right Arm (5). Find the Butterfly Cable (89)Ñthis section, fully unwind the five Cables and identify the Cables by comparing the lengths and the ends. Slide one end of the Left Arm (6) and the Right Arm (5). 20 5 6 48 48... CABLE ASSEMBLY 21 21. Thread another 5/16Ó Nylon Jam Nut (91) onto the Bolt, but do not overtighten the bolts and nuts attaching the pulleys. ...
Insert a 5/16Ó x 1Ó Bolt (97) through 50, refer to the CABLE DIAGRAMS on 22 the Right Arm (5). Find the Butterfly Cable (89)Ñthis section, fully unwind the five Cables and identify the Cables by comparing the lengths and the ends. Slide one end of the Left Arm (6) and the Right Arm (5). 20 5 6 48 48... CABLE ASSEMBLY 21 21. Thread another 5/16Ó Nylon Jam Nut (91) onto the Bolt, but do not overtighten the bolts and nuts attaching the pulleys. ...

English Manual
Page 22
... manual for the Right Fly Arm (5). 5 6 22 37 63 62. Before using the home gym system, pull each cable a few times to be sure that all parts have been properly tightened. See the CABLE DIAGRAMS on page 26 and 27 of the remaining parts will be damaged when heavy weight is any slack... in HOW TO USE THE HOME GYM SYSTEM, beginning on page 25. 22 See TROUBLE-SHOOTING AND MAINTENANCE on page 23 of the cables does not move smoothly over...
... manual for the Right Fly Arm (5). 5 6 22 37 63 62. Before using the home gym system, pull each cable a few times to be sure that all parts have been properly tightened. See the CABLE DIAGRAMS on page 26 and 27 of the remaining parts will be damaged when heavy weight is any slack... in HOW TO USE THE HOME GYM SYSTEM, beginning on page 25. 22 See TROUBLE-SHOOTING AND MAINTENANCE on page 23 of the cables does not move smoothly over...
English Manual
Page 26
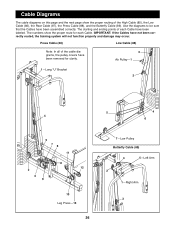
... Cable (88), and the Butterfly Cable (89). Use the diagrams to be sure that the Cables have not been correctly routed, the training system will not function properly and damage may occur. IMPORTANT: If the Cables have been assembled correctly. The starting and ending points of each Cable. The numbers show the proper routing of the cable diagrams...
... Cable (88), and the Butterfly Cable (89). Use the diagrams to be sure that the Cables have not been correctly routed, the training system will not function properly and damage may occur. IMPORTANT: If the Cables have been assembled correctly. The starting and ending points of each Cable. The numbers show the proper routing of the cable diagrams...


