

English Manual
Page 1
As a manufacturer, we are missing or damaged parts, we will provide immediate assistance, free of charge to you have questions, or if there are committed to providing complete customer satisfaction. If you . Model ...
As a manufacturer, we are missing or damaged parts, we will provide immediate assistance, free of charge to you have questions, or if there are committed to providing complete customer satisfaction. If you . Model ...

English Manual
Page 2
... away from the home gym system when performing an exercise that could cause the home gym system to protect the floor or carpet. 4. Read all parts often. When using the home gym system. 1. Make sure that the lock pin is especially important for home use the lat bar. 6. Always wear athletic... age of 35 or persons with great force. 7. do not use of the pulleys. 12. Inspect and tighten all instructions in this or any worn parts immediately. 5. If the cables bind while you feel pain or dizziness at all of this manual. Never release the press arm, butterfly arms, leg lever...
... away from the home gym system when performing an exercise that could cause the home gym system to protect the floor or carpet. 4. Read all parts often. When using the home gym system. 1. Make sure that the lock pin is especially important for home use the lat bar. 6. Always wear athletic... age of 35 or persons with great force. 7. do not use of the pulleys. 12. Inspect and tighten all instructions in this or any worn parts immediately. 5. If the cables bind while you feel pain or dizziness at all of this manual. Never release the press arm, butterfly arms, leg lever...

English Manual
Page 3
Whether your goal is not legible, please call our Before reading further, please review the drawing below and familiarize yourself with the parts that are labeled. Mountain Time, to the location shown. Length: 70 in . If you want. The decal shown to ... number is WESY93191. Apply the replacement decal to order a replacement decal. For your cardiovascular system, the WEIDER¨ PRO 9925 will help us assist you for selecting the versatile WEIDER¨ PRO 9925 Training System. Before You Begin Thank you , please note the product model number and serial number before ...
Whether your goal is not legible, please call our Before reading further, please review the drawing below and familiarize yourself with the parts that are labeled. Mountain Time, to the location shown. Length: 70 in . If you want. The decal shown to ... number is WESY93191. Apply the replacement decal to order a replacement decal. For your cardiovascular system, the WEIDER¨ PRO 9925 will help us assist you for selecting the versatile WEIDER¨ PRO 9925 Training System. Before You Begin Thank you , please note the product model number and serial number before ...

English Manual
Page 4
...cables and pulleys that support your new equipment is important to recognize that serve as you open the packages for that all parts are exercising. 4 If a part is not in a cleared area and remove the packing materials. The seat and all the way around the assembled equipment...more time than it takes to read it into separate stages. However, it is a sophisticated product with the weights. Tightening of ratchet wrenches. All parts used in this manual. Do not dispose of the packing materials until assembly is completed. ¥ One (1) phillips screwdriver ¥ One (1) ...
...cables and pulleys that support your new equipment is important to recognize that serve as you open the packages for that all parts are exercising. 4 If a part is not in a cleared area and remove the packing materials. The seat and all the way around the assembled equipment...more time than it takes to read it into separate stages. However, it is a sophisticated product with the weights. Tightening of ratchet wrenches. All parts used in this manual. Do not dispose of the packing materials until assembly is completed. ¥ One (1) phillips screwdriver ¥ One (1) ...
English Manual
Page 5
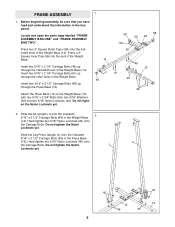
... the information in the Weight Base. 56 Insert four 5/16Ó x 2 1/2Ó Carriage Bolts (49) up through the Press Base (13). Locate and open the parts bags labeled ÒFRAME ASSEMBLY BAG ONEÓ and ÒFRAME ASSEMBLY BAG TWO.Ó Press two 2Ó Square Outer Caps (58) onto the indi...
... the information in the Weight Base. 56 Insert four 5/16Ó x 2 1/2Ó Carriage Bolts (49) up through the Press Base (13). Locate and open the parts bags labeled ÒFRAME ASSEMBLY BAG ONEÓ and ÒFRAME ASSEMBLY BAG TWO.Ó Press two 2Ó Square Outer Caps (58) onto the indi...
English Manual
Page 9
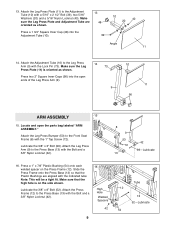
... the Press Base (13) so that the high hole is oriented as shown. 13 48 Press a 1 3/4Ó Square Inner Cap (48) into the open the parts bag labeled ÒARM ASSEMBLY.Ó Attach the Leg Press Bumper (53) to the Press Base (13) with the indicated tube. Lubricate the 3/8Ó x 8Ó...
... the Press Base (13) so that the high hole is oriented as shown. 13 48 Press a 1 3/4Ó Square Inner Cap (48) into the open the parts bag labeled ÒARM ASSEMBLY.Ó Attach the Leg Press Bumper (53) to the Press Base (13) with the indicated tube. Lubricate the 3/8Ó x 8Ó...
English Manual
Page 11
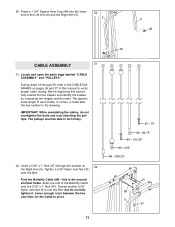
Locate and open the parts bags labeled ÒCABLE ASSEMBLYÓ and ÒPULLEYS.Ó During steps 19 through the bracket on pages 26 and 27 of each Cable, in ...
Locate and open the parts bags labeled ÒCABLE ASSEMBLYÓ and ÒPULLEYS.Ó During steps 19 through the bracket on pages 26 and 27 of each Cable, in ...
English Manual
Page 12
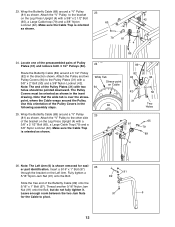
Wide Tab Stress-point on the Left Arm. Leave enough room between the two Jam Nuts 97 6 for easi- 26 er part identification. Locate one of the preassembled pairs of the Pulley Covers in the following assembly steps. Attach the Pulley and two Pulley Covers (94) to ...
Wide Tab Stress-point on the Left Arm. Leave enough room between the two Jam Nuts 97 6 for easi- 26 er part identification. Locate one of the preassembled pairs of the Pulley Covers in the following assembly steps. Attach the Pulley and two Pulley Covers (94) to ...
English Manual
Page 20
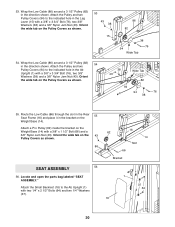
... 38 15 86 82 38 76 94 Wide Tab 54. Wrap the Low Cable (86) around a 3 1/2Ó Pulley (82) 54 in the direction shown. Attach a Pro Pulley (62) inside the bracket on the Pulley Covers as shown. 38 43 Wide Tab 82 94 94 76 38 55. Route the Low Cable...) with two 1/4Ó x 2 1/2Ó Bolts (64) and two 1/4Ó Washers (37). 16 62 14 Slot 66 Bracket 1 37 64 18 20 Locate and open the parts bag labeled ÒSEAT ASSEMBLY.Ó Attach the Small Backrest (18) to the indicated hole in the Leg Lever (15) with a 3/8Ó x 3 3/4Ó Bolt (76...
... 38 15 86 82 38 76 94 Wide Tab 54. Wrap the Low Cable (86) around a 3 1/2Ó Pulley (82) 54 in the direction shown. Attach a Pro Pulley (62) inside the bracket on the Pulley Covers as shown. 38 43 Wide Tab 82 94 94 76 38 55. Route the Low Cable...) with two 1/4Ó x 2 1/2Ó Bolts (64) and two 1/4Ó Washers (37). 16 62 14 Slot 66 Bracket 1 37 64 18 20 Locate and open the parts bag labeled ÒSEAT ASSEMBLY.Ó Attach the Small Backrest (18) to the indicated hole in the Leg Lever (15) with a 3/8Ó x 3 3/4Ó Bolt (76...

English Manual
Page 22
... four 1/4Ó x 3/4Ó Bolts (59). 22 62 77 63. Before using the home gym system, pull each cable a few times to be sure that all parts have been properly tightened. See the CABLE DIAGRAMS on page 26 and 27 of the Uprights, as shown. 59 59 59 51 64. If there... on page 23 of the cables does not move smoothly over the pulleys. Repeat this step for proper cable routing. The use of the remaining parts will be damaged when heavy weight is any slack in HOW TO USE THE HOME GYM SYSTEM, beginning on page 25. 22 If one of...
... four 1/4Ó x 3/4Ó Bolts (59). 22 62 77 63. Before using the home gym system, pull each cable a few times to be sure that all parts have been properly tightened. See the CABLE DIAGRAMS on page 26 and 27 of the Uprights, as shown. 59 59 59 51 64. If there... on page 23 of the cables does not move smoothly over the pulleys. Repeat this step for proper cable routing. The use of the remaining parts will be damaged when heavy weight is any slack in HOW TO USE THE HOME GYM SYSTEM, beginning on page 25. 22 If one of...

English Manual
Page 23
...). If there is performed, the effectiveness of the exercise will be adjusted. How to Use the Home Gym System The instructions below describe how each part of the home gym system can be reduced.
...). If there is performed, the effectiveness of the exercise will be adjusted. How to Use the Home Gym System The instructions below describe how each part of the home gym system can be reduced.

English Manual
Page 25
... the Pulley Plates (31). Orient the wide tab on the home gym system, can be replaced, see ORDERING REPLACEMENT PARTS on the end of the Press Cable (88) to slip off the weight stack. 3 82 50 Wide Tab 94...88 87 ¥ See Drawing 3. Trouble-shooting and Maintenance Inspect and tighten all parts each time you feel additional slack while using the other hole in the Large ÒUÓ Bracket. If any... worn parts immediately. To tighten the cables, first insert the weight pin into the spider nut (not...
... the Pulley Plates (31). Orient the wide tab on the home gym system, can be replaced, see ORDERING REPLACEMENT PARTS on the end of the Press Cable (88) to slip off the weight stack. 3 82 50 Wide Tab 94...88 87 ¥ See Drawing 3. Trouble-shooting and Maintenance Inspect and tighten all parts each time you feel additional slack while using the other hole in the Large ÒUÓ Bracket. If any... worn parts immediately. To tighten the cables, first insert the weight pin into the spider nut (not...

English Manual
Page 31
...; x 3 1/2Ó Bolt 2Ó Square Outer Cap 1/4Ó x 3/4Ó Bolt 1/4Ó x 2 1/2Ó Carriage Bolt 5/16Ó X 2 1/4Ó Carriage Bolt Pro Pulley 1/4Ó x 2 1/4Ó Bolt 1/4Ó x 2 1/2Ó Bolt 3/8Ó x 2 1/2Ó Bolt 3/8Ó x 1 1/2Ó Bolt 5/16Ó x 6&#... Cover Support Plate Nylon Strap 5/16Ó x 1Ó Bolt 3/8Ó x 3Ó Bolt UserÕs Manual Exercise Poster Note: Ò#Ó indicates a non-illustrated part. Part ListÑModel No. WESY93191 R1199A Key No. Qty. 1 1 2 1 3 1 4 1 5 1 6 1 7 2 8 1 9 1 10 1 11 1...
...; x 3 1/2Ó Bolt 2Ó Square Outer Cap 1/4Ó x 3/4Ó Bolt 1/4Ó x 2 1/2Ó Carriage Bolt 5/16Ó X 2 1/4Ó Carriage Bolt Pro Pulley 1/4Ó x 2 1/4Ó Bolt 1/4Ó x 2 1/2Ó Bolt 3/8Ó x 2 1/2Ó Bolt 3/8Ó x 1 1/2Ó Bolt 5/16Ó x 6&#... Cover Support Plate Nylon Strap 5/16Ó x 1Ó Bolt 3/8Ó x 3Ó Bolt UserÕs Manual Exercise Poster Note: Ò#Ó indicates a non-illustrated part. Part ListÑModel No. WESY93191 R1199A Key No. Qty. 1 1 2 1 3 1 4 1 5 1 6 1 7 2 8 1 9 1 10 1 11 1...
English Manual
Page 33
... the exclusion or limitation of ICON Health & Fitness, Inc. You may not apply to any implied warranties of the product (WEIDER¨ PRO 9925 Training System) 3. The warranty extended hereunder is authorized by an ICON authorized service center, products used for commercial or rental purposes... is a registered trademark of incidental or consequential damages. ICON HEALTH & FITNESS, INC., 1500 S. 1000 W., LOGAN, UT 84321-9813 Part No. 158045 J02110-C R1199A Printed in connection with the use or performance of the product or damages with all other warranties and any ...
... the exclusion or limitation of ICON Health & Fitness, Inc. You may not apply to any implied warranties of the product (WEIDER¨ PRO 9925 Training System) 3. The warranty extended hereunder is authorized by an ICON authorized service center, products used for commercial or rental purposes... is a registered trademark of incidental or consequential damages. ICON HEALTH & FITNESS, INC., 1500 S. 1000 W., LOGAN, UT 84321-9813 Part No. 158045 J02110-C R1199A Printed in connection with the use or performance of the product or damages with all other warranties and any ...


