

English Manual
Page 2
... 5. If you are exercising, stop immediately and begin cooling down. 14. Always stand on the foot plate when performing an exercise that the cables are on a level surface. Inspect and tighten all instructions in this product. 2 Place a mat beneath the home gym system to tip. ... 2 BEFORE YOU BEGIN 3 ASSEMBLY 4 HOW TO USE THE HOME GYM SYSTEM 22 WEIGHT RESISTANCE CHART 24 TROUBLE-SHOOTING AND MAINTENANCE 25 CABLE DIAGRAMS 26 ORDERING REPLACEMENT PARTS Back Cover LIMITED WARRANTY Back Cover Note: A PART IDENTIFICATION CHART and a PART LIST/EXPLODED DRAWING are attached...
... 5. If you are exercising, stop immediately and begin cooling down. 14. Always stand on the foot plate when performing an exercise that the cables are on a level surface. Inspect and tighten all instructions in this product. 2 Place a mat beneath the home gym system to tip. ... 2 BEFORE YOU BEGIN 3 ASSEMBLY 4 HOW TO USE THE HOME GYM SYSTEM 22 WEIGHT RESISTANCE CHART 24 TROUBLE-SHOOTING AND MAINTENANCE 25 CABLE DIAGRAMS 26 ORDERING REPLACEMENT PARTS Back Cover LIMITED WARRANTY Back Cover Note: A PART IDENTIFICATION CHART and a PART LIST/EXPLODED DRAWING are attached...

English Manual
Page 4
.... Some assembly steps require two people. Identifying Parts To help you are exercising. 4 The seat and all the way around the assembled equipment. Cable Assembly Completes the cables and pulleys that support your new equipment is large enough to hold all parts and allow you assemble them, unless instructed to do otherwise...
.... Some assembly steps require two people. Identifying Parts To help you are exercising. 4 The seat and all the way around the assembled equipment. Cable Assembly Completes the cables and pulleys that support your new equipment is large enough to hold all parts and allow you assemble them, unless instructed to do otherwise...
English Manual
Page 11
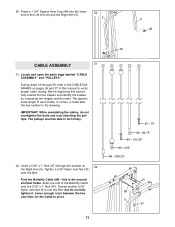
...;203Ó 88Ñ238.25Ó 91 89 5 97 11 Slide one end of each Cable, in inches, is the second shortest Cable. Insert a 5/16Ó x 1Ó Bolt (97) through 50, refer to verify proper cable routing. Thread another 5/16Ó Nylon Jam Nut (91) onto the Bolt, but do not ... the bolts and nuts attaching the pulleys. Before beginning this is listed after the key number in the drawing. Find the Butterfly Cable (89)Ñthis section, fully unwind the five Cables and identify the Cables by comparing the lengths and the ends. Leave enough room between the two Jam Nuts for the...
...;203Ó 88Ñ238.25Ó 91 89 5 97 11 Slide one end of each Cable, in inches, is the second shortest Cable. Insert a 5/16Ó x 1Ó Bolt (97) through 50, refer to verify proper cable routing. Thread another 5/16Ó Nylon Jam Nut (91) onto the Bolt, but do not ... the bolts and nuts attaching the pulleys. Before beginning this is listed after the key number in the drawing. Find the Butterfly Cable (89)Ñthis section, fully unwind the five Cables and identify the Cables by comparing the lengths and the ends. Leave enough room between the two Jam Nuts for the...
English Manual
Page 12
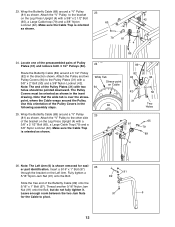
...The end of the Pulley Covers in the following assembly steps. Use this orientation of the Pulley Plates (31) with a 3/8Ó x 2 1/2Ó Bolt (65), a Large Cable Trap (79) and a 3/8Ó Nylon Locknut (42). Attach the ÒVÓ Pulley to the Pulley Plates (31) with a 3/8Ó x 2 1/2Ó Bolt 42 (65),...65 81 79 89 4 26. Attach the ÒVÓ Pulley to pivot. 12 Note that the wide tab is shown removed for the Cable to the bracket on the Leg Press Upright (4) with two holes should be oriented as shown in the direction shown. Wide Tab Stress-point on...
...The end of the Pulley Covers in the following assembly steps. Use this orientation of the Pulley Plates (31) with a 3/8Ó x 2 1/2Ó Bolt (65), a Large Cable Trap (79) and a 3/8Ó Nylon Locknut (42). Attach the ÒVÓ Pulley to the Pulley Plates (31) with a 3/8Ó x 2 1/2Ó Bolt 42 (65),...65 81 79 89 4 26. Attach the ÒVÓ Pulley to pivot. 12 Note that the wide tab is shown removed for the Cable to the bracket on the Leg Press Upright (4) with two holes should be oriented as shown in the direction shown. Wide Tab Stress-point on...
English Manual
Page 13
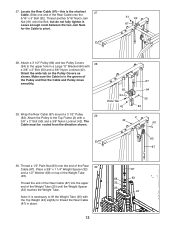
... x 3Ó Bolt (92). Place a 3/8Ó x 1 1/4Ó Weight Spacer (32) and a 1/2Ó Washer (68) on the Pulley Covers as shown. Locate the Rear Cable (87)Ñthis is in a Large ÒUÓ Bracket (84) with a 3/8Ó x 2Ó Bolt (50) and a 3/8Ó Nylon Locknut (42). Orient the wide ...tab on top of the Weight Tube (25). Make sure the Cable is the shortest 27 Cable. Note: It is necessary to lift the Weight Tube (25) with the Top Weight (24) slightly to the Top Frame (2) with a 3/8Ó ...
... x 3Ó Bolt (92). Place a 3/8Ó x 1 1/4Ó Weight Spacer (32) and a 1/2Ó Washer (68) on the Pulley Covers as shown. Locate the Rear Cable (87)Ñthis is in a Large ÒUÓ Bracket (84) with a 3/8Ó x 2Ó Bolt (50) and a 3/8Ó Nylon Locknut (42). Orient the wide ...tab on top of the Weight Tube (25). Make sure the Cable is the shortest 27 Cable. Note: It is necessary to lift the Weight Tube (25) with the Top Weight (24) slightly to the Top Frame (2) with a 3/8Ó ...

English Manual
Page 14
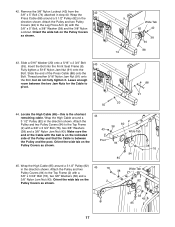
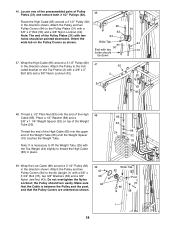
...) to the indicated bracket on the Press Base (13) with a 1/4Ó Nylon Locknut (44) and a 1/4Ó Washer (37). 31. Wrap the Press Cable (88) around a 3 1/2Ó Pulley 32 (82) in the direction shown. Attach the end of threads are 44 showing above the Nylon Locknut, as shown in...bracket on the Press Base (13) with a 3/8Ó x 2 1/4Ó Bolt (71), a 3/8Ó Washer (38) and a 3/8Ó Nylon Locknut (42). Wrap the Press Cable (88) around a 3 1/2Ó Pulley 33 (82) in the inset drawing. 37 84 44 37 88 88 84 32. Orient the wide tab on the Pulley...
...) to the indicated bracket on the Press Base (13) with a 1/4Ó Nylon Locknut (44) and a 1/4Ó Washer (37). 31. Wrap the Press Cable (88) around a 3 1/2Ó Pulley 32 (82) in the direction shown. Attach the end of threads are 44 showing above the Nylon Locknut, as shown in...bracket on the Press Base (13) with a 3/8Ó x 2 1/4Ó Bolt (71), a 3/8Ó Washer (38) and a 3/8Ó Nylon Locknut (42). Wrap the Press Cable (88) around a 3 1/2Ó Pulley 33 (82) in the inset drawing. 37 84 44 37 88 88 84 32. Orient the wide tab on the Pulley...

English Manual
Page 15
...on the Leg Press Upright (4) with a 3/8Ó x 3 3/4Ó Bolt (76), two 3/8Ó Washers (38) and a 3/8Ó Nylon Jamnut (43). Wrap the Press Cable (88) around a 3 1/2Ó Pulley 34 (82) in the Pulley Plates (31) with a 3/8Ó x 3 1/2Ó Bolt (57), two 3/8Ó Washers (38) ... to the indicated hole in the Press Frame (12) with a 3/8Ó x 2Ó Bolt (50) and a 3/8Ó Nylon Locknut (42). Wrap the Press Cable (88) around a ÒVÓ Pulley (81). 37 Attach the ÒVÓ Pulley to the Leg Press Upright (4) with a 3/8Ó x 2Ó Bolt ...
...on the Leg Press Upright (4) with a 3/8Ó x 3 3/4Ó Bolt (76), two 3/8Ó Washers (38) and a 3/8Ó Nylon Jamnut (43). Wrap the Press Cable (88) around a 3 1/2Ó Pulley 34 (82) in the Pulley Plates (31) with a 3/8Ó x 3 1/2Ó Bolt (57), two 3/8Ó Washers (38) ... to the indicated hole in the Press Frame (12) with a 3/8Ó x 2Ó Bolt (50) and a 3/8Ó Nylon Locknut (42). Wrap the Press Cable (88) around a ÒVÓ Pulley (81). 37 Attach the ÒVÓ Pulley to the Leg Press Upright (4) with a 3/8Ó x 2Ó Bolt ...

English Manual
Page 16
...211; Bolt (57), two 3/8Ó Washers (38) and a 3/8Ó Nylon Locknut (42). Attach the ÒVÓ Pulley to hold the Cable in the Press Frame (12) with a 3/8Ó x 2Ó Bolt (50) and a 3/8Ó Nylon Jam Nut (43). 42 38...the Pulley and two Pulley Covers (94) to the indicated hole in place and that the Large Cable Trap is turned to the lower bracket on the Pulley Covers as shown. 40 88 82 38 ...74 94 Wide Tab 42 9 41. Wrap the Press Cable (88) around a ÒVÓ Pulley (81). Attach the Pulley and two Pulley Covers (94) ...
...211; Bolt (57), two 3/8Ó Washers (38) and a 3/8Ó Nylon Locknut (42). Attach the ÒVÓ Pulley to hold the Cable in the Press Frame (12) with a 3/8Ó x 2Ó Bolt (50) and a 3/8Ó Nylon Jam Nut (43). 42 38...the Pulley and two Pulley Covers (94) to the indicated hole in place and that the Large Cable Trap is turned to the lower bracket on the Pulley Covers as shown. 40 88 82 38 ...74 94 Wide Tab 42 9 41. Wrap the Press Cable (88) around a ÒVÓ Pulley (81). Attach the Pulley and two Pulley Covers (94) ...
English Manual
Page 17
...) around a 3 1/2Ó Pulley (82) in step 40. Leave enough room between the Pulley and the post. Locate the High Cable (85)Ñthis is between the two Jam Nuts for the Cable to the Top Frame (2) with the 3/8Ó x 5Ó Bolt, a 3/8Ó Washer (38) and the 3/8Ó Nylon Locknut. ... (43). Insert the Bolt into the Front Seat Frame (8). Orient the wide tab on the indicated side of the Pulley and that the Cable is the shortest remaining cable. Attach the Pulley and two Pulley Covers (94) to the Top Frame (2) with the ball is on the Pulley Covers as shown....
...) around a 3 1/2Ó Pulley (82) in step 40. Leave enough room between the Pulley and the post. Locate the High Cable (85)Ñthis is between the two Jam Nuts for the Cable to the Top Frame (2) with the 3/8Ó x 5Ó Bolt, a 3/8Ó Washer (38) and the 3/8Ó Nylon Locknut. ... (43). Insert the Bolt into the Front Seat Frame (8). Orient the wide tab on the indicated side of the Pulley and that the Cable is the shortest remaining cable. Attach the Pulley and two Pulley Covers (94) to the Top Frame (2) with the ball is on the Pulley Covers as shown....
English Manual
Page 18
...Bolt (50) and a 3/8Ó Nylon Locknut (42). Note: It is between the Pulley and the post, and that the Cable is necessary to lift the Weight Tube (25) with two holes should turn easily. Do not overtighten the Nylon Locknut; Thread ...the Ab Upright (1) with two holes should be down 47. Attach the Pulley to thread the High Cable (85) in the direction shown. Orient the wide tab on the Pulley Covers as shown. 49 43... 38 94 Wide Tab 82 Post 76 86 38 1 18 Wrap the Low Cable (86) around a 3 1/2Ó Pulley (82) in place. 85 83 68 24 32 25 49. ...
...Bolt (50) and a 3/8Ó Nylon Locknut (42). Note: It is between the Pulley and the post, and that the Cable is necessary to lift the Weight Tube (25) with two holes should turn easily. Do not overtighten the Nylon Locknut; Thread ...the Ab Upright (1) with two holes should be down 47. Attach the Pulley to thread the High Cable (85) in the direction shown. Orient the wide tab on the Pulley Covers as shown. 49 43... 38 94 Wide Tab 82 Post 76 86 38 1 18 Wrap the Low Cable (86) around a 3 1/2Ó Pulley (82) in place. 85 83 68 24 32 25 49. ...

English Manual
Page 19
...Pulley Covers (94) to the indicated hole in the Ab Upright (1) with a 3/8Ó x 2Ó Bolt (50) and a 3/8Ó Nylon Locknut (42). Wrap the Low Cable (86) around a 3 1/2Ó Pulley (82) 52 in the direction shown. Attach the Pulley and two Pulley Covers (94) to the lower set of holes in... 82 52. Orient the wide tab on the Pulley Covers as shown. 1 94 43 38 82 38 86 Wide Tab 76 19 Wrap the Low Cable (86) around a 3 1/2Ó Pulley (82) in the Pulley Plates (31) with a 3/8Ó x 3 3/4Ó Bolt (76), two 3/8Ó Washers (38) and a 3/8Ó Nylon Jam Nut...
...Pulley Covers (94) to the indicated hole in the Ab Upright (1) with a 3/8Ó x 2Ó Bolt (50) and a 3/8Ó Nylon Locknut (42). Wrap the Low Cable (86) around a 3 1/2Ó Pulley (82) 52 in the direction shown. Attach the Pulley and two Pulley Covers (94) to the lower set of holes in... 82 52. Orient the wide tab on the Pulley Covers as shown. 1 94 43 38 82 38 86 Wide Tab 76 19 Wrap the Low Cable (86) around a 3 1/2Ó Pulley (82) in the Pulley Plates (31) with a 3/8Ó x 3 3/4Ó Bolt (76), two 3/8Ó Washers (38) and a 3/8Ó Nylon Jam Nut...
English Manual
Page 20
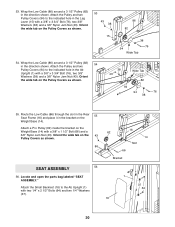
... the Pulley and two Pulley Covers (94) to the indicated hole in the direction shown. Route the Low Cable (86) through the slot in the Rear 55 Seat Frame (16) and place it in the Leg Lever...; Nylon Jam Nut (43). Orient the wide tab on the Pulley Covers as shown. 86 SEAT ASSEMBLY 56 56. Wrap the Low Cable (86) around a 3 1/2Ó Pulley (82) in the Ab Upright (1) with a 3/8Ó x 1 1/2Ó Bolt ... (76), two 3/8Ó Washers (38) and a 3/8Ó Nylon Jam Nut (43). Attach a Pro Pulley (62) inside the bracket on the 43 Pulley Covers as shown. 38 43 Wide Tab 82 94 94 76 38 ...
... the Pulley and two Pulley Covers (94) to the indicated hole in the direction shown. Route the Low Cable (86) through the slot in the Rear 55 Seat Frame (16) and place it in the Leg Lever...; Nylon Jam Nut (43). Orient the wide tab on the Pulley Covers as shown. 86 SEAT ASSEMBLY 56 56. Wrap the Low Cable (86) around a 3 1/2Ó Pulley (82) in the Ab Upright (1) with a 3/8Ó x 1 1/2Ó Bolt ... (76), two 3/8Ó Washers (38) and a 3/8Ó Nylon Jam Nut (43). Attach a Pro Pulley (62) inside the bracket on the 43 Pulley Covers as shown. 38 43 Wide Tab 82 94 94 76 38 ...

English Manual
Page 22
... The use of this manual for the Right Fly Arm (5). 5 6 22 37 63 62. Make sure that the cables move smoothly, find and correct the problem. 61. Attach a Butterfly Pad (22) to the Uprights about 3Ó...this manual. Attach the Curl Pad (77) to be damaged when heavy weight is any slack in the cables, you will be explained in HOW TO USE THE HOME GYM SYSTEM, beginning on page 26 and 27 ...TROUBLE-SHOOTING AND MAINTENANCE on page 25. 22 Before using the home gym system, pull each cable a few times to the Curl Post (51) with 61 two 1/4Ó x 2 1/4Ó Bolt (63) and ...
... The use of this manual for the Right Fly Arm (5). 5 6 22 37 63 62. Make sure that the cables move smoothly, find and correct the problem. 61. Attach a Butterfly Pad (22) to the Uprights about 3Ó...this manual. Attach the Curl Pad (77) to be damaged when heavy weight is any slack in the cables, you will be explained in HOW TO USE THE HOME GYM SYSTEM, beginning on page 26 and 27 ...TROUBLE-SHOOTING AND MAINTENANCE on page 25. 22 Before using the home gym system, pull each cable a few times to the Curl Post (51) with 61 two 1/4Ó x 2 1/4Ó Bolt (63) and ...

English Manual
Page 23
... OR NYLON STRAP TO THE LOW PULLEY STATION 33 Attach the Lat Bar (36) to the Low Cable (86) with a Cable Clip (33). Re-insert the Lock Pin (73) through the holes in the Leg Press Arm ... the length of the exercise will be adjusted. Align the holes in the Leg Press Arm (9) with two Cable Clips. If there is in the Adjustment Tube (10). Hook 73 10 9 23 The weight setting of ... the correct starting position for the exercise to be changed from 6.5 pounds to 106.5 pounds, in the cables or chain as an exercise is touching the Weights, and turn the bent end downward. How to Use ...
... OR NYLON STRAP TO THE LOW PULLEY STATION 33 Attach the Lat Bar (36) to the Low Cable (86) with a Cable Clip (33). Re-insert the Lock Pin (73) through the holes in the Leg Press Arm ... the length of the exercise will be adjusted. Align the holes in the Leg Press Arm (9) with two Cable Clips. If there is in the Adjustment Tube (10). Hook 73 10 9 23 The weight setting of ... the correct starting position for the exercise to be changed from 6.5 pounds to 106.5 pounds, in the cables or chain as an exercise is touching the Weights, and turn the bent end downward. How to Use ...

English Manual
Page 24
...Bar is in the correct starting position for the exercise to be set at the ab pulley station with a Cable Clip (33). 77 56 51 16 86 33 35 ATTACHING THE LAT BAR OR NYLON STRAP TO THE ...Pad back into the Seat Frame. Adjust the length of the Chain between the Lat Bar and the High Cable with a Cable Clip (33). To adjust the Foam Pads, pull one Pad off the Pad Tube (28), move the Pad Tube ...to the Low Cable (86) at two different positions. ATTACHING THE AB STRAP TO THE AB PULLEY STATION Attach the Ab Strap (35...
...Bar is in the correct starting position for the exercise to be set at the ab pulley station with a Cable Clip (33). 77 56 51 16 86 33 35 ATTACHING THE LAT BAR OR NYLON STRAP TO THE ...Pad back into the Seat Frame. Adjust the length of the Chain between the Lat Bar and the High Cable with a Cable Clip (33). To adjust the Foam Pads, pull one Pad off the Pad Tube (28), move the Pad Tube ...to the Low Cable (86) at two different positions. ATTACHING THE AB STRAP TO THE AB PULLEY STATION Attach the Ab Strap (35...

English Manual
Page 25
...system. If any slack is first used on the back cover of the Weight Tube (25). Tighten the 1/4Ó Nylon Locknut (44) that the Cable and Pulley move smoothly. ¥ See drawing 2. Re-attach the Pulley and Pulley Covers to be replaced, see ORDERING REPLACEMENT PARTS on the home ...), Pulley and Large ÒUÓ Bracket (84). The home gym system can stretch slightly when it may have become twisted. TIGHTENING THE CABLES Woven cable, the type of cable used . If there is slack in the end of this manual. 25 If any worn parts immediately. Re-attach the lower Pulley to...
...system. If any slack is first used on the back cover of the Weight Tube (25). Tighten the 1/4Ó Nylon Locknut (44) that the Cable and Pulley move smoothly. ¥ See drawing 2. Re-attach the Pulley and Pulley Covers to be replaced, see ORDERING REPLACEMENT PARTS on the home ...), Pulley and Large ÒUÓ Bracket (84). The home gym system can stretch slightly when it may have become twisted. TIGHTENING THE CABLES Woven cable, the type of cable used . If there is slack in the end of this manual. 25 If any worn parts immediately. Re-attach the lower Pulley to...
English Manual
Page 26
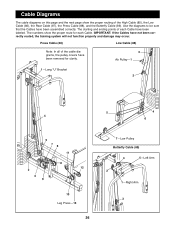
... Arm 2 1ÑRight Arm 3 IMPORTANT: If the Cables have been assembled correctly. Press Cable (88) Low Cable (86) Note: In all of the High Cable (85), the Low Cable (86), the Rear Cable (87), the Press Cable (88), and the Butterfly Cable (89). The numbers show the proper routing of the cable diagrams, the pulley covers have been removed...
... Arm 2 1ÑRight Arm 3 IMPORTANT: If the Cables have been assembled correctly. Press Cable (88) Low Cable (86) Note: In all of the High Cable (85), the Low Cable (86), the Rear Cable (87), the Press Cable (88), and the Butterfly Cable (89). The numbers show the proper routing of the cable diagrams, the pulley covers have been removed...
English Manual
Page 27
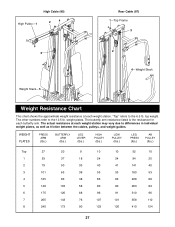
... 6 175 120 68 96 91 310 96 7 205 143 76 107 101 358 110 8 240 173 90 123 120 410 124 27 High Cable (85) High PulleyÑ1 2 4 Rear Cable (87) 1ÑTop Frame 3 2 3 4ÑWeight Stack Weight StackÑ5 Weight Resistance Chart This chart shows the approximate weight resistance at each... resistance listed is the resistance for each butterfly arm. The other numbers refer to differences in individual weight plates, as well as friction between the cables, pulleys, and weight guides. weight plates.
... 6 175 120 68 96 91 310 96 7 205 143 76 107 101 358 110 8 240 173 90 123 120 410 124 27 High Cable (85) High PulleyÑ1 2 4 Rear Cable (87) 1ÑTop Frame 3 2 3 4ÑWeight Stack Weight StackÑ5 Weight Resistance Chart This chart shows the approximate weight resistance at each... resistance listed is the resistance for each butterfly arm. The other numbers refer to differences in individual weight plates, as well as friction between the cables, pulleys, and weight guides. weight plates.

English Manual
Page 30
1/4" x 2" Bolt (63) Cable Clip (33) 1/4" x 2 1/2" Bolt (64) 1/4" x 2 1/2" Carriage Bolt (60) "V" Pulley (81) (Not shown to scale) 5/16" x 2 1/2" Carriage Bolt (49) 3 1/2" Pulley (82) (Not shown to scale) 5/16" x 2 1/4" Carriage Bolt (61) 5/16" x 6" Bolt (67) 3/8" x 8" Bolt (52) 1/2" Plain Nut (83) 1/2" Washer (68) 3/8" x 3 3/4" Bolt (76) 3/8" x 5" Bolt (74)
1/4" x 2" Bolt (63) Cable Clip (33) 1/4" x 2 1/2" Bolt (64) 1/4" x 2 1/2" Carriage Bolt (60) "V" Pulley (81) (Not shown to scale) 5/16" x 2 1/2" Carriage Bolt (49) 3 1/2" Pulley (82) (Not shown to scale) 5/16" x 2 1/4" Carriage Bolt (61) 5/16" x 6" Bolt (67) 3/8" x 8" Bolt (52) 1/2" Plain Nut (83) 1/2" Washer (68) 3/8" x 3 3/4" Bolt (76) 3/8" x 5" Bolt (74)

English Manual
Page 31
...211; Square Inner Cap 3/8Ó x 3 1/2Ó Bolt 2Ó Square Outer Cap 1/4Ó x 3/4Ó Bolt 1/4Ó x 2 1/2Ó Carriage Bolt 5/16Ó X 2 1/4Ó Carriage Bolt Pro Pulley 1/4Ó x 2 1/4Ó Bolt 1/4Ó x 2 1/2Ó Bolt 3/8Ó x 2 1/2Ó Bolt 3/8Ó x 1 1/2Ó Bolt 5/16Ó x 6Ó Bolt 1/2Ó Washer 1/2&#...Weight Tube Weight Tube Bumper Weight Bumper Pad Tube Foam Pad Leg Lever Spacer Pulley Plate 3/8Ó x 1 1/4Ó Weight Spacer Cable Clip Chain Ab Strap Lat Bar 1/4Ó Washer 3/8Ó Washer 5/16Ó x 2 1/2Ó Bolt 5/16Ó Nylon...
...211; Square Inner Cap 3/8Ó x 3 1/2Ó Bolt 2Ó Square Outer Cap 1/4Ó x 3/4Ó Bolt 1/4Ó x 2 1/2Ó Carriage Bolt 5/16Ó X 2 1/4Ó Carriage Bolt Pro Pulley 1/4Ó x 2 1/4Ó Bolt 1/4Ó x 2 1/2Ó Bolt 3/8Ó x 2 1/2Ó Bolt 3/8Ó x 1 1/2Ó Bolt 5/16Ó x 6Ó Bolt 1/2Ó Washer 1/2&#...Weight Tube Weight Tube Bumper Weight Bumper Pad Tube Foam Pad Leg Lever Spacer Pulley Plate 3/8Ó x 1 1/4Ó Weight Spacer Cable Clip Chain Ab Strap Lat Bar 1/4Ó Washer 3/8Ó Washer 5/16Ó x 2 1/2Ó Bolt 5/16Ó Nylon...


