

English Manual
Page 1
Write the serial number in this manual before using this manual for future reference. As a manufacturer, we are missing or damaged parts, we will provide immediate assistance, free of charge to you have questions, or if there are committed to providing complete customer satisfaction. CUSTOMER HOT LINE: 1-...
Write the serial number in this manual before using this manual for future reference. As a manufacturer, we are missing or damaged parts, we will provide immediate assistance, free of charge to you have questions, or if there are committed to providing complete customer satisfaction. CUSTOMER HOT LINE: 1-...

English Manual
Page 2
...while weights are attached in place on all precautions. 9. When using the home gym system. 3. do not use of this or any worn parts immediately. 5. Always stand on the foot plate when performing an exercise that the cables remain on a level surface. Use the home gym ...system only on the pulleys at all parts often. Important Precautions WARNING: To reduce the risk of serious injury, read the following important precautions before beginning assembly. This is intended for...
...while weights are attached in place on all precautions. 9. When using the home gym system. 3. do not use of this or any worn parts immediately. 5. Always stand on the foot plate when performing an exercise that the cables remain on a level surface. Use the home gym ...system only on the pulleys at all parts often. Important Precautions WARNING: To reduce the risk of serious injury, read the following important precautions before beginning assembly. This is intended for...

English Manual
Page 3
... p.m. The model number is to tone your body, build dramatic muscle size and strength, or improve your cardiovascular system, the WEIDER¨ PRO 9925 will help us assist you to develop every major muscle group of this manual carefully before calling. The decal shown to the location... with the parts that are labeled. Whether your benefit, read this manual). Width: 64 in . To help you , please note the product model number and serial number before using the WEIDER¨ PRO 9925 Training System. If you for selecting the versatile WEIDER¨ PRO 9925 Training System....
... p.m. The model number is to tone your body, build dramatic muscle size and strength, or improve your cardiovascular system, the WEIDER¨ PRO 9925 will help us assist you to develop every major muscle group of this manual carefully before calling. The decal shown to the location... with the parts that are labeled. Whether your benefit, read this manual). Width: 64 in . To help you , please note the product model number and serial number before using the WEIDER¨ PRO 9925 Training System. If you for selecting the versatile WEIDER¨ PRO 9925 Training System....

English Manual
Page 4
...assembly of our products can be sure that your body while you are exercising. 4 Orienting Parts As you assemble this product, be completed successfully by anyone. Tightening of Parts Tighten all parts as you assemble them, unless instructed to walk all the way around the assembled equipment.... Assembly will be attached to quickly identify different parts as the skeleton of the equipment. This ties the different parts together and makes the equipment function as clear tape or masking tape Important: Wait until assembly is ...
...assembly of our products can be sure that your body while you are exercising. 4 Orienting Parts As you assemble this product, be completed successfully by anyone. Tightening of Parts Tighten all parts as you assemble them, unless instructed to walk all the way around the assembled equipment.... Assembly will be attached to quickly identify different parts as the skeleton of the equipment. This ties the different parts together and makes the equipment function as clear tape or masking tape Important: Wait until assembly is ...
English Manual
Page 5
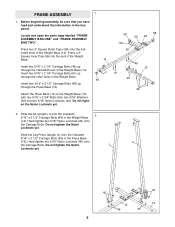
... (56) into the end of the Weight Base (14). Hand tighten two 5/16Ó Nylon Locknuts (40) onto the Carriage Bolts. Locate and open the parts bags labeled ÒFRAME ASSEMBLY BAG ONEÓ and ÒFRAME ASSEMBLY BAG TWO.Ó Press two 2Ó Square Outer Caps (58) onto the indi...
... (56) into the end of the Weight Base (14). Hand tighten two 5/16Ó Nylon Locknuts (40) onto the Carriage Bolts. Locate and open the parts bags labeled ÒFRAME ASSEMBLY BAG ONEÓ and ÒFRAME ASSEMBLY BAG TWO.Ó Press two 2Ó Square Outer Caps (58) onto the indi...
English Manual
Page 9
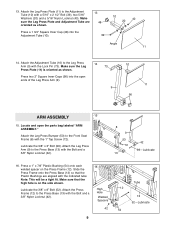
... the Press Base (13) so that the high hole is oriented as shown. 13 48 Press a 1 3/4Ó Square Inner Cap (48) into the open the parts bag labeled ÒARM ASSEMBLY.Ó Attach the Leg Press Bumper (53) to the Press Base (13) with the 1Ó Tap Screw (72). Locate and...
... the Press Base (13) so that the high hole is oriented as shown. 13 48 Press a 1 3/4Ó Square Inner Cap (48) into the open the parts bag labeled ÒARM ASSEMBLY.Ó Attach the Leg Press Bumper (53) to the Press Base (13) with the 1Ó Tap Screw (72). Locate and...
English Manual
Page 11
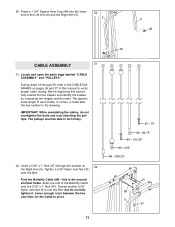
... one end of this section, fully unwind the five Cables and identify the Cables by comparing the lengths and the ends. Locate and open the parts bags labeled ÒCABLE ASSEMBLYÓ and ÒPULLEYS.Ó During steps 19 through the bracket on pages 26 and 27 of the Butterfly Cable...
... one end of this section, fully unwind the five Cables and identify the Cables by comparing the lengths and the ends. Locate and open the parts bags labeled ÒCABLE ASSEMBLYÓ and ÒPULLEYS.Ó During steps 19 through the bracket on pages 26 and 27 of the Butterfly Cable...
English Manual
Page 12
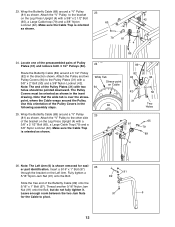
...Ó x 1Ó Bolt (97) through the bracket on Cable 94 82 25. Leave enough room between the two Jam Nuts 97 6 for easi- 26 er part identification. 23. Wrap the Butterfly Cable (89) around the Pulley. Attach the ÒVÓ Pulley to pivot. 12 Make sure the Cable Trap is shown...
...Ó x 1Ó Bolt (97) through the bracket on Cable 94 82 25. Leave enough room between the two Jam Nuts 97 6 for easi- 26 er part identification. 23. Wrap the Butterfly Cable (89) around the Pulley. Attach the ÒVÓ Pulley to pivot. 12 Make sure the Cable Trap is shown...
English Manual
Page 20
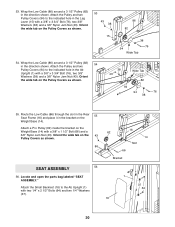
... Pulley and two Pulley Covers (94) to the indicated hole in the direction shown. Attach a Pro Pulley (62) inside the bracket on the Pulley Covers as shown. 86 SEAT ASSEMBLY 56 56. Locate and open the parts bag labeled ÒSEAT ASSEMBLY.Ó Attach the Small Backrest (18) to the indicated hole...
... Pulley and two Pulley Covers (94) to the indicated hole in the direction shown. Attach a Pro Pulley (62) inside the bracket on the Pulley Covers as shown. 86 SEAT ASSEMBLY 56 56. Locate and open the parts bag labeled ÒSEAT ASSEMBLY.Ó Attach the Small Backrest (18) to the indicated hole...

English Manual
Page 22
... the problem. Before using the home gym system, pull each cable a few times to be explained in the cables, you will be sure that all parts have been properly tightened. If one of this step for proper cable routing. See TROUBLE-SHOOTING AND MAINTENANCE on page 26 and 27 of the... Uprights, as shown. 59 59 59 51 64. The use of the remaining parts will need to the Uprights about 3Ó 63 down from the top of this manual for the Right Fly Arm (5). 5 6 22 37 63 62. Attach...
... the problem. Before using the home gym system, pull each cable a few times to be explained in the cables, you will be sure that all parts have been properly tightened. If one of this step for proper cable routing. See TROUBLE-SHOOTING AND MAINTENANCE on page 26 and 27 of the... Uprights, as shown. 59 59 59 51 64. The use of the remaining parts will need to the Uprights about 3Ó 63 down from the top of this manual for the Right Fly Arm (5). 5 6 22 37 63 62. Attach...

English Manual
Page 23
...) through the holes in the Leg Press Arm and the holes in place on page 24 to find the approximate amount of resistance at each part of 12.5 pounds. If there is any slack in the cables or chain as an exercise is in the correct starting position for each weight...
...) through the holes in the Leg Press Arm and the holes in place on page 24 to find the approximate amount of resistance at each part of 12.5 pounds. If there is any slack in the cables or chain as an exercise is in the correct starting position for each weight...

English Manual
Page 25
Trouble-shooting and Maintenance Inspect and tighten all parts each time you feel additional slack while using a damp cloth and mild .... Replace any slack is felt when using the other hole in the Large ÒUÓ Bracket. If any worn parts immediately. To tighten the cables, first insert the weight pin into the spider nut (not shown) in the Pulley Plates...Cable (88) can be tightened further. If there is felt, the cables should be replaced, see ORDERING REPLACEMENT PARTS on the Pulley Covers as shown and make sure the Cable and Pulley move smoothly. If the Cable needs to...
Trouble-shooting and Maintenance Inspect and tighten all parts each time you feel additional slack while using a damp cloth and mild .... Replace any slack is felt when using the other hole in the Large ÒUÓ Bracket. If any worn parts immediately. To tighten the cables, first insert the weight pin into the spider nut (not shown) in the Pulley Plates...Cable (88) can be tightened further. If there is felt, the cables should be replaced, see ORDERING REPLACEMENT PARTS on the Pulley Covers as shown and make sure the Cable and Pulley move smoothly. If the Cable needs to...

English Manual
Page 31
...; x 3 1/2Ó Bolt 2Ó Square Outer Cap 1/4Ó x 3/4Ó Bolt 1/4Ó x 2 1/2Ó Carriage Bolt 5/16Ó X 2 1/4Ó Carriage Bolt Pro Pulley 1/4Ó x 2 1/4Ó Bolt 1/4Ó x 2 1/2Ó Bolt 3/8Ó x 2 1/2Ó Bolt 3/8Ó x 1 1/2Ó Bolt 5/16Ó x 6&#... Pin Pulley Cover Support Plate Nylon Strap 5/16Ó x 1Ó Bolt 3/8Ó x 3Ó Bolt UserÕs Manual Exercise Poster Note: Ò#Ó indicates a non-illustrated part. Qty. 1 1 2 1 3 1 4 1 5 1 6 1 7 2 8 1 9 1 10 1 11 1 12 1 13 1 14 1 15 1 16 1 17 2 18 1...
...; x 3 1/2Ó Bolt 2Ó Square Outer Cap 1/4Ó x 3/4Ó Bolt 1/4Ó x 2 1/2Ó Carriage Bolt 5/16Ó X 2 1/4Ó Carriage Bolt Pro Pulley 1/4Ó x 2 1/4Ó Bolt 1/4Ó x 2 1/2Ó Bolt 3/8Ó x 2 1/2Ó Bolt 3/8Ó x 1 1/2Ó Bolt 5/16Ó x 6&#... Pin Pulley Cover Support Plate Nylon Strap 5/16Ó x 1Ó Bolt 3/8Ó x 3Ó Bolt UserÕs Manual Exercise Poster Note: Ò#Ó indicates a non-illustrated part. Qty. 1 1 2 1 3 1 4 1 5 1 6 1 7 2 8 1 9 1 10 1 11 1 12 1 13 1 14 1 15 1 16 1 17 2 18 1...

English Manual
Page 33
...warranty claim is limited to give the following information: 1. ICON HEALTH & FITNESS, INC., 1500 S. 1000 W., LOGAN, UT 84321-9813 Part No. 158045 J02110-C R1199A Printed in workmanship and material, under this product to the original purchaser. Some states do not allow the ... with all other warranties and any implied warranties of merchantability or fitness for a particular purpose is a registered trademark of the product (WEIDER¨ PRO 9925 Training System) 3. Limited Warranty ICON Health & Fitness, Inc. (ICON), warrants this warranty is made must be received by an ...
...warranty claim is limited to give the following information: 1. ICON HEALTH & FITNESS, INC., 1500 S. 1000 W., LOGAN, UT 84321-9813 Part No. 158045 J02110-C R1199A Printed in workmanship and material, under this product to the original purchaser. Some states do not allow the ... with all other warranties and any implied warranties of merchantability or fitness for a particular purpose is a registered trademark of the product (WEIDER¨ PRO 9925 Training System) 3. Limited Warranty ICON Health & Fitness, Inc. (ICON), warrants this warranty is made must be received by an ...


