
English Manual
Page 1
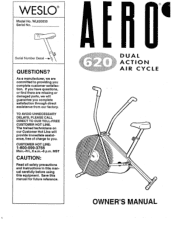
... Mon.-Fri., 6 a.m.-6 p.m. Serial Number Decal QUESTIONS? Save this equipment. DUAL ACTION AIR CYCLE OWNER'S MANUAL If you have questions, or find there are missing or damaged parts, we are committed to you complete customer satisfaction. MST CAUTION: Read ail safety precautions and Instructions in this manual carefully before using this manual for future reference. WESLO® Model No. WL620030 Serial No. As...
... Mon.-Fri., 6 a.m.-6 p.m. Serial Number Decal QUESTIONS? Save this equipment. DUAL ACTION AIR CYCLE OWNER'S MANUAL If you have questions, or find there are missing or damaged parts, we are committed to you complete customer satisfaction. MST CAUTION: Read ail safety precautions and Instructions in this manual carefully before using this manual for future reference. WESLO® Model No. WL620030 Serial No. As...
English Manual
Page 2
... BEFORE YOU BEGIN ASSEMBLY OPERATION AND ADJUSTMENT TROUBLE-SHOOTING AND MAINTENANCE CONDITIONING GUIDELINES PART LIST EXPLODED DRAWING ORDERING REPLACEMENT PARTS LIMITED WARRANTY 2 3 4 6 8 9 10 11 Back Cover Back Cover IMPORTANT SAFETY PRECAUTIONS WARNING: To reduce the risk of serious injury, read the following Important safety precautions before using. If the seat pin is especially important for foot protection. 3. WARNING: Before beginning this or any exercise program, consult your...
... BEFORE YOU BEGIN ASSEMBLY OPERATION AND ADJUSTMENT TROUBLE-SHOOTING AND MAINTENANCE CONDITIONING GUIDELINES PART LIST EXPLODED DRAWING ORDERING REPLACEMENT PARTS LIMITED WARRANTY 2 3 4 6 8 9 10 11 Back Cover Back Cover IMPORTANT SAFETY PRECAUTIONS WARNING: To reduce the risk of serious injury, read the following Important safety precautions before using. If the seat pin is especially important for foot protection. 3. WARNING: Before beginning this or any exercise program, consult your...
English Manual
Page 3
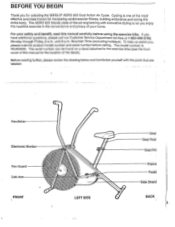
... assist you enjoy this manual for the location of the most effective exercises known for selecting the WESLO3 AERO 620 Dual Action Air Cycle. Handlebar Electronic Monitor Fan Guard Link Arm FRONT a, LEFT SIDE Seat Seat Post Seat Pin Frame Pedal Side Shield BACK BEFORE YOU BEGIN Thank you have additional questions, please call our Customer Service Department toll-free at 1-800-999-3756...
... assist you enjoy this manual for the location of the most effective exercises known for selecting the WESLO3 AERO 620 Dual Action Air Cycle. Handlebar Electronic Monitor Fan Guard Link Arm FRONT a, LEFT SIDE Seat Seat Post Seat Pin Frame Pedal Side Shield BACK BEFORE YOU BEGIN Thank you have additional questions, please call our Customer Service Department toll-free at 1-800-999-3756...
English Manual
Page 4
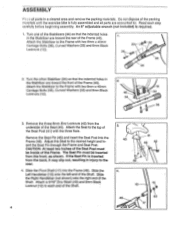
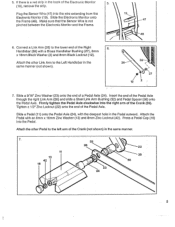
...8mm x 40mm 12 Carriage Bolts (36), Curved Washers (33) and 8mm Black Locknuts (12). 46 33 34 36 3. Remove the Seat Pin (45) and insert the Seat Post into the Frame (46). Attach the Seat to the user. 4. If the Seat Pin is inserted from the ...ASSEMBLY Pin -3 all parts in injury to the top of the packing materials until the exercise bike is fully assembled and all parts are accounted for. Adjust the Seat to each step carefully before beginning assembly. Turn the other Stabilizer (34) so that the indented holes in the Stabilizer are toward the rear of the Seat...
...8mm x 40mm 12 Carriage Bolts (36), Curved Washers (33) and 8mm Black Locknuts (12). 46 33 34 36 3. Remove the Seat Pin (45) and insert the Seat Post into the Frame (46). Attach the Seat to the user. 4. If the Seat Pin is inserted from the ...ASSEMBLY Pin -3 all parts in injury to the top of the packing materials until the exercise bike is fully assembled and all parts are accounted for. Adjust the Seat to each step carefully before beginning assembly. Turn the other Stabilizer (34) so that the indented holes in the Stabilizer are toward the rear of the Seat...
English Manual
Page 5
... the Crank (39). Make sure that the Sensor Wire is a red strip in the Pedal outward. 5. Plug the Sensor Wire (47) into the Pedal. Slide a Pedal (11) onto the Pedal Axle (24), with an 8mm x 16mm Zinc Washer (13) and 8mm Zinc Locknut (42). Press a Pedal Cap (18) into the wire extending from the Electronic Monitor (19). Firmly tighten the Pedal Axle clockwise Into the right arm...
... the Crank (39). Make sure that the Sensor Wire is a red strip in the Pedal outward. 5. Plug the Sensor Wire (47) into the Pedal. Slide a Pedal (11) onto the Pedal Axle (24), with an 8mm x 16mm Zinc Washer (13) and 8mm Zinc Locknut (42). Press a Pedal Cap (18) into the wire extending from the Electronic Monitor (19). Firmly tighten the Pedal Axle clockwise Into the right arm...
English Manual
Page 6
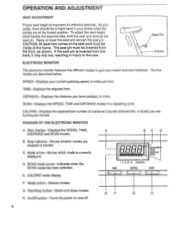
.... DISTANCE-Displays the distance you pedal, there should be a slight bend in miles. C. Mode Start/Stop °net E. Start/Stop button-Starts and stops modes. SPEED-Displays your knees when the pedals are burning per hour. DIAGRAM OF THE ELECTRONIC MONITOR A. Mode arrow-Shows which mode is important for effective exercise. D. A BC D T-1)_t.,_is_tili.ez--Speed/MPH IaIIIII0IIIII:II0IIIII0IIIIII:N--s, Distance Scan i -. . 1 8 15 22 29 Kcal/Min. Mode button-Selects modes. Raise or lower the seat and reinsert the seat pin. CAUTION...
.... DISTANCE-Displays the distance you pedal, there should be a slight bend in miles. C. Mode Start/Stop °net E. Start/Stop button-Starts and stops modes. SPEED-Displays your knees when the pedals are burning per hour. DIAGRAM OF THE ELECTRONIC MONITOR A. Mode arrow-Shows which mode is important for effective exercise. D. A BC D T-1)_t.,_is_tili.ez--Speed/MPH IaIIIII0IIIII:II0IIIII0IIIIII:N--s, Distance Scan i -. . 1 8 15 22 29 Kcal/Min. Mode button-Selects modes. Raise or lower the seat and reinsert the seat pin. CAUTION...
English Manual
Page 7
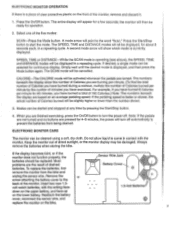
... the number of the monitor. Reattach the battery cover, reconnect the sensor wire, and replace the monitor on an average pedaling speed. ELECTRONIC MONITOR OPERATION If there is operating (see above), the SPEED, TIME and DISTANCE modes will be displayed in a repeating cycle. the monitor will then be slightly higher or lower than the number shown. 3. A mode arrow will turn the power off automatically to turn off . When you have exercised. Press the Start/Stop button to...
... the number of the monitor. Reattach the battery cover, reconnect the sensor wire, and replace the monitor on an average pedaling speed. ELECTRONIC MONITOR OPERATION If there is operating (see above), the SPEED, TIME and DISTANCE modes will be displayed in a repeating cycle. the monitor will then be slightly higher or lower than the number shown. 3. A mode arrow will turn the power off automatically to turn off . When you have exercised. Press the Start/Stop button to...
English Manual
Page 8
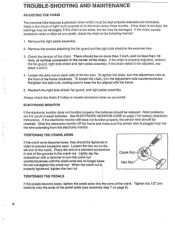
... right pedal assembly. Remove the right pedal assembly. 2. To tighten the chain, turn the adjustment nuts counterclockwise. Slide the electronic monitor off the frame and make sure the sensor wire is plugged fully into the arms of the grooves in the crank nut. ELECTRONIC MONITOR If the electronic monitor does not function properly, the batteries should be adjusted, see assembly step 7 on page 7 for battery installation instructions. TROUBLE-SHOOTING AND MAINTENANCE ADJUSTING THE CHAIN The exercise bike features...
... right pedal assembly. Remove the right pedal assembly. 2. To tighten the chain, turn the adjustment nuts counterclockwise. Slide the electronic monitor off the frame and make sure the sensor wire is plugged fully into the arms of the grooves in the crank nut. ELECTRONIC MONITOR If the electronic monitor does not function properly, the batteries should be adjusted, see assembly step 7 on page 7 for battery installation instructions. TROUBLE-SHOOTING AND MAINTENANCE ADJUSTING THE CHAIN The exercise bike features...
English Manual
Page 9
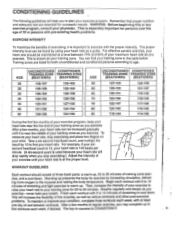
... up prepares the body for both unconditioned and conditioned persons according to plan your exercise program. ing more oxygen to find your training zone. Finish each workout with 5 to 10 minutes of stretching to exercise with pre-existing health problems. EXERCISE INTENSITY To maximize the benefits of exercising, it is used because your heart rate will drop rapidly when you stop exercising and place two...
... up prepares the body for both unconditioned and conditioned persons according to plan your exercise program. ing more oxygen to find your training zone. Finish each workout with 5 to 10 minutes of stretching to exercise with pre-existing health problems. EXERCISE INTENSITY To maximize the benefits of exercising, it is used because your heart rate will drop rapidly when you stop exercising and place two...
English Manual
Page 10
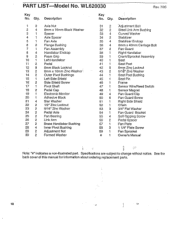
... Bolt Fan Guard Right Handlebar Crank/Sprocket Assembly Seat Seat Post 8mm Zinc Locknut 5/16u-Zinc Washer Seat Post Bushing Seat Pin Frame Sensor Wire/Reed Switch Sensor Magnet Fan Guard Clip Fan Guard Screw Right Side Shield Chain 3/4" Flat Washer Fan Guard Bracket Self-Tapping Screw Pedal Spacer Fan Plate 1 1/4" Plate Screw Fan Sprocket Owner's Manual Note: "#" indicates a non-illustrated part. Specifications are subject to change without notice. WL620030 Rev. 7/93 Key...
... Bolt Fan Guard Right Handlebar Crank/Sprocket Assembly Seat Seat Post 8mm Zinc Locknut 5/16u-Zinc Washer Seat Post Bushing Seat Pin Frame Sensor Wire/Reed Switch Sensor Magnet Fan Guard Clip Fan Guard Screw Right Side Shield Chain 3/4" Flat Washer Fan Guard Bracket Self-Tapping Screw Pedal Spacer Fan Plate 1 1/4" Plate Screw Fan Sprocket Owner's Manual Note: "#" indicates a non-illustrated part. Specifications are subject to change without notice. WL620030 Rev. 7/93 Key...
English Manual
Page 11
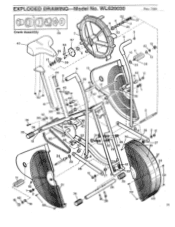
WL620030 Rev. 7/93 C Crank Assembly 39 7 57 40 58 25 6 21 59 44 8 45 9 15 38 19 -42 • 41 14 2 43 32 \ 53 4 6 21 3 25 53 8 ..--- 9 10 11 23 18 42 \\it 3 24 43 12 14 17 2 28 2 12 33 36 34 35 12 22 46 35 20 39 52 47 22 32 31 29 30 29 5 8 26 2 12 27 49 11 42 18 16 17O 2 13 24 8 23 26 12 2 51 35 \\\\\\\ .\` 55 12 33 27 rte 35 34 50 36 37 54 50 49 11 EXPLODED DRAWING Model No.
WL620030 Rev. 7/93 C Crank Assembly 39 7 57 40 58 25 6 21 59 44 8 45 9 15 38 19 -42 • 41 14 2 43 32 \ 53 4 6 21 3 25 53 8 ..--- 9 10 11 23 18 42 \\it 3 24 43 12 14 17 2 28 2 12 33 36 34 35 12 22 46 35 20 39 52 47 22 32 31 29 30 29 5 8 26 2 12 27 49 11 42 18 16 17O 2 13 24 8 23 26 12 2 51 35 \\\\\\\ .\` 55 12 33 27 rte 35 34 50 36 37 54 50 49 11 EXPLODED DRAWING Model No.
English Manual
Page 12
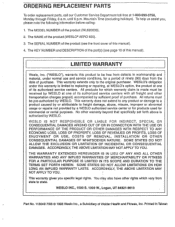
... MERCHANTABILITY OR FITNESS FOR A PARTICULAR PURPOSE IS LIMITED IN ITS SCOPE AND DURATION TO THE TERMS SET FORTH HEREIN. Printed in workmanship and material, under this warranty is limited to the original purchaser. The SERIAL NUMBER of the product (see page 10 of this manual). The KEY NUMBER and DESCRIPTION of the part(s) (see the front cover of this manual). 4. This warranty does not...
... MERCHANTABILITY OR FITNESS FOR A PARTICULAR PURPOSE IS LIMITED IN ITS SCOPE AND DURATION TO THE TERMS SET FORTH HEREIN. Printed in workmanship and material, under this warranty is limited to the original purchaser. The SERIAL NUMBER of the product (see page 10 of this manual). The KEY NUMBER and DESCRIPTION of the part(s) (see the front cover of this manual). 4. This warranty does not...


