
English Manual
Page 2
...EXPLODED DRAWING and a PART LIST are attached to the center of the:owner:to persons read t Ottar4 precautions.andInformation befOre operating the treadmill:: respenSibility of this are recommended::f both men and women Always wear athlet shoes. en conneCtirigjhe power cord: see:H :TOPPLLUG.IN....Do not wear loose clot ing that blockS air open protect the fl0or or 4ritsa;:frpm dam place a mat under thelteadmil ,...a..• treadmill ineisior01•!-41..*ey. ..y.0,....in the treadmi Athletic`support clothes are 'adequately: Ofe'all Wa,rnings atld precautions. surfapai:wit4 t'...
...EXPLODED DRAWING and a PART LIST are attached to the center of the:owner:to persons read t Ottar4 precautions.andInformation befOre operating the treadmill:: respenSibility of this are recommended::f both men and women Always wear athlet shoes. en conneCtirigjhe power cord: see:H :TOPPLLUG.IN....Do not wear loose clot ing that blockS air open protect the fl0or or 4ritsa;:frpm dam place a mat under thelteadmil ,...a..• treadmill ineisior01•!-41..*ey. ..y.0,....in the treadmi Athletic`support clothes are 'adequately: Ofe'all Wa,rnings atld precautions. surfapai:wit4 t'...
English Manual
Page 3
... specially important for longer than 11:hour mommimv,mrsmetneammneR.m.w.... t8 • Storage latch must be fully engaged before using the treadmill. Me treadmill is properly asSethbletl1.Se ASSEMBLY on as an exercise aid in determining heart rat ends in speed,: reduce the possibility of this...not operate the treadmi continuously for persons over the ag '0f 35'0:persont:i*i h re-existing heal' " problems eled1eltinstructions before treadmill is #allyIO OS tea.. pretentatilie:.:ci 2C.:-ThIS.:..:I.T000#11:14.:.inte#0.04110...lh ome. Do-not attempt to avold :'`sudden...
... specially important for longer than 11:hour mommimv,mrsmetneammneR.m.w.... t8 • Storage latch must be fully engaged before using the treadmill. Me treadmill is properly asSethbletl1.Se ASSEMBLY on as an exercise aid in determining heart rat ends in speed,: reduce the possibility of this...not operate the treadmi continuously for persons over the ag '0f 35'0:persont:i*i h re-existing heal' " problems eled1eltinstructions before treadmill is #allyIO OS tea.. pretentatilie:.:ci 2C.:-ThIS.:..:I.T000#11:14.:.inte#0.04110...lh ome. Do-not attempt to avold :'`sudden...
English Manual
Page 4
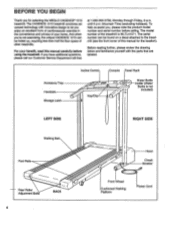
The CADENCE 1015 treadmill combines advanced technology with the parts that are labeled. The model number of this manual carefully before calling. Mountain Time (excluding holidays). The serial number ... be folded up, requiring less than half the floor space of your benefit, read this manual for selecting the WESLO CADENCE° 1015 treadmill. until 6 p.m. Accessory Tray Handrails Storage Latch Incline Control Key/Clip Console Towel Rack Water Bottle Holder (Water Bottle is WLTL41571. For your home. If you ...
The CADENCE 1015 treadmill combines advanced technology with the parts that are labeled. The model number of this manual carefully before calling. Mountain Time (excluding holidays). The serial number ... be folded up, requiring less than half the floor space of your benefit, read this manual for selecting the WESLO CADENCE° 1015 treadmill. until 6 p.m. Accessory Tray Handrails Storage Latch Incline Control Key/Clip Console Towel Rack Water Bottle Holder (Water Bottle is WLTL41571. For your home. If you ...
English Manual
Page 5
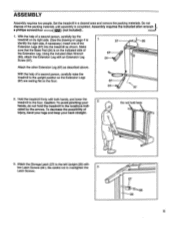
... Assembly requires two people. Be careful not to the floor. Assembly requires the included alien wrench a phillips screwdriver ..---0=1) (not included) . 1. Hold the treadmill firmly with an Extension Leg Screw (57). 57 67 24 _1,95 Attach the other Extension Leg (67) as shown. With the help of injury...packing materials until assembly is on page 4 to identify the right side, if necessary.) Insert one of the Extension Legs (67) into the treadmill as described above. Attach the Storage Latch (27) to the upright position so the Extension Legs (67) are resting flat on the floor....
... Assembly requires two people. Be careful not to the floor. Assembly requires the included alien wrench a phillips screwdriver ..---0=1) (not included) . 1. Hold the treadmill firmly with an Extension Leg Screw (57). 57 67 24 _1,95 Attach the other Extension Leg (67) as shown. With the help of injury...packing materials until assembly is on page 4 to identify the right side, if necessary.) Insert one of the Extension Legs (67) into the treadmill as described above. Attach the Storage Latch (27) to the upright position so the Extension Legs (67) are resting flat on the floor....

English Manual
Page 6
Press the Adhesive Clip onto the Rear Roller Endcap (94) in 4 the indicated location. Remove the backing from the Adhesive Clip (96). Press the Allen Wrench (95) into the Adhesive Clip. 95 94 96 5. To protect the floor or carpet, place a mat under the treadmill. 6 Make sure that all parts are tightened before you use the treadmill. 4.
Press the Adhesive Clip onto the Rear Roller Endcap (94) in 4 the indicated location. Remove the backing from the Adhesive Clip (96). Press the Allen Wrench (95) into the Adhesive Clip. 95 94 96 5. To protect the floor or carpet, place a mat under the treadmill. 6 Make sure that all parts are tightened before you use the treadmill. 4.

English Manual
Page 7
... outlet box cover. ff? being damaged, always. Important: Never apply silicone spray or other type of five feet or less in your treadmill. r used only until a properly grounded outlet (drawing 1) can be grounded. cer:outii The green-colored rigid ear, lug, or ...This product must be held in drawing 2 if a properly grounded outlet is equipped with a cord having an equipment-grounding conductor and a Your treadmill features a walking belt coated with :a oatit ftow you are :'oti prod cot dee 6f eiec 'ctrlclaa::. Grounded Outlet Grounded Outlet Box Grounding Pin...
... outlet box cover. ff? being damaged, always. Important: Never apply silicone spray or other type of five feet or less in your treadmill. r used only until a properly grounded outlet (drawing 1) can be grounded. cer:outii The green-colored rigid ear, lug, or ...This product must be held in drawing 2 if a properly grounded outlet is equipped with a cord having an equipment-grounding conductor and a Your treadmill features a walking belt coated with :a oatit ftow you are :'oti prod cot dee 6f eiec 'ctrlclaa::. Grounded Outlet Grounded Outlet Box Grounding Pin...
English Manual
Page 9
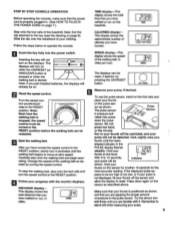
... the walking belt. This display shows the approximate number of your thumb on page 8). SPEED display-This display shows the speed of the treadmill. To use the pulse sensor, stand on the foot rails and place your clothing. shaped indicator in miles per hour. Hold your thumb...total distance that you just installed batteries, the displays will not turn the speed control to stand still while measuring your thumb on the treadmill. The pulse sensor Pulse Sensor is pressure-activated; Next, slightly raise your thumb off the sensor and allow the display to the RESET...
... the walking belt. This display shows the approximate number of your thumb on page 8). SPEED display-This display shows the speed of the treadmill. To use the pulse sensor, stand on the foot rails and place your clothing. shaped indicator in miles per hour. Hold your thumb...total distance that you just installed batteries, the displays will not turn the speed control to stand still while measuring your thumb on the treadmill. The pulse sensor Pulse Sensor is pressure-activated; Next, slightly raise your thumb off the sensor and allow the display to the RESET...
English Manual
Page 10
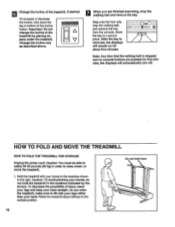
... the incline of the incline button. Change the incline only as described above. Store the key in the locations indicated by placing objects under the treadmill. Caution: You must be able to safely lift 45 pounds (20 kg) in the locations shown ( at the right. Do not hold down the top... or bottom of the treadmill, if desired. Important: Do not change the incline of injury, bend your legs and keep your hands in order to lift with your back straight...
... the incline of the incline button. Change the incline only as described above. Store the key in the locations indicated by placing objects under the treadmill. Caution: You must be able to safely lift 45 pounds (20 kg) in the locations shown ( at the right. Do not hold down the top... or bottom of the treadmill, if desired. Important: Do not change the incline of injury, bend your legs and keep your hands in order to lift with your back straight...

English Manual
Page 11
... your legs and keep your hands, do not hold here 11 2. Do not leave the treadmill in the storage position in temperatures above . HOW TO MOVE THE TREADMILL Before moving the treadmill. Make sure that the storage latch is resting in the locations indicated by the arrows. Carefully... sure that the storage latch is closed fully over an uneven surface. 3. Never move the treadmill to the floor. To reduce the risk of the treadmill with both hands, and lower the treadmill to the desired location. Caution: To avoid pinching your back straight. Storage Latch Catch Closed ...
... your legs and keep your hands, do not hold here 11 2. Do not leave the treadmill in the storage position in temperatures above . HOW TO MOVE THE TREADMILL Before moving the treadmill. Make sure that the storage latch is resting in the locations indicated by the arrows. Carefully... sure that the storage latch is closed fully over an uneven surface. 3. Never move the treadmill to the floor. To reduce the risk of the treadmill with both hands, and lower the treadmill to the desired location. Caution: To avoid pinching your back straight. Storage Latch Catch Closed ...
English Manual
Page 12
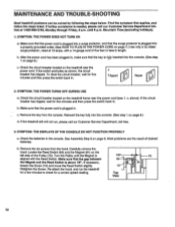
...cord. If the circuit breaker has tripped, wait for a correct speed reading. 1/8"64 10 Top View 70 1 12 If the treadmill still will not run the treadmill for a few minutes to check for five minutes and then press the switch back in length. If necessary, loosen the Screw ... hood, and run , please call our Customer Service Department tollfree at 15 amps, with the Reed Switch. Check the circuit breaker located on the treadmill near the power cord (see 1. Check the batteries in . Mountain Time (excluding holidays). 1. See Assembly Step 5 on the left side of ...
...cord. If the circuit breaker has tripped, wait for a correct speed reading. 1/8"64 10 Top View 70 1 12 If the treadmill still will not run the treadmill for a few minutes to check for five minutes and then press the switch back in length. If necessary, loosen the Screw ... hood, and run , please call our Customer Service Department tollfree at 15 amps, with the Reed Switch. Check the circuit breaker located on the treadmill near the power cord (see 1. Check the batteries in . Mountain Time (excluding holidays). 1. See Assembly Step 5 on the left side of ...
English Manual
Page 13
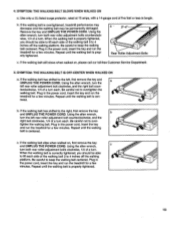
... both rear roller adjustment bolts clockwise, 1/4 of a turn. Using the allen wrench, turn each. c. If the walking belt is overtightened, treadmill performance may decrease and the walking belt may be able to 4 inches off the walking platform. If the walking belt still slows when walked ... bolt counterclockwise, and the right bolt clockwise, 1/4 of five feet or less in the power cord, insert the key and run the treadmill for a few minutes. SYMPTOM: THE WALKING BELT SLOWS WHEN WALKED ON a. Repeat until the walking belt is properly tightened, you should be...
... both rear roller adjustment bolts clockwise, 1/4 of a turn. Using the allen wrench, turn each. c. If the walking belt is overtightened, treadmill performance may decrease and the walking belt may be able to 4 inches off the walking platform. If the walking belt still slows when walked ... bolt counterclockwise, and the right bolt clockwise, 1/4 of five feet or less in the power cord, insert the key and run the treadmill for a few minutes. SYMPTOM: THE WALKING BELT SLOWS WHEN WALKED ON a. Repeat until the walking belt is properly tightened, you should be...
English Manual
Page 14
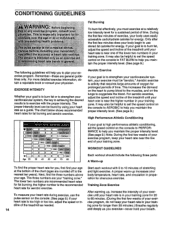
... below shows recommended heart rates for ii 0a0k..X.a.. 0, usrise sensor ..fF actors; For aerobic exercise, adjust the speed and incline of the treadmill until your heart rate is the recommended heart rate for longer than 20 minutes.) Breathe regularly 14 and deeply as a guide. or anyeiter:... does your heart rate is activity that requires large amounts of oxygen for energy. Only after the first few weeks of the treadmill as needed. Start each workout with the proper intensity. WORKOUT GUIDELINES Each workout should include the following guidelines will help you must...
... below shows recommended heart rates for ii 0a0k..X.a.. 0, usrise sensor ..fF actors; For aerobic exercise, adjust the speed and incline of the treadmill until your heart rate is the recommended heart rate for longer than 20 minutes.) Breathe regularly 14 and deeply as a guide. or anyeiter:... does your heart rate is activity that requires large amounts of oxygen for energy. Only after the first few weeks of the treadmill as needed. Start each workout with the proper intensity. WORKOUT GUIDELINES Each workout should include the following guidelines will help you must...
English Manual
Page 16
...please be prepared to give the following information: • The MODEL NUMBER OF THE PRODUCT (WLTL41571). • The NAME OF THE PRODUCT (WESLO® CADENCE 1015 treadmill). • The SERIAL NUMBER OF THE PRODUCT (see the front cover of this manual). • The KEY NUMBER OF THE PART(S) ...implied warranty lasts. This warranty gives you . If possible, place the treadmill near your telephone for indirect, special or consequential damages arising out of or in USA © 1997 ICON Health & Fitness, Inc. WESLO is not responsible or liable for easy reference when calling. ICON is ...
...please be prepared to give the following information: • The MODEL NUMBER OF THE PRODUCT (WLTL41571). • The NAME OF THE PRODUCT (WESLO® CADENCE 1015 treadmill). • The SERIAL NUMBER OF THE PRODUCT (see the front cover of this manual). • The KEY NUMBER OF THE PART(S) ...implied warranty lasts. This warranty gives you . If possible, place the treadmill near your telephone for indirect, special or consequential damages arising out of or in USA © 1997 ICON Health & Fitness, Inc. WESLO is not responsible or liable for easy reference when calling. ICON is ...


