

Uk Manual
Page 1
Save this equipment. As a manufacturer, we are missing or damaged parts, please call: 08457 089 009 Or write: ICON Health & Fitness, Ltd. Unit 4 Revie Road Industrial Estate Revie Road, Beeston Leeds, LS11 8JG UK [email protected] CAUTION Read all precautions and instructions in this manual before using this manual for future reference. WETL21020 Serial No. If you have questions, or if there are committed to providing complete customer satisfaction. Visit our website at www.iconeurope.com Model No. Serial Number Decal USER'S MANUAL QUESTIONS?
Save this equipment. As a manufacturer, we are missing or damaged parts, please call: 08457 089 009 Or write: ICON Health & Fitness, Ltd. Unit 4 Revie Road Industrial Estate Revie Road, Beeston Leeds, LS11 8JG UK [email protected] CAUTION Read all precautions and instructions in this manual before using this manual for future reference. WETL21020 Serial No. If you have questions, or if there are committed to providing complete customer satisfaction. Visit our website at www.iconeurope.com Model No. Serial Number Decal USER'S MANUAL QUESTIONS?

Uk Manual
Page 2
... extension cord is needed, use the treadmill with at all warnings and precautions. 2. TABLE OF CONTENTS IMPORTANT PRECAUTIONS 2 BEFORE YOU BEGIN 4 ASSEMBLY 5 OPERATION AND ADJUSTMENT 7 HOW TO FOLD AND MOVE THE TREADMILL 10 MAINTENANCE AND TROUBLESHOOTING 12 CONDITIONING GUIDELINES 14 ORDERING REPLACEMENT PARTS Back Cover Note: An EXPLODED DRAWING and a PART LIST are attached in sandals. 10. Place the treadmill on page 4 if the treadmill is turned off. Athletic support clothes...
... extension cord is needed, use the treadmill with at all warnings and precautions. 2. TABLE OF CONTENTS IMPORTANT PRECAUTIONS 2 BEFORE YOU BEGIN 4 ASSEMBLY 5 OPERATION AND ADJUSTMENT 7 HOW TO FOLD AND MOVE THE TREADMILL 10 MAINTENANCE AND TROUBLESHOOTING 12 CONDITIONING GUIDELINES 14 ORDERING REPLACEMENT PARTS Back Cover Note: An EXPLODED DRAWING and a PART LIST are attached in sandals. 10. Place the treadmill on page 4 if the treadmill is turned off. Athletic support clothes...
Uk Manual
Page 3
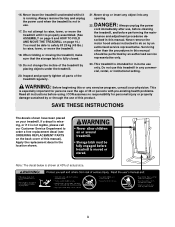
... at 40% of the treadmill by an authorised service representative. Inspect and properly tighten all instructions before performing the main- Apply the replacement decal in -home use of the treadmill regularly. 21. Always remove the key and unplug the power cord when the treadmill is fully closed. 19. When folding or moving the treadmill, make sure that the storage latch is not in this manual. Never drop or insert...
... at 40% of the treadmill by an authorised service representative. Inspect and properly tighten all instructions before performing the main- Apply the replacement decal in -home use of the treadmill regularly. 21. Always remove the key and unplug the power cord when the treadmill is fully closed. 19. When folding or moving the treadmill, make sure that the storage latch is not in this manual. Never drop or insert...

Uk Manual
Page 4
... your benefit, read this manual for selecting the WESLO CADENCE® 630 treadmill. Water Bottle Holder (Bottle not included) Console Key/Clip LEFT SIDE Handrail RIGHT SIDE Walking Belt Foot Pad Rear Roller Adjustment Bolts Incline Leg Hood Front Wheel Circuit Breaker 4 For your home. If you for the location). The serial number can be found on a decal attached to let you enjoy an excellent form of cardiovascular exercise in the convenience and...
... your benefit, read this manual for selecting the WESLO CADENCE® 630 treadmill. Water Bottle Holder (Bottle not included) Console Key/Clip LEFT SIDE Handrail RIGHT SIDE Walking Belt Foot Pad Rear Roller Adjustment Bolts Incline Leg Hood Front Wheel Circuit Breaker 4 For your home. If you for the location). The serial number can be found on a decal attached to let you enjoy an excellent form of cardiovascular exercise in the convenience and...
Uk Manual
Page 5
Set the treadmill in the power cord until assembly is coated with a soft cloth and a mild, non-abrasive cleaner. Note: The underside of the packing materials until the treadmill is lubricant on top of the walking belt, simply wipe off the lubricant with high-performance lubricant. This does not affect treadmill performance. WARNING: Do not plug in a cleared area and remove all four Handrail Nuts...
Set the treadmill in the power cord until assembly is coated with a soft cloth and a mild, non-abrasive cleaner. Note: The underside of the packing materials until the treadmill is lubricant on top of the walking belt, simply wipe off the lubricant with high-performance lubricant. This does not affect treadmill performance. WARNING: Do not plug in a cleared area and remove all four Handrail Nuts...
Uk Manual
Page 6
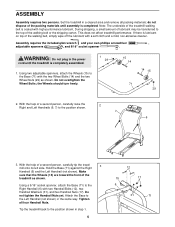
... use the treadmill. Make sure that all parts are recommended. 4. Then, tighten the three Screws. 6 55 41 5 69 7 41 69 Hole 7 7. Close the battery 8 cover, push up on the tab, and then push the tab forward as shown. To install batteries, 7 first touch the Handrail (6) to the vertical position. 9 7 6. Loosen the two Console Bolts (9) underneath the Console (1), and rotate the Console to adjust the walking belt...
... use the treadmill. Make sure that all parts are recommended. 4. Then, tighten the three Screws. 6 55 41 5 69 7 41 69 Hole 7 7. Close the battery 8 cover, push up on the tab, and then push the tab forward as shown. To install batteries, 7 first touch the Handrail (6) to the vertical position. 9 7 6. Loosen the two Console Bolts (9) underneath the Console (1), and rotate the Console to adjust the walking belt...

Uk Manual
Page 7
... ferrite box around the power cord. Check with all local codes and ordinances. Such substances will deteriorate the walking belt and cause excessive wear. Important: The treadmill is damaged, it should malfunction or break down, earthing provides a path of least resistance for electric 1 current to the walking belt or the walking platform. This product is properly installed and earthed in doubt...
... ferrite box around the power cord. Check with all local codes and ordinances. Such substances will deteriorate the walking belt and cause excessive wear. Important: The treadmill is damaged, it should malfunction or break down, earthing provides a path of least resistance for electric 1 current to the walking belt or the walking platform. This product is properly installed and earthed in doubt...

Uk Manual
Page 8
..., insert the key into the power switch. If the key is pulled from the console, adjust the position of the clip as needed. The display will already be on the power. • Always wear the clip (see the drawing above ) whilst operating the treadmill. Then, remove the key from the console, the walking belt will not turn on the console and use only a sealable water bottle. Speed Control Key Clip CAUTION...
..., insert the key into the power switch. If the key is pulled from the console, adjust the position of the clip as needed. The display will already be on the power. • Always wear the clip (see the drawing above ) whilst operating the treadmill. Then, remove the key from the console, the walking belt will not turn on the console and use only a sealable water bottle. Speed Control Key Clip CAUTION...

Uk Manual
Page 9
... incline pin. CAUTION: Before using the treadmill, make sure that the walking belt is stopped and the ON/RESET button is not pressed for a few minutes after the key is currently displayed. After you are finished exercising, stop the walking belt, step onto the foot pads and turn off a few minutes. Carefully step onto the walking belt and begin walking. Before changing the incline, remove the key and unplug the power cord. Make sure that the incline pin is stopped, the speed control...
... incline pin. CAUTION: Before using the treadmill, make sure that the walking belt is stopped and the ON/RESET button is not pressed for a few minutes after the key is currently displayed. After you are finished exercising, stop the walking belt, step onto the foot pads and turn off a few minutes. Carefully step onto the walking belt and begin walking. Before changing the incline, remove the key and unplug the power cord. Make sure that the incline pin is stopped, the speed control...

Uk Manual
Page 10
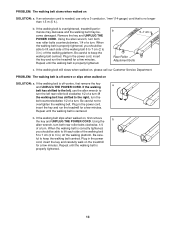
... treadmill until it back. HOW TO FOLD AND MOVE THE TREADMILL HOW TO FOLD THE TREADMILL FOR STORAGE Unplug the power cord. Raise the treadmill about halfway to the desired location. Slide the latch pin into the slot in the inset drawing. Keep the treadmill out of the pin into the hole. Tilt the treadmill back until the latch pin is resting in order to raise, lower, or move the treadmill...
... treadmill until it back. HOW TO FOLD AND MOVE THE TREADMILL HOW TO FOLD THE TREADMILL FOR STORAGE Unplug the power cord. Raise the treadmill about halfway to the desired location. Slide the latch pin into the slot in the inset drawing. Keep the treadmill out of the pin into the hole. Tilt the treadmill back until the latch pin is resting in order to raise, lower, or move the treadmill...

Uk Manual
Page 11
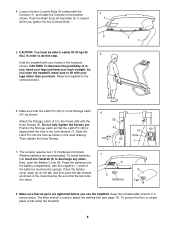
Lock the pin in place by pressing the end of injury, bend your legs and keep your back straight. Hold the treadmill firmly with your left hand, slide the latch pin to the floor. HOW TO LOWER THE TREADMILL FOR USE 1. Using your right hand as shown in the storage latch as shown. Latch Pin Slot 11 Hold the upper end of the treadmill with both hands, and lower the treadmill to the right. To decrease the possibility of the pin into the slot in the inset drawing. 2.
Lock the pin in place by pressing the end of injury, bend your legs and keep your back straight. Hold the treadmill firmly with your left hand, slide the latch pin to the floor. HOW TO LOWER THE TREADMILL FOR USE 1. Using your right hand as shown in the storage latch as shown. Latch Pin Slot 11 Hold the upper end of the treadmill with both hands, and lower the treadmill to the right. To decrease the possibility of the pin into the slot in the inset drawing. 2.
Uk Manual
Page 12
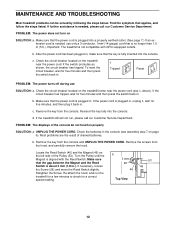
.... Check the batteries in . Remove the key from the hood, and carefully remove the hood. Remove the screws from the console and UNPLUG THE POWER CORD. Check the circuit breaker located on the treadmill near the power cord (see assembly step 7 on the left side of drained batteries. c Tripped Reset Tripped Reset PROBLEM: The power turns off during use only a 3-conductor, 1mm2 (14-gauge) cord that the gap between the Magnet and the Reed Switch is no...
.... Check the batteries in . Remove the key from the hood, and carefully remove the hood. Remove the screws from the console and UNPLUG THE POWER CORD. Check the circuit breaker located on the treadmill near the power cord (see assembly step 7 on the left side of drained batteries. c Tripped Reset Tripped Reset PROBLEM: The power turns off during use only a 3-conductor, 1mm2 (14-gauge) cord that the gap between the Magnet and the Reed Switch is no...
Uk Manual
Page 13
... walking platform. Be care- Remove the key and UNPLUG THE POWER CORD. Repeat until the walking belt is properly tightened. 13 PROBLEM: The walking belt is properly tightened. If the walking belt slips when walked on SOLUTION: a. Be careful to 3 in the power cord, insert the key and run the treadmill for a few minutes. b. Using the allen wrench, turn both rear roller bolts clockwise, 1/4 of a turn both rear roller bolts counterclockwise, 1/4 of the walking belt 5 to 7 cm (2 to keep the walking belt centred. Plug...
... walking platform. Be care- Remove the key and UNPLUG THE POWER CORD. Repeat until the walking belt is properly tightened. 13 PROBLEM: The walking belt is properly tightened. If the walking belt slips when walked on SOLUTION: a. Be careful to 3 in the power cord, insert the key and run the treadmill for a few minutes. b. Using the allen wrench, turn both rear roller bolts clockwise, 1/4 of a turn both rear roller bolts counterclockwise, 1/4 of the walking belt 5 to 7 cm (2 to keep the walking belt centred. Plug...
Uk Manual
Page 14
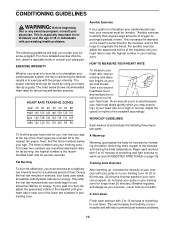
... page 15). WORKOUT GUIDELINES To find your heart rate. (A six-second count is used because your heart rate drops quickly when you stop exercising and place two fingers on the lungs to use stored fat calories for prolonged periods of exercise, your wrist as a guide. If your goal is to burn fat, adjust the speed and incline of the treadmill until your pulse is especially important...
... page 15). WORKOUT GUIDELINES To find your heart rate. (A six-second count is used because your heart rate drops quickly when you stop exercising and place two fingers on the lungs to use stored fat calories for prolonged periods of exercise, your wrist as a guide. If your goal is to burn fat, adjust the speed and incline of the treadmill until your pulse is especially important...

Uk Manual
Page 15
...Hamstrings, lower back, and groin. 3 3. Stretches: Quadriceps and hip muscles. 1 2 4 Hold for 15 counts, then relax. tween workouts. After a few months, you may complete up to relax as well. SUGGESTED STRETCHES The correct form for balance, reach back and grasp one leg extended....move your back foot flat on the floor. To cause further stretching of the other hand. Quadriceps Stretch With one leg in front of the achilles tendons, bend your but- Bring your hands against the inner thigh of rest be- tocks as close to make exercise a regular and enjoyable part...
...Hamstrings, lower back, and groin. 3 3. Stretches: Quadriceps and hip muscles. 1 2 4 Hold for 15 counts, then relax. tween workouts. After a few months, you may complete up to relax as well. SUGGESTED STRETCHES The correct form for balance, reach back and grasp one leg extended....move your back foot flat on the floor. To cause further stretching of the other hand. Quadriceps Stretch With one leg in front of the achilles tendons, bend your but- Bring your hands against the inner thigh of rest be- tocks as close to make exercise a regular and enjoyable part...
Uk Manual
Page 16
... give the following information: • the MODEL NUMBER of the product (WETL21020) • the NAME of the product (WESLO® CADENCE 630 treadmill) • the SERIAL NUMBER of the product (see the front cover of this manual) • the KEY NUMBER and DESCRIPTION of the part(s) (see the PART LIST and the EXPLODED DRAWING in USA © 2002 ICON Health & Fitness, Inc. office, or write: ICON Health & Fitness, Ltd. Customer Service Department Unit...
... give the following information: • the MODEL NUMBER of the product (WETL21020) • the NAME of the product (WESLO® CADENCE 630 treadmill) • the SERIAL NUMBER of the product (see the front cover of this manual) • the KEY NUMBER and DESCRIPTION of the part(s) (see the PART LIST and the EXPLODED DRAWING in USA © 2002 ICON Health & Fitness, Inc. office, or write: ICON Health & Fitness, Ltd. Customer Service Department Unit...
Uk Manual
Page 17
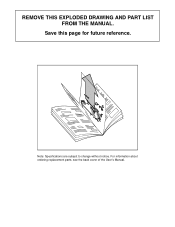
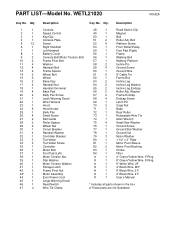
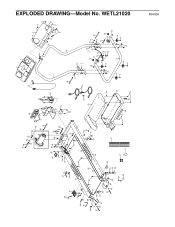
For information about ordering replacement parts, see the back cover of the User's Manual. 34 Note: Specifications are subject to change without notice. Save this page for future reference. REMOVE THIS EXPLODED DRAWING AND PART LIST FROM THE MANUAL.
For information about ordering replacement parts, see the back cover of the User's Manual. 34 Note: Specifications are subject to change without notice. Save this page for future reference. REMOVE THIS EXPLODED DRAWING AND PART LIST FROM THE MANUAL.
Uk Manual
Page 18
... Battery Cover Console Bolt/Motor Tension Bolt Frame Pivot Bolt Washer Handrail Bolt Frame Spacer Wheel Bolt Wheel Base Cap Handrail Nut Handrail Grommet Base Pad Belly Pan Screw Latch Warning Decal Wire Harness Hood Hood Screw Belly Pan Small Screw Belt Guide Roller Spacer Wheel Nut Circuit Breaker Handrail Washer Controller Bracket Tie Holder Tie Holder Screw Controller Motor Bolt Foot Pad (Left) Motor Tension Nut Star Washer Motor Tension Washer Storage Latch Frame Pivot Nut Motor Assembly Euro Power Cord...
... Battery Cover Console Bolt/Motor Tension Bolt Frame Pivot Bolt Washer Handrail Bolt Frame Spacer Wheel Bolt Wheel Base Cap Handrail Nut Handrail Grommet Base Pad Belly Pan Screw Latch Warning Decal Wire Harness Hood Hood Screw Belly Pan Small Screw Belt Guide Roller Spacer Wheel Nut Circuit Breaker Handrail Washer Controller Bracket Tie Holder Tie Holder Screw Controller Motor Bolt Foot Pad (Left) Motor Tension Nut Star Washer Motor Tension Washer Storage Latch Frame Pivot Nut Motor Assembly Euro Power Cord...
Uk Manual
Page 19
EXPLODED DRAWING-Model No. WETL21020 41 40 81 79 3 35 79 38 43* 82 5 36 24 5 1 2 70 54 5 5 27 69 41 26 37 5 58 74 21 80 68 72 51 63 66 67 64 65 51 66 52 80 67 68 59 56 57 63 64 65 60 46 26 42 82 39 50 48 28 49 75 34 33 53 42 75 52 52 54 28 24 27 26 55 58 61 47 73 83 7 32 84 5 11 5 11 8 9 24 20 45 62 23 30 10 6 44 24 25 20 11 75 13 12 13 29 16 18 15 14 22 19 76 31 5 77 17 78 75 11 10 12 14 16 15 29 19 71 5 19 5 19 5 31 17 R0402A
EXPLODED DRAWING-Model No. WETL21020 41 40 81 79 3 35 79 38 43* 82 5 36 24 5 1 2 70 54 5 5 27 69 41 26 37 5 58 74 21 80 68 72 51 63 66 67 64 65 51 66 52 80 67 68 59 56 57 63 64 65 60 46 26 42 82 39 50 48 28 49 75 34 33 53 42 75 52 52 54 28 24 27 26 55 58 61 47 73 83 7 32 84 5 11 5 11 8 9 24 20 45 62 23 30 10 6 44 24 25 20 11 75 13 12 13 29 16 18 15 14 22 19 76 31 5 77 17 78 75 11 10 12 14 16 15 29 19 71 5 19 5 19 5 31 17 R0402A


