
Canadian English Manual
Page 1
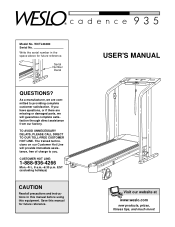
.... USER'S MANUAL Visit our website at www.weslo.com new products, prizes, fitness tips, and much more! Write the serial number in this manual before using this manual for future reference. Save this equipment. WCTL26080 Serial No. If you . TO AVOID UNNECESSARY DELAYS, PLEASE CALL DIRECT TO OUR TOLL-FREE CUSTOMER HOT LINE. EST (excluding holidays) CAUTION Read all precautions and instructions in...
.... USER'S MANUAL Visit our website at www.weslo.com new products, prizes, fitness tips, and much more! Write the serial number in this manual before using this manual for future reference. Save this equipment. WCTL26080 Serial No. If you . TO AVOID UNNECESSARY DELAYS, PLEASE CALL DIRECT TO OUR TOLL-FREE CUSTOMER HOT LINE. EST (excluding holidays) CAUTION Read all precautions and instructions in...
Canadian English Manual
Page 2
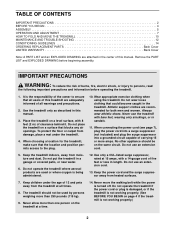
... operating the treadmill. 1. When connecting the power cord (see page 7), plug the power cord into a surge suppressor (not included) and plug the surge suppressor into a grounded circuit capable of all times. 8. TABLE OF CONTENTS IMPORTANT PRECAUTIONS 2 BEFORE YOU BEGIN 4 ASSEMBLY 5 OPERATION AND ADJUSTMENT 7 HOW TO FOLD AND MOVE THE TREADMILL 10 MAINTENANCE AND TROUBLE-SHOOTING 12 CONDITIONING GUIDELINES 14 ORDERING REPLACEMENT PARTS Back Cover LIMITED WARRANTY Back Cover Note: A PART LIST and an...
... operating the treadmill. 1. When connecting the power cord (see page 7), plug the power cord into a surge suppressor (not included) and plug the surge suppressor into a grounded circuit capable of all times. 8. TABLE OF CONTENTS IMPORTANT PRECAUTIONS 2 BEFORE YOU BEGIN 4 ASSEMBLY 5 OPERATION AND ADJUSTMENT 7 HOW TO FOLD AND MOVE THE TREADMILL 10 MAINTENANCE AND TROUBLE-SHOOTING 12 CONDITIONING GUIDELINES 14 ORDERING REPLACEMENT PARTS Back Cover LIMITED WARRANTY Back Cover Note: A PART LIST and an...
Canadian English Manual
Page 3
... exercise program, consult your treadmill. Do not change the incline of this manual should be able to raise, lower, or move the treadmill. 21. DANGER: 24. Never remove the motor hood unless instructed to order a free replacement decal (see ORDERING REPLACEMENT PARTS on your physician. Do not use only. The pulse sensor is fully closed. 22. Inspect and tighten all instructions before performing the maintenance and adjustment procedures described in any opening. This treadmill is running. ICON...
... exercise program, consult your treadmill. Do not change the incline of this manual should be able to raise, lower, or move the treadmill. 21. DANGER: 24. Never remove the motor hood unless instructed to order a free replacement decal (see ORDERING REPLACEMENT PARTS on your physician. Do not use only. The pulse sensor is fully closed. 22. Inspect and tighten all instructions before performing the maintenance and adjustment procedures described in any opening. This treadmill is running. ICON...
Canadian English Manual
Page 4
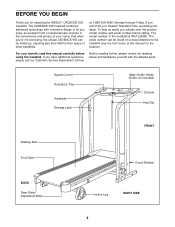
... WESLO® CADENCE 935 treadmill. until 6:30 p.m. If you enjoy an excellent form of cardiovascular exercise in the convenience and privacy of this manual carefully before calling. For your home. Eastern Standard Time (excluding holidays). To help us assist you for the location). Speed Control Accessory Tray Handrails Storage Latch Water Bottle Holder (Bottle not included) Console Key/Clip Walking Belt Foot Rails FRONT Circuit Breaker BACK Rear Roller Adjustment Bolts Incline Leg...
... WESLO® CADENCE 935 treadmill. until 6:30 p.m. If you enjoy an excellent form of cardiovascular exercise in the convenience and privacy of this manual carefully before calling. For your home. Eastern Standard Time (excluding holidays). To help us assist you for the location). Speed Control Accessory Tray Handrails Storage Latch Water Bottle Holder (Bottle not included) Console Key/Clip Walking Belt Foot Rails FRONT Circuit Breaker BACK Rear Roller Adjustment Bolts Incline Leg...
Canadian English Manual
Page 5
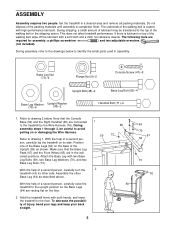
... treadmill on or damaging the Wire Harness. During assembly, refer to identify the small parts used in a cleared area and remove all packing materials. During assembly steps 1 through 3, be transferred to drawing 1. Assemble the other side. ASSEMBLY Assembly requires two people. This does not affect treadmill performance. Base Leg Nut (73)-4 Flange Nut (9)-2 Console Screw (47)-8 Upright Bolt (48)-2 Base Leg Bolt (69)-4 Base Leg Washer (70)-6 Upright Washer (38)-2 Handrail Bolt...
... treadmill on or damaging the Wire Harness. During assembly, refer to identify the small parts used in a cleared area and remove all packing materials. During assembly steps 1 through 3, be transferred to drawing 1. Assemble the other side. ASSEMBLY Assembly requires two people. This does not affect treadmill performance. Base Leg Nut (73)-4 Flange Nut (9)-2 Console Screw (47)-8 Upright Bolt (48)-2 Base Leg Bolt (69)-4 Base Leg Washer (70)-6 Upright Washer (38)-2 Handrail Bolt...
Canadian English Manual
Page 6
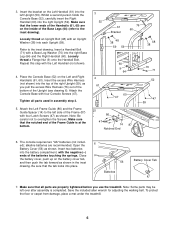
... Leg (64) and the Right Handrail (60). Be sure that all parts used in the inset 56 drawing. Loosely thread an Upright Bolt (48) with four Latch Screws (47) as shown in assembly step 3. 5. Insert a Handrail Bolt (71) with the negative (-) ends of the batteries touching the springs. Attach the Left Frame Guide (86) and the Frame Guide Spacer (14) to the inset drawing). Batteries Battery Cover...
... Leg (64) and the Right Handrail (60). Be sure that all parts used in the inset 56 drawing. Loosely thread an Upright Bolt (48) with four Latch Screws (47) as shown in assembly step 3. 5. Insert a Handrail Bolt (71) with the negative (-) ends of the batteries touching the springs. Attach the Left Frame Guide (86) and the Frame Guide Spacer (14) to the inset drawing). Batteries Battery Cover...
Canadian English Manual
Page 7
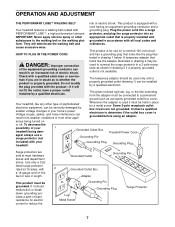
... treadmill features a walking belt coated with all local codes and form. To decrease the possibility of least resistance for use a surge protector (not Grounded Outlet Box Grounding Pin Treadmill Power Cord included) with the product-if it should be used it must be DANGER: Improper connection of the equipment-grounding conductor can result from weather conditions or from the adapter must be installed by a metal screw...
... treadmill features a walking belt coated with all local codes and form. To decrease the possibility of least resistance for use a surge protector (not Grounded Outlet Box Grounding Pin Treadmill Power Cord included) with the product-if it should be used it must be DANGER: Improper connection of the equipment-grounding conductor can result from weather conditions or from the adapter must be installed by a metal screw...
Canadian English Manual
Page 8
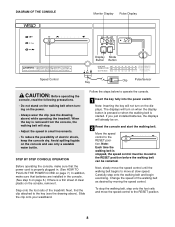
... operate the console. 1 Insert the key fully into the power switch. To stop . • Adjust the speed in the console. (See step 6 on page 6.) If there is removed from the console, the walking belt will already be restarted. Change the speed of the treadmill. When the key is a thin sheet of electric shock, keep the console dry. Next, find the clip attached to the RESET position. DIAGRAM OF THE CONSOLE Monitor Display Pulse Display Display Mode Button Button Speed Control Key Clip Pulse Sensor CAUTION...
... operate the console. 1 Insert the key fully into the power switch. To stop . • Adjust the speed in the console. (See step 6 on page 6.) If there is removed from the console, the walking belt will already be restarted. Change the speed of the treadmill. When the key is a thin sheet of electric shock, keep the console dry. Next, find the clip attached to the RESET position. DIAGRAM OF THE CONSOLE Monitor Display Pulse Display Display Mode Button Button Speed Control Key Clip Pulse Sensor CAUTION...

Canadian English Manual
Page 9
... not using the pulse sensor, a "P" will appear by the scan icon. Try the sensor several times until you are applying the proper amount of miles or kilometres you stop exercising for five seconds each, in the display and your pulse. 5 Turn off the sensor and allow the display to stand still whilst measuring your pulse will not be individually selected. To reset the display, press the display button. 4 Measure...
... not using the pulse sensor, a "P" will appear by the scan icon. Try the sensor several times until you are applying the proper amount of miles or kilometres you stop exercising for five seconds each, in the display and your pulse. 5 Turn off the sensor and allow the display to stand still whilst measuring your pulse will not be individually selected. To reset the display, press the display button. 4 Measure...

Canadian English Manual
Page 10
... treadmill can display distance and speed in order to the console base. Locate the small switch on the wires, and turn the console over. Move the switch upward or downward to the "fat burn" position. Re-attach the console to raise, lower, or move the treadmill. 1. This will reset the console. cap with your legs rather than your exercise, the incline of the batteries from the console for maximum fat burning. HOW TO FOLD AND MOVE...
... treadmill can display distance and speed in order to the console base. Locate the small switch on the wires, and turn the console over. Move the switch upward or downward to the "fat burn" position. Re-attach the console to raise, lower, or move the treadmill. 1. This will reset the console. cap with your legs rather than your exercise, the incline of the batteries from the console for maximum fat burning. HOW TO FOLD AND MOVE...

Canadian English Manual
Page 11
... move the treadmill without tipping it rolls freely on page 10. 2. Tilt the treadmill back until the storage latch locks over the frame guide. 1. HOW TO LOWER THE TREADMILL FOR USE 1. To protect the floor or carpet from damage, place a mat under the treadmill. Hold the upper ends of direct sunlight. If necessary, turn the incline leg as you raise the treadmill. 2. If necessary, turn the incline leg...
... move the treadmill without tipping it rolls freely on page 10. 2. Tilt the treadmill back until the storage latch locks over the frame guide. 1. HOW TO LOWER THE TREADMILL FOR USE 1. To protect the floor or carpet from damage, place a mat under the treadmill. Hold the upper ends of direct sunlight. If necessary, turn the incline leg as you raise the treadmill. 2. If necessary, turn the incline leg...
Canadian English Manual
Page 12
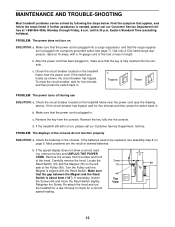
... breaker has tripped, wait for five minutes and then press the switch back in the console. Make sure that applies, and follow the steps listed. MAINTENANCE AND TROUBLE-SHOOTING Most treadmill problems can be replaced, see assembly step 6 on page 6. Retighten the Screw. until the Magnet is plugged into the console. PROBLEM: The displays of the hood. If the speed display does not show a correct reading, remove the key and UNPLUG THE POWER CORD.
... breaker has tripped, wait for five minutes and then press the switch back in the console. Make sure that applies, and follow the steps listed. MAINTENANCE AND TROUBLE-SHOOTING Most treadmill problems can be replaced, see assembly step 6 on page 6. Retighten the Screw. until the Magnet is plugged into the console. PROBLEM: The displays of the hood. If the speed display does not show a correct reading, remove the key and UNPLUG THE POWER CORD.

Canadian English Manual
Page 13
... walking platform. If the walking belt slips when walked on SOLUTION: a. Repeat until the walking belt is overtightened, treadmill performance may decrease and the walking belt may be able to lift each side of the walking belt 5 to overtighten the walking belt. Using the allen wrench, turn both rear roller adjust- PROBLEM: The walking belt is properly tightened. ment bolt clockwise, and the right bolt counterclock- b Using the allen wrench, turn the left rear roller adjust- Plug in the power cord, insert the key...
... walking platform. If the walking belt slips when walked on SOLUTION: a. Repeat until the walking belt is overtightened, treadmill performance may decrease and the walking belt may be able to lift each side of the walking belt 5 to overtighten the walking belt. Using the allen wrench, turn both rear roller adjust- PROBLEM: The walking belt is properly tightened. ment bolt clockwise, and the right bolt counterclock- b Using the allen wrench, turn the left rear roller adjust- Plug in the power cord, insert the key...
Canadian English Manual
Page 14
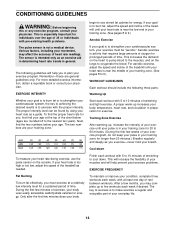
... use the pulse sensor on the lungs to 9.) WORKOUT GUIDELINES Each workout should include the following guidelines will help you may affect the accuracy of your exercise program, do not keep your pulse in your heart rate is intended only as a guide. For aerobic exercise, adjust the speed and incline of the treadmill until your training zone for longer than 20 minutes.) Breathe regularly and deeply as needed...
... use the pulse sensor on the lungs to 9.) WORKOUT GUIDELINES Each workout should include the following guidelines will help you may affect the accuracy of your exercise program, do not keep your pulse in your heart rate is intended only as a guide. For aerobic exercise, adjust the speed and incline of the treadmill until your training zone for longer than 20 minutes.) Breathe regularly and deeply as needed...

Canadian English Manual
Page 15
...floor. To cause further stretching of your feet together and your hips toward your back leg as you stretch-never bounce. 1. SUGGESTED STRETCHES The correct form for both legs. Stretches: Hamstrings, lower back and groin. 3 3. Allow your back and shoulders to your groin area as ...it against a wall. Calf/Achilles Stretch With one leg extended. Repeat 3 times. Hold for both legs. Keep your back leg straight and your hands against the inner thigh of knees and back. 2. Bend your front leg, lean forward and move your knees outward. Hold for 15 counts, then...
...floor. To cause further stretching of your feet together and your hips toward your back leg as you stretch-never bounce. 1. SUGGESTED STRETCHES The correct form for both legs. Stretches: Hamstrings, lower back and groin. 3 3. Allow your back and shoulders to your groin area as ...it against a wall. Calf/Achilles Stretch With one leg extended. Repeat 3 times. Hold for both legs. Keep your back leg straight and your hands against the inner thigh of knees and back. 2. Bend your front leg, lean forward and move your knees outward. Hold for 15 counts, then...
Canadian English Manual
Page 16
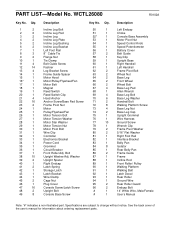
... Rear Belly Pan Frame Guide Frame Incline Rod Front Roller/ Pulley Walking Platform Walking Belt Latch Decal Rear Roller Ground Wire Rear Roller Guard Endcap Bolt 14" White Wire, Male/Female User's Manual Note: "#" indicates a non-illustrated part. Washer Upright Spacer Right Endcap Latch Spring Storage Latch Latch Bracket Wire Clamp Cage Nut Plug Cover Console Screw/Latch Screw Upright Bolt Console Base Screw Key No. Specifications are subject to change without notice. Bolt Upright Washer/Adj. See the back cover of the user's manual for information about ordering replacement parts...
... Rear Belly Pan Frame Guide Frame Incline Rod Front Roller/ Pulley Walking Platform Walking Belt Latch Decal Rear Roller Ground Wire Rear Roller Guard Endcap Bolt 14" White Wire, Male/Female User's Manual Note: "#" indicates a non-illustrated part. Washer Upright Spacer Right Endcap Latch Spring Storage Latch Latch Bracket Wire Clamp Cage Nut Plug Cover Console Screw/Latch Screw Upright Bolt Console Base Screw Key No. Specifications are subject to change without notice. Bolt Upright Washer/Adj. See the back cover of the user's manual for information about ordering replacement parts...

Canadian English Manual
Page 17
Note: Specifications are subject to change without notice. For information about ordering replacement parts, see the back cover of the User's Manual. 34 REMOVE THIS EXPLODED DRAWING AND PART LIST FROM THE MANUAL Save this EXPLODED DRAWING and PART LIST for future reference.
Note: Specifications are subject to change without notice. For information about ordering replacement parts, see the back cover of the User's Manual. 34 REMOVE THIS EXPLODED DRAWING AND PART LIST FROM THE MANUAL Save this EXPLODED DRAWING and PART LIST for future reference.
Canadian English Manual
Page 18
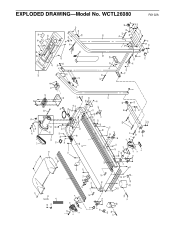
EXPLODED DRAWING-Model No. WCTL26080 26 29 47 27 47 28 17 49 52* 55 54 49 46 56 49 43 10 8 1 38 2 2 4 3 2 5 81 6 78 13 68 38 ...
EXPLODED DRAWING-Model No. WCTL26080 26 29 47 27 47 28 17 49 52* 55 54 49 46 56 49 43 10 8 1 38 2 2 4 3 2 5 81 6 78 13 68 38 ...
Canadian English Manual
Page 19
... (WESLO® CADENCE 935 treadmill) • The SERIAL NUMBER of the product (see the front cover of this manual) • The KEY NUMBER AND DESCRIPTION OF THE PART(S) (see the EXPLODED DRAWING and PART LIST attached in workmanship and material, under this manual). ICON is in Canada © 2002 ICON Health & Fitness, Inc. The warranty extended hereunder is not responsible or liable for commercial or rental purposes, or to replacing or repairing...
... (WESLO® CADENCE 935 treadmill) • The SERIAL NUMBER of the product (see the front cover of this manual) • The KEY NUMBER AND DESCRIPTION OF THE PART(S) (see the EXPLODED DRAWING and PART LIST attached in workmanship and material, under this manual). ICON is in Canada © 2002 ICON Health & Fitness, Inc. The warranty extended hereunder is not responsible or liable for commercial or rental purposes, or to replacing or repairing...


