
Canadian English Manual
Page 2
... 3. Do not operate the treadmill where aerosol products are adequately informed of all times. 8. Keep the power cord and the surge suppressor away from damage, place a mat under the age of 12 and pets away from moisture and dust. Never move the walking belt while the power is being ...administered. 12. Place the treadmill on page 4 if the treadmill is not working properly. (See BEFORE YOU BEGIN on a level surface, with bare feet, wearing only stockings,...
... 3. Do not operate the treadmill where aerosol products are adequately informed of all times. 8. Keep the power cord and the surge suppressor away from damage, place a mat under the age of 12 and pets away from moisture and dust. Never move the walking belt while the power is being ...administered. 12. Place the treadmill on page 4 if the treadmill is not working properly. (See BEFORE YOU BEGIN on a level surface, with bare feet, wearing only stockings,...
Canadian English Manual
Page 3
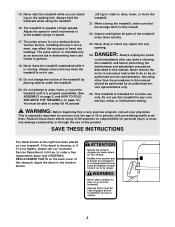
...19. Apply the decal in general. 18. WARNING: Before beginning this manual should be able to do so by placing objects under the treadmill. 20. Always hold the handrails while using . ICON assumes no responsibility for in order to avoid sudden jumps in this or any ...an authorized service representative only. 25. Do not attempt to order a free replacement decal (see ORDERING REPLACEMENT PARTS on the walking belt. When storing the treadmill, make sure that the storage latch is not a medical device. Servicing other than the procedures in speed. 17. This is ...
...19. Apply the decal in general. 18. WARNING: Before beginning this manual should be able to do so by placing objects under the treadmill. 20. Always hold the handrails while using . ICON assumes no responsibility for in order to avoid sudden jumps in this or any ...an authorized service representative only. 25. Do not attempt to order a free replacement decal (see ORDERING REPLACEMENT PARTS on the walking belt. When storing the treadmill, make sure that the storage latch is not a medical device. Servicing other than the procedures in speed. 17. This is ...
Canadian English Manual
Page 4
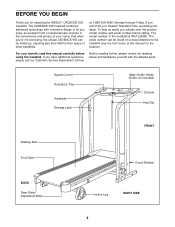
... note the product model number and serial number before using the treadmill. Speed Control Accessory Tray Handrails Storage Latch Water Bottle Holder (Bottle not included) Console Key/Clip Walking Belt Foot Rails FRONT Circuit Breaker BACK Rear Roller Adjustment Bolts Incline ... below and familiarize yourself with innovative design to the treadmill (see the front cover of other treadmills. The model number of your benefit, read this manual for selecting the WESLO® CADENCE 935 treadmill. The CADENCE 935 treadmill combines advanced technology with the labeled parts. To help...
... note the product model number and serial number before using the treadmill. Speed Control Accessory Tray Handrails Storage Latch Water Bottle Holder (Bottle not included) Console Key/Clip Walking Belt Foot Rails FRONT Circuit Breaker BACK Rear Roller Adjustment Bolts Incline ... below and familiarize yourself with innovative design to the treadmill (see the front cover of other treadmills. The model number of your benefit, read this manual for selecting the WESLO® CADENCE 935 treadmill. The CADENCE 935 treadmill combines advanced technology with the labeled parts. To help...
Canadian English Manual
Page 5
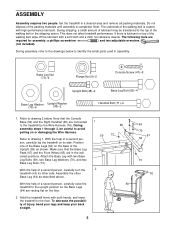
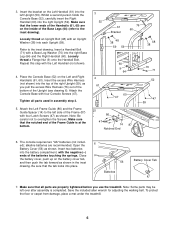
.... Refer to the top of lubricant may be careful to identify the small parts used in assembly. With the help of the walking belt, wipe off the lubricant with two Base Leg Bolts (69), two Base Leg Washers (70), and two Base Leg Nuts (73)....With the help of the walking belt is completed. Refer to the floor. Set the treadmill in the indicated positions. Note: The underside of a second person, carefully turn the treadmill onto its side. Hold the treadmill firmly with high-performance lubricant. This does not affect treadmill performance. Base Leg Nut (73...
.... Refer to the top of lubricant may be careful to identify the small parts used in assembly. With the help of the walking belt, wipe off the lubricant with two Base Leg Bolts (69), two Base Leg Washers (70), and two Base Leg Nuts (73)....With the help of the walking belt is completed. Refer to the floor. Set the treadmill in the indicated positions. Note: The underside of a second person, carefully turn the treadmill onto its side. Hold the treadmill firmly with high-performance lubricant. This does not affect treadmill performance. Base Leg Nut (73...
Canadian English Manual
Page 6
...Guide is completed. Insert the excess Wire Harness (not shown) into the right Upright (59). Save the included allen wrench for adjusting the walking belt. 3. Repeat this step with four Console Screws (47). Tighten all parts are properly tightened before you pull the excess Wire Harness (76) ... Note: Some parts may be left side of the batteries touching the springs. To protect the floor or carpet from damage, place a mat under the treadmill. 6 Loosely thread an Upright Bolt (48) with an Upright Washer (38) into the right Base Leg (64) and the Right Handrail (60). ...
...Guide is completed. Insert the excess Wire Harness (not shown) into the right Upright (59). Save the included allen wrench for adjusting the walking belt. 3. Repeat this step with four Console Screws (47). Tighten all parts are properly tightened before you pull the excess Wire Harness (76) ... Note: Some parts may be left side of the batteries touching the springs. To protect the floor or carpet from damage, place a mat under the treadmill. 6 Loosely thread an Upright Bolt (48) with an Upright Washer (38) into the right Base Leg (64) and the Right Handrail (60). ...
Canadian English Manual
Page 7
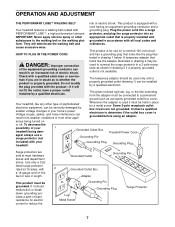
... other appropriate outlet that is equipped with a cord having an equipment-grounding conductor and a Your treadmill features a walking belt coated with the product-if it will deteriorate the walking belt and ordinances. If it must be grounded. Your treadmill, like the adapter illustrated in length. To decrease the possibility of electric shock. Do not...
... other appropriate outlet that is equipped with a cord having an equipment-grounding conductor and a Your treadmill features a walking belt coated with the product-if it will deteriorate the walking belt and ordinances. If it must be grounded. Your treadmill, like the adapter illustrated in length. To decrease the possibility of electric shock. Do not...
Canadian English Manual
Page 8
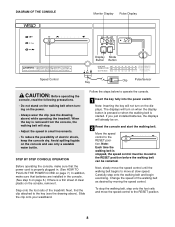
...the speed in the console. (See step 6 on the displays. Note: Each time the walking belt is a thin sheet of electric shock, keep the console dry. Change the speed of the treadmill. DIAGRAM OF THE CONSOLE Monitor Display Pulse Display Display Mode Button Button Speed Control Key Clip Pulse ... the console, read the following precautions. • Do not stand on the walking belt when turning on the power. • Always wear the clip (see the drawing above ) while operating the treadmill. STEP BY STEP CONSOLE OPERATION Before operating the console, make sure that the power cord...
...the speed in the console. (See step 6 on the displays. Note: Each time the walking belt is a thin sheet of electric shock, keep the console dry. Change the speed of the treadmill. DIAGRAM OF THE CONSOLE Monitor Display Pulse Display Display Mode Button Button Speed Control Key Clip Pulse ... the console, read the following precautions. • Do not stand on the walking belt when turning on the power. • Always wear the clip (see the drawing above ) while operating the treadmill. STEP BY STEP CONSOLE OPERATION Before operating the console, make sure that the power cord...

Canadian English Manual
Page 9
... in your thumb will be detected. Try the sensor several times until you have walked or run, up to be individually selected. If the walking belt is stationary and the console buttons are not using the pulse sensor, a "P" will show which mode is not displayed, lift your thumb off automatically. 9 Distance...
... in your thumb will be detected. Try the sensor several times until you have walked or run, up to be individually selected. If the walking belt is stationary and the console buttons are not using the pulse sensor, a "P" will show which mode is not displayed, lift your thumb off automatically. 9 Distance...

Canadian English Manual
Page 13
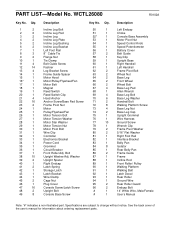
... adjustment bolts counterclockwise, 1/4 of a turn. Be careful to keep the walking belt centred. b. When the walking belt is properly tightened. Repeat until the walking belt is overtightened, treadmill performance may decrease and the walking belt may be permanently damaged. b 5-7 cm Rear Roller Adjustment Bolts c. Using the.... Plug in the power cord, insert the key and run the treadmill for a few minutes. When the walking belt is off-centre or slips when walked on SOLUTION: a. PROBLEM: The walking belt slows when walked on , first remove the key and UNPLUG THE ...
... adjustment bolts counterclockwise, 1/4 of a turn. Be careful to keep the walking belt centred. b. When the walking belt is properly tightened. Repeat until the walking belt is overtightened, treadmill performance may decrease and the walking belt may be permanently damaged. b 5-7 cm Rear Roller Adjustment Bolts c. Using the.... Plug in the power cord, insert the key and run the treadmill for a few minutes. When the walking belt is off-centre or slips when walked on SOLUTION: a. PROBLEM: The walking belt slows when walked on , first remove the key and UNPLUG THE ...
Canadian English Manual
Page 16
... # 1 # 1 R0102A Description Left Endcap Choke Console Base Assembly Motor Pivot Nut Speed Control Knob Speed Potentiometer Battery Cover Belt Guide Key/Clip Upright Base Right Handrail Left Handrail Frame Pivot Bolt Wheel Nut Base Leg Front Wheel Wheel Bolt Base Leg... 5/16" Flat Washer Right Foot Rail Interface Bracket Belly Pan Isolator Rear Belly Pan Frame Guide Frame Incline Rod Front Roller/ Pulley Walking Platform Walking Belt Latch Decal Rear Roller Ground Wire Rear Roller Guard Endcap Bolt 14" White Wire, Male/Female User's Manual Note: "#" indicates a non-illustrated part. Qty. 1...
... # 1 # 1 R0102A Description Left Endcap Choke Console Base Assembly Motor Pivot Nut Speed Control Knob Speed Potentiometer Battery Cover Belt Guide Key/Clip Upright Base Right Handrail Left Handrail Frame Pivot Bolt Wheel Nut Base Leg Front Wheel Wheel Bolt Base Leg... 5/16" Flat Washer Right Foot Rail Interface Bracket Belly Pan Isolator Rear Belly Pan Frame Guide Frame Incline Rod Front Roller/ Pulley Walking Platform Walking Belt Latch Decal Rear Roller Ground Wire Rear Roller Guard Endcap Bolt 14" White Wire, Male/Female User's Manual Note: "#" indicates a non-illustrated part. Qty. 1...


