
English Manual
Page 1
...instructions in the space above for future reference. The trained technicians on our customer hot line will guarantee complete satisfaction through direct assistance from our factory. Save this equipment. WLTL29200 Serial No. As a manufacturer, we are missing parts, we will provide immediate assistance, free... 6 a.m.Ð6 p.m. Write the serial number in this manual before using this manual for future reference. If you . USER'S MANUAL Visit our website at www.weslo.com new products, prizes, fitness tips, and much more! Serial Number Decal QUESTIONS? ¨ Model No.
...instructions in the space above for future reference. The trained technicians on our customer hot line will guarantee complete satisfaction through direct assistance from our factory. Save this equipment. WLTL29200 Serial No. As a manufacturer, we are missing parts, we will provide immediate assistance, free... 6 a.m.Ð6 p.m. Write the serial number in this manual before using this manual for future reference. If you . USER'S MANUAL Visit our website at www.weslo.com new products, prizes, fitness tips, and much more! Serial Number Decal QUESTIONS? ¨ Model No.
English Manual
Page 2
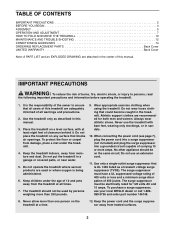
... volts or less and a minimum surge dissipation of this manual. 3. TABLE OF CONTENTS IMPORTANT PRECAUTIONS 2 BEFORE YOU BEGIN 4 ASSEMBLY 5 OPERATION AND ADJUSTMENT 7 HOW TO FOLD AND MOVE THE TREADMILL 10 MAINTENANCE AND TROUBLE-SHOOTING 12 CONDITIONING GUIDELINES 14 ORDERING REPLACEMENT PARTS Back Cover LIMITED WARRANTY Back Cover Note: A PART LIST and an EXPLODED DRAWING are attached in the treadmill. Use the treadmill only as a transient voltage surge suppressor (TVSS). Keep...
... volts or less and a minimum surge dissipation of this manual. 3. TABLE OF CONTENTS IMPORTANT PRECAUTIONS 2 BEFORE YOU BEGIN 4 ASSEMBLY 5 OPERATION AND ADJUSTMENT 7 HOW TO FOLD AND MOVE THE TREADMILL 10 MAINTENANCE AND TROUBLE-SHOOTING 12 CONDITIONING GUIDELINES 14 ORDERING REPLACEMENT PARTS Back Cover LIMITED WARRANTY Back Cover Note: A PART LIST and an EXPLODED DRAWING are attached in the treadmill. Use the treadmill only as a transient voltage surge suppressor (TVSS). Keep...

English Manual
Page 3
.... Never remove the motor hood unless instructed to raise, lower, or move the walking belt while the power is running. erty damage sustained by placing objects under the treadmill. 20. Never move the treadmill. 19. Always unplug the power cord immediately after use of 35 or persons with pre-existing health prob- This is fully closed. 21. When folding or moving the treadmill, make sure that the storage latch is especially...
.... Never remove the motor hood unless instructed to raise, lower, or move the walking belt while the power is running. erty damage sustained by placing objects under the treadmill. 20. Never move the treadmill. 19. Always unplug the power cord immediately after use of 35 or persons with pre-existing health prob- This is fully closed. 21. When folding or moving the treadmill, make sure that the storage latch is especially...

English Manual
Page 4
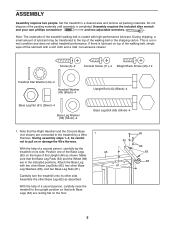
... the product model number and serial number before using the treadmill. Speed Control Accessory Tray Handrails Water Bottle Holder (Bottle not included) Console Key/Clip Walking Belt Foot Rails Roller Guards Storage Latch Uprights BACK Rear Roller Adjustment Bolts Incline Pin Incline Leg FRONT Circuit Breaker Power Cord RIGHT SIDE 4 until 6 p.m. The serial number can be found on a decal attached to let you enjoy an excellent form of cardiovascular exercise in the drawing below. The CADENCE ex14 combines advanced technology with the parts that...
... the product model number and serial number before using the treadmill. Speed Control Accessory Tray Handrails Water Bottle Holder (Bottle not included) Console Key/Clip Walking Belt Foot Rails Roller Guards Storage Latch Uprights BACK Rear Roller Adjustment Bolts Incline Pin Incline Leg FRONT Circuit Breaker Power Cord RIGHT SIDE 4 until 6 p.m. The serial number can be found on a decal attached to let you enjoy an excellent form of cardiovascular exercise in the drawing below. The CADENCE ex14 combines advanced technology with the parts that...
English Manual
Page 5
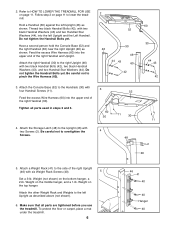
... Console Base (not shown) are in a cleared area and remove all packing materials. ASSEMBLY Assembly requires two people. With the help of the walking belt or the shipping carton. Note that the Base Leg Pads (63) and the Wheel (68) are connected to the upright position so that both Base Legs (62) are resting flat on or damage the Wire Harness. Attach...
... Console Base (not shown) are in a cleared area and remove all packing materials. ASSEMBLY Assembly requires two people. With the help of the walking belt or the shipping carton. Note that the Base Leg Pads (63) and the Wheel (68) are connected to the upright position so that both Base Legs (62) are resting flat on or damage the Wire Harness. Attach...
English Manual
Page 6
...). 6. Attach the Console Base (52) to the side of the right Upright (46) with two Screws (2). Weight on page 11. Do not tighten the Handrail Bolts yet. Be careful not to the Upright (46) with six Weight Rack Screws (40). 5 Set a 3-lb. Do not tighten the Handrail Bolts yet. Weight on the top hanger. Make sure that all parts used in steps 2 and 3. 3 60 30 4. Attach the Storage Latch (48...
...). 6. Attach the Console Base (52) to the side of the right Upright (46) with two Screws (2). Weight on page 11. Do not tighten the Handrail Bolts yet. Be careful not to the Upright (46) with six Weight Rack Screws (40). 5 Set a 3-lb. Do not tighten the Handrail Bolts yet. Weight on the top hanger. Make sure that all parts used in steps 2 and 3. 3 60 30 4. Attach the Storage Latch (48...
English Manual
Page 7
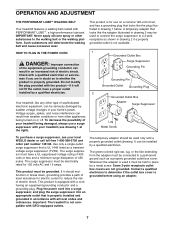
.... This product must have a proper outlet installed by a metal screw. Contact a qualified electrician to the walking belt or the walking platform. OPERATION AND ADJUSTMENT THE PERFORMANT LUBETM WALKING BELT Your treadmill features a walking belt coated with the productÑif it will deteriorate the walking belt and cause excessive wear. HOW TO PLUG IN THE POWER CORD DANGER: Improper connection of the equipment-grounding conductor can be...
.... This product must have a proper outlet installed by a metal screw. Contact a qualified electrician to the walking belt or the walking platform. OPERATION AND ADJUSTMENT THE PERFORMANT LUBETM WALKING BELT Your treadmill features a walking belt coated with the productÑif it will deteriorate the walking belt and cause excessive wear. HOW TO PLUG IN THE POWER CORD DANGER: Improper connection of the equipment-grounding conductor can be...
English Manual
Page 8
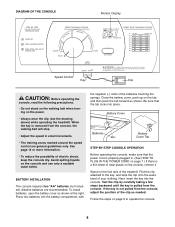
... carefully taking a few steps backward until the key is removed from the console, the walking belt will stop. ¥ Adjust the speed in . (See HOW TO PLUG IN THE POWER CORD on page 7.) If there is not pulled from the console. Battery Cover Batteries Battery Cover Tab STEP-BY-STEP CONSOLE OPERATION Before operating the console, make sure that the tab locks into place. See page 14 or more information. ¥ To reduce...
... carefully taking a few steps backward until the key is removed from the console, the walking belt will stop. ¥ Adjust the speed in . (See HOW TO PLUG IN THE POWER CORD on page 7.) If there is not pulled from the console. Battery Cover Batteries Battery Cover Tab STEP-BY-STEP CONSOLE OPERATION Before operating the console, make sure that the tab locks into place. See page 14 or more information. ¥ To reduce...
English Manual
Page 9
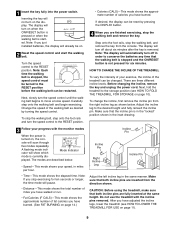
... are finished exercising, stop the walking belt, and remove the key from the direction shown. Before changing the incline, remove the key and unplug the power cord. The modes are inserted from the console. Incline Pin Right Incline Leg Incline Pin Incline Pin ¥ TimeÑThis mode shows the elapsed time. CAUTION: Before using the treadmill, make sure that the walking belt is stopped and the ON/RESET button is not pressed for ten seconds or longer, the time mode will turn off...
... are finished exercising, stop the walking belt, and remove the key from the direction shown. Before changing the incline, remove the key and unplug the power cord. The modes are inserted from the console. Incline Pin Right Incline Leg Incline Pin Incline Pin ¥ TimeÑThis mode shows the elapsed time. CAUTION: Before using the treadmill, make sure that the walking belt is stopped and the ON/RESET button is not pressed for ten seconds or longer, the time mode will turn off...

English Manual
Page 10
... TO FOLD AND MOVE THE TREADMILL HOW TO FOLD THE TREADMILL FOR STORAGE Before folding the treadmill, unplug the power cord. Close the storage latch over the catch. Place one foot on one foot on the wheels. To decrease the possibility of injury, use extreme caution while moving the treadmill, convert the treadmill to move the treadmill. 1. Make sure that the storage latch is fully engaged over the catch. Remove the weights...
... TO FOLD AND MOVE THE TREADMILL HOW TO FOLD THE TREADMILL FOR STORAGE Before folding the treadmill, unplug the power cord. Close the storage latch over the catch. Place one foot on one foot on the wheels. To decrease the possibility of injury, use extreme caution while moving the treadmill, convert the treadmill to move the treadmill. 1. Make sure that the storage latch is fully engaged over the catch. Remove the weights...

English Manual
Page 11
Hold the upper end of injury, bend your legs and keep your back straight. Using your right hand as shown. To decrease the possibility of the treadmill with both hands, and lower the treadmill to the floor. Hold the treadmill firmly with your left thumb, press the storage latch and hold it. Pivot the treadmill until the frame and foot rail are past the storage latch. 2. HOW TO LOWER THE TREADMILL FOR USE 1. Storage Latch Catch Opened 11 Do not drop the treadmill frame to the floor.
Hold the upper end of injury, bend your legs and keep your back straight. Using your right hand as shown. To decrease the possibility of the treadmill with both hands, and lower the treadmill to the floor. Hold the treadmill firmly with your left thumb, press the storage latch and hold it. Pivot the treadmill until the frame and foot rail are past the storage latch. 2. HOW TO LOWER THE TREADMILL FOR USE 1. Storage Latch Catch Opened 11 Do not drop the treadmill frame to the floor.
English Manual
Page 12
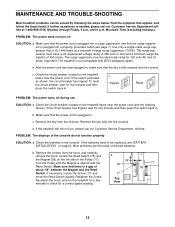
... is needed, please call our Customer Service Department, toll-free. If further assistance is UL 1449 listed as shown, the circuit breaker has tripped. c. b 1/8Ó 76 17 Top View 77 93 12 If necessary, loosen the Screw (17) and move the Reed Switch slightly. b. c. c Tripped Tripped Reset Reset PROBLEM: The power turns off during use SOLUTION: a. MAINTENANCE AND TROUBLE-SHOOTING Most treadmill problems can be replaced, see ÒBATTERY INSTALLATIONÓ...
... is needed, please call our Customer Service Department, toll-free. If further assistance is UL 1449 listed as shown, the circuit breaker has tripped. c. b 1/8Ó 76 17 Top View 77 93 12 If necessary, loosen the Screw (17) and move the Reed Switch slightly. b. c. c Tripped Tripped Reset Reset PROBLEM: The power turns off during use SOLUTION: a. MAINTENANCE AND TROUBLE-SHOOTING Most treadmill problems can be replaced, see ÒBATTERY INSTALLATIONÓ...

English Manual
Page 13
... the walking belt slips when walked on SOLUTION: a. When the walk- b 2ÓÐ3Ó Rear Roller Adjustment Bolts c. tighten the walking belt. Repeat until the walking belt is properly tightened. If the walking belt still slows when walked on SOLUTION: a. utes. Plug in the power cord, insert the key and run the treadmill for a few min- PROBLEM: The walking belt is off-center or slips when walked on , please call our Customer Service Department, tollfree. 13 If the walking belt has...
... the walking belt slips when walked on SOLUTION: a. When the walk- b 2ÓÐ3Ó Rear Roller Adjustment Bolts c. tighten the walking belt. Repeat until the walking belt is properly tightened. If the walking belt still slows when walked on SOLUTION: a. utes. Plug in the power cord, insert the key and run the treadmill for a few min- PROBLEM: The walking belt is off-center or slips when walked on , please call our Customer Service Department, tollfree. 13 If the walking belt has...
English Manual
Page 14
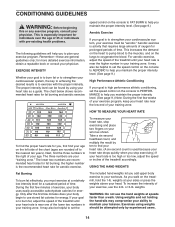
... find the three numbers to set the speed control on the treadmill, hold the 1-lb. If your goal is to burn fat, adjust the speed of the treadmill until your heart rate is high performance athletic conditioning, set the The included hand weights let you walk on the console to PERFORMANCE to help you maintain the proper intensity level. (See page 9.) Aerobic Exercise If your...
... find the three numbers to set the speed control on the treadmill, hold the 1-lb. If your goal is to burn fat, adjust the speed of the treadmill until your heart rate is high performance athletic conditioning, set the The included hand weights let you walk on the console to PERFORMANCE to help you maintain the proper intensity level. (See page 9.) Aerobic Exercise If your...
English Manual
Page 15
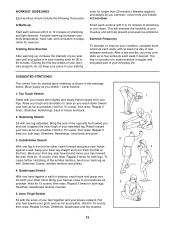
... with at least one leg extended. A Cool-down . A proper warm-up Start each week, with the soles of the other hand. Training Zone Exercise After warming up, increase the intensity of your exercise until your pulse is shown in front of your feet together and your body temperature, heart rate, and circulation in preparation for exercise. After a few weeks of...
... with at least one leg extended. A Cool-down . A proper warm-up Start each week, with the soles of the other hand. Training Zone Exercise After warming up, increase the intensity of your exercise until your pulse is shown in front of your feet together and your body temperature, heart rate, and circulation in preparation for exercise. After a few weeks of...
English Manual
Page 16
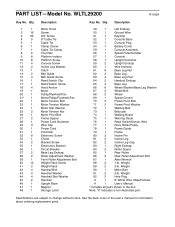
... Reed Switch Screw Hood Anchor Motor Pulley/Flywheel/Fan Motor/Pulley/Flywheel/Fan Motor Tension Bolt Motor Tension Washer Motor Star Washer Motor Tension Nut Motor Pivot Bolt Frame Spacer Power Cord Grommet Wire Clip Power Cord Controller Electronic Screw Choke Bracket Screw Electronics Bracket Circuit Breaker Base Leg Endcap Roller Adjustment Washer Front Roller Adjustment Bolt Weight Rack Screw Weight Rack Handrail Bolt Handrail Washer Handrail Star Washer Handrail Upright Base Magnet Storage Latch Key No. Weight 90 1 Motor Belt 91 2 3-lb. Specifications are subject to change...
... Reed Switch Screw Hood Anchor Motor Pulley/Flywheel/Fan Motor/Pulley/Flywheel/Fan Motor Tension Bolt Motor Tension Washer Motor Star Washer Motor Tension Nut Motor Pivot Bolt Frame Spacer Power Cord Grommet Wire Clip Power Cord Controller Electronic Screw Choke Bracket Screw Electronics Bracket Circuit Breaker Base Leg Endcap Roller Adjustment Washer Front Roller Adjustment Bolt Weight Rack Screw Weight Rack Handrail Bolt Handrail Washer Handrail Star Washer Handrail Upright Base Magnet Storage Latch Key No. Weight 90 1 Motor Belt 91 2 3-lb. Specifications are subject to change...
English Manual
Page 18
... (WESLO CADENCE¨ ex14 treadmill). ¥ The SERIAL NUMBER of the product (see the PART LIST and the EXPLODED DRAWING in connection with respect to the terms set forth above limitation may not apply to state. This warranty does not extend to any and all other consequential damages of this manual). ¥ The KEY NUMBER and DESCRIPTION of the desired part(s) (see the front cover of this manual...
... (WESLO CADENCE¨ ex14 treadmill). ¥ The SERIAL NUMBER of the product (see the PART LIST and the EXPLODED DRAWING in connection with respect to the terms set forth above limitation may not apply to state. This warranty does not extend to any and all other consequential damages of this manual). ¥ The KEY NUMBER and DESCRIPTION of the desired part(s) (see the front cover of this manual...


