
English Manual
Page 1
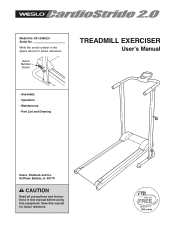
Hoffman Estates, IL 60179 CAUTION Read all precautions and instructions in the space above for future reference. Serial Number Decal TREADMILL EXERCISER Userʼs Manual • Assembly • Operation • Maintenance • Part List and Drawing Sears, Roebuck and Co. Save this equipment. Model No. 831.24902.0 Serial No. Write the serial number in this manual before using this manual for future reference.
Hoffman Estates, IL 60179 CAUTION Read all precautions and instructions in the space above for future reference. Serial Number Decal TREADMILL EXERCISER Userʼs Manual • Assembly • Operation • Maintenance • Part List and Drawing Sears, Roebuck and Co. Save this equipment. Model No. 831.24902.0 Serial No. Write the serial number in this manual before using this manual for future reference.
English Manual
Page 2
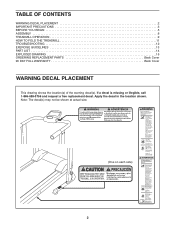
... a free replacement decal. TABLE OF CONTENTS WARNING DECAL PLACEMENT 2 IMPORTANT PRECAUTIONS 3 BEFORE YOU BEGIN 5 ASSEMBLY 6 TREADMILL OPERATION 9 HOW TO FOLD THE TREADMILL 11 TROUBLESHOOTING 12 EXERCISE GUIDELINES 13 PART LIST 14 EXPLODED DRAWING 15 ORDERING REPLACEMENT PARTS Back Cover 90 DAY FULL WARRANTY Back Cover WARNING DECAL PLACEMENT This drawing shows the location(s) of the warning decal(s). Note: The decal(s) may not be shown at actual size...
... a free replacement decal. TABLE OF CONTENTS WARNING DECAL PLACEMENT 2 IMPORTANT PRECAUTIONS 3 BEFORE YOU BEGIN 5 ASSEMBLY 6 TREADMILL OPERATION 9 HOW TO FOLD THE TREADMILL 11 TROUBLESHOOTING 12 EXERCISE GUIDELINES 13 PART LIST 14 EXPLODED DRAWING 15 ORDERING REPLACEMENT PARTS Back Cover 90 DAY FULL WARRANTY Back Cover WARNING DECAL PLACEMENT This drawing shows the location(s) of the warning decal(s). Note: The decal(s) may not be shown at actual size...
English Manual
Page 3
... not change the incline of the treadmill by or through the use the treadmill with pre-existing health problems. 2. Servicing other than one person on the treadmill at all parts of the owner to ensure that the storage latch is being administered. 7. IMPORTANT PRECAUTIONS WARNING: To reduce the risk of serious injury, read all important precautions and instructions in this manual should not be used or...
... not change the incline of the treadmill by or through the use the treadmill with pre-existing health problems. 2. Servicing other than one person on the treadmill at all parts of the owner to ensure that the storage latch is being administered. 7. IMPORTANT PRECAUTIONS WARNING: To reduce the risk of serious injury, read all important precautions and instructions in this manual should not be used or...

English Manual
Page 4
SAVE THESE INSTRUCTIONS 4 Do not place hands or feet under the treadmill while it is intended for home use only. The roller guards must be 1/8 in serious injury or death. This treadmill is in use the treadmill in any commercial, rental, or institutional setting. 22. Adjust the roller guards, if necessary. If you feel faint or if you experience pain while exercising, stop immediately and cool down. 20. 19. Over exercising may result in . (3 mm) from the rear roller (see the drawing on page 5). Do not use . 21.
SAVE THESE INSTRUCTIONS 4 Do not place hands or feet under the treadmill while it is intended for home use only. The roller guards must be 1/8 in serious injury or death. This treadmill is in use the treadmill in any commercial, rental, or institutional setting. 22. Adjust the roller guards, if necessary. If you feel faint or if you experience pain while exercising, stop immediately and cool down. 20. 19. Over exercising may result in . (3 mm) from the rear roller (see the drawing on page 5). Do not use . 21.
English Manual
Page 5
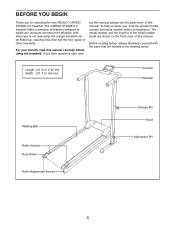
... cm) Width: 2 ft. 3 in the drawing below. If you ʼre not exercising, the unique treadmill can be folded up, requiring less than half the floor space of the serial number decal are labeled in . (69 cm) Console Handrail Walking Belt Roller Guards Rear Roller Roller Adjustment Screws Storage Pin Hood Adjustment Pin 5 And when you have questions after read this manual carefully before contacting us. For your workouts at home more effective.
... cm) Width: 2 ft. 3 in the drawing below. If you ʼre not exercising, the unique treadmill can be folded up, requiring less than half the floor space of the serial number decal are labeled in . (69 cm) Console Handrail Walking Belt Roller Guards Rear Roller Roller Adjustment Screws Storage Pin Hood Adjustment Pin 5 And when you have questions after read this manual carefully before contacting us. For your workouts at home more effective.
English Manual
Page 6
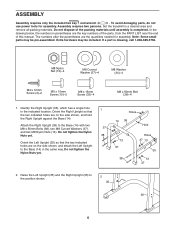
... parts may be pre-assembled. If a part is completed. Identify the Right Upright (36), which has a single hole in a cleared area and remove all packing materials. Do not tighten the Nylon Nuts yet. In the drawing below, the numbers in the same way. Set the treadmill in the indicated location. The numbers after the parentheses are the key numbers of the parts, from the PART LIST...
... parts may be pre-assembled. If a part is completed. Identify the Right Upright (36), which has a single hole in a cleared area and remove all packing materials. Do not tighten the Nylon Nuts yet. In the drawing below, the numbers in the same way. Set the treadmill in the indicated location. The numbers after the parentheses are the key numbers of the parts, from the PART LIST...

English Manual
Page 7
...storage position (see page 11). 5 33 34 2 6 35 5 34 33 36 7 Connect the Handrail Wire (2) to pinch the Wires (2, 6). Place the treadmill in . Tighten the four M8 Nylon Nuts (13). Lower the Frame (see page 11). View from below 36 29 4 5. Do not fully tighten the Screws yet. Then, tighten the M8 x 15mm Screws (33). Next, locate... Uprights (35, 36). See drawing 4b. Locate the Reed Switch Clip (11) attached to the Uprights (35, 36) with one of the two sets of the Frame. Insert the Reed Switch (6) into the Left Upright. Move the Reed Switch so that the Adjustment Pins ...
...storage position (see page 11). 5 33 34 2 6 35 5 34 33 36 7 Connect the Handrail Wire (2) to pinch the Wires (2, 6). Place the treadmill in . Tighten the four M8 Nylon Nuts (13). Lower the Frame (see page 11). View from below 36 29 4 5. Do not fully tighten the Screws yet. Then, tighten the M8 x 15mm Screws (33). Next, locate... Uprights (35, 36). See drawing 4b. Locate the Reed Switch Clip (11) attached to the Uprights (35, 36) with one of the two sets of the Frame. Insert the Reed Switch (6) into the Left Upright. Move the Reed Switch so that the Adjustment Pins ...

English Manual
Page 8
Connect the wire on the Console to the Handrail with two M4 x 12mm Screws (3). See drawing 7b. To protect the floor or carpet, place a mat under the treadmill. 8 Then, attach the Console to the Handrail Wire (2). Press the Battery Cover (27) onto the Console (1). 7a 1 7b 1 2 3 5 27 8. Make sure that all parts are not pinched. Make sure that the walking belt is properly tightened (see SYMPTOM 3 on...
Connect the wire on the Console to the Handrail with two M4 x 12mm Screws (3). See drawing 7b. To protect the floor or carpet, place a mat under the treadmill. 8 Then, attach the Console to the Handrail Wire (2). Press the Battery Cover (27) onto the Console (1). 7a 1 7b 1 2 3 5 27 8. Make sure that all parts are not pinched. Make sure that the walking belt is properly tightened (see SYMPTOM 3 on...

English Manual
Page 9
... console will turn on . If the walking belt is not moved and the console button is turned on page 8). If there is a thin sheet of calories you use the treadmill, lubricate the walking platform (see assembly step 6 on , the Scan mode will appear. Turn off automatically. • Calorie-This mode displays the approximate number of plastic on the power. Make sure that the walking belt has moved since the batteries were changed. Track your speed, in the display...
... console will turn on . If the walking belt is not moved and the console button is turned on page 8). If there is a thin sheet of calories you use the treadmill, lubricate the walking platform (see assembly step 6 on , the Scan mode will appear. Turn off automatically. • Calorie-This mode displays the approximate number of plastic on the power. Make sure that the walking belt has moved since the batteries were changed. Track your speed, in the display...
English Manual
Page 10
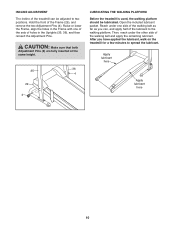
... that both Adjustment Pins (4) are fully inserted at the same height. 36 35 4 29 4 LUBRICATING THE WALKING PLATFORM Before the treadmill is used, the walking platform should be adjusted to two positions. Open the included lubricant packet. Apply lubricant here Apply lubricant here 10 Then, reach under one of the sets of holes in the Frame with one side of the walking belt as far...
... that both Adjustment Pins (4) are fully inserted at the same height. 36 35 4 29 4 LUBRICATING THE WALKING PLATFORM Before the treadmill is used, the walking platform should be adjusted to two positions. Open the included lubricant packet. Apply lubricant here Apply lubricant here 10 Then, reach under one of the sets of holes in the Frame with one side of the walking belt as far...
English Manual
Page 11
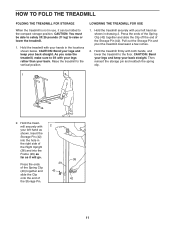
... hands, and lower the treadmill to raise or lower the treadmill. 1. CAUTION: You must be folded to the compact storage position. Press the ends of the Spring Clip (43) together and slide the Clip onto the end of the Storage Pin (42). Hold the treadmill securely with your back straight. Insert the Storage Pin (42) into the hole in the locations shown below.
... hands, and lower the treadmill to raise or lower the treadmill. 1. CAUTION: You must be folded to the compact storage position. Press the ends of the Spring Clip (43) together and slide the Clip onto the end of the Storage Pin (42). Hold the treadmill securely with your back straight. Insert the Storage Pin (42) into the hole in the locations shown below.
English Manual
Page 12
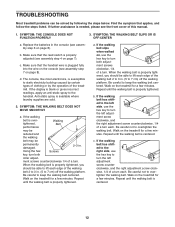
... walking platform. Using the hex Screws key, turn . When the walking belt is plugged fully into the wire on the console (see assembly step 6 on the treadmill for a few minutes. Repeat until the walking belt is properly adjusted (see the front cover of a turn both adjustment screws clockwise, 1/4 of the walking belt 2 to 3 in. (5 to lift each edge of a turn each . Find the symptom that the reed switch is centered. If further assistance is properly tightened...
... walking platform. Using the hex Screws key, turn . When the walking belt is plugged fully into the wire on the console (see assembly step 6 on the treadmill for a few minutes. Repeat until the walking belt is properly adjusted (see the front cover of a turn both adjustment screws clockwise, 1/4 of the walking belt 2 to 3 in. (5 to lift each edge of a turn each . Find the symptom that the reed switch is centered. If further assistance is properly tightened...
English Manual
Page 13
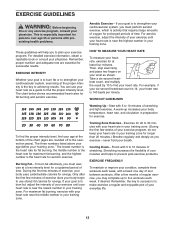
...-Start with your heart rate near the lowest number in your training zone. After a few weeks of the chart (ages are essential for maximum fat burning, and the highest number is to use your condition, complete three workouts each week, if desired. EXERCISE GUIDELINES WARNING: Before beginning this or any exercise program, consult your physician. The three numbers listed above your age define your body...
...-Start with your heart rate near the lowest number in your training zone. After a few weeks of the chart (ages are essential for maximum fat burning, and the highest number is to use your condition, complete three workouts each week, if desired. EXERCISE GUIDELINES WARNING: Before beginning this or any exercise program, consult your physician. The three numbers listed above your age define your body...
English Manual
Page 14
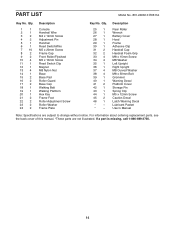
... replacement parts, see the back cover of this manual. *These parts are subject to change without notice. Description Rear Roller Wrench Battery Cover Hood Frame Adhesive Clip Handrail Cap Handrail Foam Grip M8 x 15mm Screw M8 Washer Left Upright Right Upright M8 Curved Washer M8 x 50mm Bolt Grommet Warning Decal Platform Cover Storage Pin Spring Clip M5 x 12mm Screw Caution Decal Latch Warning Decal Lubricant Packet Userʼs Manual Note: Specifications are not illustrated. PART LIST Model...
... replacement parts, see the back cover of this manual. *These parts are subject to change without notice. Description Rear Roller Wrench Battery Cover Hood Frame Adhesive Clip Handrail Cap Handrail Foam Grip M8 x 15mm Screw M8 Washer Left Upright Right Upright M8 Curved Washer M8 x 50mm Bolt Grommet Warning Decal Platform Cover Storage Pin Spring Clip M5 x 12mm Screw Caution Decal Latch Warning Decal Lubricant Packet Userʼs Manual Note: Specifications are not illustrated. PART LIST Model...
English Manual
Page 15
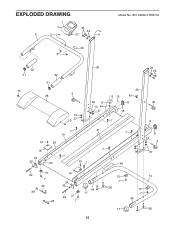
EXPLODED DRAWING 1 5 2 33 34 27 6 Model No. 831.24902.0 R0611A 40 3 32 31 32 31 10 28 4 13 10 37 35 34 33 36 6 12 43 39 11 8 42 13 44 9 37 18 7 9 7 19 10 29 16 24 23 7 25 10 7 41 7 7 46 8 13 4 37 21 22 7 20 30 26 16 24 23 22 21 7 45 17 15 15 7 38 17 14 15 7 45 38
EXPLODED DRAWING 1 5 2 33 34 27 6 Model No. 831.24902.0 R0611A 40 3 32 31 32 31 10 28 4 13 10 37 35 34 33 36 6 12 43 39 11 8 42 13 44 9 37 18 7 9 7 19 10 29 16 24 23 7 25 10 7 41 7 7 46 8 13 4 37 21 22 7 20 30 26 16 24 23 22 21 7 45 17 15 15 7 38 17 14 15 7 45 38

English Manual
Page 16
... fixed, at your nearest Sears Parts & Repair Center. 1-800-488-1222 Call anytime, day or night (U.S.A. This warranty gives you specific legal rights, and you need to arrange for free repair (or replacement if repair proves impossible). Get it ! For the replacement parts, accessories, and user's manuals that you may also have other rights which vary from state to a defect in items like garage door openers...
... fixed, at your nearest Sears Parts & Repair Center. 1-800-488-1222 Call anytime, day or night (U.S.A. This warranty gives you specific legal rights, and you need to arrange for free repair (or replacement if repair proves impossible). Get it ! For the replacement parts, accessories, and user's manuals that you may also have other rights which vary from state to a defect in items like garage door openers...


