

English Manual
Page 2
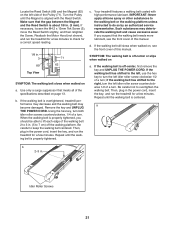
... actual size. TABLE OF CONTENTS WARNING DECAL PLACEMENT 2 IMPORTANT PRECAUTIONS 3 BEFORE YOU BEGIN 6 PART IDENTIFICATION CHART 7 ASSEMBLY 8 OPERATION AND ADJUSTMENT 13 HOW TO FOLD AND MOVE THE TREADMILL 19 TROUBLESHOOTING 20 EXERCISE GUIDELINES 23 PART LIST 26 EXPLODED DRAWING 28 ORDERING REPLACEMENT PARTS Back Cover LIMITED WARRANTY Back Cover WARNING DECAL PLACEMENT This drawing shows the location(s) of this manual and request a free replacement decal. If a decal is a registered trademark of ICON IP...
... actual size. TABLE OF CONTENTS WARNING DECAL PLACEMENT 2 IMPORTANT PRECAUTIONS 3 BEFORE YOU BEGIN 6 PART IDENTIFICATION CHART 7 ASSEMBLY 8 OPERATION AND ADJUSTMENT 13 HOW TO FOLD AND MOVE THE TREADMILL 19 TROUBLESHOOTING 20 EXERCISE GUIDELINES 23 PART LIST 26 EXPLODED DRAWING 28 ORDERING REPLACEMENT PARTS Back Cover LIMITED WARRANTY Back Cover WARNING DECAL PLACEMENT This drawing shows the location(s) of this manual and request a free replacement decal. If a decal is a registered trademark of ICON IP...
English Manual
Page 3
... surface that could result in damage to the control system of the treadmill. Keep the treadmill indoors, away from the treadmill at a time. 11. Adjust the speed in small increments to use the treadmill in sandals. 14. If the control system is turned off. Never move the walking belt while the power is damaged, the walking belt may slow, accelerate, or stop procedure before using the treadmill (see your...
... surface that could result in damage to the control system of the treadmill. Keep the treadmill indoors, away from the treadmill at a time. 11. Adjust the speed in small increments to use the treadmill in sandals. 14. If the control system is turned off. Never move the walking belt while the power is damaged, the walking belt may slow, accelerate, or stop procedure before using the treadmill (see your...
English Manual
Page 4
...- 20. SAVE THESE INSTRUCTIONS 4 The heart rate monitor is running. Never leave the treadmill unattended while it is not in use , before performing the maintenance and adjustment procedures described in this manual. Always remove the key, press the power switch into any object into the off position (see the drawing on the treadmill. 25. Inspect and properly tighten all parts of heart rate readings. ing the treadmill, and before clean...
...- 20. SAVE THESE INSTRUCTIONS 4 The heart rate monitor is running. Never leave the treadmill unattended while it is not in use , before performing the maintenance and adjustment procedures described in this manual. Always remove the key, press the power switch into any object into the off position (see the drawing on the treadmill. 25. Inspect and properly tighten all parts of heart rate readings. ing the treadmill, and before clean...
English Manual
Page 6
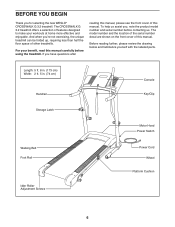
... the labeled parts. For your workouts at home more effective and enjoyable. Length: 5 ft. 8 in. (173 cm) Width: 2 ft. 5 in. (74 cm) Handrail Storage Latch Console Key/Clip Motor Hood Power Switch Walking Belt Foot Rail Idler Roller Adjustment Screws Power Cord Wheel Platform Cushion 6 The CROSSWALK G 3.2 treadmill offers a selection of other treadmills. To help us . The model number and the location of the serial number decal are shown on the front cover of this manual. If you...
... the labeled parts. For your workouts at home more effective and enjoyable. Length: 5 ft. 8 in. (173 cm) Width: 2 ft. 5 in. (74 cm) Handrail Storage Latch Console Key/Clip Motor Hood Power Switch Walking Belt Foot Rail Idler Roller Adjustment Screws Power Cord Wheel Platform Cushion 6 The CROSSWALK G 3.2 treadmill offers a selection of other treadmills. To help us . The model number and the location of the serial number decal are shown on the front cover of this manual. If you...
English Manual
Page 8
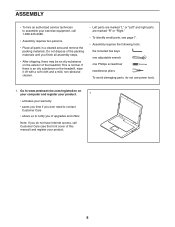
... you ever need to contact Customer Care •• allows us to assemble your exercise equipment, call Customer Care (see the front cover of this manual) and register your product. 8 ASSEMBLY •• To hire an authorized service technician to notify you of upgrades and offers Note: If you nish all parts in a cleared area and remove the packing...
... you ever need to contact Customer Care •• allows us to assemble your exercise equipment, call Customer Care (see the front cover of this manual) and register your product. 8 ASSEMBLY •• To hire an authorized service technician to notify you of upgrades and offers Note: If you nish all parts in a cleared area and remove the packing...
English Manual
Page 9
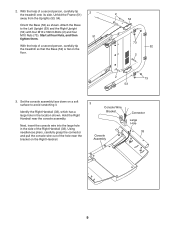
... (33). Unfold the Frame (51) away from the Uprights (53, 54). Identify the Right Handrail (33), which has a large hole in the side of the hole near the console assembly. Next, insert the console wire into the large hole in the location shown. With the help of a second person, carefully tip the treadmill onto its side. Start all four...
... (33). Unfold the Frame (51) away from the Uprights (53, 54). Identify the Right Handrail (33), which has a large hole in the side of the hole near the console assembly. Next, insert the console wire into the large hole in the location shown. With the help of a second person, carefully tip the treadmill onto its side. Start all four...
English Manual
Page 10
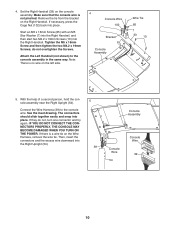
... Wire Harness, remove the wire tie. With the help of a second person, hold the console assembly near the Right Upright (54). If they do not overtighten the Screws. If necessary, press the Cage Nut (102) back into the Right Handrail. Start an M5 x 16mm Screw (85) with an M5 Star Washer (7) into the Right Handrail, and then start two M4.2 x 19mm Screws...
... Wire Harness, remove the wire tie. With the help of a second person, hold the console assembly near the Right Upright (54). If they do not overtighten the Screws. If necessary, press the Cage Nut (102) back into the Right Handrail. Start an M5 x 16mm Screw (85) with an M5 Star Washer (7) into the Right Handrail, and then start two M4.2 x 19mm Screws...
English Manual
Page 11
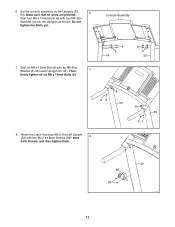
6. Then, 7 firmly tighten all six M8 x 15mm Bolts (8). 8 5 54 8 5 53 85 8 53 8. Attach the Latch Housing (48) to the Left Upright (53) with four M8 Star Washers (5) into each Upright (53, 54). Console Assembly 7. start 8 both Screws, and then tighten them. 8 54 85 53 48 58 11 Start an M8 x 15mm Bolt (8) with an M8 Star Washer (5) into the Uprights as shown. Do not tighten the Bolts yet. Set the console assembly on the Uprights (53, 54). Make sure that no wires are pinched. 6 Start four M8 x 15mm Bolts (8) with two M4.2 x 18mm Screws (58);
6. Then, 7 firmly tighten all six M8 x 15mm Bolts (8). 8 5 54 8 5 53 85 8 53 8. Attach the Latch Housing (48) to the Left Upright (53) with four M8 Star Washers (5) into each Upright (53, 54). Console Assembly 7. start 8 both Screws, and then tighten them. 8 54 85 53 48 58 11 Start an M8 x 15mm Bolt (8) with an M8 Star Washer (5) into the Uprights as shown. Do not tighten the Bolts yet. Set the console assembly on the Uprights (53, 54). Make sure that no wires are pinched. 6 Start four M8 x 15mm Bolts (8) with two M4.2 x 18mm Screws (58);
English Manual
Page 13
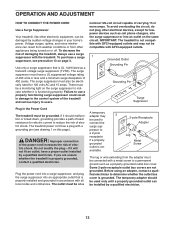
... may be used only until a properly grounded outlet can be installed by sudden voltage changes in the Power Cord The treadmill must have a proper outlet installed by a qualified electrician. Some 2-pole receptacle outlet box covers are unsure whether the treadmill is not available. 2 2-pole Receptacle Adapter Lug Metal Screw The lug or wire extending from other appliances being turned on a A temporary adapter may not...
... may be used only until a properly grounded outlet can be installed by sudden voltage changes in the Power Cord The treadmill must have a proper outlet installed by a qualified electrician. Some 2-pole receptacle outlet box covers are unsure whether the treadmill is not available. 2 2-pole Receptacle Adapter Lug Metal Screw The lug or wire extending from other appliances being turned on a A temporary adapter may not...

English Manual
Page 14
... treadmill as it guides you exercise, the displays will provide continuous exercise feedback. CONSOLE DIAGRAM Key Clip FEATURES OF THE CONSOLE The treadmill console offers a selection of features designed to the walking platform, wear clean athletic shoes while using the thumb heart rate monitor. When the manual mode of the console is a sheet of plastic on the power, see page 21). 14 The console also offers a selection of a button. To turn on the console, remove...
... treadmill as it guides you exercise, the displays will provide continuous exercise feedback. CONSOLE DIAGRAM Key Clip FEATURES OF THE CONSOLE The treadmill console offers a selection of features designed to the walking platform, wear clean athletic shoes while using the thumb heart rate monitor. When the manual mode of the console is a sheet of plastic on the power, see page 21). 14 The console also offers a selection of a button. To turn on the console, remove...
English Manual
Page 15
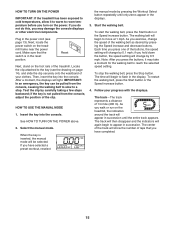
... console. To restart the walking belt, press the Start button or the Speed increase button. 4. if the key is in succession. HOW TO USE THE MANUAL MODE 1. Note: After you may take a moment for the walking belt to a stop the walking belt, press the Stop button. As you press one of the treadmill. After a moment, the displays will begin to the key (see page 13). See HOW TO TURN ON THE POWER above. 2. To start the walking belt, press the Start button...
... console. To restart the walking belt, press the Start button or the Speed increase button. 4. if the key is in succession. HOW TO USE THE MANUAL MODE 1. Note: After you may take a moment for the walking belt to a stop the walking belt, press the Stop button. As you press one of the treadmill. After a moment, the displays will begin to the key (see page 13). See HOW TO TURN ON THE POWER above. 2. To start the walking belt, press the Start button...
English Manual
Page 16
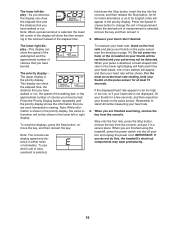
... the displayed heart rate appears to be shown. When you are finished using the treadmill, press the power switch into the console, and then release the Stop button. Note: When a preset workout is not displayed, lift your pulse is the priority display. When your thumb for English miles will show the speed of the walking belt and the approximate number of calories you have burned. When you are finished exercising, remove the key...
... the displayed heart rate appears to be shown. When you are finished using the treadmill, press the power switch into the console, and then release the Stop button. Note: When a preset workout is not displayed, lift your pulse is the priority display. When your thumb for English miles will show the speed of the walking belt and the approximate number of calories you have burned. When you are finished exercising, remove the key...

English Manual
Page 17
... button, the treadmill will continue in the display for a few seconds. Insert the key into the console. See HOW TO TURN ON THE POWER on page 16. 17 Note: The same speed setting may be programmed for the next segment. 4. The walking belt will change during the workout, you and the treadmill will automatically adjust to the new speed setting. Press the Start button or the Speed increase button to a stop the workout temporarily, press the Stop button...
... button, the treadmill will continue in the display for a few seconds. Insert the key into the console. See HOW TO TURN ON THE POWER on page 16. 17 Note: The same speed setting may be programmed for the next segment. 4. The walking belt will change during the workout, you and the treadmill will automatically adjust to the new speed setting. Press the Start button or the Speed increase button to a stop the workout temporarily, press the Stop button...
English Manual
Page 18
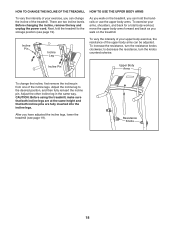
... power cord. Adjust the incline leg to the storage position (see page 19). As you walk on the treadmill, you can hold the handrails or use the upper body arms. To exercise your upper body exercise, the resistance of the upper body arms can change the incline, first remove the incline pin from one of the incline legs. To increase the resistance, turn the knobs counterclockwise. Incline Pin Upper Body Arms To change the incline of the treadmill. Adjust the other incline leg in the same way. Incline Pin Incline Leg...
... power cord. Adjust the incline leg to the storage position (see page 19). As you walk on the treadmill, you can hold the handrails or use the upper body arms. To exercise your upper body exercise, the resistance of the upper body arms can change the incline, first remove the incline pin from one of the incline legs. To increase the resistance, turn the knobs counterclockwise. Incline Pin Upper Body Arms To change the incline of the treadmill. Adjust the other incline leg in the same way. Incline Pin Incline Leg...
English Manual
Page 20
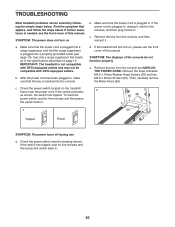
... the front cover of the specications described on the treadmill frame near the power cord. Then, carefully remove the Motor Hood (65). SYMPTOM: The power does not turn on b. c. Make sure that the power cord is plugged into a surge suppressor and that meets all of this manual. SYMPTOM: The displays of this manual. Make sure that applies, and follow the steps listed. a. If the switch protrudes...
... the front cover of the specications described on the treadmill frame near the power cord. Then, carefully remove the Motor Hood (65). SYMPTOM: The power does not turn on b. c. Make sure that the power cord is plugged into a surge suppressor and that meets all of this manual. SYMPTOM: The displays of this manual. Make sure that applies, and follow the steps listed. a. If the switch protrudes...
English Manual
Page 21
... idler roller screw clockwise 1/2 of a turn . Locate the Reed Switch (89) and the Magnet (62) on a. Reattach the Motor Hood (not shown), and run the treadmill for a few minutes. If the walking belt is properly tightened. Your treadmill features a walking belt coated with the Reed Switch. b. If you should be able to lift each edge of the walking belt 2 to 3 in the power cord, insert the key, and run the treadmill for a correct speed...
... idler roller screw clockwise 1/2 of a turn . Locate the Reed Switch (89) and the Magnet (62) on a. Reattach the Motor Hood (not shown), and run the treadmill for a few minutes. If the walking belt is properly tightened. Your treadmill features a walking belt coated with the Reed Switch. b. If you should be able to lift each edge of the walking belt 2 to 3 in the power cord, insert the key, and run the treadmill for a correct speed...

English Manual
Page 22
... at hardware stores.) Turn the Resistance Knob (A) counterclockwise and remove it back in the power cord, insert the key, and carefully walk on , rst remove the key and UNPLUG THE POWER CORD. b. a 105 B F EA C G D 22 b SYMPTOM: The upperbody arms squeak during use a. (Note: Correcting this problem requires a small amount of the Resistance Cone (B). If the walking belt slips when walked on the treadmill for a few minutes. When the walking belt is properly tightened.
... at hardware stores.) Turn the Resistance Knob (A) counterclockwise and remove it back in the power cord, insert the key, and carefully walk on , rst remove the key and UNPLUG THE POWER CORD. b. a 105 B F EA C G D 22 b SYMPTOM: The upperbody arms squeak during use a. (Note: Correcting this problem requires a small amount of the Resistance Cone (B). If the walking belt slips when walked on the treadmill for a few minutes. When the walking belt is properly tightened.

English Manual
Page 23
... pre-existing health problems. The heart rate monitor is to make exercise a regular and enjoyable part of your everyday life. 23 Cooling Down—-Finish with your heart rate in your training zone. Remember, the key to success is not a medical device. The heart rate monitor is near the highest number in preparation for successful results. The three numbers listed above your age define your body uses carbohydrate calories...
... pre-existing health problems. The heart rate monitor is to make exercise a regular and enjoyable part of your everyday life. 23 Cooling Down—-Finish with your heart rate in your training zone. Remember, the key to success is not a medical device. The heart rate monitor is near the highest number in preparation for successful results. The three numbers listed above your age define your body uses carbohydrate calories...
English Manual
Page 26
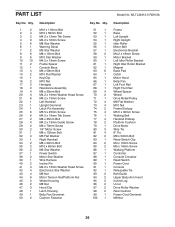
... Pan Left Foot Rail Right Foot Rail Wheel Spacer Wheel Drive Roller/Pulley M8 Flat Washer M10 Nut Frame Endcap M5.5 x 30mm Screw Walking Belt Handrail Endcap Platform Cushion Drive Motor Wire Tie 8" Tie M8 x 52mm Bolt Reed Switch Clip M4 x 10mm Screw M5 x 16mm Screw Walking Platform Controller Console Crossbar Reed Switch Power Cord Console Releasable Tie Belt Guide Upper Body Arm Insert Incline Leg U-nut Drive Roller Washer Rear Cushion Power Cord Grommet M8 Nut 26 Qty. 1 2 2 4 3 2 4 9 5 6 6 1 7 2 8 6 9 6 10 10 11 2 12...
... Pan Left Foot Rail Right Foot Rail Wheel Spacer Wheel Drive Roller/Pulley M8 Flat Washer M10 Nut Frame Endcap M5.5 x 30mm Screw Walking Belt Handrail Endcap Platform Cushion Drive Motor Wire Tie 8" Tie M8 x 52mm Bolt Reed Switch Clip M4 x 10mm Screw M5 x 16mm Screw Walking Platform Controller Console Crossbar Reed Switch Power Cord Console Releasable Tie Belt Guide Upper Body Arm Insert Incline Leg U-nut Drive Roller Washer Rear Cushion Power Cord Grommet M8 Nut 26 Qty. 1 2 2 4 3 2 4 9 5 6 6 1 7 2 8 6 9 6 10 10 11 2 12...
English Manual
Page 32
... exclusion or limitation of this manual. The warranty extended hereunder is in lieu of any and all instructions in -home service, the customer will be prepared to provide the following information when contacting us assist you, be responsible for commercial or rental purposes. This warranty provides specic legal rights; ICON Health & Fitness, Inc., 1500 S. 1000 W., Logan, UT 84321-9813 Part No...
... exclusion or limitation of this manual. The warranty extended hereunder is in lieu of any and all instructions in -home service, the customer will be prepared to provide the following information when contacting us assist you, be responsible for commercial or rental purposes. This warranty provides specic legal rights; ICON Health & Fitness, Inc., 1500 S. 1000 W., Logan, UT 84321-9813 Part No...


