

English Manual
Page 1
Model No. Access Panel QUESTIONS? MST CAUTION Read all precautions and instructions in the space above for future reference. The trained technicians on a plastic sign inside the spa behind the access panel. Write the serial number in this manual before using this manual for reference. Save this equipment. TO AVOID UNNECESSARY DELAYS, PLEASE CALL DIRECT TO OUR TOLL-FREE CUSTOMER HOT LINE. The...
Model No. Access Panel QUESTIONS? MST CAUTION Read all precautions and instructions in the space above for future reference. The trained technicians on a plastic sign inside the spa behind the access panel. Write the serial number in this manual before using this manual for reference. Save this equipment. TO AVOID UNNECESSARY DELAYS, PLEASE CALL DIRECT TO OUR TOLL-FREE CUSTOMER HOT LINE. The...

English Manual
Page 2
..., call our toll-free Customer Hot Line at 1-877-897-7493 to all users of ICON Health & Fitness, Inc. 2 Table of Contents Posting the Warning Sign 2 Important Safety Instructions 3 Before You Begin 6 Choosing a Location for the Hydrotherapy Spa 7 Assembly 8 Using the Hydrotherapy Spa 10 Spa Shell Diagram 11 Using the Controls 12 Maintenance 13 Trouble-shooting 16 Part List 18 Exploded Drawing 19 Ordering Replacement Parts Back Cover Limited Warranty Back Cover Posting the Warning...
..., call our toll-free Customer Hot Line at 1-877-897-7493 to all users of ICON Health & Fitness, Inc. 2 Table of Contents Posting the Warning Sign 2 Important Safety Instructions 3 Before You Begin 6 Choosing a Location for the Hydrotherapy Spa 7 Assembly 8 Using the Hydrotherapy Spa 10 Spa Shell Diagram 11 Using the Controls 12 Maintenance 13 Trouble-shooting 16 Part List 18 Exploded Drawing 19 Ordering Replacement Parts Back Cover Limited Warranty Back Cover Posting the Warning...

English Manual
Page 3
... guard. DANGER-When connecting the power cord (see pages 10 and 14). READ AND FOLLOW ALL INSTRUCTIONS 1. Do not allow the hydrotherapy spa to ensure that may cause injury to users or damage to replace a suction fitting or pump, make sure you select for home use an extension cord with a bathing cap. 8. Do not use . 15. Keep hair and body parts away from children...
... guard. DANGER-When connecting the power cord (see pages 10 and 14). READ AND FOLLOW ALL INSTRUCTIONS 1. Do not allow the hydrotherapy spa to ensure that may cause injury to users or damage to replace a suction fitting or pump, make sure you select for home use an extension cord with a bathing cap. 8. Do not use . 15. Keep hair and body parts away from children...

English Manual
Page 4
... they must be taking before using the hydrotherapy spa. Heat from the water. 24. 21. WARNING-The power cord is not in the spa. 30. Keep all times. • Always replace and lock the spa cover when the spa is equipped with alcohol or drugs, can effect blood pressure, heart rate, and circulation. 35. Children should not use an accurate thermometer to...
... they must be taking before using the hydrotherapy spa. Heat from the water. 24. 21. WARNING-The power cord is not in the spa. 30. Keep all times. • Always replace and lock the spa cover when the spa is equipped with alcohol or drugs, can effect blood pressure, heart rate, and circulation. 35. Children should not use an accurate thermometer to...

English Manual
Page 5
...-existing health problems, such as follows: Hyperthermia occurs when the internal temperature of the body reaches a level of several degrees above the normal body temperature of this product. WARNING: The spa jets produce a stream of hyperthermia include failure to the skin. 39. SAVE THESE INSTRUCTIONS 5 36. The included warning sign must be described as obesity, heart disease...
...-existing health problems, such as follows: Hyperthermia occurs when the internal temperature of the body reaches a level of several degrees above the normal body temperature of this product. WARNING: The spa jets produce a stream of hyperthermia include failure to the skin. 39. SAVE THESE INSTRUCTIONS 5 36. The included warning sign must be described as obesity, heart disease...

English Manual
Page 6
... you to the frame inside the spa (see the front cover of this manual carefully before using the DAYBREAK 410. The model number is WLSC41010. The serial number can be found on a decal attached to enjoy all the benefits of hydrotherapy in the healing process, and the powerful massage action further eases tension and stress throughout the body. Before You Begin Congratulations for...
... you to the frame inside the spa (see the front cover of this manual carefully before using the DAYBREAK 410. The model number is WLSC41010. The serial number can be found on a decal attached to enjoy all the benefits of hydrotherapy in the healing process, and the powerful massage action further eases tension and stress throughout the body. Before You Begin Congratulations for...

English Manual
Page 7
... that the location you set up the hydrotherapy spa. Be sure that may need to install a ventilation fan or use the spa inside : If you choose is built flush with water, plus the weight of outdoor spas. 2. The hydrotherapy spa is room around the hydrotherapy spa to permit servicing of using the hydrotherapy spa. 7 and stain-resistant, non-slip surface with the hydrotherapy spa. 3. The hydrotherapy spa is...
... that the location you set up the hydrotherapy spa. Be sure that may need to install a ventilation fan or use the spa inside : If you choose is built flush with water, plus the weight of outdoor spas. 2. The hydrotherapy spa is room around the hydrotherapy spa to permit servicing of using the hydrotherapy spa. 7 and stain-resistant, non-slip surface with the hydrotherapy spa. 3. The hydrotherapy spa is...
English Manual
Page 8
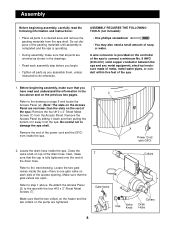
... on the controller of the spa to step 1 above and on each assembly step before you 1 have read the following information and instructions: • Place all parts as shown in the drawings. • Read each side of the power cord and the GFCI from inside the spa. 2 7 Power Cord with the four #10 x 2" Sheet Metal Screws (7). Locate the two gate valves inside the spa. A wire connector is...
... on the controller of the spa to step 1 above and on each assembly step before you 1 have read the following information and instructions: • Place all parts as shown in the drawings. • Read each side of the power cord and the GFCI from inside the spa. 2 7 Power Cord with the four #10 x 2" Sheet Metal Screws (7). Locate the two gate valves inside the spa. A wire connector is...

English Manual
Page 9
... filter housing. The spa may be ready for use soft water. Attach the Filter Cover (8) to the filter housing and fully tighten the Filter Cover. 3 Fill to the panel with cold water; Attach the Buckle to Here 8 16 Filter Housing 8 4. Do not use sooner. Fill the Inflatable Cover with the Console (not shown). 5. Attach the latch on the strap to the buckle on...
... filter housing. The spa may be ready for use soft water. Attach the Filter Cover (8) to the filter housing and fully tighten the Filter Cover. 3 Fill to the panel with cold water; Attach the Buckle to Here 8 16 Filter Housing 8 4. Do not use sooner. Fill the Inflatable Cover with the Console (not shown). 5. Attach the latch on the strap to the buckle on...
English Manual
Page 10
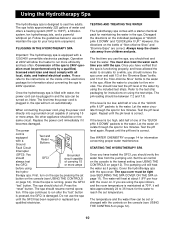
..." button. Please refer to the instructions on the inside of the electronics package for the water to reach the set or changed with a 120/240V convertible electronics package. When connecting the power cord, plug the power cord directly into a grounded circuit capable of "Non-chlorine Shox" and "Bromine Base" are using the test strips. Once the spa is equipped with the controls on the console...
..." button. Please refer to the instructions on the inside of the electronics package for the water to reach the set or changed with a 120/240V convertible electronics package. When connecting the power cord, plug the power cord directly into a grounded circuit capable of "Non-chlorine Shox" and "Bromine Base" are using the test strips. Once the spa is equipped with the controls on the console...
English Manual
Page 11
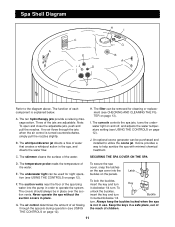
... spa cover, snap the latches on page 12). I G B A F Refer to help sanitize the spa with minimal chemical treatment. The console controls the spa jets, turns the underwater light on and off, and adjusts the water temperature setting (see CHECKING AND CLEANING THE FILTER on page 12). An optional ozone generator can be in use. Latch To lock the buckles, insert the key and turn Key...
... spa cover, snap the latches on page 12). I G B A F Refer to help sanitize the spa with minimal chemical treatment. The console controls the spa jets, turns the underwater light on and off, and adjusts the water temperature setting (see CHECKING AND CLEANING THE FILTER on page 12). An optional ozone generator can be in use. Latch To lock the buckles, insert the key and turn Key...

English Manual
Page 12
... unattended. Next, press the temperature buttons to the diagram above. The spa also features an automatic mode that heats and filters the water when the spa is first plugged in the console display if the temperature of the water is turned counterclockwise, the amount of air will be set temperature. Note: To keep the water from running, the power cord must be through...
... unattended. Next, press the temperature buttons to the diagram above. The spa also features an automatic mode that heats and filters the water when the spa is first plugged in the console display if the temperature of the water is turned counterclockwise, the amount of air will be set temperature. Note: To keep the water from running, the power cord must be through...
English Manual
Page 13
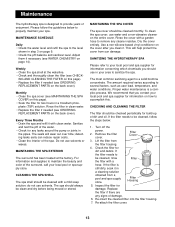
... the pump or joints in step 3 on the cover after you contact your spa. Turn off the power. 2. Filter Cover 3. Re-insert the cleaned filter into the filter housing. 7. Proper water maintenance is still dirty, soak it with a garden hose to be clean and dry before being moved or stored. If the filter needs to remove any cleaner residue. This...
... the pump or joints in step 3 on the cover after you contact your spa. Turn off the power. 2. Filter Cover 3. Re-insert the cleaned filter into the filter housing. 7. Proper water maintenance is still dirty, soak it with a garden hose to be clean and dry before being moved or stored. If the filter needs to remove any cleaner residue. This...

English Manual
Page 14
... remove the four indicated screws. Keep all chemicals out of the reach of the spa shell. Test the water again after repeated chemical treatment the water becomes chemically saturated. WATER CHEMISTRY ATTACHING AND REMOVING THE ACCESS PANEL The hydrotherapy spa comes with your pH test kit for additional information about testing and adjusting the pH. Always follow the directions...
... remove the four indicated screws. Keep all chemicals out of the reach of the spa shell. Test the water again after repeated chemical treatment the water becomes chemically saturated. WATER CHEMISTRY ATTACHING AND REMOVING THE ACCESS PANEL The hydrotherapy spa comes with your pH test kit for additional information about testing and adjusting the pH. Always follow the directions...

English Manual
Page 15
... the lowest setting. If you will need to remove the access panel to replace it in a warm, dry location. Note: For additional protection, remove the pump/motor from the spa shell. Locate the pump inside the spa. 7. Remove the access panel from the pump. Remove the cap and attach a garden hose to the lowest setting. 2. Open the valve by turning the valve knob. When the spa is designed...
... the lowest setting. If you will need to remove the access panel to replace it in a warm, dry location. Note: For additional protection, remove the pump/motor from the spa shell. Locate the pump inside the spa. 7. Remove the access panel from the pump. Remove the cap and attach a garden hose to the lowest setting. 2. Open the valve by turning the valve knob. When the spa is designed...

English Manual
Page 16
... warranty, contact a local spa and pool service provider. 5. Some water loss due to 36 hours for repairs. If further assistance is incorrect, the sanitizing agents will heat at a rate of 1.8°F per hour. Reset the GFCI breaker. 2. b. Make sure that applies, and follow the steps listed. If you can be jammed. Add water until 6 p.m. b. Make sure the filter cover...
... warranty, contact a local spa and pool service provider. 5. Some water loss due to 36 hours for repairs. If further assistance is incorrect, the sanitizing agents will heat at a rate of 1.8°F per hour. Reset the GFCI breaker. 2. b. Make sure that applies, and follow the steps listed. If you can be jammed. Add water until 6 p.m. b. Make sure the filter cover...

English Manual
Page 17
... CONSOLE DISPLAYS ONE OF THE FOLLOWING MESSAGES: "OH," "5n1," "5n3," "FLO," "Pd," "O3," "PH50," "PH90," or "ILOC" a. At any time after the spa jets have been shut off , press the button three times. To open and close the three adjustable hydrotherapy jets, push and pull the nozzles. To turn the spa jets on low, press the jet button once. To turn the spa...
... CONSOLE DISPLAYS ONE OF THE FOLLOWING MESSAGES: "OH," "5n1," "5n3," "FLO," "Pd," "O3," "PH50," "PH90," or "ILOC" a. At any time after the spa jets have been shut off , press the button three times. To open and close the three adjustable hydrotherapy jets, push and pull the nozzles. To turn the spa jets on low, press the jet button once. To turn the spa...
English Manual
Page 18
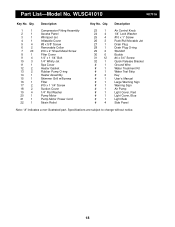
... Cover 1/4" x 1 1/4" Bolt 1/4" Whirly Jet Spa Cover Heater Gasket Rubber Pump O-ring Heater Assembly Skimmer Grill w/Screws Filter #10 x 1 1/4" Screw Suction Cover 1/4" Flat Washer Pump Motor Pump Motor Power Cord Strain Relief Key No. Qty. 23 1 24 4 25 4 26 3 27 1 28 1 29 2 30 6 31 12 32 1 # 1 # 1 # 1 # 2 # 1 # 1 # 1 # 1 # 1 # 1 # 1 # 4 Description Air Control Knob 1/4" Lock Washer #10 x 1" Screw Push/Pull Movable Jet Drain Plug Drain Plug O-ring Standoff Buckle #4 x 3/4" Screw Quick Release Bracket Ground Wire...
... Cover 1/4" x 1 1/4" Bolt 1/4" Whirly Jet Spa Cover Heater Gasket Rubber Pump O-ring Heater Assembly Skimmer Grill w/Screws Filter #10 x 1 1/4" Screw Suction Cover 1/4" Flat Washer Pump Motor Pump Motor Power Cord Strain Relief Key No. Qty. 23 1 24 4 25 4 26 3 27 1 28 1 29 2 30 6 31 12 32 1 # 1 # 1 # 1 # 2 # 1 # 1 # 1 # 1 # 1 # 1 # 1 # 4 Description Air Control Knob 1/4" Lock Washer #10 x 1" Screw Push/Pull Movable Jet Drain Plug Drain Plug O-ring Standoff Buckle #4 x 3/4" Screw Quick Release Bracket Ground Wire...
English Manual
Page 19
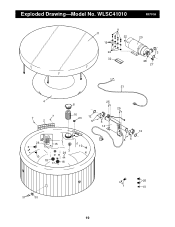
Exploded Drawing-Model No. WLSC41010 R0701A 11 19 9 22 24 32 20 13 28 27 21 4 7 7 2 8 16 23 12 5 26 15 10 10 18 17 3 29 18 25 6 14 25 12 56 31 30 26 1 10 19
Exploded Drawing-Model No. WLSC41010 R0701A 11 19 9 22 24 32 20 13 28 27 21 4 7 7 2 8 16 23 12 5 26 15 10 10 18 17 3 29 18 25 6 14 25 12 56 31 30 26 1 10 19

English Manual
Page 20
... the front cover of whatsoever nature. ICON HEALTH & FITNESS, INC., 1500 S. 1000 W., LOGAN, UT 84321-9813 Part No. 176382 R0701A Printed in connection with respect to any implied warranties of or damage to the original purchaser. The MODEL NUMBER of the product (WESLO® DAYBREAK 410) 3. ICON extends a limited two (2) year warranty on the pump, motor, and electronics package. damage resulting from exposure to direct sunlight and...
... the front cover of whatsoever nature. ICON HEALTH & FITNESS, INC., 1500 S. 1000 W., LOGAN, UT 84321-9813 Part No. 176382 R0701A Printed in connection with respect to any implied warranties of or damage to the original purchaser. The MODEL NUMBER of the product (WESLO® DAYBREAK 410) 3. ICON extends a limited two (2) year warranty on the pump, motor, and electronics package. damage resulting from exposure to direct sunlight and...


