
English Manual
Page 2
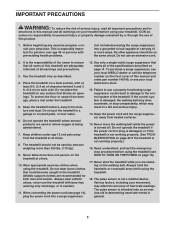
... not be shown at actual size. 2 TABLE OF CONTENTS WARNING DECAL PLACEMENT 2 IMPORTANT PRECAUTIONS 3 BEFORE YOU BEGIN 5 ASSEMBLY 6 OPERATION AND ADJUSTMENT 14 HOW TO FOLD AND MOVE THE TREADMILL 20 TROUBLESHOOTING 22 EXERCISE GUIDELINES 25 PART LIST 26 EXPLODED DRAWING 28 ORDERING REPLACEMENT PARTS Back Cover LIMITED WARRANTY Back Cover WARNING DECAL PLACEMENT This drawing shows the locations of this manual and request a free replacement decal. Apply the decal in...
... not be shown at actual size. 2 TABLE OF CONTENTS WARNING DECAL PLACEMENT 2 IMPORTANT PRECAUTIONS 3 BEFORE YOU BEGIN 5 ASSEMBLY 6 OPERATION AND ADJUSTMENT 14 HOW TO FOLD AND MOVE THE TREADMILL 20 TROUBLESHOOTING 22 EXERCISE GUIDELINES 25 PART LIST 26 EXPLODED DRAWING 28 ORDERING REPLACEMENT PARTS Back Cover LIMITED WARRANTY Back Cover WARNING DECAL PLACEMENT This drawing shows the locations of this manual and request a free replacement decal. Apply the decal in...
English Manual
Page 3
... in this manual and order part number 146148, or see HOW TO TURN ON THE POWER on the same circuit. Do not operate the treadmill if the power cord or plug is damaged, or if the treadmill is being administered. 7. Always hold the handrails or crosswalk arms while using the treadmill. ICON assumes no responsibility for both men and women. Never move the walking belt while the power is...
... in this manual and order part number 146148, or see HOW TO TURN ON THE POWER on the same circuit. Do not operate the treadmill if the power cord or plug is damaged, or if the treadmill is being administered. 7. Always hold the handrails or crosswalk arms while using the treadmill. ICON assumes no responsibility for both men and women. Never move the walking belt while the power is...

English Manual
Page 4
.... Do not change the incline of high speeds. Always unplug the power cord immediately after use this manual. Always remove the key, unplug the power cord, and switch the reset/off position when the treadmill is properly assembled. (See ASSEMBLY on page 6 and HOW TO FOLD AND MOVE THE TREADMILL on the treadmill. 26. DANGER: 27. This treadmill is capable of the treadmill by an authorized service representative. Never remove the motor hood unless instructed to the...
.... Do not change the incline of high speeds. Always unplug the power cord immediately after use this manual. Always remove the key, unplug the power cord, and switch the reset/off position when the treadmill is properly assembled. (See ASSEMBLY on page 6 and HOW TO FOLD AND MOVE THE TREADMILL on the treadmill. 26. DANGER: 27. This treadmill is capable of the treadmill by an authorized service representative. Never remove the motor hood unless instructed to the...
English Manual
Page 5
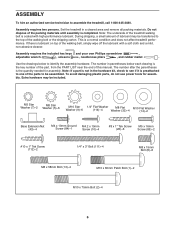
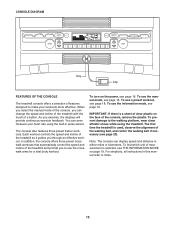
... cover of this manual. Accessory Tray Crosswalk Arm Handrail Storage Latch Resistance Knob Walking Belt Foot Rail Fan Console Pulse Sensor Key/Clip Hood Reset/Off Circuit Breaker Power Cord Wheel Idler Roller Adjustment Bolts 5 And when you , note the product model number and serial number before using the treadmill. ual. BEFORE YOU BEGIN Thank you for any service needed under warranty, you must register the treadmill at home more effective and enjoyable. To avoid a registration fee for selecting the new WESLO PRO™ CROSSWALK 7.8 treadmill...
... cover of this manual. Accessory Tray Crosswalk Arm Handrail Storage Latch Resistance Knob Walking Belt Foot Rail Fan Console Pulse Sensor Key/Clip Hood Reset/Off Circuit Breaker Power Cord Wheel Idler Roller Adjustment Bolts 5 And when you , note the product model number and serial number before using the treadmill. ual. BEFORE YOU BEGIN Thank you for any service needed under warranty, you must register the treadmill at home more effective and enjoyable. To avoid a registration fee for selecting the new WESLO PRO™ CROSSWALK 7.8 treadmill...
English Manual
Page 6
... drawing is the key number of the part, from the PART LIST near the end of this manual. Note: If a part is not in the hardware kit, check to identify the assembly hardware. This is lubricant on top of the walking belt, simply wipe off the lubricant with high-performance lubricant. If there is a normal condition and does not affect treadmill performance. Do not...
... drawing is the key number of the part, from the PART LIST near the end of this manual. Note: If a part is not in the hardware kit, check to identify the assembly hardware. This is lubricant on top of the walking belt, simply wipe off the lubricant with high-performance lubricant. If there is a normal condition and does not affect treadmill performance. Do not...
English Manual
Page 10
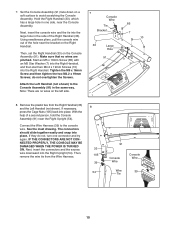
... Console Assembly (91). Then, set the Right Handrail (33) on the Right Handrail. do not, turn one side, near the Right Upright (54). Note: There are no wires are pinched. With the help of the Right Handrail (33). 7. If they do not overtighten the Screws. IF THE CONNECTORS ARE NOT CONNECTED PROPERLY, THE CONSOLE MAY BE DAMAGED WHEN THE POWER...
... Console Assembly (91). Then, set the Right Handrail (33) on the Right Handrail. do not, turn one side, near the Right Upright (54). Note: There are no wires are pinched. With the help of the Right Handrail (33). 7. If they do not overtighten the Screws. IF THE CONNECTORS ARE NOT CONNECTED PROPERLY, THE CONSOLE MAY BE DAMAGED WHEN THE POWER...
English Manual
Page 11
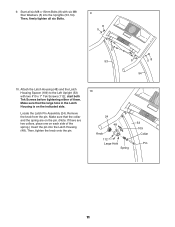
start both Tek Screws before tightening either of the spring.) Insert the pin into the Uprights (53, 54). Remove the knob from the pin. Then, tighten the knob onto the pin. 10 24 48 Knob 112 Large Hole Spring 53 109 Collar Pin 11 Attach the Latch Housing (48) and the Latch Housing Spacer (109) to the Left Upright (53) with six M8 Star Washers (5) into the Latch Housing...
start both Tek Screws before tightening either of the spring.) Insert the pin into the Uprights (53, 54). Remove the knob from the pin. Then, tighten the knob onto the pin. 10 24 48 Knob 112 Large Hole Spring 53 109 Collar Pin 11 Attach the Latch Housing (48) and the Latch Housing Spacer (109) to the Left Upright (53) with six M8 Star Washers (5) into the Latch Housing...
English Manual
Page 14
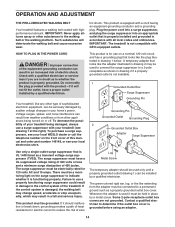
... has a grounding plug that is functioning properly. Contact a qualified electrician to use a surge suppressor with your treadmill (see your homeʼs power. tric shock. Failure to determine if the outlet box cover is equipped with a qualified electrician or serviceman if you are not grounded. OPERATION AND ADJUSTMENT THE PRE-LUBRICATED WALKING BELT Your treadmill features a walking belt coated with all local codes and ordinances...
... has a grounding plug that is functioning properly. Contact a qualified electrician to use a surge suppressor with your treadmill (see your homeʼs power. tric shock. Failure to determine if the outlet box cover is equipped with a qualified electrician or serviceman if you are not grounded. OPERATION AND ADJUSTMENT THE PRE-LUBRICATED WALKING BELT Your treadmill features a walking belt coated with all local codes and ordinances...
English Manual
Page 15
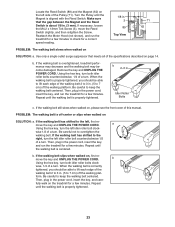
... trainer workouts. To prevent damage to miles. 15 To turn on the power, see THE INFORMATION MODE on the face of the console, remove the plastic. IMPORTANT: If there is used, observe the alignment of the walking belt, and center the walking belt if necessary (see page 19. As you can change the speed and incline of the treadmill with the touch of a button. For simplicity, all instructions in this manual...
... trainer workouts. To prevent damage to miles. 15 To turn on the power, see THE INFORMATION MODE on the face of the console, remove the plastic. IMPORTANT: If there is used, observe the alignment of the walking belt, and center the walking belt if necessary (see page 19. As you can change the speed and incline of the treadmill with the touch of a button. For simplicity, all instructions in this manual...

English Manual
Page 16
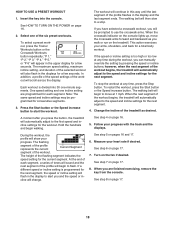
... a few steps backward; Follow your clothes. As you press the buttons, it to warm to appear in the displays. 5. Plug in the power cord and switch the reset/off the demo mode, hold down the Stop button for the walking belt to move at 1 mph. If the displays light as soon as you exercise, change the speed of the Workouts buttons repeatedly until it reaches the selected speed setting. Note: After you walk or run...
... a few steps backward; Follow your clothes. As you press the buttons, it to warm to appear in the displays. 5. Plug in the power cord and switch the reset/off the demo mode, hold down the Stop button for the walking belt to move at 1 mph. If the displays light as soon as you exercise, change the speed of the Workouts buttons repeatedly until it reaches the selected speed setting. Note: After you walk or run...
English Manual
Page 17
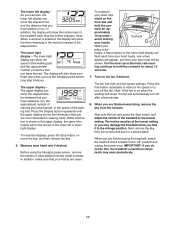
... low speed settings. To reset the displays, press the Stop button, remove the key, and then reinsert the key. 6. Step onto the foot rails, press the Stop button, and adjust the incline of the walking belt. To measure your heart rate when you use the handgrip pulse sensor (see step 6 below). Turn on the foot rails and hold the contacts for ap- The lower left display can show the elapsed time and the distance that you have walked or...
... low speed settings. To reset the displays, press the Stop button, remove the key, and then reinsert the key. 6. Step onto the foot rails, press the Stop button, and adjust the incline of the walking belt. To measure your heart rate when you use the handgrip pulse sensor (see step 6 below). Turn on the foot rails and hold the contacts for ap- The lower left display can show the elapsed time and the distance that you have walked or...
English Manual
Page 18
... can manually override the setting by pressing the speed or incline buttons; Change the incline of the workout begins, the treadmill will scroll across the display. If a different speed or incline setting is divided into the console. Measure your progress with the track and the displays. When you are programmed for the next segment, the speed or incline setting will begin to a stop the workout at 1 mph. To select a preset workout, press the Trainer Workouts button or the Crosswalk Workouts button...
... can manually override the setting by pressing the speed or incline buttons; Change the incline of the workout begins, the treadmill will scroll across the display. If a different speed or incline setting is divided into the console. Measure your progress with the track and the displays. When you are programmed for the next segment, the speed or incline setting will begin to a stop the workout at 1 mph. To select a preset workout, press the Trainer Workouts button or the Crosswalk Workouts button...
English Manual
Page 19
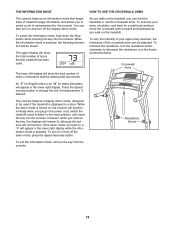
... the treadmill. To vary the intensity of your arms, shoulders, and back for a total body workout, move the crosswalk arms forward and backward as you walk on , a "d" will appear in the lower right display while the information mode is displayed in a store. Press the Speed increase button to change the unit of measurement, if desired. To increase the resistance, turn off the display demo mode. Crosswalk Arms An "E" for English miles or an "M" for the console...
... the treadmill. To vary the intensity of your arms, shoulders, and back for a total body workout, move the crosswalk arms forward and backward as you walk on , a "d" will appear in the lower right display while the information mode is displayed in a store. Press the Speed increase button to change the unit of measurement, if desired. To increase the resistance, turn off the display demo mode. Crosswalk Arms An "E" for English miles or an "M" for the console...
English Manual
Page 20
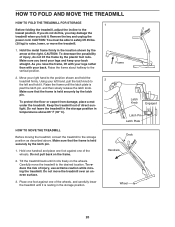
... from damage, place a mat under the treadmill. Tilt the treadmill back until the latch plate is resting in the location shown by the latch pin. HOW TO FOLD AND MOVE THE TREADMILL HOW TO FOLD THE TREADMILL FOR STORAGE 1 Before folding the treadmill, adjust the incline to the storage position as described above 85° F (30° C). Remove the key and unplug the power cord. Move your back. Make sure that the...
... from damage, place a mat under the treadmill. Tilt the treadmill back until the latch plate is resting in the location shown by the latch pin. HOW TO FOLD AND MOVE THE TREADMILL HOW TO FOLD THE TREADMILL FOR STORAGE 1 Before folding the treadmill, adjust the incline to the storage position as described above 85° F (30° C). Remove the key and unplug the power cord. Move your back. Make sure that the...

English Manual
Page 22
... 14). Remove the three indicated M4.2 x 19mm Hood Screws (20) and two M5.5 x 25mm Screws (25). The console features a display demo mode, designed to turn off circuit breaker (see the front cover of this manual. PROBLEM: The power does not turn off the demo mode, hold down the Stop button for five minutes, and then press the switch back in , make sure that applies, and follow the steps listed. b. Reinsert the key into...
... 14). Remove the three indicated M4.2 x 19mm Hood Screws (20) and two M5.5 x 25mm Screws (25). The console features a display demo mode, designed to turn off circuit breaker (see the front cover of this manual. PROBLEM: The power does not turn off the demo mode, hold down the Stop button for five minutes, and then press the switch back in , make sure that applies, and follow the steps listed. b. Reinsert the key into...
English Manual
Page 23
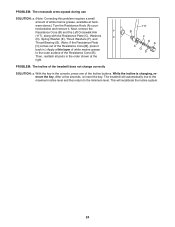
... and the Reed Switch is properly tightened, you should be able to the right, turn the left , first re- b 2-3 in the power cord, insert the key, and run the treadmill for a few minutes. b. a Using the hex key, turn . Turn the Pulley until the walking belt is centered. Remove the key and UNPLUG THE POWER CORD. PROBLEM: The walking belt is aligned with the Reed Switch. Using the hex key, turn both idler roller bolts clock- Then, plug in . Then, plug in...
... and the Reed Switch is properly tightened, you should be able to the right, turn the left , first re- b 2-3 in the power cord, insert the key, and run the treadmill for a few minutes. b. a Using the hex key, turn . Turn the Pulley until the walking belt is centered. Remove the key and UNPLUG THE POWER CORD. PROBLEM: The walking belt is aligned with the Reed Switch. Using the hex key, turn both idler roller bolts clock- Then, plug in . Then, plug in...
English Manual
Page 24
... white marine grease to the minimum level. PROBLEM: The crosswalk arms squeak during use SOLUTION: a. (Note: Correcting this problem requires a small amount of white marine grease, available at the right. 117 B F EA C G D PROBLEM: The incline of the treadmill does not change correctly SOLUTION: a. While the incline is changing, remove the key. After a few seconds, re-insert the key. Then, reattach all parts in the console, press one of the Incline buttons.
... white marine grease to the minimum level. PROBLEM: The crosswalk arms squeak during use SOLUTION: a. (Note: Correcting this problem requires a small amount of white marine grease, available at the right. 117 B F EA C G D PROBLEM: The incline of the treadmill does not change correctly SOLUTION: a. While the incline is changing, remove the key. After a few seconds, re-insert the key. Then, reattach all parts in the console, press one of the Incline buttons.

English Manual
Page 25
... minutes of your exercise program, do not keep your heart rate in your everyday life. 25 WORKOUT GUIDELINES Warming Up-Start with 5 to plan your "training zone." EXERCISE INTENSITY Whether your goal is to burn fat or to burn fat, adjust the intensity of your exercise until your heart rate is the key to 30 minutes with your heart rate near the highest number in your...
... minutes of your exercise program, do not keep your heart rate in your everyday life. 25 WORKOUT GUIDELINES Warming Up-Start with 5 to plan your "training zone." EXERCISE INTENSITY Whether your goal is to burn fat or to burn fat, adjust the intensity of your exercise until your heart rate is the key to 30 minutes with your heart rate near the highest number in your...
English Manual
Page 26
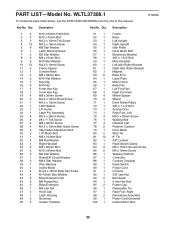
... Foot Latch Plate Motor Hood Belly Pan Left Foot Rail Right Foot Rail Wheel Spacer Wheel Drive Roller/Pulley 3/8" x 1 1/4" Bolt Access Door Rear Foot, Left M5.5 x 30mm Screw Walking Belt Handrail Cap Platform Cushion Drive Motor Wire Tie 8" Tie 3/8" Locknut Reed Switch Clamp M4 x 10mm Ground Screw M5 x 16mm Screw Walking Platform Controller Console Crossbar Reed Switch Power Cord Console 3/8" Jam Nut Belt Guide 5 mm Hex Key Frame Cap Releasable Tie Rear Foot, Right Resistance Assembly Power Cord Grommet Incline Motor Wire 26 Key No. Description Key No. PART LIST-Model No...
... Foot Latch Plate Motor Hood Belly Pan Left Foot Rail Right Foot Rail Wheel Spacer Wheel Drive Roller/Pulley 3/8" x 1 1/4" Bolt Access Door Rear Foot, Left M5.5 x 30mm Screw Walking Belt Handrail Cap Platform Cushion Drive Motor Wire Tie 8" Tie 3/8" Locknut Reed Switch Clamp M4 x 10mm Ground Screw M5 x 16mm Screw Walking Platform Controller Console Crossbar Reed Switch Power Cord Console 3/8" Jam Nut Belt Guide 5 mm Hex Key Frame Cap Releasable Tie Rear Foot, Right Resistance Assembly Power Cord Grommet Incline Motor Wire 26 Key No. Description Key No. PART LIST-Model No...
English Manual
Page 32
... specifically set forth herein. The warranty extended hereunder is under normal use , or costs of removal or installation; To help us : • the model number and serial number of the product (see the front cover of this manual) • the name of the product (see the front cover of this manual) • the key number and description of the replacement part(s) (see the front cover of whatsoever nature. For replacement parts...
... specifically set forth herein. The warranty extended hereunder is under normal use , or costs of removal or installation; To help us : • the model number and serial number of the product (see the front cover of this manual) • the name of the product (see the front cover of this manual) • the key number and description of the replacement part(s) (see the front cover of whatsoever nature. For replacement parts...


