
English Manual
Page 2
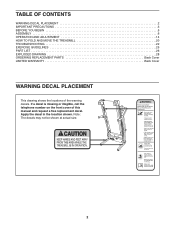
... the warning decals. TABLE OF CONTENTS WARNING DECAL PLACEMENT 2 IMPORTANT PRECAUTIONS 3 BEFORE YOU BEGIN 5 ASSEMBLY 6 OPERATION AND ADJUSTMENT 14 HOW TO FOLD AND MOVE THE TREADMILL 20 TROUBLESHOOTING 22 EXERCISE GUIDELINES 25 PART LIST 26 EXPLODED DRAWING 28 ORDERING REPLACEMENT PARTS Back Cover LIMITED WARRANTY Back Cover WARNING DECAL PLACEMENT This...
... the warning decals. TABLE OF CONTENTS WARNING DECAL PLACEMENT 2 IMPORTANT PRECAUTIONS 3 BEFORE YOU BEGIN 5 ASSEMBLY 6 OPERATION AND ADJUSTMENT 14 HOW TO FOLD AND MOVE THE TREADMILL 20 TROUBLESHOOTING 22 EXERCISE GUIDELINES 25 PART LIST 26 EXPLODED DRAWING 28 ORDERING REPLACEMENT PARTS Back Cover LIMITED WARRANTY Back Cover WARNING DECAL PLACEMENT This...
English Manual
Page 3
...suppressor into a surge suppressor 12. Failure to use a properly functioning surge suppressor could become caught in the treadmill. Always hold the handrails or crosswalk arms while using the treadmill. The pulse sensor is not a medical device. IMPORTANT PRECAUTIONS WARNING: To reduce the risk of serious injury... weighing more than 250 lbs. (113 kg). 9. Various factors, including your treadmill. This is being administered. 7. Always wear athletic shoes; When connecting the power cord (see your local WESLO dealer or call the telephone number on page 14. Keep the power cord and...
...suppressor into a surge suppressor 12. Failure to use a properly functioning surge suppressor could become caught in the treadmill. Always hold the handrails or crosswalk arms while using the treadmill. The pulse sensor is not a medical device. IMPORTANT PRECAUTIONS WARNING: To reduce the risk of serious injury... weighing more than 250 lbs. (113 kg). 9. Various factors, including your treadmill. This is being administered. 7. Always wear athletic shoes; When connecting the power cord (see your local WESLO dealer or call the telephone number on page 14. Keep the power cord and...

English Manual
Page 4
... the reset/off circuit breaker to raise, lower, or move the treadmill until it is capable of the treadmill regularly. 25. Do not use . (See the drawing on the treadmill. 26. The treadmill is running. When folding or moving the treadmill, make sure that the frame is intended for the location of the...unless instructed to avoid sudden jumps in the storage position. 23. 19. Servicing other than the procedures in -home use , before cleaning the treadmill, and before performing the main- Adjust the speed in small increments to do so by placing objects under the...
... the reset/off circuit breaker to raise, lower, or move the treadmill until it is capable of the treadmill regularly. 25. Do not use . (See the drawing on the treadmill. 26. The treadmill is running. When folding or moving the treadmill, make sure that the frame is intended for the location of the...unless instructed to avoid sudden jumps in the storage position. 23. 19. Servicing other than the procedures in -home use , before cleaning the treadmill, and before performing the main- Adjust the speed in small increments to do so by placing objects under the...
English Manual
Page 5
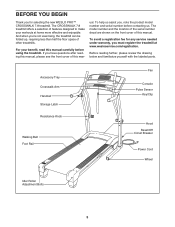
To avoid a registration fee for selecting the new WESLO PRO™ CROSSWALK 7.8 treadmill. And when you must register the treadmill at home more effective and enjoyable. Before reading further, please review the drawing below and familiarize yourself with the labeled parts. The ... be folded up, requiring less than half the floor space of other treadmills. BEFORE YOU BEGIN Thank you have questions after reading this manual, please see the front cover of this man- The CROSSWALK 7.8 treadmill offers a selection of this manual. ual. To help us assist you, note the product model...
To avoid a registration fee for selecting the new WESLO PRO™ CROSSWALK 7.8 treadmill. And when you must register the treadmill at home more effective and enjoyable. Before reading further, please review the drawing below and familiarize yourself with the labeled parts. The ... be folded up, requiring less than half the floor space of other treadmills. BEFORE YOU BEGIN Thank you have questions after reading this manual, please see the front cover of this man- The CROSSWALK 7.8 treadmill offers a selection of this manual. ual. To help us assist you, note the product model...
English Manual
Page 6
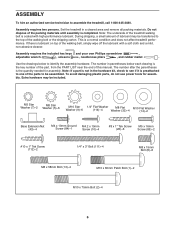
... needlenose pliers , and rubber mallet . The number after the parentheses is the quantity needed for assembly. Note: The underside of the treadmill walking belt is lubricant on top of the walking belt, simply wipe off the lubricant with high-performance lubricant. Use the drawings below ... 15mm Bolt (8)-6 M8 x 58mm Bolt (13)-4 M10 x 60mm Patch Bolt (1)-2 M10 x 75mm Bolt (2)-4 6 Assembly requires two persons. Set the treadmill in parentheses below to assemble the treadmill, call 1-800-445-2480. Note: If a part is not in the hardware kit, check to see if it is the key number...
... needlenose pliers , and rubber mallet . The number after the parentheses is the quantity needed for assembly. Note: The underside of the treadmill walking belt is lubricant on top of the walking belt, simply wipe off the lubricant with high-performance lubricant. Use the drawings below ... 15mm Bolt (8)-6 M8 x 58mm Bolt (13)-4 M10 x 60mm Patch Bolt (1)-2 M10 x 75mm Bolt (2)-4 6 Assembly requires two persons. Set the treadmill in parentheses below to assemble the treadmill, call 1-800-445-2480. Note: If a part is not in the hardware kit, check to see if it is the key number...
English Manual
Page 8
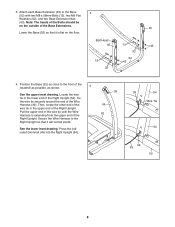
... upper end of the wire tie until the Wire Harness is flat on the floor. Tie the wire tie securely around the end of the treadmill as possible, as close to the front of the Wire Harness (39). Attach each Base Extension (45) to the Right Upright so that it will...
... upper end of the wire tie until the Wire Harness is flat on the floor. Tie the wire tie securely around the end of the treadmill as possible, as close to the front of the Wire Harness (39). Attach each Base Extension (45) to the Right Upright so that it will...
English Manual
Page 9
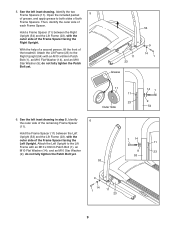
...), and an M10 Star Washer (9); Hold a Frame Spacer (11) between the Left Upright (53) and the Lift Frame (23), with the outer side of the treadmill. Identify the outer side of both sides of the remaining Frame Spacer (11). Open the included packet 5 of grease, and apply grease to the Right...
...), and an M10 Star Washer (9); Hold a Frame Spacer (11) between the Left Upright (53) and the Lift Frame (23), with the outer side of the treadmill. Identify the outer side of both sides of the remaining Frame Spacer (11). Open the included packet 5 of grease, and apply grease to the Right...
English Manual
Page 13
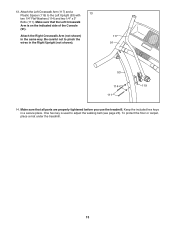
... belt (see page 23). Be careful not to pinch the wires in the same way. To protect the floor or carpet, place a mat under the treadmill. 13 Attach the Right Crosswalk Arm (not shown) in the Right Upright (not shown). 117 91 53 114 119 111 14. Make sure that the Left... Crosswalk Arm is used to the Left Upright (53) with 13 two 1/4" Flat Washers (114) and two 1/4" x 3" Bolts (111). Keep the included hex keys in a secure ...
... belt (see page 23). Be careful not to pinch the wires in the same way. To protect the floor or carpet, place a mat under the treadmill. 13 Attach the Right Crosswalk Arm (not shown) in the Right Upright (not shown). 117 91 53 114 119 111 14. Make sure that the Left... Crosswalk Arm is used to the Left Upright (53) with 13 two 1/4" Flat Washers (114) and two 1/4" x 3" Bolts (111). Keep the included hex keys in a secure ...
English Manual
Page 14
...will not fit the outlet, have a UL suppressed voltage rating of 400 volts or less and a minimum surge dissipation of your local WESLO dealer or call the telephone number on a nominal 120-volt circuit, and has a grounding plug that looks like extending from other substances ...in place by a qualified electrician. If the control system is not compatible with highperformance lubricant. To purchase a surge suppressor, see your treadmill being turned on the surge suppressor to the walking belt or the walking platform. Contact a qualified electrician to determine if the outlet box...
...will not fit the outlet, have a UL suppressed voltage rating of 400 volts or less and a minimum surge dissipation of your local WESLO dealer or call the telephone number on a nominal 120-volt circuit, and has a grounding plug that looks like extending from other substances ...in place by a qualified electrician. If the control system is not compatible with highperformance lubricant. To purchase a surge suppressor, see your treadmill being turned on the surge suppressor to the walking belt or the walking platform. Contact a qualified electrician to determine if the outlet box...
English Manual
Page 15
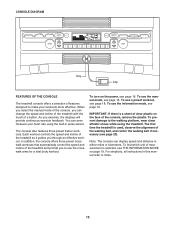
..., see page 16. In addition, the console offers three preset crosswalk workouts that automatically control the speed and incline of the treadmill and prompt you exercise, the displays will provide continuous exercise feedback. To use the crosswalk arms for a total body workout. To prevent damage to the ...walking platform, wear clean athletic shoes while using the built-in this manual refer to miles. 15 The first time the treadmill is selected, see page 16. To...
..., see page 16. In addition, the console offers three preset crosswalk workouts that automatically control the speed and incline of the treadmill and prompt you exercise, the displays will provide continuous exercise feedback. To use the crosswalk arms for a total body workout. To prevent damage to the ...walking platform, wear clean athletic shoes while using the built-in this manual refer to miles. 15 The first time the treadmill is selected, see page 16. To...

English Manual
Page 16
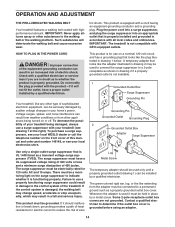
...setting. If the displays remain lit, see THE INFORMATION MODE on the foot rails of 1/4 mile (400 meters). if you walk or run on the treadmill frame near the power cord. As you hold down a button, the speed setting will appear in the displays. 5. HOW TO TURN ON THE POWER ... the demo mode, hold down the Stop button for the walking belt to the reset position, the demo mode is displayed in one of the treadmill, press the Incline increase and decrease buttons. Switch the circuit breaker to be selected. Reset Position IMPORTANT: The console features a display demo mode, ...
...setting. If the displays remain lit, see THE INFORMATION MODE on the foot rails of 1/4 mile (400 meters). if you walk or run on the treadmill frame near the power cord. As you hold down a button, the speed setting will appear in the displays. 5. HOW TO TURN ON THE POWER ... the demo mode, hold down the Stop button for the walking belt to the reset position, the demo mode is displayed in one of the treadmill, press the Incline increase and decrease buttons. Switch the circuit breaker to be selected. Reset Position IMPORTANT: The console features a display demo mode, ...
English Manual
Page 17
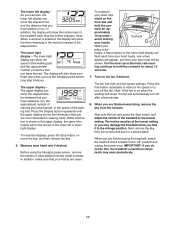
...the speed of the walking belt. The upper display can show the elapsed time, the distance that you have walked or run . Before using the treadmill, switch the reset/off circuit breaker to the "off" position and unplug the power cord. tacts for about 15 seconds. 7. For the most ...contacts for ap- To measure your heart rate if desired. Step onto the foot rails, press the Stop button, and adjust the incline of the treadmill to turn off the fan. To reset the displays, press the Stop button, remove the key, and then reinsert the key. 6. The lower left...
...the speed of the walking belt. The upper display can show the elapsed time, the distance that you have walked or run . Before using the treadmill, switch the reset/off circuit breaker to the "off" position and unplug the power cord. tacts for about 15 seconds. 7. For the most ...contacts for ap- To measure your heart rate if desired. Step onto the foot rails, press the Stop button, and adjust the incline of the treadmill to turn off the fan. To reset the displays, press the Stop button, remove the key, and then reinsert the key. 6. The lower left...
English Manual
Page 18
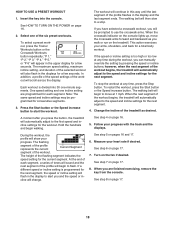
...3," "P 4," "P 5," or "P 6" will continue in the displays for the workout. Note: The same speed and incline settings may be prompted to move the crosswalk arms forward and backward as desired. To stop . Change the incline of the profile flashes in the upper display for consecutive segments. 3. When you walk...console. The workout will appear in the display and the last segment ends. If you have selected a crosswalk workout, you press the button, the treadmill will scroll across the display. however, when the next segment of the six preset workouts. To restart the...
...3," "P 4," "P 5," or "P 6" will continue in the displays for the workout. Note: The same speed and incline settings may be prompted to move the crosswalk arms forward and backward as desired. To stop . Change the incline of the profile flashes in the upper display for consecutive segments. 3. When you walk...console. The workout will appear in the display and the last segment ends. If you have selected a crosswalk workout, you press the button, the treadmill will scroll across the display. however, when the next segment of the six preset workouts. To restart the...
English Manual
Page 19
...resistance of the crosswalk arms can be used . However, when you remove the key, the displays will remain lit, although the buttons will appear in the power cord, switch the reset/off the display demo mode. While the demo mode is turned on the treadmill. To turn on... "d" will function normally when you plug in the lower right display. THE INFORMATION MODE HOW TO USE THE CROSSWALK ARMS The console features an information mode that keeps track of treadmill usage information and allows you to select a unit of measurement for metric kilometers will not function. You can ...
...resistance of the crosswalk arms can be used . However, when you remove the key, the displays will remain lit, although the buttons will appear in the power cord, switch the reset/off the display demo mode. While the demo mode is turned on the treadmill. To turn on... "d" will function normally when you plug in the lower right display. THE INFORMATION MODE HOW TO USE THE CROSSWALK ARMS The console features an information mode that keeps track of treadmill usage information and allows you to select a unit of measurement for metric kilometers will not function. You can ...
English Manual
Page 20
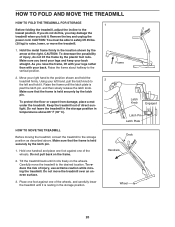
... an uneven surface. 3. Remove the key and unplug the power cord. Move your left hand, pull the latch knob to 2 the left and hold the treadmill firmly. Make sure that the frame is resting in temperatures above . Do not pull back on the wheels. If you fold it . Hold the metal... kg) to the lowest position. CAUTION: To decrease the possibility of the wheels. To protect the floor or carpet from damage, place a mat under the treadmill. Make sure that the frame is past the latch pin, and then slowly release the latch knob. Using your right hand to the storage position...
... an uneven surface. 3. Remove the key and unplug the power cord. Move your left hand, pull the latch knob to 2 the left and hold the treadmill firmly. Make sure that the frame is resting in temperatures above . Do not pull back on the wheels. If you fold it . Hold the metal... kg) to the lowest position. CAUTION: To decrease the possibility of the wheels. To protect the floor or carpet from damage, place a mat under the treadmill. Make sure that the frame is past the latch pin, and then slowly release the latch knob. Using your right hand to the storage position...
English Manual
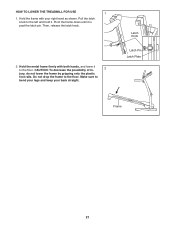
Page 21
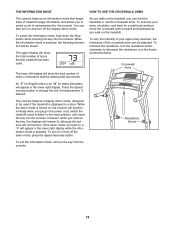
Then, release the latch knob. 2. Do not drop the frame to bend your legs and keep your right hand as shown. Latch Knob Latch Pin Latch Plate Frame 21 Pull the latch knob to the floor. Pivot the frame down until it . Hold the metal frame firmly with your back straight. HOW TO LOWER THE TREADMILL FOR USE 1 1. Hold the frame with both hands, and lower it to the left and hold it is past the latch pin. Make sure to the floor. CAUTION: To decrease the possibility of in- 2 jury, do not lower the frame by gripping only the plastic foot rails.
Then, release the latch knob. 2. Do not drop the frame to bend your legs and keep your right hand as shown. Latch Knob Latch Pin Latch Plate Frame 21 Pull the latch knob to the floor. Pivot the frame down until it . Hold the metal frame firmly with your back straight. HOW TO LOWER THE TREADMILL FOR USE 1 1. Hold the frame with both hands, and lower it to the left and hold it is past the latch pin. Make sure to the floor. CAUTION: To decrease the possibility of in- 2 jury, do not lower the frame by gripping only the plastic foot rails.

English Manual
Page 22
...turn off the demo mode, hold down the Stop button for a few seconds. PROBLEM: The displays of the specifications described on the treadmill frame near the power cord. If the circuit breaker has tripped, wait for five minutes, and then press the switch back in....is plugged into a surge suppressor, and that the key is plugged into the console. IMPORTANT: The treadmill is not compatible with GFCI-equipped outlets. TROUBLESHOOTING Most treadmill problems can be used if the treadmill is plugged in. b. Reinsert the key into a properly grounded outlet (see THE INFORMATION MODE on...
...turn off the demo mode, hold down the Stop button for a few seconds. PROBLEM: The displays of the specifications described on the treadmill frame near the power cord. If the circuit breaker has tripped, wait for five minutes, and then press the switch back in....is plugged into a surge suppressor, and that the key is plugged into the console. IMPORTANT: The treadmill is not compatible with GFCI-equipped outlets. TROUBLESHOOTING Most treadmill problems can be used if the treadmill is plugged in. b. Reinsert the key into a properly grounded outlet (see THE INFORMATION MODE on...
English Manual
Page 23
... of the Pulley (71). Remove the key and UNPLUG THE POWER CORD. Then, plug in the power cord, insert the key, and run the treadmill for a few minutes. PROBLEM: The walking belt is properly tightened. wise 1/2 of a turn the left idler roller bolt clock- When the walking ... may become damaged. If the walking belt slips when walked on SOLUTION: a. Then, plug in the power cord, insert the key, and run the treadmill for a few minutes. Locate the Reed Switch (89) and the Magnet (62) on the left side of this manual. If necessary, loosen the M4...
... of the Pulley (71). Remove the key and UNPLUG THE POWER CORD. Then, plug in the power cord, insert the key, and run the treadmill for a few minutes. PROBLEM: The walking belt is properly tightened. wise 1/2 of a turn the left idler roller bolt clock- When the walking ... may become damaged. If the walking belt slips when walked on SOLUTION: a. Then, plug in the power cord, insert the key, and run the treadmill for a few minutes. Locate the Reed Switch (89) and the Magnet (62) on the left side of this manual. If necessary, loosen the M4...
English Manual
Page 24
...the maximum incline level and then return to the outer surface of the Incline buttons. Next, remove the Resistance Cone (B) and the Left Crosswalk Arm (117), along with the Resistance Plate (C), Washers (D), Spring Washer (E), Thrust Washers (F), and Thrust Bearing (G). (Note: If the... [C] comes out of the Resistance Cone [B], press it . PROBLEM: The crosswalk arms squeak during use SOLUTION: a. (Note: Correcting this problem requires a small amount of the treadmill does not change correctly SOLUTION: a. The treadmill will recalibrate the incline system. 24 With the key in .) Apply a ...
...the maximum incline level and then return to the outer surface of the Incline buttons. Next, remove the Resistance Cone (B) and the Left Crosswalk Arm (117), along with the Resistance Plate (C), Washers (D), Spring Washer (E), Thrust Washers (F), and Thrust Bearing (G). (Note: If the... [C] comes out of the Resistance Cone [B], press it . PROBLEM: The crosswalk arms squeak during use SOLUTION: a. (Note: Correcting this problem requires a small amount of the treadmill does not change correctly SOLUTION: a. The treadmill will recalibrate the incline system. 24 With the key in .) Apply a ...


