
English Manual
Page 1
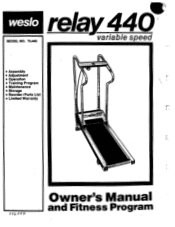
weslo relay440. MODEL NO. TL440 variable speed • Assembly • Adjustment • Operation r- • Training Program • Maintenance • Storage • Reorder/Parts List • Limited Warranty Owner's Manual and Fitness Program o 94, 0 4,14
weslo relay440. MODEL NO. TL440 variable speed • Assembly • Adjustment • Operation r- • Training Program • Maintenance • Storage • Reorder/Parts List • Limited Warranty Owner's Manual and Fitness Program o 94, 0 4,14
English Manual
Page 2
... have additional questions regarding assembly, parts, operation or your workout on your individual fitness level. relay44O variable speed Owner's Manual and Fitness Program INTRODUCTION Congratulations on the multi-function electronics console. With variable speed and incline you started with the operation of the Weslo Relay 440 variable speed treadmill. A basic fitness guide is designed to get you can monitor your 90 day warranty, please call our Customer Service Line toll-free at your convenience...
... have additional questions regarding assembly, parts, operation or your workout on your individual fitness level. relay44O variable speed Owner's Manual and Fitness Program INTRODUCTION Congratulations on the multi-function electronics console. With variable speed and incline you started with the operation of the Weslo Relay 440 variable speed treadmill. A basic fitness guide is designed to get you can monitor your 90 day warranty, please call our Customer Service Line toll-free at your convenience...
English Manual
Page 3
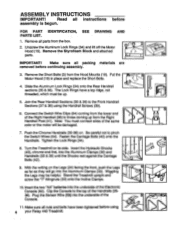
...) using 4 your Relay 440 Treadmill. Turn the Treadmill on . Remove all nuts and bolts have a top ridge, not threaded, which must connect wires of the Electronic Console (60). Join the Rear Handrail Sections (35 & 36) to pinch the Switch Wires (64). Clip the Console to those coming from the Right Handrail Post (41). Make sure all parts from the Hood Mounts (18). Make sure all instructions before assembly is...
...) using 4 your Relay 440 Treadmill. Turn the Treadmill on . Remove all nuts and bolts have a top ridge, not threaded, which must connect wires of the Electronic Console (60). Join the Rear Handrail Sections (35 & 36) to pinch the Switch Wires (64). Clip the Console to those coming from the Right Handrail Post (41). Make sure all parts from the Hood Mounts (18). Make sure all instructions before assembly is...
English Manual
Page 5
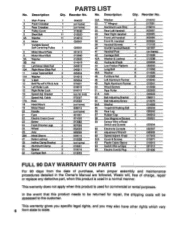
... Wood Screws 6 51 R9ar Roller 1 51A Axle 1 52 Belt Adjusting Bracket 2 54 Belt Adjusting Screw 2 54A Washer 2 55 Treadmill Walking Belt 1 56 Rear Leg 2 57 Rubber Cap 2 58 Snsr Magnet w/Screws 1 59 Sensor Wire w/Read Switch and Screws 1 60 Electronic Console 1 61 Adjustment Wrench 1 62 Speed Adjmnt. This warranty gives you specific legal rights, and you may also have other rights which vary 6 from the date of purchase, when proper assembly and maintenance procedures...
... Wood Screws 6 51 R9ar Roller 1 51A Axle 1 52 Belt Adjusting Bracket 2 54 Belt Adjusting Screw 2 54A Washer 2 55 Treadmill Walking Belt 1 56 Rear Leg 2 57 Rubber Cap 2 58 Snsr Magnet w/Screws 1 59 Sensor Wire w/Read Switch and Screws 1 60 Electronic Console 1 61 Adjustment Wrench 1 62 Speed Adjmnt. This warranty gives you specific legal rights, and you may also have other rights which vary 6 from the date of purchase, when proper assembly and maintenance procedures...

English Manual
Page 6
... need adjustment. To decrease the speed turn the knob counter-clockwise. If the belt slips during use of the walking belt can be adjusted in the following manner: 1. SPEED ADJUSTMENT The speed of your treadmill, it should be centered in the following manner: 1. Turn the treadmill on the front of a turn at the rear of the walking belt can be controlled with the adjustment and operating procedures. Turn the treadmill on the belt may cause the treadmill...
... need adjustment. To decrease the speed turn the knob counter-clockwise. If the belt slips during use of the walking belt can be adjusted in the following manner: 1. SPEED ADJUSTMENT The speed of your treadmill, it should be centered in the following manner: 1. Turn the treadmill on the front of a turn at the rear of the walking belt can be controlled with the adjustment and operating procedures. Turn the treadmill on the belt may cause the treadmill...
English Manual
Page 7
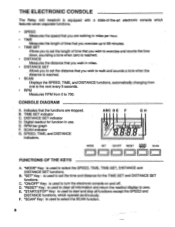
... CONSOLE The Relay 440 treadmill is equipped with a state-of-the-art electronic console which operate continuously. TIME SET indicator C. ABC D E G H r (-Di& 'IME SPEED- 1-e.V3P.0.1m.Oit.00 . B. D. F. DISTANCE SET indicator D. RPM bar graph F. "SET" Key : is used to start and stop all information and return the readout display to zero. SPEED, TIME, and DISTANCE indicators. "SCAN" Key: is used to turn the electronic console on and off. SCAN indicator G. "ON/OFF" Key: is used...
... CONSOLE The Relay 440 treadmill is equipped with a state-of-the-art electronic console which operate continuously. TIME SET indicator C. ABC D E G H r (-Di& 'IME SPEED- 1-e.V3P.0.1m.Oit.00 . B. D. F. DISTANCE SET indicator D. RPM bar graph F. "SET" Key : is used to start and stop all information and return the readout display to zero. SPEED, TIME, and DISTANCE indicators. "SCAN" Key: is used to turn the electronic console on and off. SCAN indicator G. "ON/OFF" Key: is used...
English Manual
Page 8
..." key. Press the "START/STOP" key to get into the console. Begin your exercise, press the "START/STOP" key and the functions will appear. When you wish to preserve the batteries. 9 Always turn the console off after use . 1. SPEED, TIME, or DISTANCE functions: press the "MODE" key until the desired • number is powered by 2 "AA" batteries, which must be pressed again. 3. To cancel the SCAN function the "SCAN" key must be installed prior to direct sunlight...
..." key. Press the "START/STOP" key to get into the console. Begin your exercise, press the "START/STOP" key and the functions will appear. When you wish to preserve the batteries. 9 Always turn the console off after use . 1. SPEED, TIME, or DISTANCE functions: press the "MODE" key until the desired • number is powered by 2 "AA" batteries, which must be pressed again. 3. To cancel the SCAN function the "SCAN" key must be installed prior to direct sunlight...
English Manual
Page 9
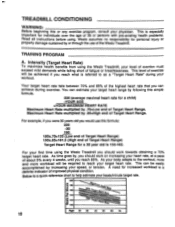
... any exercise program, consult your beats/minute target rate. 200 S• 180 C 85% a 160 bout Re .. • M• 100 70% Tar r Hem am. A need for increased workload is a quick reference chart to help estimate your physician. Intensity (Target Heart Rate) To maximize health benefits from using . For your speed, or tension. This can achieve during your heart rate, at a pace of the Weslo Treadmill...
... any exercise program, consult your beats/minute target rate. 200 S• 180 C 85% a 160 bout Re .. • M• 100 70% Tar r Hem am. A need for increased workload is a quick reference chart to help estimate your physician. Intensity (Target Heart Rate) To maximize health benefits from using . For your speed, or tension. This can achieve during your heart rate, at a pace of the Weslo Treadmill...
English Manual
Page 10
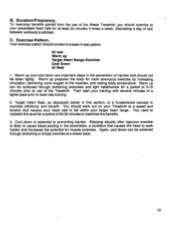
... 1. Stopping abuptly after vigorous exercise is advised. You should exercise at least 20 minutes 3 times a week. Duration/Frequency. B. Alternating a day of a basic 5 step pattern. Exercise Pattern. At rest Warm up and cool down are important steps in the prevention of injuries and should consist of rest between workouts is likely to heart rate training. 2. Then start your prescribed heart rate for more strenuous exercise...
... 1. Stopping abuptly after vigorous exercise is advised. You should exercise at least 20 minutes 3 times a week. Duration/Frequency. B. Alternating a day of a basic 5 step pattern. Exercise Pattern. At rest Warm up and cool down are important steps in the prevention of injuries and should consist of rest between workouts is likely to heart rate training. 2. Then start your prescribed heart rate for more strenuous exercise...
English Manual
Page 11
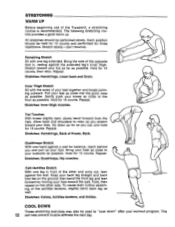
...: Hamstrings, Back of the Treadmill, a stretching routine is recommended...leg as possible. Stretches: Hamstrings, Lower back and Groin. Pull your toe as far as possible. Gently push your back leg straight and back foot flat on the other and arms out, lean against the extended leg...exercises may also be held for 15 counts and performed for balance, reach behind you and pull up . STRETCHING WARM UP Before beginning use of Knees, Back. Calf/Achilles Stretch With one hand against a wall for three repetitions. then bend the front leg and lean forward by moving your workout program...
...: Hamstrings, Back of the Treadmill, a stretching routine is recommended...leg as possible. Stretches: Hamstrings, Lower back and Groin. Pull your toe as far as possible. Gently push your back leg straight and back foot flat on the other and arms out, lean against the extended leg...exercises may also be held for 15 counts and performed for balance, reach behind you and pull up . STRETCHING WARM UP Before beginning use of Knees, Back. Calf/Achilles Stretch With one hand against a wall for three repetitions. then bend the front leg and lean forward by moving your workout program...
English Manual
Page 12
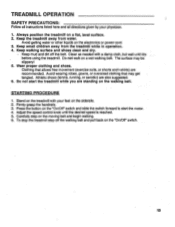
... "On/Off" switch and slide the switch forward to start the treadmill while you are also suggested. 6. Always position the treadmill on the moving belt and begin walking. 6. Keep the treadmill away from the treadmill while in operation. 4. Avoid wearing robes, gowns, or oversized clothing that allows free movement (exercise suits, or shorts and t-shirts) are recommended. Adjust the speed control knob until dry before using the treadmill.
... "On/Off" switch and slide the switch forward to start the treadmill while you are also suggested. 6. Always position the treadmill on the moving belt and begin walking. 6. Keep the treadmill away from the treadmill while in operation. 4. Avoid wearing robes, gowns, or oversized clothing that allows free movement (exercise suits, or shorts and t-shirts) are recommended. Adjust the speed control knob until dry before using the treadmill.
English Manual
Page 13
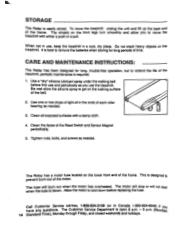
... AND MAINTENANCE INSTRUCTIONS: The Relay has been designed for long periods of the frame. Clean the faces of the belt. 2. Tighten nuts, bolts, and screws as needed . When not in a cool, dry place. Do not allow you use , keep the treadmill in use the treadmill. The motor will stop or will bum out when the motor has overheated. Use a "dry" silicone lubricant spray under the walking belt before replacing the...
... AND MAINTENANCE INSTRUCTIONS: The Relay has been designed for long periods of the frame. Clean the faces of the belt. 2. Tighten nuts, bolts, and screws as needed . When not in a cool, dry place. Do not allow you use , keep the treadmill in use the treadmill. The motor will stop or will bum out when the motor has overheated. Use a "dry" silicone lubricant spray under the walking belt before replacing the...


