User Manual
Page 20
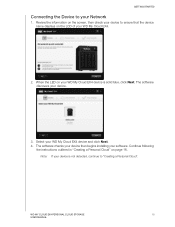
...: If your WD My Cloud EX4. 2. WD MY CLOUD EX4 PERSONAL CLOUD STORAGE 15 USER MANUAL GETTING STARTED Connecting the Device to "Creating a Personal Cloud". Review the information on the screen, then check your WD My Cloud EX4 device and click Next. 4.
...: If your WD My Cloud EX4. 2. WD MY CLOUD EX4 PERSONAL CLOUD STORAGE 15 USER MANUAL GETTING STARTED Connecting the Device to "Creating a Personal Cloud". Review the information on the screen, then check your WD My Cloud EX4 device and click Next. 4.

User Manual
Page 22
...MANUAL Click Yes if you selected the Install the WD My Cloud application check box: - The installation begins. - Opens the My Cloud application. Review the Western Digital License Agreement, then select I accept the terms of the License Agreement, and click Install. When installation is complete, click Done. Click Finish to... need to check your email spam folder if your spam filter does not allow email from the pull-down menu, then click OK. - Review the Apple License Agreement, then select I accept the terms of the Public Share. You've successfully set up your WD My Cloud EX4 ...
...MANUAL Click Yes if you selected the Install the WD My Cloud application check box: - The installation begins. - Opens the My Cloud application. Review the Western Digital License Agreement, then select I accept the terms of the License Agreement, and click Install. When installation is complete, click Done. Click Finish to... need to check your email spam folder if your spam filter does not allow email from the pull-down menu, then click OK. - Review the Apple License Agreement, then select I accept the terms of the Public Share. You've successfully set up your WD My Cloud EX4 ...
User Manual
Page 26
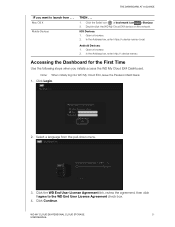
...-click the WD My Cloud EX4 device on the network. In the Address bar, enter https://.local. Click the WD End User License Agreement link, review the agreement, then click I agree to launch from the pull-down menu. 3. THE DASHBOARD AT A GLANCE IF you initially access the WD My Cloud EX4...
...-click the WD My Cloud EX4 device on the network. In the Address bar, enter https://.local. Click the WD End User License Agreement link, review the agreement, then click I agree to launch from the pull-down menu. 3. THE DASHBOARD AT A GLANCE IF you initially access the WD My Cloud EX4...
User Manual
Page 27
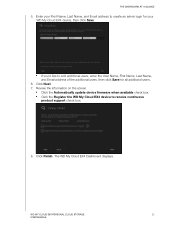
THE DASHBOARD AT A GLANCE 5. Click Finish. Review the information on the screen. Click the Automatically update device firmware when available check box. Click the Register the WD My Cloud EX4 ...
THE DASHBOARD AT A GLANCE 5. Click Finish. Review the information on the screen. Click the Automatically update device firmware when available check box. Click the Register the WD My Cloud EX4 ...
User Manual
Page 37
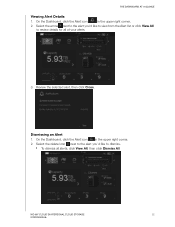
... PERSONAL CLOUD STORAGE 32 USER MANUAL THE DASHBOARD AT A GLANCE Viewing Alert Details 1. On the Dashboard, click the Alert icon in the upper right corner. 2. Review the selected alert, then click Close. Dismissing an Alert 1. Select the arrow next to the alert you 'd like to view from the Alert list or... click View All to dismiss. To dismiss all of your alerts. 3. Select the delete icon next to the alert you 'd like to review details for all alerts, click View All, then click Dismiss All. On the Dashboard, click the Alert icon in the upper right corner. 2.
... PERSONAL CLOUD STORAGE 32 USER MANUAL THE DASHBOARD AT A GLANCE Viewing Alert Details 1. On the Dashboard, click the Alert icon in the upper right corner. 2. Review the selected alert, then click Close. Dismissing an Alert 1. Select the arrow next to the alert you 'd like to view from the Alert list or... click View All to dismiss. To dismiss all of your alerts. 3. Select the delete icon next to the alert you 'd like to review details for all alerts, click View All, then click Dismiss All. On the Dashboard, click the Alert icon in the upper right corner. 2.
User Manual
Page 38
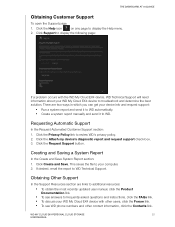
Click the Help icon on any page to review WD's privacy policy. 2. Click the Privacy Policy link to display the Help menu. 2. Click the Request Support button. Click Create and Save. WD MY CLOUD ...
Click the Help icon on any page to review WD's privacy policy. 2. Click the Privacy Policy link to display the Help menu. 2. Click the Request Support button. Click Create and Save. WD MY CLOUD ...
User Manual
Page 59
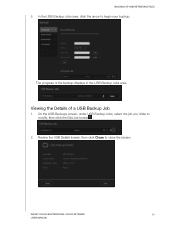
On the USB Backups screen, under USB Backup Jobs, select the job you'd like to close the screen. Review the USB Details screen, then click Close to modify, then click the Edit Job button . 2. Viewing the Details of the backup displays in the USB Backup Jobs area. WD MY CLOUD EX4 PERSONAL CLOUD STORAGE 54 USER MANUAL BACKING UP AND RETRIEVING FILES 5. In the USB Backup Jobs area, click the arrow to begin your backup. The progress of a USB Backup Job 1.
On the USB Backups screen, under USB Backup Jobs, select the job you'd like to close the screen. Review the USB Details screen, then click Close to modify, then click the Edit Job button . 2. Viewing the Details of the backup displays in the USB Backup Jobs area. WD MY CLOUD EX4 PERSONAL CLOUD STORAGE 54 USER MANUAL BACKING UP AND RETRIEVING FILES 5. In the USB Backup Jobs area, click the arrow to begin your backup. The progress of a USB Backup Job 1.
User Manual
Page 62
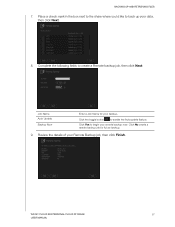
Place a check mark in the box next to the share where you'd like to begin your data, then click Next. 8. Click the toggle button to create a Remote backup job, then click Next: Job Name Auto Update Backup Now Enter a Job Name for future backup. 9. Click Yes to back up your remote backup now. WD MY CLOUD EX4 PERSONAL CLOUD STORAGE 57 USER MANUAL Complete the following fields to enable the Autoupdate feature. Click No create a remote backup job for your Remote Backup job, then click Finish. BACKING UP AND RETRIEVING FILES 7. Review the details of your backup.
Place a check mark in the box next to the share where you'd like to begin your data, then click Next. 8. Click the toggle button to create a Remote backup job, then click Next: Job Name Auto Update Backup Now Enter a Job Name for future backup. 9. Click Yes to back up your remote backup now. WD MY CLOUD EX4 PERSONAL CLOUD STORAGE 57 USER MANUAL Complete the following fields to enable the Autoupdate feature. Click No create a remote backup job for your Remote Backup job, then click Finish. BACKING UP AND RETRIEVING FILES 7. Review the details of your backup.
User Manual
Page 63
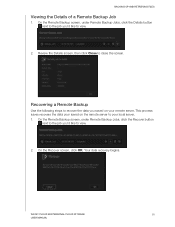
WD MY CLOUD EX4 PERSONAL CLOUD STORAGE 58 USER MANUAL Review the Details screen, then click Close to view. 2. On the Recover screen, click OK. Your data recovery begins. On the Remote Backup screen, under Remote ...
WD MY CLOUD EX4 PERSONAL CLOUD STORAGE 58 USER MANUAL Review the Details screen, then click Close to view. 2. On the Recover screen, click OK. Your data recovery begins. On the Remote Backup screen, under Remote ...
User Manual
Page 65
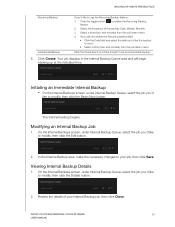
... If you'd like to modify, then click the Begin Now button. Select a time (hour and minutes) from the pull-down menu. 4. Viewing Internal Backup Details 1. Review the details of the backup: Daily, Weekly, Monthly 3. to enable the Recurring Backup 2.
... If you'd like to modify, then click the Begin Now button. Select a time (hour and minutes) from the pull-down menu. 4. Viewing Internal Backup Details 1. Review the details of the backup: Daily, Weekly, Monthly 3. to enable the Recurring Backup 2.
User Manual
Page 71
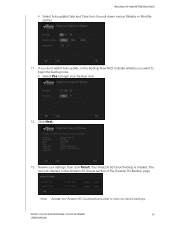
... option). 11. Note: Access your Amazon S3 Cloud backup bucket to begin the backup now. Select Yes to view your settings, then click Finish. Review your device backups. Click Next. 13. The new job displays in the Backup Now field, indicate whether you want to begin your backup now. 12...
... option). 11. Note: Access your Amazon S3 Cloud backup bucket to begin the backup now. Select Yes to view your settings, then click Finish. Review your device backups. Click Next. 13. The new job displays in the Backup Now field, indicate whether you want to begin your backup now. 12...
User Manual
Page 74
Review the Warning message, then click OK. 5. On the navigation bar, click Storage to use of the screen. 4. Combination of drives in a linear fashion to create ...
Review the Warning message, then click OK. 5. On the navigation bar, click Storage to use of the screen. 4. Combination of drives in a linear fashion to create ...
User Manual
Page 75
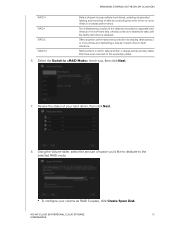
Offers superior performance and protection by combining the work of two or more drives and dedicating a quarter of each drive to the secondary disks. 6. Review the status of your volume as RAID 5+spare, click Create Spare Disk. Two instantaneous copies of the data are recorded on separate hard drives so ...
Offers superior performance and protection by combining the work of two or more drives and dedicating a quarter of each drive to the secondary disks. 6. Review the status of your volume as RAID 5+spare, click Create Spare Disk. Two instantaneous copies of the data are recorded on separate hard drives so ...
User Manual
Page 76
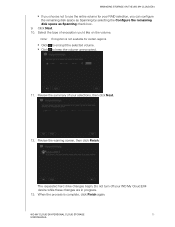
... requested hard drive changes begin. Note: Encryption is complete, click Finish again. WD MY CLOUD EX4 PERSONAL CLOUD STORAGE 71 USER MANUAL Review the summary of encryption you can configure the remaining disk space as Spanning by selecting the Configure the remaining disk space as Spanning check ... Click to encrypt the selected volume. Click to use the entire volume for your RAID selection, you 'd like on the volume. Review the warning screen, then click Finish. Do not turn off your selections, then click Next. 12. Click Next. 10. MANAGING STORAGE ON THE WD ...
... requested hard drive changes begin. Note: Encryption is complete, click Finish again. WD MY CLOUD EX4 PERSONAL CLOUD STORAGE 71 USER MANUAL Review the summary of encryption you can configure the remaining disk space as Spanning by selecting the Configure the remaining disk space as Spanning check ... Click to encrypt the selected volume. Click to use the entire volume for your RAID selection, you 'd like on the volume. Review the warning screen, then click Finish. Do not turn off your selections, then click Next. 12. Click Next. 10. MANAGING STORAGE ON THE WD ...
User Manual
Page 77
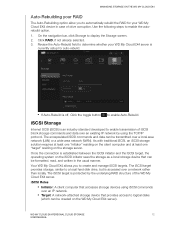
... on the iSCSI initiator sees the storage as a local storage device that can be transmitted over a local area network (LAN) or a wide area network (WAN). Review the Auto-Rebuild field to determine whether your WD My Cloud EX4 device in the usual manner. The iSCSI target is protected by using iSCSI...
... on the iSCSI initiator sees the storage as a local storage device that can be transmitted over a local area network (LAN) or a wide area network (WAN). Review the Auto-Rebuild field to determine whether your WD My Cloud EX4 device in the usual manner. The iSCSI target is protected by using iSCSI...

User Manual
Page 84
.... Once connected to connect. 3. On the Storage page, click Volume Virtualization, if not already selected. 2. WD MY CLOUD EX4 PERSONAL CLOUD STORAGE 79 USER MANUAL Review the Volume Virtualization summary to connect a virtualized volume on your settings are correct, then click Save.
.... Once connected to connect. 3. On the Storage page, click Volume Virtualization, if not already selected. 2. WD MY CLOUD EX4 PERSONAL CLOUD STORAGE 79 USER MANUAL Review the Volume Virtualization summary to connect a virtualized volume on your settings are correct, then click Save.

User Manual
Page 87
The Hard Drive Information screen displays the following data: Vendor Model Serial Number Capacity Firmware Version The vendor from whom the hard drive was obtained. The current firmware version used on the drive selected. The capacity of the hard drive selected. MANAGING STORAGE ON THE WD MY CLOUD EX4 3. The model number of the hard drive selected. WD MY CLOUD EX4 PERSONAL CLOUD STORAGE 82 USER MANUAL The serial number of the hard drive selected. Review the hard drive information, then click Close.
The Hard Drive Information screen displays the following data: Vendor Model Serial Number Capacity Firmware Version The vendor from whom the hard drive was obtained. The current firmware version used on the drive selected. The capacity of the hard drive selected. MANAGING STORAGE ON THE WD MY CLOUD EX4 3. The model number of the hard drive selected. WD MY CLOUD EX4 PERSONAL CLOUD STORAGE 82 USER MANUAL The serial number of the hard drive selected. Review the hard drive information, then click Close.
User Manual
Page 89
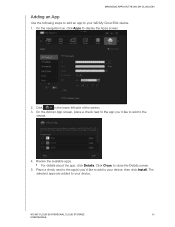
... Apps to close the Details screen. 5. On the Add an App screen, place a check next to the app you 'd like to add to the device. 4. Review the available apps. For details about the app, click Details. MANAGING APPS ON THE WD MY CLOUD EX4 Adding an App Use the following...
... Apps to close the Details screen. 5. On the Add an App screen, place a check next to the app you 'd like to add to the device. 4. Review the available apps. For details about the app, click Details. MANAGING APPS ON THE WD MY CLOUD EX4 Adding an App Use the following...
User Manual
Page 105
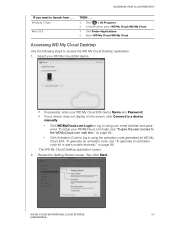
... WD My Cloud EX4. The WD My Cloud Desktop application opens. 2. To generate an activation code, see "To give the user access to a device manually. - Review the Getting Started screen, then click Start. Click Finder>Applications 2. ACCESSING YOUR CLOUD REMOTELY IF you want to access the WD My Cloud Desktop application...
... WD My Cloud EX4. The WD My Cloud Desktop application opens. 2. To generate an activation code, see "To give the user access to a device manually. - Review the Getting Started screen, then click Start. Click Finder>Applications 2. ACCESSING YOUR CLOUD REMOTELY IF you want to access the WD My Cloud Desktop application...
User Manual
Page 119
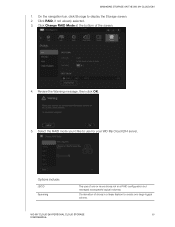
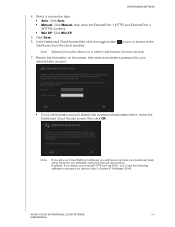
...MY CLOUD EX4 PERSONAL CLOUD STORAGE 114 USER MANUAL Click Save. 6. Example: If you setup your administrator account already has a password associated with it, review the Dashboard Cloud Access screen, then click OK. Note: Selecting this option allows you to the Dashboard from the cloud remotely. Select a connection type:...: Click Auto. Manual: Click Manual, then enter the External Port 1 (HTTP) and External Port 2 (HTTPS) numbers. Win XP: Click Win XP. 5. Review the information on access to perform administrator functions remotely. 7. CONFIGURING SETTINGS 4.
...MY CLOUD EX4 PERSONAL CLOUD STORAGE 114 USER MANUAL Click Save. 6. Example: If you setup your administrator account already has a password associated with it, review the Dashboard Cloud Access screen, then click OK. Note: Selecting this option allows you to the Dashboard from the cloud remotely. Select a connection type:...: Click Auto. Manual: Click Manual, then enter the External Port 1 (HTTP) and External Port 2 (HTTPS) numbers. Win XP: Click Win XP. 5. Review the information on access to perform administrator functions remotely. 7. CONFIGURING SETTINGS 4.