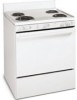
Use and Care Guide
Page 3
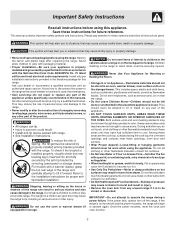
...or Flour on Grease Fires-Smother the fire with the National Electrical Code ANSI/NFPA No. 70 latest edition and local electrical code requirements. IMPORTANT-Do not attempt to the range. • Never modify or alter the construction of a range. Ask your appliance is to be hot even though they have...to disconnect the power to reach items could be left alone or unattended in the area where appliance is not turned off the range. Children climbing on any part of the appliance. • DO NOT TOUCH SURFACE UNITS, AREAS NEAR THESE UNITS, HEATING ELEMENTS OR INTERIOR SURFACES OF THE OVEN...
...or Flour on Grease Fires-Smother the fire with the National Electrical Code ANSI/NFPA No. 70 latest edition and local electrical code requirements. IMPORTANT-Do not attempt to the range. • Never modify or alter the construction of a range. Ask your appliance is to be hot even though they have...to disconnect the power to reach items could be left alone or unattended in the area where appliance is not turned off the range. Children climbing on any part of the appliance. • DO NOT TOUCH SURFACE UNITS, AREAS NEAR THESE UNITS, HEATING ELEMENTS OR INTERIOR SURFACES OF THE OVEN...

Use and Care Guide
Page 4
...8226; Clean Ventilating Hoods Frequently-Grease should never be immersed in risk of a hot oven. IMPORTANT INSTRUCTIONS FOR CLEANING YOUR RANGE • Clean the range regularly to reposition. Pay particular attention to the sudden change in risk of grease that has boiled dry may result in ...or ignite. • Placement of the broiler. • Do not cover the broiler insert with ceramic-glass cook tops. Remove all parts free of electric shock, or fire. Improper installation of these liners may melt. • Do Not Immerse or Soak Removable Heating Elements- Check the...
...8226; Clean Ventilating Hoods Frequently-Grease should never be immersed in risk of a hot oven. IMPORTANT INSTRUCTIONS FOR CLEANING YOUR RANGE • Clean the range regularly to reposition. Pay particular attention to the sudden change in risk of grease that has boiled dry may result in ...or ignite. • Placement of the broiler. • Do not cover the broiler insert with ceramic-glass cook tops. Remove all parts free of electric shock, or fire. Improper installation of these liners may melt. • Do Not Immerse or Soak Removable Heating Elements- Check the...

Use and Care Guide
Page 8
... and the shaft then push the knob into the rack positions). Painted and Plastic Control Knobs, Body Parts, and Decorative Trim For general cleaning, use spray oven cleaners on soil for 30 to 60 minutes. Clean using hot, soapy water and a dishcloth. Rinse with an ammonia-soaked paper...; Backguard Before cleaning the control panel, turn to OFF and remove the control knobs. Porcelain Enamel Broiler Pan and Insert, Door Liner, Body Parts, Warmer Drawer (if equipped) Gentle scouring with wax paper or a cloth containing a small amount of both the knob and the shaft then ...
... and the shaft then push the knob into the rack positions). Painted and Plastic Control Knobs, Body Parts, and Decorative Trim For general cleaning, use spray oven cleaners on soil for 30 to 60 minutes. Clean using hot, soapy water and a dishcloth. Rinse with an ammonia-soaked paper...; Backguard Before cleaning the control panel, turn to OFF and remove the control knobs. Porcelain Enamel Broiler Pan and Insert, Door Liner, Body Parts, Warmer Drawer (if equipped) Gentle scouring with wax paper or a cloth containing a small amount of both the knob and the shaft then ...

Use and Care Guide
Page 10
...panel to be inserted into each hinge (See B Fig. 2). 4. To reset, see Setting Surface & Oven Controls in this Use & Care Manual. Be sure the range is located at the same 45 degree angle. Changing the Oven Light (some models) On some models, the oven light automatically turns on the light... again at the same angle. (See Fig. 3) 6. To replace the oven light: 1. Fig. 1 Fig. 2 Fig. 3 Care & Cleaning Removing and Replacing the Oven Door (all parts are still locking the hinge arms from holes in door hinges. 5. Turn electrical power off hinges at the main source (or plug the...
...panel to be inserted into each hinge (See B Fig. 2). 4. To reset, see Setting Surface & Oven Controls in this Use & Care Manual. Be sure the range is located at the same 45 degree angle. Changing the Oven Light (some models) On some models, the oven light automatically turns on the light... again at the same angle. (See Fig. 3) 6. To replace the oven light: 1. Fig. 1 Fig. 2 Fig. 3 Care & Cleaning Removing and Replacing the Oven Door (all parts are still locking the hinge arms from holes in door hinges. 5. Turn electrical power off hinges at the main source (or plug the...

Use and Care Guide
Page 12
...Products with original serial numbers that has been transferred from the factory. 10. Expenses for making the appliance accessible for service and parts under this warranty must be required. Damages caused by: services performed by Electrolux or an authorized service company. SOME STATES AND ... not cover the following: 1. or external causes such as described or illustrated are not covered by this appliance that prove to , any parts of the unit. 4. Product features or specifications as abuse, misuse, inadequate power supply, accidents, fires, or acts of purchase, Electrolux ...
...Products with original serial numbers that has been transferred from the factory. 10. Expenses for making the appliance accessible for service and parts under this warranty must be required. Damages caused by: services performed by Electrolux or an authorized service company. SOME STATES AND ... not cover the following: 1. or external causes such as described or illustrated are not covered by this appliance that prove to , any parts of the unit. 4. Product features or specifications as abuse, misuse, inadequate power supply, accidents, fires, or acts of purchase, Electrolux ...

Parts Catalog
Page 3
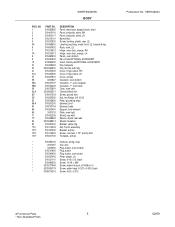
NO 12 # 14 18 32 36 40 46 49 53 54 # 54A# 69 PART NO. 316215901 316022503 316263900 316102331 316102327 316201851 316557300 316263802 316238500 316498602 316498603 5303288565 DESCRIPTION Thermostat Light/Lamp, indicator, surface, 250 V Bracket, backguard Knob, thermostat, white ... mtg * 316021105 Screw, hex head cup pt, 8-18 x 0.375, black * 316021108 Screw, cup pt, 8-18 x 0.375, chrome * 316021109 Screw, 8-18 x 0.5, chrome Publication No: 5995532644 # Functional Parts 3 * Non-Illustrated Parts 02/09 WWEF3000KWC BACKGUARD POS.
NO 12 # 14 18 32 36 40 46 49 53 54 # 54A# 69 PART NO. 316215901 316022503 316263900 316102331 316102327 316201851 316557300 316263802 316238500 316498602 316498603 5303288565 DESCRIPTION Thermostat Light/Lamp, indicator, surface, 250 V Bracket, backguard Knob, thermostat, white ... mtg * 316021105 Screw, hex head cup pt, 8-18 x 0.375, black * 316021108 Screw, cup pt, 8-18 x 0.375, chrome * 316021109 Screw, 8-18 x 0.5, chrome Publication No: 5995532644 # Functional Parts 3 * Non-Illustrated Parts 02/09 WWEF3000KWC BACKGUARD POS.
Parts Catalog
Page 5
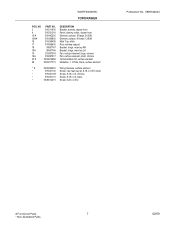
... 21 27 41 41A 57 58 58A 58B 59 62 # 62* 62* 63 66 # 67 68 69 71 71* 82 87 170 170* 170* 170* PART NO. 316080805 316400116 316400117 316210101 316272900 316498900 316067902 316216512 316216513 316495903 316081900 316082000 316408000 5303284616 316233400 316233500 316457801 3200847 316047707 316054202 316073601 5303935271 316001003 316205500..., 10-16 x .486 * 5303271648 Screw, wafer hd sq dr, 8-18AB x 0.5 * 5303285179 Screw, wafer head, 8-32T x 0.500, black * 5308014215 Screw, 6-20 x 0.312 Publication No: 5995532644 # Functional Parts 5 * Non-Illustrated Parts 02/09
... 21 27 41 41A 57 58 58A 58B 59 62 # 62* 62* 63 66 # 67 68 69 71 71* 82 87 170 170* 170* 170* PART NO. 316080805 316400116 316400117 316210101 316272900 316498900 316067902 316216512 316216513 316495903 316081900 316082000 316408000 5303284616 316233400 316233500 316457801 3200847 316047707 316054202 316073601 5303935271 316001003 316205500..., 10-16 x .486 * 5303271648 Screw, wafer hd sq dr, 8-18AB x 0.5 * 5303285179 Screw, wafer head, 8-32T x 0.500, black * 5308014215 Screw, 6-20 x 0.312 Publication No: 5995532644 # Functional Parts 5 * Non-Illustrated Parts 02/09
Parts Catalog
Page 7
WWEF3000KWC TOP/DRAWER POS. NO 2 4 15 # 15A# 16 17 18 18A 19 19A 27 # 28 PART NO. 316211900 316231216 316442300 316439800 316245406 316066900 08067747 08067746 318067018 318067017 5303912666 5303017715 DESCRIPTION Bracket, dummy, drawer front Panel, dummy, white, drawer front Element, surface, 8"/... * 316021105 Screw, hex head cup pt, 8-18 x 0.375, black * 316021109 Screw, 8-18 x 0.5, chrome * 316021110 Screw, 8-18 x 0.5, black * 5308014215 Screw, 6-20 x 0.312 Publication No: 5995532644 # Functional Parts 7 * Non-Illustrated Parts 02/09
WWEF3000KWC TOP/DRAWER POS. NO 2 4 15 # 15A# 16 17 18 18A 19 19A 27 # 28 PART NO. 316211900 316231216 316442300 316439800 316245406 316066900 08067747 08067746 318067018 318067017 5303912666 5303017715 DESCRIPTION Bracket, dummy, drawer front Panel, dummy, white, drawer front Element, surface, 8"/... * 316021105 Screw, hex head cup pt, 8-18 x 0.375, black * 316021109 Screw, 8-18 x 0.5, chrome * 316021110 Screw, 8-18 x 0.5, black * 5308014215 Screw, 6-20 x 0.312 Publication No: 5995532644 # Functional Parts 7 * Non-Illustrated Parts 02/09

Parts Catalog
Page 9
WWEF3000KWC DOOR POS. NO 6 7 9 10 10B 12 13 39 49 60B PART NO. 316546800 316236801 316230621 316001009 316008401 316239700 316202603 316020202 316137000 316021110 DESCRIPTION Shield, knock out Insulation, oven door Liner, oven door Screw, waf hd sq, ... * 316433600 Label, anti-tip * 3131737 Washer, black * 5303271648 Screw, wafer hd sq dr, 8-18AB x 0.5 * 5303285179 Screw, wafer head, 8-32T x 0.500, black Publication No: 5995532644 # Functional Parts 9 * Non-Illustrated Parts 02/09
WWEF3000KWC DOOR POS. NO 6 7 9 10 10B 12 13 39 49 60B PART NO. 316546800 316236801 316230621 316001009 316008401 316239700 316202603 316020202 316137000 316021110 DESCRIPTION Shield, knock out Insulation, oven door Liner, oven door Screw, waf hd sq, ... * 316433600 Label, anti-tip * 3131737 Washer, black * 5303271648 Screw, wafer hd sq dr, 8-18AB x 0.5 * 5303285179 Screw, wafer head, 8-32T x 0.500, black Publication No: 5995532644 # Functional Parts 9 * Non-Illustrated Parts 02/09