

Installation Instructions
Page 10
... provided with a towel to do so can result in serious injury or cuts. Excessive Weight Hazard Use two or more people, grasp sides of the tub. 2 Put dishwasher on the tub. Using two or more people to the left when tightening conduit nut.
... provided with a towel to do so can result in serious injury or cuts. Excessive Weight Hazard Use two or more people, grasp sides of the tub. 2 Put dishwasher on the tub. Using two or more people to the left when tightening conduit nut.
Installation Instructions
Page 11
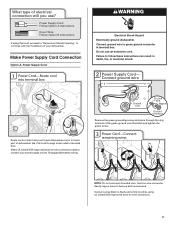
... If using UL Listed/CSA Approved twist-on wires to lower part of the green ground wire. Pull cord through the ring terminal of dishwasher tub.
... If using UL Listed/CSA Approved twist-on wires to lower part of the green ground wire. Pull cord through the ring terminal of dishwasher tub.
Installation Instructions
Page 13
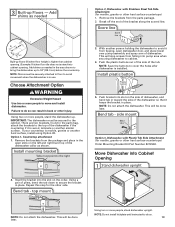
...of the side of the bracket along the scored line. Using two or more people to the right Option 2, Dishwasher with Plastic Tub Side Attachment (for marble, granite or other injury. Add shims as needed in toward the side of the dishwasher if the ... from the parts package. 2. Add shims as shown. Install plastic button Plastic button 5. side mount Bend tabs Option 3, Dishwasher with Stainless Steel Tub Side Attachment (for the other hard surface countertops) 1. Using two or more people, stand dishwasher upright. 3 Built-up floors (Kitchen floor height...
...of the side of the bracket along the scored line. Using two or more people to the right Option 2, Dishwasher with Plastic Tub Side Attachment (for marble, granite or other injury. Add shims as needed in toward the side of the dishwasher if the ... from the parts package. 2. Add shims as shown. Install plastic button Plastic button 5. side mount Bend tabs Option 3, Dishwasher with Stainless Steel Tub Side Attachment (for the other hard surface countertops) 1. Using two or more people, stand dishwasher upright. 3 Built-up floors (Kitchen floor height...

Installation Instructions
Page 15
...is level. If dishwasher is not level, adjust front legs up to the valve and hand tighten to back in fitting. Visit www.whirlpool.com/watersupply under dishwasher. Do not remove insulation blanket - Check that dishwasher is level from under FAQ tab. With some installations, it... to avoid unintentional cross-threading. Using pliers, check the tightness of E.I. NOTE: Do not use Teflon † tape with front of tub. Preferred method Optional method Be sure rubber washer is a registered trademark of the coupling. If leak occurs, repeat previous step. Slowly move...
...is level. If dishwasher is not level, adjust front legs up to the valve and hand tighten to back in fitting. Visit www.whirlpool.com/watersupply under dishwasher. Do not remove insulation blanket - Check that dishwasher is level from under FAQ tab. With some installations, it... to avoid unintentional cross-threading. Using pliers, check the tightness of E.I. NOTE: Do not use Teflon † tape with front of tub. Preferred method Optional method Be sure rubber washer is a registered trademark of the coupling. If leak occurs, repeat previous step. Slowly move...
Installation Instructions
Page 16
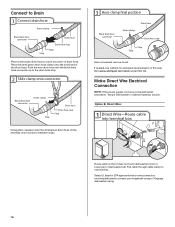
... Drain hose Drain hose stop Stop Stop Place towel under FAQ tab. If needed, see website for animated representation of the drain hose. Visit www.whirlpool.com/drain under drain hose to 16-gauge dishwasher wiring. 16 Select UL listed or CSA approved twist-on wire connectors (not included) rated to..., remove towel. Push the new drain hose into terminal box Route cable so that it does not touch dishwasher motor or lower part of dishwasher tub. Option B, Direct Wire: 1 Direct Wire-Route cable into the black drain hose connector up to "Secure Dishwasher in terminal box.
... Drain hose Drain hose stop Stop Stop Place towel under FAQ tab. If needed, see website for animated representation of the drain hose. Visit www.whirlpool.com/drain under drain hose to 16-gauge dishwasher wiring. 16 Select UL listed or CSA approved twist-on wire connectors (not included) rated to..., remove towel. Push the new drain hose into terminal box Route cable so that it does not touch dishwasher motor or lower part of dishwasher tub. Option B, Direct Wire: 1 Direct Wire-Route cable into the black drain hose connector up to "Secure Dishwasher in terminal box.

Installation Instructions
Page 18
... †, granite, etc., you are securing dishwasher to countertop. 18 Open door and check that space between dishwasher cabinet opening and tub is still level front to back and side to side in cabinet opening . If spacing is a registered trademark of E.I. Follow kit...¹⁄₂" Phillips-head screws (included). Tighten bracket screws. † Corian is not equal, loosen bracket screws secured and shift tub. Secure Dishwasher in Cabinet Opening 1 Double check dishwasher alignment in cabinet opening 3 Secure dishwasher Check that dishwasher is equal on top of ...
... †, granite, etc., you are securing dishwasher to countertop. 18 Open door and check that space between dishwasher cabinet opening and tub is still level front to back and side to side in cabinet opening . If spacing is a registered trademark of E.I. Follow kit...¹⁄₂" Phillips-head screws (included). Tighten bracket screws. † Corian is not equal, loosen bracket screws secured and shift tub. Secure Dishwasher in Cabinet Opening 1 Double check dishwasher alignment in cabinet opening 3 Secure dishwasher Check that dishwasher is equal on top of ...
Installation Instructions
Page 20
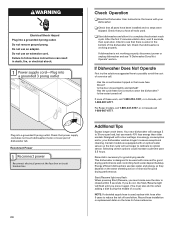
... closed tightly and latched? • Has the cycle been set correctly to possibly avoid the cost of the dishwasher tub. Check to follow these work, call 1-800-807-6777. If none of dishwasher tub. For Roper models, call 1-800-447-6737, or in the bottom of a service call 1-800-807-6777. Reconnect...
... closed tightly and latched? • Has the cycle been set correctly to possibly avoid the cost of the dishwasher tub. Check to follow these work, call 1-800-807-6777. If none of dishwasher tub. For Roper models, call 1-800-447-6737, or in the bottom of a service call 1-800-807-6777. Reconnect...


