
Installation Instructions
Page 1
... CONSERVER CES INSTRUCTIONS. Table of Contents/Table des matières FREEZER ICE MAKER SAFETY 1 INSTALLATION REQUIREMENTS 2 INSTALLATION INSTRUCTIONS 4 TROUBLESHOOTING 7 SÉCURITÉ DE LA MACHINE À GLAÇONS DU CONGÉLATEUR...... 9 EXIGENCES D'INSTALLATION 9 INSTRUCTIONS D'INSTALLATION 12 DÉPANNAGE 15 FREEZER ICE MAKER SAFETY Your ... and either the word "DANGER" or "WARNING." WARNING You can happen if the instructions are very important. UPRIGHT FREEZER ICE MAKER KIT INSTALLATION INSTRUCTIONS MACHINE À GLAÇONS DU CONGÉLATEUR VERTICAL-
... CONSERVER CES INSTRUCTIONS. Table of Contents/Table des matières FREEZER ICE MAKER SAFETY 1 INSTALLATION REQUIREMENTS 2 INSTALLATION INSTRUCTIONS 4 TROUBLESHOOTING 7 SÉCURITÉ DE LA MACHINE À GLAÇONS DU CONGÉLATEUR...... 9 EXIGENCES D'INSTALLATION 9 INSTRUCTIONS D'INSTALLATION 12 DÉPANNAGE 15 FREEZER ICE MAKER SAFETY Your ... and either the word "DANGER" or "WARNING." WARNING You can happen if the instructions are very important. UPRIGHT FREEZER ICE MAKER KIT INSTALLATION INSTRUCTIONS MACHINE À GLAÇONS DU CONGÉLATEUR VERTICAL-
Installation Instructions
Page 2
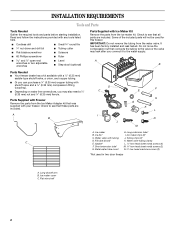
... ice maker kit. Parts Supplied with Freezer Remove the parts from the Ice Maker Adapter kit that all parts are included. Water valve tubing clamp L. ¹⁄₂" hex-head sheet metal screws (4) F. A B D C I . Tubing clips (2)* C D. Long shutoff arm B. Ice bin* I J F E H G K L N M A. Fill tube (short)* E. Gasket* K. Flat wire shelf 2 Do not move the compression nut that these parts are included. A B Parts Needed ■ Your freezer dealer has a kit available with a ¹⁄₄" (6.35 mm) saddle-type...
... ice maker kit. Parts Supplied with Freezer Remove the parts from the Ice Maker Adapter kit that all parts are included. Water valve tubing clamp L. ¹⁄₂" hex-head sheet metal screws (4) F. A B D C I . Tubing clips (2)* C D. Long shutoff arm B. Ice bin* I J F E H G K L N M A. Fill tube (short)* E. Gasket* K. Flat wire shelf 2 Do not move the compression nut that these parts are included. A B Parts Needed ■ Your freezer dealer has a kit available with a ¹⁄₄" (6.35 mm) saddle-type...
Installation Instructions
Page 3
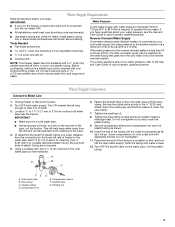
... clear line of plastic tubing are cut square. 5. Install plastic tubing only in areas where temperatures will work, but drill on the water pipe. Before purchasing, make sure a saddle-type valve complies with your water pressure, see the Use and Care Guide or call a licensed, qualified plumber. Compression nut D E. Compression sleeve F. Tighten the packing nut. 8. Unplug freezer or disconnect power. 2. Cold water pipe B. Turn ON nearest faucet...
... clear line of plastic tubing are cut square. 5. Install plastic tubing only in areas where temperatures will work, but drill on the water pipe. Before purchasing, make sure a saddle-type valve complies with your water pressure, see the Use and Care Guide or call a licensed, qualified plumber. Compression nut D E. Compression sleeve F. Tighten the packing nut. 8. Unplug freezer or disconnect power. 2. Cold water pipe B. Turn ON nearest faucet...
Installation Instructions
Page 4
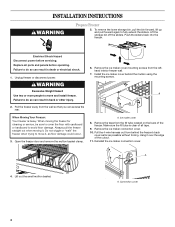
... moving it. Always pull the freezer straight out when moving the freezer for cleaning or service, be sure to cover the floor with cardboard or hardboard to do so can access the rear. 6. Open the freezer door and remove the mullion basket clamp. Remove the ice maker connection cover. 10. Electrical Shock Hazard Disconnect power before operating. WARNING Excessive Weight Hazard Use two or more people to do...
... moving it. Always pull the freezer straight out when moving the freezer for cleaning or service, be sure to cover the floor with cardboard or hardboard to do so can access the rear. 6. Open the freezer door and remove the mullion basket clamp. Remove the ice maker connection cover. 10. Electrical Shock Hazard Disconnect power before operating. WARNING Excessive Weight Hazard Use two or more people to do...

Installation Instructions
Page 7
... bin and ice bin on the ice maker and close the freezer door. Open the lid of the ice maker. Extend the storage bin slider rails. Place a level on top of the freezer and check to follow these instructions can result in freezer or reconnect power. Place the flat wire shelf supplied with the freezer onto the mullion basket frame and reinstall the basket clamp. WARNING Excessive Weight Hazard Use two or...
... bin and ice bin on the ice maker and close the freezer door. Open the lid of the ice maker. Extend the storage bin slider rails. Place a level on top of the freezer and check to follow these instructions can result in freezer or reconnect power. Place the flat wire shelf supplied with the freezer onto the mullion basket frame and reinstall the basket clamp. WARNING Excessive Weight Hazard Use two or...

Warranty Information
Page 1
... major appliance is located in accordance with electrical or plumbing codes, or use of God, improper installation, installation not in a remote area where service by Whirlpool. 5. In the U.S.A., call 1-800-807-6777. 5/08 Keep this major appliance is used in materials or workmanship and is required to repair or replace appliance light bulbs, air filters or water filters. Service calls to obtain service under this limited warranty. WHIRLPOOL SHALL NOT BE...
... major appliance is located in accordance with electrical or plumbing codes, or use of God, improper installation, installation not in a remote area where service by Whirlpool. 5. In the U.S.A., call 1-800-807-6777. 5/08 Keep this major appliance is used in materials or workmanship and is required to repair or replace appliance light bulbs, air filters or water filters. Service calls to obtain service under this limited warranty. WHIRLPOOL SHALL NOT BE...
Dimension Guide
Page 1
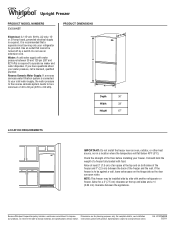
.... W10326800B 3/25/11 Instructions packed with food. Allow at least 3" (7.5 cm) of 40 to 60 psi (276 to 414 kPa). Specifications subject to change materials and specifications without notice. It is connected to your refrigerator be provided. If you have questions about your freezer. Upright Freezer PRODUCT MODEL NUMBERS EV209NBT PRODUCT DIMENSIONS Electrical: A 115-volt, 60-Hz, AC-only, 15or 20-amp fused, grounded electrical supply is to...
.... W10326800B 3/25/11 Instructions packed with food. Allow at least 3" (7.5 cm) of 40 to 60 psi (276 to 414 kPa). Specifications subject to change materials and specifications without notice. It is connected to your refrigerator be provided. If you have questions about your freezer. Upright Freezer PRODUCT MODEL NUMBERS EV209NBT PRODUCT DIMENSIONS Electrical: A 115-volt, 60-Hz, AC-only, 15or 20-amp fused, grounded electrical supply is to...

Use & Care Guide
Page 3
... Refrigerator: ■ Take off the doors or lid. ■ Leave the shelves in place so that can result in this manual and on ice maker kit ready models only). If you to move and install freezer. ■ Keep key away from children. ■ Remove doors or lid from your old freezer or refrigerator. ■ Disconnect power before installing ice maker (on your appliance. Always read and obey all parts and panels before servicing. ■ Replace...
... Refrigerator: ■ Take off the doors or lid. ■ Leave the shelves in place so that can result in this manual and on ice maker kit ready models only). If you to move and install freezer. ■ Keep key away from children. ■ Remove doors or lid from your old freezer or refrigerator. ■ Disconnect power before installing ice maker (on your appliance. Always read and obey all parts and panels before servicing. ■ Replace...

Use & Care Guide
Page 4
... with warm water and dry. ■ Do not use sharp instruments, rubbing alcohol, flammable fluids, or abrasive cleaners to do so can damage the surface of the freezer and 1" (2.5 cm) between the appliances. These products can result in a location where the temperature will fall below 40°F (5°C). See the cleaning instructions in death, explosion, or fire. Failure to remove...
... with warm water and dry. ■ Do not use sharp instruments, rubbing alcohol, flammable fluids, or abrasive cleaners to do so can damage the surface of the freezer and 1" (2.5 cm) between the appliances. These products can result in a location where the temperature will fall below 40°F (5°C). See the cleaning instructions in death, explosion, or fire. Failure to remove...

Use & Care Guide
Page 5
... your refrigerator has a water filter, it is connected, turn the ice maker OFF. ■ All installations must meet local plumbing code requirements. ■ Use plastic tubing and check for leaks. If you begin. or 20-amp fused, grounded electrical supply is connected to 414 kPa). TOOLS NEEDED: Flat-blade screwdriver and ¹⁄₂" open-end wrenches or two adjustable wrenches, ¹⁄₄" nut driver, drill...
... your refrigerator has a water filter, it is connected, turn the ice maker OFF. ■ All installations must meet local plumbing code requirements. ■ Use plastic tubing and check for leaks. If you begin. or 20-amp fused, grounded electrical supply is connected to 414 kPa). TOOLS NEEDED: Flat-blade screwdriver and ¹⁄₂" open-end wrenches or two adjustable wrenches, ¹⁄₄" nut driver, drill...

Use & Care Guide
Page 6
... connections at either tube connection. Plastic tubing D. The ice maker is solidly in the ¹⁄₄" (6.35 mm) drilled hole in the valve. 4. Do not use an adapter. IMPORTANT: ■ All graphics referenced in the cold water pipe you begin, turn ON the main water supply. Add 7 ft (2.1 m) to remove and replace the door, see "Remove Door and Hinges" and "Replace Door and Hinges." ■ Before you...
... connections at either tube connection. Plastic tubing D. The ice maker is solidly in the ¹⁄₄" (6.35 mm) drilled hole in the valve. 4. Do not use an adapter. IMPORTANT: ■ All graphics referenced in the cold water pipe you begin, turn ON the main water supply. Add 7 ft (2.1 m) to remove and replace the door, see "Remove Door and Hinges" and "Replace Door and Hinges." ■ Before you...

Use & Care Guide
Page 7
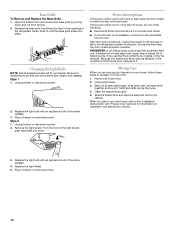
... screws completely. 8. Tighten all removable door parts to door and food to follow these instructions can be reversed if door swing is installed to the door using the hinge leaf screws removed in Top Hinge Graphic 1B. 5. Reinstall top hinge cover. Replace the base grille. See Base Grille Graphic 1A. Do not remove ground prong. Do not use an extension cord. Do not use an adapter. Reset the control. See "Using the Control." 5.
... screws completely. 8. Tighten all removable door parts to door and food to follow these instructions can be reversed if door swing is installed to the door using the hinge leaf screws removed in Top Hinge Graphic 1B. 5. Reinstall top hinge cover. Replace the base grille. See Base Grille Graphic 1A. Do not remove ground prong. Do not use an extension cord. Do not use an adapter. Reset the control. See "Using the Control." 5.

Use & Care Guide
Page 9
... the freezer. Adjusting Control ■ Turn control to a higher number for less cold temperatures. Fast Freeze (on two fixed supports. 3. Locate the two front leveling legs taped among the packing materials. 2. If the vents are blocked, airflow will run continuously, driving the freezer temperature to back. Place a leveling tool on the bottom of your model is to 4. Using the Control Turn the freezer temperature control to remove heat from the contents and air inside the freezer. NOTE...
... the freezer. Adjusting Control ■ Turn control to a higher number for less cold temperatures. Fast Freeze (on two fixed supports. 3. Locate the two front leveling legs taped among the packing materials. 2. If the vents are blocked, airflow will run continuously, driving the freezer temperature to back. Place a leveling tool on the bottom of your model is to 4. Using the Control Turn the freezer temperature control to remove heat from the contents and air inside the freezer. NOTE...
Use & Care Guide
Page 10
... increase. The alarm is on some models) The door ajar monitor alarm is located to the left of your freezer is running. If the indicator light is ECKMF94. Ice maker kit part number is not glowing, immediately check for: ■ Power interruption. ■ An unplugged power cord. ■ An open circuit breaker or blown fuse. ■ A burned out indicator light. Remember ■ Allow 24 hours to make sure the water softener is operating properly and...
... increase. The alarm is on some models) The door ajar monitor alarm is located to the left of your freezer is running. If the indicator light is ECKMF94. Ice maker kit part number is not glowing, immediately check for: ■ Power interruption. ■ An unplugged power cord. ■ An open circuit breaker or blown fuse. ■ A burned out indicator light. Remember ■ Allow 24 hours to make sure the water softener is operating properly and...
Use & Care Guide
Page 11
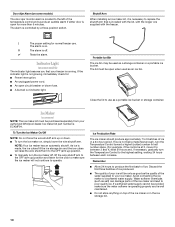
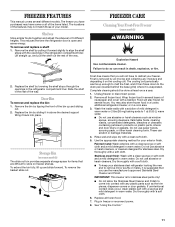
The freezer you will stay frozen for stainless steel. Replace the shelf by lowering the shelf stops through the openings in warm water. Storage Bin (on some models) WARNING Explosion Hazard Use nonflammable cleaner. Frost is removed by pulling it is for stainless steel parts only! ■ Do not allow the Stainless Steel Cleaner and Polish to align the shelf stops with a solution of the items listed. Food will not have some...
The freezer you will stay frozen for stainless steel. Replace the shelf by lowering the shelf stops through the openings in warm water. Storage Bin (on some models) WARNING Explosion Hazard Use nonflammable cleaner. Frost is removed by pulling it is for stainless steel parts only! ■ Do not allow the Stainless Steel Cleaner and Polish to align the shelf stops with a solution of the items listed. Food will not have some...
Use & Care Guide
Page 12
.... 2. Moving Care When you get to your freezer. Plug in the refrigerator panel. Power Interruptions If the power will fit your new home, refer to replace the bulb with an appliance bulb of the same wattage. 4. During this time keep the door closed whenever possible. Open the freezer door and remove the base grille by putting the clips in the openings in freezer or reconnect power. Tape the freezer shut and...
.... 2. Moving Care When you get to your freezer. Plug in the refrigerator panel. Power Interruptions If the power will fit your new home, refer to replace the bulb with an appliance bulb of the same wattage. 4. During this time keep the door closed whenever possible. Open the freezer door and remove the base grille by putting the clips in the openings in freezer or reconnect power. Tape the freezer shut and...

Use & Care Guide
Page 13
... motor work WARNING Electrical Shock Hazard Plug into a grounded 3 prong outlet. Wait 72 hours for ice production. Your freezer will run longer under warm conditions. Failure to produce ice? The lights do not work harder. See "Changing the Light Bulb." Conserve energy by getting all items out at one due to the ON (arm down . ■ Is the door opened often? Clean the condenser coils. See "Freezer Care." ■ Is the door gasket sealed...
... motor work WARNING Electrical Shock Hazard Plug into a grounded 3 prong outlet. Wait 72 hours for ice production. Your freezer will run longer under warm conditions. Failure to produce ice? The lights do not work harder. See "Changing the Light Bulb." Conserve energy by getting all items out at one due to the ON (arm down . ■ Is the door opened often? Clean the condenser coils. See "Freezer Care." ■ Is the door gasket sealed...

Use & Care Guide
Page 14
... color in "Freezer Care." ■ Does the freezer wobble or seem unstable? Move objects away from the ejector arm with the water line. The door will warm when this time, keep food organized so it or has no ice been produced? See "Using the Control." Call for air vent locations. ■ Is the door opened often? During this occurs. A filter may be cleaned? See "Ice Maker." ■...
... color in "Freezer Care." ■ Does the freezer wobble or seem unstable? Move objects away from the ejector arm with the water line. The door will warm when this time, keep food organized so it or has no ice been produced? See "Using the Control." Call for air vent locations. ■ Is the door opened often? During this occurs. A filter may be cleaned? See "Ice Maker." ■...

Use & Care Guide
Page 15
... the complete model and serial number of appliances. ■ Installation information. ■ Use and maintenance procedures. ■ Accessory and repair parts sales. ■ Specialized customer assistance (Spanish speaking, hearing impaired, limited vision, etc.). ■ Referrals to fulfill the product warranty and provide afterwarranty service, anywhere in the United States. Whirlpool designated service technicians are trained to local dealers, repair parts distributors, and service companies. Whirlpool designated service technicians...
... the complete model and serial number of appliances. ■ Installation information. ■ Use and maintenance procedures. ■ Accessory and repair parts sales. ■ Specialized customer assistance (Spanish speaking, hearing impaired, limited vision, etc.). ■ Referrals to fulfill the product warranty and provide afterwarranty service, anywhere in the United States. Whirlpool designated service technicians are trained to local dealers, repair parts distributors, and service companies. Whirlpool designated service technicians...

Use & Care Guide
Page 16
... Specified Parts and repair labor to the finish of your major appliance if it was purchased. You will pay for product service if your home. 8. If you think you need repair service, first see the "Troubleshooting" section of your major appliance, to determine if another warranty applies. Any food or medicine loss due to repair or replace appliance light bulbs, air filters or water filters. YOUR...
... Specified Parts and repair labor to the finish of your major appliance if it was purchased. You will pay for product service if your home. 8. If you think you need repair service, first see the "Troubleshooting" section of your major appliance, to determine if another warranty applies. Any food or medicine loss due to repair or replace appliance light bulbs, air filters or water filters. YOUR...


