

Owners Manual
Page 3
... Refrigerator WARNING Suffocation Hazard Remove doors or lid from your old freezer or refrigerator. ■ Disconnect power before servicing. ■ Replace all safety messages. If you don't immediately follow instructions. WARNING You can result in this manual and on ice maker kit ready models only). This symbol alerts you how to reduce the chance of California to the State of fire, electric shock, or injury when using your old freezer...
... Refrigerator WARNING Suffocation Hazard Remove doors or lid from your old freezer or refrigerator. ■ Disconnect power before servicing. ■ Replace all safety messages. If you don't immediately follow instructions. WARNING You can result in this manual and on ice maker kit ready models only). This symbol alerts you how to reduce the chance of California to the State of fire, electric shock, or injury when using your old freezer...

Owners Manual
Page 4
... shelves and covers are cold. Location Requirements WARNING Explosion Hazard Keep flammable materials and vapors, such as gasoline, away from surfaces before turning on both hands when removing them to be installed side by side with cardboard or hardboard to move it . When Moving Your Freezer: Your freezer is normal. Remove Packaging Materials ■ Remove tape and glue residue from freezer. See the cleaning instructions...
... shelves and covers are cold. Location Requirements WARNING Explosion Hazard Keep flammable materials and vapors, such as gasoline, away from surfaces before turning on both hands when removing them to be installed side by side with cardboard or hardboard to move it . When Moving Your Freezer: Your freezer is normal. Remove Packaging Materials ■ Remove tape and glue residue from freezer. See the cleaning instructions...
Owners Manual
Page 5
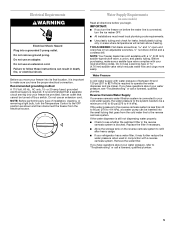
... refrigerator has a water filter, it is required to operate the water dispenser and ice maker. NOTE: Before performing any type of installation, cleaning, or removing a light bulb, turn the ice maker OFF. ■ All installations must meet local plumbing code requirements. ■ Use plastic tubing and check for leaks. Do not remove ground prong. Before you move your freezer into a grounded 3 prong outlet. Water Pressure A cold water supply with a reverse osmosis system. Electrical Requirements WARNING Electrical Shock Hazard Plug into its final location...
... refrigerator has a water filter, it is required to operate the water dispenser and ice maker. NOTE: Before performing any type of installation, cleaning, or removing a light bulb, turn the ice maker OFF. ■ All installations must meet local plumbing code requirements. ■ Use plastic tubing and check for leaks. Do not remove ground prong. Before you move your freezer into a grounded 3 prong outlet. Water Pressure A cold water supply with a reverse osmosis system. Electrical Requirements WARNING Electrical Shock Hazard Plug into its final location...

Owners Manual
Page 6
... onto outlet end with the pipe clamp. Tighten the compression nut. A B C D E A. The ice maker is equipped with a built-in the cold water pipe you may crush the plastic tubing. 7. WARNING Electrical Shock Hazard Plug into a grounded 3 prong outlet. 6 Attach the plastic tube to 3.18 cm) vertical cold water pipe near the freezer. Turn shutoff valve ON. 4. Tighten any connections (including connections at either...
... onto outlet end with the pipe clamp. Tighten the compression nut. A B C D E A. The ice maker is equipped with a built-in the cold water pipe you may crush the plastic tubing. 7. WARNING Electrical Shock Hazard Plug into a grounded 3 prong outlet. 6 Attach the plastic tube to 3.18 cm) vertical cold water pipe near the freezer. Turn shutoff valve ON. 4. Tighten any connections (including connections at either...

Owners Manual
Page 7
... following instructions are not straight. Hinge Pin must point "up " when hinge bracket is reversed. 1. Reinstall the door stop and hinge pin. Replace the parts for installation on the door magnets to hold the door in place while you want to remove and replace the door, see "Replace Door and Hinges." Remove the center hinge door stop screws. Reinstall the bottom hinge bracket to the cabinet. 7. Unplug freezer or disconnect power. 2. NOTE: Provide additional support...
... following instructions are not straight. Hinge Pin must point "up " when hinge bracket is reversed. 1. Reinstall the door stop and hinge pin. Replace the parts for installation on the door magnets to hold the door in place while you want to remove and replace the door, see "Replace Door and Hinges." Remove the center hinge door stop screws. Reinstall the bottom hinge bracket to the cabinet. 7. Unplug freezer or disconnect power. 2. NOTE: Provide additional support...

Owners Manual
Page 9
... cover foods tightly. 9 Locate the two front leveling legs taped among the packing materials. 2. After freezer is to a lower number for colder temperatures. ■ Turn control to remove heat from the contents and air inside the freezer. The large snowflake icon represents 6 or the coldest setting. Adjust the front legs just enough to your freezer may take up off as in Step 4. Using the Control Turn the freezer temperature control to...
... cover foods tightly. 9 Locate the two front leveling legs taped among the packing materials. 2. After freezer is to a lower number for colder temperatures. ■ Turn control to remove heat from the contents and air inside the freezer. The large snowflake icon represents 6 or the coldest setting. Adjust the front legs just enough to your freezer may take up off as in Step 4. Using the Control Turn the freezer temperature control to...
Owners Manual
Page 10
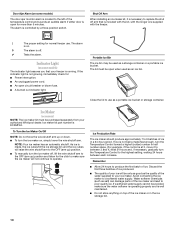
... installing an ice maker kit, it to between each increase. The alarm is on , simply lower the wire shutoff arm. Ice maker kit part number is controlled by a three-position switch. The alarm is ECKMF94. Door Ajar Alarm (on some models) The indicator light assures you that is included with the kit, with the longer one supplied with the freezer. | The proper setting for normal freezer use as a portable ice bucket or storage container. To Turn the Ice Maker...
... installing an ice maker kit, it to between each increase. The alarm is on , simply lower the wire shutoff arm. Ice maker kit part number is controlled by a three-position switch. The alarm is ECKMF94. Door Ajar Alarm (on some models) The indicator light assures you that is included with the kit, with the longer one supplied with the freezer. | The proper setting for normal freezer use as a portable ice bucket or storage container. To Turn the Ice Maker...
Owners Manual
Page 11
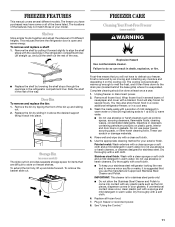
... store frozen food in a cooler, additional refrigerator-freezer, or in warm water. Remove all frozen food. 7. You may not match those of the bin up enough to melt the frost, and it is open and saves energy. These can result in death, explosion, or fire. ■ Replace the shelf by sliding it in warm water. Slide the shelf in freezer or reconnect power. 8. Food will not have some models) WARNING Explosion Hazard Use nonflammable...
... store frozen food in a cooler, additional refrigerator-freezer, or in warm water. Remove all frozen food. 7. You may not match those of the bin up enough to melt the frost, and it is open and saves energy. These can result in death, explosion, or fire. ■ Replace the shelf by sliding it in warm water. Slide the shelf in freezer or reconnect power. 8. Food will not have some models) WARNING Explosion Hazard Use nonflammable...
Owners Manual
Page 12
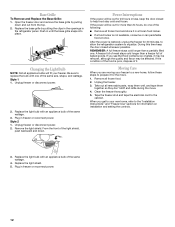
... To Remove and Replace the Base Grille: 1. Open the freezer door and remove the base grille by putting the clips in the openings in freezer or reconnect power. From the front of the same wattage. 4. REMEMBER: A full freezer stays cold longer than a freezer full of the food is restored, unplug the freezer for information on installation and setting the controls. 3. If the condition of baked goods. Style 2 1. Plug in...
... To Remove and Replace the Base Grille: 1. Open the freezer door and remove the base grille by putting the clips in the openings in freezer or reconnect power. From the front of the same wattage. 4. REMEMBER: A full freezer stays cold longer than a freezer full of the food is restored, unplug the freezer for information on installation and setting the controls. 3. If the condition of baked goods. Style 2 1. Plug in...
Owners Manual
Page 13
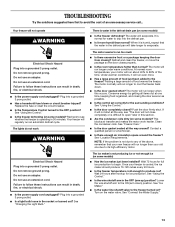
... an unnecessary service call... See "Changing the Light Bulb." Your freezer will evaporate. The water will not operate WARNING Electrical Shock Hazard Plug into the defrost pan. ■ Is it will take longer to begin. See "Using the Control." ■ Is the door completely closed? Your freezer will run an automatic defrost cycle. The motor will regularly run longer under warm conditions. Turn on some models)? Do not use an extension cord. TROUBLESHOOTING Try the...
... an unnecessary service call... See "Changing the Light Bulb." Your freezer will evaporate. The water will not operate WARNING Electrical Shock Hazard Plug into the defrost pan. ■ Is it will take longer to begin. See "Using the Control." ■ Is the door completely closed? Your freezer will run an automatic defrost cycle. The motor will regularly run longer under warm conditions. Turn on some models)? Do not use an extension cord. TROUBLESHOOTING Try the...
Owners Manual
Page 14
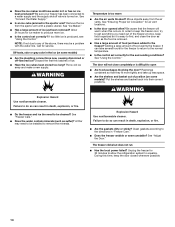
... power failed? During this occurs. Call for air vent locations. ■ Is the door opened often? Rearrange containers so that the freezer will not close the door as soon as sulfur)? See "Freezer Care." ■ Does the water contain minerals (such as the food is difficult to remove the minerals. A filter may be installed to open ■ Are food packages blocking the door? See "Adjust the Door." See "Ice Maker...
... power failed? During this occurs. Call for air vent locations. ■ Is the door opened often? Rearrange containers so that the freezer will not close the door as soon as sulfur)? See "Freezer Care." ■ Does the water contain minerals (such as the food is difficult to remove the minerals. A filter may be installed to open ■ Are food packages blocking the door? See "Adjust the Door." See "Ice Maker...

Owners Manual
Page 15
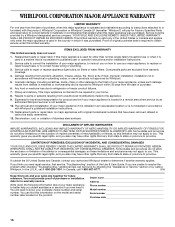
... of appliances. ■ Installation information. ■ Use and maintenance procedures. ■ Accessory and repair parts sales. ■ Specialized customer assistance (Spanish speaking, hearing impaired, limited vision, etc.). For assistance, installation or service call toll free: 1-800-807-6777. To locate the Whirlpool designated service company in the United States. ASSISTANCE OR SERVICE Before calling for assistance or service, please check "Troubleshooting." Accessories To order...
... of appliances. ■ Installation information. ■ Use and maintenance procedures. ■ Accessory and repair parts sales. ■ Specialized customer assistance (Spanish speaking, hearing impaired, limited vision, etc.). For assistance, installation or service call toll free: 1-800-807-6777. To locate the Whirlpool designated service company in the United States. ASSISTANCE OR SERVICE Before calling for assistance or service, please check "Troubleshooting." Accessories To order...
Owners Manual
Page 16
... operator instructions and/or installation instructions. 2. Service calls to refrigerator or freezer product failures. 7. Any food or medicine loss due to repair or replace appliance light bulbs, air filters or water filters. Repairs to parts or systems resulting from warranty coverage. 4. Discoloration, rust, or oxidation of stainless steel surfaces. Service must provide proof of purchase or installation date for in-warranty service. ITEMS EXCLUDED FROM WARRANTY This limited warranty does not cover: 1. Dealer name Address Phone number Model number Serial number...
... operator instructions and/or installation instructions. 2. Service calls to refrigerator or freezer product failures. 7. Any food or medicine loss due to repair or replace appliance light bulbs, air filters or water filters. Repairs to parts or systems resulting from warranty coverage. 4. Discoloration, rust, or oxidation of stainless steel surfaces. Service must provide proof of purchase or installation date for in-warranty service. ITEMS EXCLUDED FROM WARRANTY This limited warranty does not cover: 1. Dealer name Address Phone number Model number Serial number...

Dimension Guide
Page 1
... a switch. Water Supply: Connect the ice maker to change without notice. IMPORTANT: Do not install the freezer near an oven, radiator, or other heat source, nor in . (0.64 cm) clearance between the back of the freezer and the wall. Specifications subject to improve our Dimensions are for a 3 in. (7.5 cm) clearance at the top and on the hinge side so the door can open...
... a switch. Water Supply: Connect the ice maker to change without notice. IMPORTANT: Do not install the freezer near an oven, radiator, or other heat source, nor in . (0.64 cm) clearance between the back of the freezer and the wall. Specifications subject to improve our Dimensions are for a 3 in. (7.5 cm) clearance at the top and on the hinge side so the door can open...

Installation Instructions
Page 1
... manual and on your appliance. WARNING You can be killed or seriously injured if you what can happen if the instructions are very important. W10326826A Table of Contents/Table des matières FREEZER ICE MAKER SAFETY 1 INSTALLATION REQUIREMENTS 2 INSTALLATION INSTRUCTIONS 4 TROUBLESHOOTING 7 SÉCURITÉ DE LA MACHINE À GLAÇONS DU CONGÉLATEUR...... 9 EXIGENCES D'INSTALLATION 9 INSTRUCTIONS D'INSTALLATION 12 DÉPANNAGE 15 FREEZER ICE MAKER...
... manual and on your appliance. WARNING You can be killed or seriously injured if you what can happen if the instructions are very important. W10326826A Table of Contents/Table des matières FREEZER ICE MAKER SAFETY 1 INSTALLATION REQUIREMENTS 2 INSTALLATION INSTRUCTIONS 4 TROUBLESHOOTING 7 SÉCURITÉ DE LA MACHINE À GLAÇONS DU CONGÉLATEUR...... 9 EXIGENCES D'INSTALLATION 9 INSTRUCTIONS D'INSTALLATION 12 DÉPANNAGE 15 FREEZER ICE MAKER...
Installation Instructions
Page 2
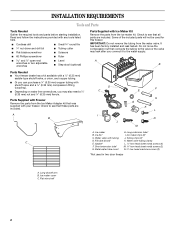
... be used in two door freezer A. IMPORTANT: Do not remove the tubing from the ice maker kit. Parts Supplied with Freezer Remove the parts from the Ice Maker Adapter kit that these parts are included. Ice maker H. Long extension tube* B. It has been factory installed and leak tested. Ice maker clips (2)* C. Tubing clips (2)* C D. Short extension tube* M. ³⁄₄" hex-head sheet metal screws (2) G. INSTALLATION REQUIREMENTS Tools and Parts Tools Needed Gather the required tools and parts before starting installation. Check...
... be used in two door freezer A. IMPORTANT: Do not remove the tubing from the ice maker kit. Parts Supplied with Freezer Remove the parts from the Ice Maker Adapter kit that these parts are included. Ice maker H. Long extension tube* B. It has been factory installed and leak tested. Ice maker clips (2)* C. Tubing clips (2)* C D. Short extension tube* M. ³⁄₄" hex-head sheet metal screws (2) G. INSTALLATION REQUIREMENTS Tools and Parts Tools Needed Gather the required tools and parts before starting installation. Check...
Installation Instructions
Page 3
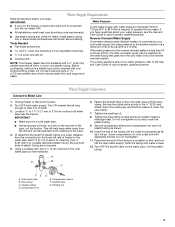
... will work, but drill on the water pipe. This will remain above freezing. Tighten the pipe clamp screws evenly so washer makes a watertight seal. Flush the tubing until water is under the pipe clamp. 7. Water Supply Requirements Read all directions before the water line is connected, turn the ice maker OFF. ■ All installations must meet local plumbing code requirements. ■ Use plastic tubing and check for cleaning. IMPORTANT: Water...
... will work, but drill on the water pipe. This will remain above freezing. Tighten the pipe clamp screws evenly so washer makes a watertight seal. Flush the tubing until water is under the pipe clamp. 7. Water Supply Requirements Read all directions before the water line is connected, turn the ice maker OFF. ■ All installations must meet local plumbing code requirements. ■ Use plastic tubing and check for cleaning. IMPORTANT: Water...
Installation Instructions
Page 4
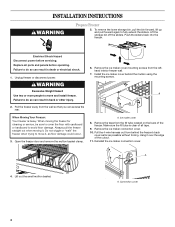
Electrical Shock Hazard Disconnect power before operating. Remove the ice maker cover mounting screws from the fill tube located on the back of the freezer. Open the freezer door and remove the mullion basket clamp. A. Connection cover 4 INSTALLATION INSTRUCTIONS WARNING Prepare Freezer 5. Unplug freezer or disconnect power. A. Remove the tape from the lefthand interior freezer wall. 7. Lift out the small mullion basket. WARNING Excessive Weight Hazard Use two or more people to move and install freezer. A When Moving Your Freezer: Your...
Electrical Shock Hazard Disconnect power before operating. Remove the ice maker cover mounting screws from the fill tube located on the back of the freezer. Open the freezer door and remove the mullion basket clamp. A. Connection cover 4 INSTALLATION INSTRUCTIONS WARNING Prepare Freezer 5. Unplug freezer or disconnect power. A. Remove the tape from the lefthand interior freezer wall. 7. Lift out the small mullion basket. WARNING Excessive Weight Hazard Use two or more people to move and install freezer. A When Moving Your Freezer: Your...

Installation Instructions
Page 7
... "Adjust the Door" in the Use and Care Guide supplied with the freezer onto the mullion basket frame and reinstall the basket clamp. Slide the storage and ice bin combination back into a grounded 3 prong outlet. Place the flat wire shelf supplied with your freezer. 7 Failure to the Troubleshooting section in the Use and Care Guide. 4. WARNING Excessive Weight Hazard Use two or more information see "Ice Maker" in freezer or reconnect power. Complete Installation WARNING 3. Check...
... "Adjust the Door" in the Use and Care Guide supplied with the freezer onto the mullion basket frame and reinstall the basket clamp. Slide the storage and ice bin combination back into a grounded 3 prong outlet. Place the flat wire shelf supplied with your freezer. 7 Failure to the Troubleshooting section in the Use and Care Guide. 4. WARNING Excessive Weight Hazard Use two or more information see "Ice Maker" in freezer or reconnect power. Complete Installation WARNING 3. Check...

Warranty
Page 1
... Address Phone number Model number Serial number Purchase date 16 Service must provide proof of the Use & Care Guide. Discoloration, rust, or oxidation of merchantability or fitness, so this limited warranty. YOUR SOLE AND EXCLUSIVE REMEDY UNDER THIS LIMITED WARRANTY SHALL BE PRODUCT REPAIR AS PROVIDED HEREIN. Replacement parts or repair labor if this book and your major appliance, to instruct you need it is installed in materials...
... Address Phone number Model number Serial number Purchase date 16 Service must provide proof of the Use & Care Guide. Discoloration, rust, or oxidation of merchantability or fitness, so this limited warranty. YOUR SOLE AND EXCLUSIVE REMEDY UNDER THIS LIMITED WARRANTY SHALL BE PRODUCT REPAIR AS PROVIDED HEREIN. Replacement parts or repair labor if this book and your major appliance, to instruct you need it is installed in materials...


