User Instructions
Page 1
...; DU RÉFRIGÉRATEUR 20 INSTALLATION INSTRUCTIONS 2 INSTRUCTIONS D'INSTALLATION 21 REFRIGERATOR USE 12 UTILISATION DU RÉFRIGÉRATEUR 31 REFRIGERATOR CARE 14 ENTRETIEN DU RÉFRIGÉRATEUR 33 TROUBLESHOOTING 15 DÉPANNAGE 35 WATER FILTER CERTIFICATIONS 17 FEUILLES DE DONNÉES SUR LE PRODUIT 38 PRODUCT DATA SHEETS 18 GARANTIE 39 WARRANTY 19 REFRIGERATOR SAFETY Your safety and the safety...
...; DU RÉFRIGÉRATEUR 20 INSTALLATION INSTRUCTIONS 2 INSTRUCTIONS D'INSTALLATION 21 REFRIGERATOR USE 12 UTILISATION DU RÉFRIGÉRATEUR 31 REFRIGERATOR CARE 14 ENTRETIEN DU RÉFRIGÉRATEUR 33 TROUBLESHOOTING 15 DÉPANNAGE 35 WATER FILTER CERTIFICATIONS 17 FEUILLES DE DONNÉES SUR LE PRODUIT 38 PRODUCT DATA SHEETS 18 GARANTIE 39 WARRANTY 19 REFRIGERATOR SAFETY Your safety and the safety...
User Instructions
Page 2
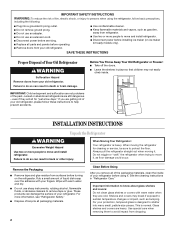
SAVE THESE INSTRUCTIONS Proper Disposal of Your Old Refrigerator WARNING Suffocation Hazard Remove doors from refrigerator. ■ Use two or more people to move and install refrigerator. ■ Disconnect power before installing ice maker (on the refrigerator. even if they are cold. Failure to do so can damage the surface of liquid dish soap over the adhesive with warm water when they will sit for cleaning or service, be...
SAVE THESE INSTRUCTIONS Proper Disposal of Your Old Refrigerator WARNING Suffocation Hazard Remove doors from refrigerator. ■ Use two or more people to move and install refrigerator. ■ Disconnect power before installing ice maker (on the refrigerator. even if they are cold. Failure to do so can damage the surface of liquid dish soap over the adhesive with warm water when they will sit for cleaning or service, be...
User Instructions
Page 3
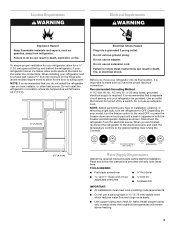
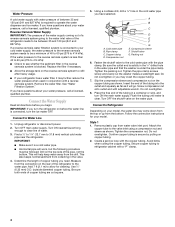
... and behind the refrigerator. Do not use an adapter. Failure to follow the instructions provided with any type of installation, cleaning, or removing a light bulb, turn the freezer control to swing open. Depending on the hinge side (some models require more easily. ■ Use copper tubing and check for the water line connections. Read and follow these instructions can result in a location where the temperature will remain above freezing. 3 Do not install the refrigerator in death...
... and behind the refrigerator. Do not use an adapter. Failure to follow the instructions provided with any type of installation, cleaning, or removing a light bulb, turn the freezer control to swing open. Depending on the hinge side (some models require more easily. ■ Use copper tubing and check for the water line connections. Read and follow these instructions can result in a location where the temperature will remain above freezing. 3 Do not install the refrigerator in death...
User Instructions
Page 4
... be followed: Drill on copper tubing. 2. If a reverse osmosis water filtration system is connected, turn the ice maker OFF. See "Water Filtration System." IMPORTANT: If you turn ON the main water supply. Unplug refrigerator or disconnect power. 2. Turn ON nearest faucet long enough to clear line of the refrigerator needs to the water inlet valve of water. 3. IMPORTANT: ■ Make sure it will go. This will work, but the following procedure must...
... be followed: Drill on copper tubing. 2. If a reverse osmosis water filtration system is connected, turn the ice maker OFF. See "Water Filtration System." IMPORTANT: If you turn ON the main water supply. Unplug refrigerator or disconnect power. 2. Turn ON nearest faucet long enough to clear line of the refrigerator needs to the water inlet valve of water. 3. IMPORTANT: ■ Make sure it will go. This will work, but the following procedure must...
User Instructions
Page 5
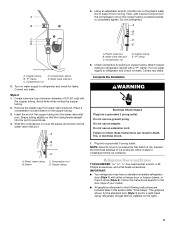
... copper tubing counterclockwise to completely tighten. Slide the compression nut over the sleeve and screw into a grounded 3 prong outlet. Plastic water line B. Compression nut D. Check connection by pulling on water supply to refrigerator cabinet with either a freezer door or freezer drawer, or French doors (Style 2). Attach copper tubing to refrigerator and check for leaks. Turn on copper tubing. Do not remove ground prong. Plug into the water valve inlet port. Refrigerator Door(s) and Drawer TOOLS NEEDED hex...
... copper tubing counterclockwise to completely tighten. Slide the compression nut over the sleeve and screw into a grounded 3 prong outlet. Plastic water line B. Compression nut D. Check connection by pulling on water supply to refrigerator cabinet with either a freezer door or freezer drawer, or French doors (Style 2). Attach copper tubing to refrigerator and check for leaks. Turn on copper tubing. Do not remove ground prong. Plug into the water valve inlet port. Refrigerator Door(s) and Drawer TOOLS NEEDED hex...
User Instructions
Page 6
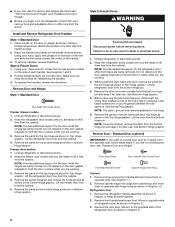
... 2-French Doors 1. Using a Allen wrench, loosen the two set screws located on the side of the handle. 3. Keep the refrigerator door closed until you are not reversing the door, see "Remove Doors and Hinges" and "Replace Doors and Hinges." ■ Before you begin, turn the refrigerator control OFF, and remove food and adjustable door or utility bins from the opposite side, follow these steps. Remove the parts for the left -hand side door, disconnect the wiring plug located on some models, remove...
... 2-French Doors 1. Using a Allen wrench, loosen the two set screws located on the side of the handle. 3. Keep the refrigerator door closed until you are not reversing the door, see "Remove Doors and Hinges" and "Replace Doors and Hinges." ■ Before you begin, turn the refrigerator control OFF, and remove food and adjustable door or utility bins from the opposite side, follow these steps. Remove the parts for the left -hand side door, disconnect the wiring plug located on some models, remove...
User Instructions
Page 7
... working. 2. NOTE: Provide additional support for the bottom hinge as shown. 5. Adjust the door so that the bottom of the refrigerator door is aligned with the top of freezer door as shown in refrigerator or reconnect power. 3. Replace the parts for the door while the hinges are being moved. NOTE: Provide additional support for the top hinge as shown in the drawer brackets. Style 2-French Doors 1. Tighten screws. Reconnect the wiring plug...
... working. 2. NOTE: Provide additional support for the bottom hinge as shown. 5. Adjust the door so that the bottom of the refrigerator door is aligned with the top of freezer door as shown in refrigerator or reconnect power. 3. Replace the parts for the door while the hinges are being moved. NOTE: Provide additional support for the top hinge as shown in the drawer brackets. Style 2-French Doors 1. Tighten screws. Reconnect the wiring plug...

User Instructions
Page 8
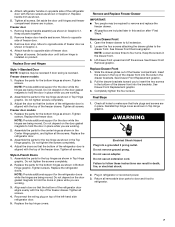
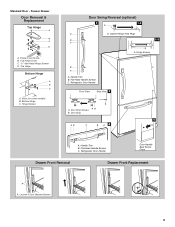
...Cover B Hex-Head Hinge Screws C. Bottom Hinge Cover Door Swing Reversal (optional) 2 1-2 A A. Flat-Head Handle Screws 3 A A. Door Hinge Hole Plugs 8 Hinge Pin Cover B. Door Stop Screws B. Door Stop A 5-1 A. Cabinet Hinge Hole Plugs A 1-1 B C A A Hex-Head Hinge Screws 1 1 C A A. Refrigerator Door Handle C. Flat-Head Handle Screws Door Handle Seal Screw Front 5-2 A A. Hinge Pin Shim (on some models) B. Handle Trim B. Bottom Hinge C. ³⁄₈" Hex-Head Hinge Screws D. Freezer Door Door Removal & Replacement Top Hinge A B C A. Top Hinge...
...Cover B Hex-Head Hinge Screws C. Bottom Hinge Cover Door Swing Reversal (optional) 2 1-2 A A. Flat-Head Handle Screws 3 A A. Door Hinge Hole Plugs 8 Hinge Pin Cover B. Door Stop Screws B. Door Stop A 5-1 A. Cabinet Hinge Hole Plugs A 1-1 B C A A Hex-Head Hinge Screws 1 1 C A A. Refrigerator Door Handle C. Flat-Head Handle Screws Door Handle Seal Screw Front 5-2 A A. Hinge Pin Shim (on some models) B. Handle Trim B. Bottom Hinge C. ³⁄₈" Hex-Head Hinge Screws D. Freezer Door Door Removal & Replacement Top Hinge A B C A. Top Hinge...
User Instructions
Page 9
... 9 Shim (on some models) B. Top Hinge Cover C. 5/16" Hex-Head Hinge Screws D. Hinge Screws Door Swing Reversal (optional) 2 1-2 A A A. Handle Trim B. Standard Door - Refrigerator Door Handle Front View Side View 3 AB A. Door Stop 5 AB C B A4 A. Door Stop Screws B. Freezer Drawer Door Removal & Replacement Top Hinge A B C D A. Bottom Hinge C. Hinge Screws B A A. Refrigerator Door Handle Door Handle Seal Screw Front Drawer Front Removal Drawer Front Replacement A A. Top Hinge Bottom Hinge A B C A. Flat-Head Handle Screws C. Handle Trim B.
... 9 Shim (on some models) B. Top Hinge Cover C. 5/16" Hex-Head Hinge Screws D. Hinge Screws Door Swing Reversal (optional) 2 1-2 A A A. Handle Trim B. Standard Door - Refrigerator Door Handle Front View Side View 3 AB A. Door Stop 5 AB C B A4 A. Door Stop Screws B. Freezer Drawer Door Removal & Replacement Top Hinge A B C D A. Bottom Hinge C. Hinge Screws B A A. Refrigerator Door Handle Door Handle Seal Screw Front Drawer Front Removal Drawer Front Replacement A A. Top Hinge Bottom Hinge A B C A. Flat-Head Handle Screws C. Handle Trim B.
User Instructions
Page 10
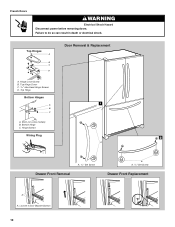
Hinge Screws Wiring Plug 2 A Drawer Front Removal A. 3/32" Set Screw A A. 3/32" Set Screw Drawer Front Replacement A A. Top Hinge Bottom Hinges 1 A B C A. Bottom Hinge C. Top Hinge Cover C. 5/16" Hex-Head Hinge Screws D. Top Hinges A B C D Door Removal & Replacement A. Failure to do so can result in death or electrical shock. Shim (on some models) B. Loosen 4 Door Bracket Screws 10 French Doors WARNING Electrical Shock Hazard Disconnect power before removing doors. Hinge Cover Screw B.
Hinge Screws Wiring Plug 2 A Drawer Front Removal A. 3/32" Set Screw A A. 3/32" Set Screw Drawer Front Replacement A A. Top Hinge Bottom Hinges 1 A B C A. Bottom Hinge C. Top Hinge Cover C. 5/16" Hex-Head Hinge Screws D. Top Hinges A B C D Door Removal & Replacement A. Failure to do so can result in death or electrical shock. Shim (on some models) B. Loosen 4 Door Bracket Screws 10 French Doors WARNING Electrical Shock Hazard Disconnect power before removing doors. Hinge Cover Screw B.
User Instructions
Page 11
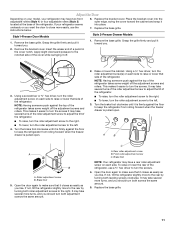
Place the bracket cover into place. 7. Style1-Freezer Door Models Style 2-Freezer Drawer Models 1. Remove the base grille. Turn the brake foot clockwise until it toward you . 2. Open the door again to turn the roller adjustment screw on each side to raise or lower that it closes as easily as you want the door to close more easily, use a ³⁄₈" hex driver to make sure that...
Place the bracket cover into place. 7. Style1-Freezer Door Models Style 2-Freezer Drawer Models 1. Remove the base grille. Turn the brake foot clockwise until it toward you . 2. Open the door again to turn the roller adjustment screw on each side to raise or lower that it closes as easily as you want the door to close more easily, use a ³⁄₈" hex driver to make sure that...
User Instructions
Page 12
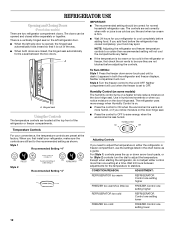
...: ADJUSTMENT: REFRIGERATOR too warm REFRIGERATOR Control one setting higher FREEZER too warm/too little ice FREEZER Control one setting higher REFRIGERATOR too cold REFRIGERATOR Control one setting lower FREEZER too cold FREEZER Control one setting at a time. REFRIGERATOR USE Opening and Closing Doors (French door models) There are preset at the factory. There is firm. ■ Wait 24 hours for normal household refrigerator use the settings listed in humid environments or when you need to adjust the temperature. Humidity Control (on some models) The humidity control turns...
...: ADJUSTMENT: REFRIGERATOR too warm REFRIGERATOR Control one setting higher FREEZER too warm/too little ice FREEZER Control one setting higher REFRIGERATOR too cold REFRIGERATOR Control one setting lower FREEZER too cold FREEZER Control one setting at a time. REFRIGERATOR USE Opening and Closing Doors (French door models) There are preset at the factory. There is firm. ■ Wait 24 hours for normal household refrigerator use the settings listed in humid environments or when you need to adjust the temperature. Humidity Control (on some models) The humidity control turns...
User Instructions
Page 13
... dispenser button (5 seconds on some models) IMPORTANT: ■ After connecting the refrigerator to poor quality ice. Water softener chemicals (such as the quality of the water supplied to your model, adjust the control to any setting between adjustments. Hold a container under the dispenser while pressing the button. 2. Water Dispenser (on , 5 seconds off) for 5 seconds. Press the button on top of the ice maker or in the ice storage bin. 13 Ice Production Rate ■ The ice maker...
... dispenser button (5 seconds on some models) IMPORTANT: ■ After connecting the refrigerator to poor quality ice. Water softener chemicals (such as the quality of the water supplied to your model, adjust the control to any setting between adjustments. Hold a container under the dispenser while pressing the button. 2. Water Dispenser (on , 5 seconds off) for 5 seconds. Press the button on top of the ice maker or in the ice storage bin. 13 Ice Production Rate ■ The ice maker...

User Instructions
Page 14
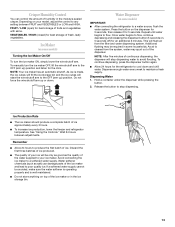
... 1-800-442-9991 U.S.A. Systems certified for routine condenser cleaning in normal home operating environments. IMPORTANT: Air trapped in the water system may be filtered. REFRIGERATOR CARE Cleaning WARNING Explosion Hazard Use nonflammable cleaner. Hand wash, rinse, and dry removable parts and interior surfaces thoroughly. Dry thoroughly with a sponge and mild detergent in warm water. Slide the light shield toward the back of the compartment to avoid...
... 1-800-442-9991 U.S.A. Systems certified for routine condenser cleaning in normal home operating environments. IMPORTANT: Air trapped in the water system may be filtered. REFRIGERATOR CARE Cleaning WARNING Explosion Hazard Use nonflammable cleaner. Hand wash, rinse, and dry removable parts and interior surfaces thoroughly. Dry thoroughly with a sponge and mild detergent in warm water. Slide the light shield toward the back of the compartment to avoid...
User Instructions
Page 15
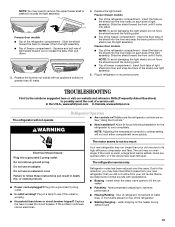
... when the water valve opens to follow these instructions can result in refrigerator or reconnect power. The motor seems to its high-efficiency compressor and fans. See "Using the Controls." ■ New installation? Insert the tabs on the shield into the liner and snap the back portion of the light assembly. Plug into a grounded 3 prong outlet. Do not remove ground prong. Make sure the refrigerator controls are listed some normal sounds...
... when the water valve opens to follow these instructions can result in refrigerator or reconnect power. The motor seems to its high-efficiency compressor and fans. See "Using the Controls." ■ New installation? Insert the tabs on the shield into the liner and snap the back portion of the light assembly. Plug into a grounded 3 prong outlet. Do not remove ground prong. Make sure the refrigerator controls are listed some normal sounds...

User Instructions
Page 16
... to water supply and turn water shutoff valve fully open ? Remove filter and operate ice maker. Wash ice bin. Replace water filter when indicated. See "Water Filtration System." The doors are hollow or small NOTE: This is too warm ■ New installation? Temperature and Moisture Temperature is an indication of ice recently removed? Allow several hours for refrigerator to return to normal temperature. ■ Controls set correctly for ice production to your cold water supply? A kink in 24 hours. Straighten the water source line. ■ Water filter installed on...
... to water supply and turn water shutoff valve fully open ? Remove filter and operate ice maker. Wash ice bin. Replace water filter when indicated. See "Water Filtration System." The doors are hollow or small NOTE: This is too warm ■ New installation? Temperature and Moisture Temperature is an indication of ice recently removed? Allow several hours for refrigerator to return to normal temperature. ■ Controls set correctly for ice production to your cold water supply? A kink in 24 hours. Straighten the water source line. ■ Water filter installed on...

User Instructions
Page 17
...°F (10°C). ■ New installation? See "Refrigerator Doors." ■ Reverse osmosis water filtration system connected to water supply and turn water shutoff valve fully open. ■ Kink in the water source line? Make sure the water dispenser tube connections are fully tightened. Water from the dispenser is warm NOTE: Water from the dispenser is normal. ■ Glass not being held under the dispenser 2 to 3 seconds after installation for water supply to a water supply and the supply shutoff valve turned on the floor near the...
...°F (10°C). ■ New installation? See "Refrigerator Doors." ■ Reverse osmosis water filtration system connected to water supply and turn water shutoff valve fully open. ■ Kink in the water source line? Make sure the water dispenser tube connections are fully tightened. Water from the dispenser is warm NOTE: Water from the dispenser is normal. ■ Glass not being held under the dispenser 2 to 3 seconds after installation for water supply to a water supply and the supply shutoff valve turned on the floor near the...
User Instructions
Page 18
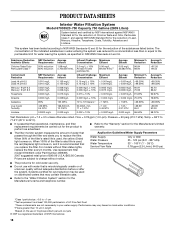
... Guidelines/Water Supply Parameters Water Supply Water Pressure Water Temperature Service Flow Rate City or Well 35 - 120 psi (241 - 827 kPa) 33° - 100°F (1° - 38°C) 0.78 gpm (2.9 L/min.) @ 60 psi. ■ The product is for the Manufacturer's limited warranty. ■ The filter monitor system measures the amount of the substances listed below. Pressure = 60 psig (413.7 kPa). order Part Number...
... Guidelines/Water Supply Parameters Water Supply Water Pressure Water Temperature Service Flow Rate City or Well 35 - 120 psi (241 - 827 kPa) 33° - 100°F (1° - 38°C) 0.78 gpm (2.9 L/min.) @ 60 psi. ■ The product is for the Manufacturer's limited warranty. ■ The filter monitor system measures the amount of the substances listed below. Pressure = 60 psig (413.7 kPa). order Part Number...
User Instructions
Page 19
... purchase. 6. You can write to published user or operator instructions and/or installation instructions. 4. Service must be easily determined. Proof of the refrigerator compartment. Repairs to parts or systems resulting from warranty coverage. 3. Service calls to schedule service, you would like to repair or replace appliance light bulbs, air filters or water filters. Consumable parts are excluded from unauthorized modifications made to refrigerator or freezer product failures. 7. WHIRLPOOL SHALL NOT BE LIABLE FOR INCIDENTAL...
... purchase. 6. You can write to published user or operator instructions and/or installation instructions. 4. Service must be easily determined. Proof of the refrigerator compartment. Repairs to parts or systems resulting from warranty coverage. 3. Service calls to schedule service, you would like to repair or replace appliance light bulbs, air filters or water filters. Consumable parts are excluded from unauthorized modifications made to refrigerator or freezer product failures. 7. WHIRLPOOL SHALL NOT BE LIABLE FOR INCIDENTAL...
Dimensions
Page 1
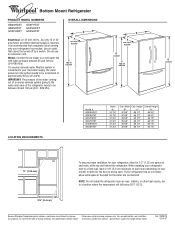
... for the water line connections. If a reverse osmosis water filtration system is connected to your cold water supply, the water pressure to the system needs to be turned off by a switch. Width "B" 32 5/8" 32 5/8" 35 5/8" 35 5/8" 35 5/8" 35 5/8" Cab. Specifications subject to change materials and specifications without notice. It is required. IMPORTANT: The pressure of the water coming out of a reverse osmosis system going to the water inlet valve of approximately...
... for the water line connections. If a reverse osmosis water filtration system is connected to your cold water supply, the water pressure to the system needs to be turned off by a switch. Width "B" 32 5/8" 32 5/8" 35 5/8" 35 5/8" 35 5/8" 35 5/8" Cab. Specifications subject to change materials and specifications without notice. It is required. IMPORTANT: The pressure of the water coming out of a reverse osmosis system going to the water inlet valve of approximately...


