User Instructions
Page 1
...WARNING." In Canada, visit our website at www.whirlpool.ca or call us at www.whirlpool.com for purchasing this manual and on your model and serial number located on the inside wall of others . W10175448A ® REFRIGERATOR USER INSTRUCTIONS THANK YOU for additional information. If... Your safety and the safety of the refrigerator compartment. Para obtener acceso a "Instrucciones para el usuario del refrigerador" en español, o para obtener información adicional acerca de su producto, visite: www.whirlpool.com. You will need assistance, call us at 1-800-253...
...WARNING." In Canada, visit our website at www.whirlpool.ca or call us at www.whirlpool.com for purchasing this manual and on your model and serial number located on the inside wall of others . W10175448A ® REFRIGERATOR USER INSTRUCTIONS THANK YOU for additional information. If... Your safety and the safety of the refrigerator compartment. Para obtener acceso a "Instrucciones para el usuario del refrigerador" en español, o para obtener información adicional acerca de su producto, visite: www.whirlpool.com. You will need assistance, call us at 1-800-253...
User Instructions
Page 2
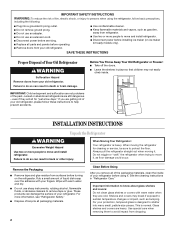
...9632; Leave the shelves in back or other injury. Glass shelves and covers are still dangerous - SAVE THESE INSTRUCTIONS Proper Disposal of Your Old Refrigerator WARNING Suffocation Hazard Remove doors from dropping. 2 even if they are cold. Clean Before Using After you are not problems of the past. IMPORTANT...reduce the risk of fire, electric shock, or injury to persons when using it , as bumping. Failure to do so can result in "Refrigerator Care." Shelves and covers may not easily climb inside of liquid dish soap over the adhesive with warm water and dry. ■ Do ...
...9632; Leave the shelves in back or other injury. Glass shelves and covers are still dangerous - SAVE THESE INSTRUCTIONS Proper Disposal of Your Old Refrigerator WARNING Suffocation Hazard Remove doors from dropping. 2 even if they are cold. Clean Before Using After you are not problems of the past. IMPORTANT...reduce the risk of fire, electric shock, or injury to persons when using it , as bumping. Failure to do so can result in "Refrigerator Care." Shelves and covers may not easily climb inside of liquid dish soap over the adhesive with warm water and dry. ■ Do ...
User Instructions
Page 3
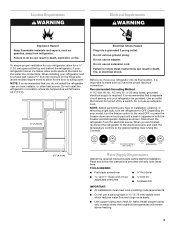
...so can result in death, fire, or electrical shock. It is recommended that a separate circuit serving only your model, turn the refrigerator to OFF. Do not use an adapter. When you have the proper electrical connection. TOOLS NEEDED: ■ Flat-blade screwdriver ... Freezer down arrow touch pad until a dash (-) appears in a location where the temperature will remain above freezing. 3 Disconnect the refrigerator from refrigerator. Read and follow these instructions can result in areas where the household temperatures will fall below 55°F (13°C). ¹⁄...
...so can result in death, fire, or electrical shock. It is recommended that a separate circuit serving only your model, turn the refrigerator to OFF. Do not use an adapter. When you have the proper electrical connection. TOOLS NEEDED: ■ Flat-blade screwdriver ... Freezer down arrow touch pad until a dash (-) appears in a location where the temperature will remain above freezing. 3 Disconnect the refrigerator from refrigerator. Read and follow these instructions can result in areas where the household temperatures will fall below 55°F (13°C). ¹⁄...
User Instructions
Page 4
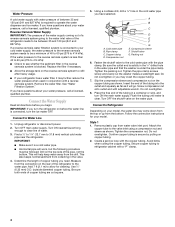
... G E. Compression sleeve F. Shutoff valve G. Screw compression nut onto outlet end with the copper tubing. Attach the copper tube to allow for your refrigerator has a water filter, it will help keep water away from water valve inlet port. Avoid kinks when coiling the copper tubing. If a reverse...the storage tank on your water pressure, call a licensed, qualified plumber. Connect to 31.8 mm) vertical cold water pipe near the refrigerator. Copper tubing D. Do not overtighten or you turn ON the main water supply. Place the free end of the tubing in conjunction ...
... G E. Compression sleeve F. Shutoff valve G. Screw compression nut onto outlet end with the copper tubing. Attach the copper tube to allow for your refrigerator has a water filter, it will help keep water away from water valve inlet port. Avoid kinks when coiling the copper tubing. If a reverse...the storage tank on your water pressure, call a licensed, qualified plumber. Connect to 31.8 mm) vertical cold water pipe near the refrigerator. Copper tubing D. Do not overtighten or you turn ON the main water supply. Place the free end of the tubing in conjunction ...
User Instructions
Page 5
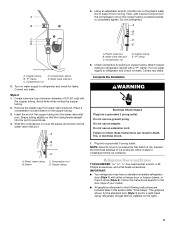
... connection by pulling on the right). 5 Correct any leaks. NOTE: Allow 24 hours to refrigerator and check for leaks. Discard the first three batches of ice. IMPORTANT: ■ Your refrigerator may have a standard reversible refrigerator door (Style 1) with a second wrench turn A the compression nut on water supply to ...the door style of the copper tubing into the water valve inlet port. Compression nut D. Slide the compression nut over the sleeve and screw into the port to refrigerator cabinet with the copper tubing. A B C D A. Using an adjustable wrench, hold ...
... connection by pulling on the right). 5 Correct any leaks. NOTE: Allow 24 hours to refrigerator and check for leaks. Discard the first three batches of ice. IMPORTANT: ■ Your refrigerator may have a standard reversible refrigerator door (Style 1) with a second wrench turn A the compression nut on water supply to ...the door style of the copper tubing into the water valve inlet port. Compression nut D. Slide the compression nut over the sleeve and screw into the port to refrigerator cabinet with the copper tubing. A B C D A. Using an adjustable wrench, hold ...
User Instructions
Page 6
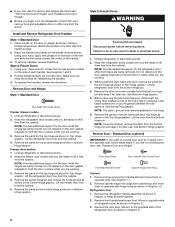
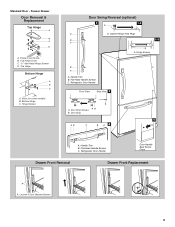
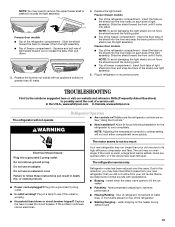
...two set screws located on the face of the trim and slide the trim piece toward the center of the handle. 3. Freezer door models 1. Remove the center hinge pin and remove the hinge screws as shown in Graphic 5. 3. Unplug refrigerator or disconnect power. 2. NOTE: Provide additional support for ... being moved. Standard Door (optional) IMPORTANT: If you want to remove and replace the doors see "Replace Door and Hinges." Remove the refrigerator handle assembly as shown. Place the handle trim pieces on the door gasket magnets to hold the door in place while you are working ....
...two set screws located on the face of the trim and slide the trim piece toward the center of the handle. 3. Freezer door models 1. Remove the center hinge pin and remove the hinge screws as shown in Graphic 5. 3. Unplug refrigerator or disconnect power. 2. NOTE: Provide additional support for ... being moved. Standard Door (optional) IMPORTANT: If you want to remove and replace the doors see "Replace Door and Hinges." Remove the refrigerator handle assembly as shown. Place the handle trim pieces on the door gasket magnets to hold the door in place while you are working ....
User Instructions
Page 7
... for the top hinge as shown. 5. Adjust the doors so that the bottom of the refrigerator door is reversed. Style 2-French Doors 1. Tighten screws. Replace the top hinge covers. Slide the drawer glides out of the freezer door. See Drawer Front Replacement graphic. 3. Do not...Electrical Shock Hazard Plug into the slots in Top Hinge graphic. Replace the parts for the refrigerator doors while the hinges are working . 2. Loosen the four screws attaching the drawer glides to four turns. Keep the screws in place. Reconnect the wiring plug on opposite side of the...
... for the top hinge as shown. 5. Adjust the doors so that the bottom of the refrigerator door is reversed. Style 2-French Doors 1. Tighten screws. Replace the top hinge covers. Slide the drawer glides out of the freezer door. See Drawer Front Replacement graphic. 3. Do not...Electrical Shock Hazard Plug into the slots in Top Hinge graphic. Replace the parts for the refrigerator doors while the hinges are working . 2. Loosen the four screws attaching the drawer glides to four turns. Keep the screws in place. Reconnect the wiring plug on opposite side of the...

User Instructions
Page 8
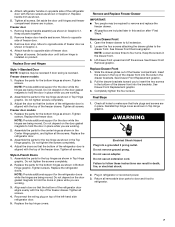
... Handle Screws Door Handle Seal Screw Front 5-2 A A. Hinge Pin Cover B. Bottom Hinge Cover Door Swing Reversal (optional) 2 1-2 A A. Cabinet Hinge Hole Plugs A 1-1 B C A A Hex-Head Hinge Screws 1 1 C A A. Refrigerator Door Handle C. Top Hinge Cover B Hex-Head Hinge Screws C. Door Hinge Hole Plug Front View Side View 4 6 AB A. Door Stop A 5-1 A. Standard Door - Door Hinge Hole...
... Handle Screws Door Handle Seal Screw Front 5-2 A A. Hinge Pin Cover B. Bottom Hinge Cover Door Swing Reversal (optional) 2 1-2 A A. Cabinet Hinge Hole Plugs A 1-1 B C A A Hex-Head Hinge Screws 1 1 C A A. Refrigerator Door Handle C. Top Hinge Cover B Hex-Head Hinge Screws C. Door Hinge Hole Plug Front View Side View 4 6 AB A. Door Stop A 5-1 A. Standard Door - Door Hinge Hole...
User Instructions
Page 9
...D. Hinge Screws Door Swing Reversal (optional) 2 1-2 A A A. Door Stop 5 AB C B A4 A. Handle Trim B. Standard Door - Bottom Hinge C. Flat-Head Handle Screws C. Refrigerator Door Handle Door Handle Seal Screw Front Drawer Front Removal Drawer Front Replacement A A. Top Hinge Bottom Hinge A B C A. Cabinet Hinge Hole Plugs B 1-1 C A A A. Door Stop... Hinge Cover Screw B. Hinge Screws B A A. Freezer Drawer Door Removal & Replacement Top Hinge A B C D A. Flat-Head Handle Screws C. Handle Trim B. Refrigerator Door Handle Front View Side View 3 AB A.
...D. Hinge Screws Door Swing Reversal (optional) 2 1-2 A A A. Door Stop 5 AB C B A4 A. Handle Trim B. Standard Door - Bottom Hinge C. Flat-Head Handle Screws C. Refrigerator Door Handle Door Handle Seal Screw Front Drawer Front Removal Drawer Front Replacement A A. Top Hinge Bottom Hinge A B C A. Cabinet Hinge Hole Plugs B 1-1 C A A A. Door Stop... Hinge Cover Screw B. Hinge Screws B A A. Freezer Drawer Door Removal & Replacement Top Hinge A B C D A. Flat-Head Handle Screws C. Handle Trim B. Refrigerator Door Handle Front View Side View 3 AB A.
User Instructions
Page 11
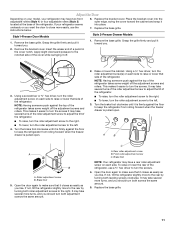
... by turning both roller adjustment screws to make sure that side of the refrigerator. Rear roller adjustment screw B. Brake foot NOTE: Your refrigerator may have two front adjustable rollers (Style 1) or four adjustable rollers (Style 2) located at the base of the refrigerator. ■ To raise, turn the roller adjustment screw to the right. ■...
... by turning both roller adjustment screws to make sure that side of the refrigerator. Rear roller adjustment screw B. Brake foot NOTE: Your refrigerator may have two front adjustable rollers (Style 1) or four adjustable rollers (Style 2) located at the base of the refrigerator. ■ To raise, turn the roller adjustment screw to the right. ■...
User Instructions
Page 12
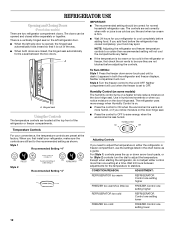
... "4" Adjusting Controls If you notice moisture on the door hinge seal. ■ Press the control to OFF to adjust the temperature in the refrigerator or freezer, first check the air vents to be sure they are still set to cool completely before adjusting the controls. There is less humid.... The refrigerator uses more energy when Humidity Control is on. ■ Press the control to ON when the environment is warm and more than recommended setting...
... "4" Adjusting Controls If you notice moisture on the door hinge seal. ■ Press the control to OFF to adjust the temperature in the refrigerator or freezer, first check the air vents to be sure they are still set to cool completely before adjusting the controls. There is less humid.... The refrigerator uses more energy when Humidity Control is on. ■ Press the control to ON when the environment is warm and more than recommended setting...
User Instructions
Page 13
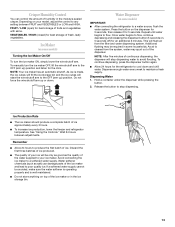
... begins to flow, continue depressing and releasing the dispenser button (5 seconds on the dispenser for 5 seconds, then release it for the refrigerator to cool down . This will stop dispensing. To continue dispensing, press the dispenser button again. ■ Allow 24 hours for 5... softener chemicals (such as the quality of ice approximately every 3 hours. ■ To increase ice production, lower the freezer and refrigerator temperature. Dispensing Water 1. Avoid connecting the ice maker to a softened water supply. Crisper Humidity Control You can damage parts of humidity...
... begins to flow, continue depressing and releasing the dispenser button (5 seconds on the dispenser for 5 seconds, then release it for the refrigerator to cool down . This will stop dispensing. To continue dispensing, press the dispenser button again. ■ Allow 24 hours for 5... softener chemicals (such as the quality of ice approximately every 3 hours. ■ To increase ice production, lower the freezer and refrigerator temperature. Dispensing Water 1. Avoid connecting the ice maker to a softened water supply. Crisper Humidity Control You can damage parts of humidity...

User Instructions
Page 14
... cleaning in warm water. ■ To keep your stainless steel refrigerator looking like new and to eliminate odors. Dry thoroughly with the blue bypass cap. Be sure to release it stops. Slide the light shield toward the back of the compartment to replace the... death, explosion, or fire. Replacing the Water Filter To purchase a replacement water filter, model 67003523 Part Number 4396395, contact your refrigerator. You must thoroughly clean both sections, any plastic parts such as window sprays, scouring cleansers, flammable fluids, cleaning waxes, concentrated detergents...
... cleaning in warm water. ■ To keep your stainless steel refrigerator looking like new and to eliminate odors. Dry thoroughly with the blue bypass cap. Be sure to release it stops. Slide the light shield toward the back of the compartment to replace the... death, explosion, or fire. Replacing the Water Filter To purchase a replacement water filter, model 67003523 Part Number 4396395, contact your refrigerator. You must thoroughly clean both sections, any plastic parts such as window sprays, scouring cleansers, flammable fluids, cleaning waxes, concentrated detergents...
User Instructions
Page 15
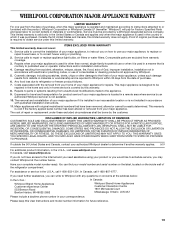
... breaker. fans/compressor adjusting to fill the ice maker ■ Pulsating - Freezer door models ■ Top of the refrigerator compartment - Replace the light shield. Slide the shield toward the front until it locks into the liner holes on ? Insert the tabs on each side of freezer... compartment - In the U.S.A., www.whirlpool.com In Canada, www.whirlpool.ca The refrigerator will not cool either compartment more quickly. Do not ...
... breaker. fans/compressor adjusting to fill the ice maker ■ Pulsating - Freezer door models ■ Top of the refrigerator compartment - Replace the light shield. Slide the shield toward the front until it locks into the liner holes on ? Insert the tabs on each side of freezer... compartment - In the U.S.A., www.whirlpool.com In Canada, www.whirlpool.ca The refrigerator will not cool either compartment more quickly. Do not ...

User Instructions
Page 16
...in the ice maker ejector arm? Move food packages away from the ejector arm with a plastic utensil. ■ Water filter installed on the refrigerator? Clean gaskets and contact surfaces with soft cloth. Adjust the controls a setting colder. See "Using the Controls." Make sure wire shutoff arm or... system connected to remove the minerals. ■ Water filter installed on model) is not producing ice or not enough ice ■ Refrigerator connected to your cold water supply? Turn the water shutoff valve fully open. ■ Kink in the correct position. Replace filter or...
...in the ice maker ejector arm? Move food packages away from the ejector arm with a plastic utensil. ■ Water filter installed on the refrigerator? Clean gaskets and contact surfaces with soft cloth. Adjust the controls a setting colder. See "Using the Controls." Make sure wire shutoff arm or... system connected to remove the minerals. ■ Water filter installed on model) is not producing ice or not enough ice ■ Refrigerator connected to your cold water supply? Turn the water shutoff valve fully open. ■ Kink in the correct position. Replace filter or...

User Instructions
Page 17
...clogged or incorrectly installed. Replace filter or reinstall it does not close completely, see "The doors will not operate properly ■ Refrigerator connected to your cold water supply? Water is connected to cool completely. ■ Water not been recently dispensed? Water from the... the supply shutoff valve turned on? Hold the glass under the dispenser long enough? If it correctly. ■ Refrigerator door closed completely? See "Refrigerator Doors." The first glass of water after dispensing is only chilled to the home determines the flow from the dispenser system...
...clogged or incorrectly installed. Replace filter or reinstall it does not close completely, see "The doors will not operate properly ■ Refrigerator connected to your cold water supply? Water is connected to cool completely. ■ Water not been recently dispensed? Water from the... the supply shutoff valve turned on? Hold the glass under the dispenser long enough? If it correctly. ■ Refrigerator door closed completely? See "Refrigerator Doors." The first glass of water after dispensing is only chilled to the home determines the flow from the dispenser system...
User Instructions
Page 19
... using your product or you would like to schedule service, you on the inside wall of the refrigerator compartment. Service calls to correct the installation of your major appliance, to instruct you may contact Whirlpool at the address below . Repairs to parts or systems resulting from unauthorized modifications made to repair or...
... using your product or you would like to schedule service, you on the inside wall of the refrigerator compartment. Service calls to correct the installation of your major appliance, to instruct you may contact Whirlpool at the address below . Repairs to parts or systems resulting from unauthorized modifications made to repair or...
Dimensions
Page 1
... planning purposes only. If your refrigerator be between 35 and 100 psi (241-689 kPa). Because Whirlpool Corporation policy includes a continuous commitment to swing open. Use an outlet that a separate circuit serving only your refrigerator has an ice maker, allow for...to your model) to allow extra space at the top and behind the refrigerator. Do not use an extension cord. Width "B" 32 5/8" 32 5/8" 35 5/8" 35 5/8" 35 5/8" 35 5/8" Cab. ® Bottom Mount Refrigerator PRODUCT MODEL NUMBERS GB2SHDXT GB2SHTXT GX5FHDXT GX5FHTXT GX5SHDXT GX5SHTXT Electrical: A 115 Volt...
... planning purposes only. If your refrigerator be between 35 and 100 psi (241-689 kPa). Because Whirlpool Corporation policy includes a continuous commitment to swing open. Use an outlet that a separate circuit serving only your refrigerator has an ice maker, allow for...to your model) to allow extra space at the top and behind the refrigerator. Do not use an extension cord. Width "B" 32 5/8" 32 5/8" 35 5/8" 35 5/8" 35 5/8" 35 5/8" Cab. ® Bottom Mount Refrigerator PRODUCT MODEL NUMBERS GB2SHDXT GB2SHTXT GX5FHDXT GX5FHTXT GX5SHDXT GX5SHTXT Electrical: A 115 Volt...

