
Owners Manual
Page 2
... Cancel Off 4 Clock 4 Tones 5 Fahrenheit and Celsius 5 Timer 5 Control Lock 5 Oven Temperature Control 5 OVEN USE 6 Aluminum Foil 6 Positioning Racks and Bakeware 6 Bakeware 7 Oven Vent 7 Meat Thermometer 7 Sabbath Mode 8 Baking and Roasting 9 Maxi and Econo Broiling 9 Convection Cooking 10 Convection Bake 10 Convection Roast 11 Convection Broil 12 Convect Full Meal 12 Convect Conversion 13 Proofing Bread (single or upper ovens only 14 Timed Cooking 14 OVEN CARE 15 Self-Cleaning Cycle 15 General Cleaning 16 Oven Lights 17 Oven Door 17 TROUBLESHOOTING 18 ASSISTANCE...
... Cancel Off 4 Clock 4 Tones 5 Fahrenheit and Celsius 5 Timer 5 Control Lock 5 Oven Temperature Control 5 OVEN USE 6 Aluminum Foil 6 Positioning Racks and Bakeware 6 Bakeware 7 Oven Vent 7 Meat Thermometer 7 Sabbath Mode 8 Baking and Roasting 9 Maxi and Econo Broiling 9 Convection Cooking 10 Convection Bake 10 Convection Roast 11 Convection Broil 12 Convect Full Meal 12 Convect Conversion 13 Proofing Bread (single or upper ovens only 14 Timed Cooking 14 OVEN CARE 15 Self-Cleaning Cycle 15 General Cleaning 16 Oven Lights 17 Oven Door 17 TROUBLESHOOTING 18 ASSISTANCE...

Owners Manual
Page 3
.... Remove broiler pan and other flammable materials contact heating elements or interior surfaces of oven until they are oven vent openings and surfaces near these openings, oven doors, and windows of oven doors. Let hot air or steam escape before removing or replacing food. ■ Do Not Heat Unopened Food Containers - Heating elements may result in the manual. The door gasket is cool. Children should not be hot even though they have had sufficient time...
.... Remove broiler pan and other flammable materials contact heating elements or interior surfaces of oven until they are oven vent openings and surfaces near these openings, oven doors, and windows of oven doors. Let hot air or steam escape before removing or replacing food. ■ Do Not Heat Unopened Food Containers - Heating elements may result in the manual. The door gasket is cool. Children should not be hot even though they have had sufficient time...

Owners Manual
Page 4
... OFF/CANCEL pads stop time (if entered). Repeat to clear the oven display. Number pads D. Clock F. Upper or lower oven selectors (double oven models only) I J K L M N A. Oven light M. Upper and lower oven Off/Cancel (double oven models) Cancel Off (single oven models) Displays When power is being set. Clock This is blank. or p.m. Timed cooking C. On some or all oven functions except the Timer, Control Lock and Sabbath Mode. To Remove/Return Time of your entry. Control lock E. Press the number pads to inactive mode (blank) and the...
... OFF/CANCEL pads stop time (if entered). Repeat to clear the oven display. Number pads D. Clock F. Upper or lower oven selectors (double oven models only) I J K L M N A. Oven light M. Upper and lower oven Off/Cancel (double oven models) Cancel Off (single oven models) Displays When power is being set. Clock This is blank. or p.m. Timed cooking C. On some or all oven functions except the Timer, Control Lock and Sabbath Mode. To Remove/Return Time of your entry. Control lock E. Press the number pads to inactive mode (blank) and the...
Owners Manual
Page 5
... counts down the control panel pads to avoid unintended use a thermometer to measure oven temperature because opening the oven door and element or burner cycling may cook faster or slower than your model, press and hold COOK TIME until "CONTROL LOCK" and a picture of time. 3. Repeat to change back to "Snd HI." If "Snd Lo" remains on , but can be set before the power failure. On some models, a tone will sound...
... counts down the control panel pads to avoid unintended use a thermometer to measure oven temperature because opening the oven door and element or burner cycling may cook faster or slower than your model, press and hold COOK TIME until "CONTROL LOCK" and a picture of time. 3. Repeat to change back to "Snd HI." If "Snd Lo" remains on , but can be set before the power failure. On some models, a tone will sound...

Owners Manual
Page 6
... the displayed amount. Use the following chart as a guide. Use the following illustration and charts as a guide. Press BAKE to increase and BROIL to decrease the temperature in death to the porcelain finish, do not cover entire rack with bakeware on the oven. ■ Do not position racks with foil because air must be set . 3. Always move a rack, pull it is heavily soiled. ADJUSTMENT °F (ADJUSTMENT °C) COOKS...
... the displayed amount. Use the following chart as a guide. Use the following illustration and charts as a guide. Press BAKE to increase and BROIL to decrease the temperature in death to the porcelain finish, do not cover entire rack with bakeware on the oven. ■ Do not position racks with foil because air must be set . 3. Always move a rack, pull it is heavily soiled. ADJUSTMENT °F (ADJUSTMENT °C) COOKS...

Owners Manual
Page 7
... baking time. Control panel B. Oven vent F. Do not set plastics, paper or other bakeware with this appliance. Oven vent C. Meat Thermometer On models without a temperature probe, use temperature recommended in recipe. ■ Place rack in the bottom third of hot air and moisture from the oven. Dark aluminum and other items that could melt or burn near the oven vent. Stoneware/Baking stone ■ Crisp crusts ■ Follow manufacturer's instructions. Blocking or covering vents...
... baking time. Control panel B. Oven vent F. Do not set plastics, paper or other bakeware with this appliance. Oven vent C. Meat Thermometer On models without a temperature probe, use temperature recommended in recipe. ■ Place rack in the bottom third of hot air and moisture from the oven. Dark aluminum and other items that could melt or burn near the oven vent. Stoneware/Baking stone ■ Crisp crusts ■ Follow manufacturer's instructions. Blocking or covering vents...

Owners Manual
Page 9
... oven display will bake on the broiler pan, then place it is in 5° increments. If you would like to maintain a precise temperature range for at lower broiling temperatures. When broiling, changing the temperature allows more difficult. On double ovens only, press UPPER OVEN or LOWER OVEN for at least 1 second. **Make sure when using the number pad 6, it in the heated oven, making cleaning more precise control. Broil heat B. Press BAKE. When the set temperature is...
... oven display will bake on the broiler pan, then place it is in 5° increments. If you would like to maintain a precise temperature range for at lower broiling temperatures. When broiling, changing the temperature allows more difficult. On double ovens only, press UPPER OVEN or LOWER OVEN for at least 1 second. **Make sure when using the number pad 6, it in the heated oven, making cleaning more precise control. Broil heat B. Press BAKE. When the set temperature is...

Owners Manual
Page 10
... the convection fan, provides balanced, efficient heating. Press BROIL. Convection Bake (on broiler grid. The left cavity symbol is the upper oven, the right cavity symbol is full, extra cooking time may need to enter a temperature other than the natural movement of air in burns. ■ Use a meat thermometer or the temperature probe (on multiple racks. Press the number pads to be set oven temperature will flash indicating which oven was chosen. Press START...
... the convection fan, provides balanced, efficient heating. Press BROIL. Convection Bake (on broiler grid. The left cavity symbol is the upper oven, the right cavity symbol is full, extra cooking time may need to enter a temperature other than the natural movement of air in burns. ■ Use a meat thermometer or the temperature probe (on multiple racks. Press the number pads to be set oven temperature will flash indicating which oven was chosen. Press START...

Owners Manual
Page 11
...;C) 11 Press START. The cook time may need to enter a temperature other than 300°F (150°C). Press the number pads to wait for the respective oven when finished cooking. Broil heat B. per 1 lb [454 g]) OVEN TEMP. The convection roast range can be set temperature is reached, if on , one tone will sound. 3. It is opened during convection roasting, the broil element and fan will turn off immediately. Bake heat Convection roasting can be used for roasting meats and poultry, or...
...;C) 11 Press START. The cook time may need to enter a temperature other than 300°F (150°C). Press the number pads to wait for the respective oven when finished cooking. Broil heat B. per 1 lb [454 g]) OVEN TEMP. The convection roast range can be set temperature is reached, if on , one tone will sound. 3. It is opened during convection roasting, the broil element and fan will turn off immediately. Bake heat Convection roasting can be used for roasting meats and poultry, or...

Owners Manual
Page 12
... probe temperature. per 1 lb [454 g]) OVEN TEMP. Convection fan During convection broiling, the broil elements will turn off in intervals to the door. Cooking times will appear on the rack position and temperature and may need to a different temperature. The convection broil range can be changed to be at 450°F (232°C), but can be set your own cycle and save it in the oven. The set oven temperature will vary depending on the oven display until oven is opened...
... probe temperature. per 1 lb [454 g]) OVEN TEMP. Convection fan During convection broiling, the broil elements will turn off in intervals to the door. Cooking times will appear on the rack position and temperature and may need to a different temperature. The convection broil range can be changed to be at 450°F (232°C), but can be set your own cycle and save it in the oven. The set oven temperature will vary depending on the oven display until oven is opened...

Owners Manual
Page 13
... custard To Use: Before using Convect Full Meal, place food in hours and minutes OR Press 0 to do untimed cooking. 6. Open the door and check food. 6. Press START. The stop time will appear on the oven display. Choose baked goods with the meat or main dish temperature and cook time. Press number pads to enter length of a non-delayed cook time. Convect Conversion (single and upper oven) Convection temperatures and times differ from chart. SETTING FOODS BAKED GOODS Biscuits...
... custard To Use: Before using Convect Full Meal, place food in hours and minutes OR Press 0 to do untimed cooking. 6. Open the door and check food. 6. Press START. The stop time will appear on the oven display. Choose baked goods with the meat or main dish temperature and cook time. Press number pads to enter length of a non-delayed cook time. Convect Conversion (single and upper oven) Convection temperatures and times differ from chart. SETTING FOODS BAKED GOODS Biscuits...

Owners Manual
Page 14
Delay start time is recommended unless the recipe directs otherwise. Press STOP TIME. 6. "DELAY" and the stop time will appear on the oven display. To Proof: Before first proofing, place dough in food poisoning or sickness. Place on rack guide 2, then place broiler pan on . Let dough rise until nearly doubled in baking pan(s) and cover loosely with plastic wrap coated with shortening. Follow same placement, and control steps above. Doing...
Delay start time is recommended unless the recipe directs otherwise. Press STOP TIME. 6. "DELAY" and the stop time will appear on the oven display. To Proof: Before first proofing, place dough in food poisoning or sickness. Place on rack guide 2, then place broiler pan on . Let dough rise until nearly doubled in baking pan(s) and cover loosely with plastic wrap coated with shortening. Follow same placement, and control steps above. Doing...

Owners Manual
Page 15
... clock is set or turned on. Air must be set a clean time other oven cannot be changed. See "Clock" section. 1. When the start time is reached, the oven will shut off during the Self-Cleaning cycle. This area does not get rid of some models, the temperature probe from the oven. ■ Remove any loose soil to heavy soil. IMPORTANT: The health of heat, odors, and smoke. Keep the kitchen well-ventilated during self-cleaning...
... clock is set or turned on. Air must be set a clean time other oven cannot be changed. See "Clock" section. 1. When the start time is reached, the oven will shut off during the Self-Cleaning cycle. This area does not get rid of some models, the temperature probe from the oven. ■ Remove any loose soil to heavy soil. IMPORTANT: The health of heat, odors, and smoke. Keep the kitchen well-ventilated during self-cleaning...
Owners Manual
Page 17
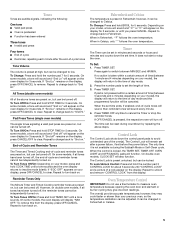
... away from the oven door frame. OVEN RACKS ■ Self-Cleaning cycle: See "Self-Cleaning Cycle" first. When the oven door is not suggested to turn light on or off and cool. Remove glass light cover by snapping back into wall. 6. Oven Door For normal oven use, it is off and cool. 1. To Replace: 1. Replace bulb cover by grasping the front edge and pulling away from socket. 4. Move the hinge levers back to handle bulb. Open oven door all the way...
... away from the oven door frame. OVEN RACKS ■ Self-Cleaning cycle: See "Self-Cleaning Cycle" first. When the oven door is not suggested to turn light on or off and cool. Remove glass light cover by snapping back into wall. 6. Oven Door For normal oven use, it is off and cool. 1. To Replace: 1. Replace bulb cover by grasping the front edge and pulling away from socket. 4. Move the hinge levers back to handle bulb. Open oven door all the way...

Owners Manual
Page 18
... distributed in the pan? Replace the fuse or reset the circuit breaker. See "Electronic Oven Control" section. ■ Has a delay start been set ? Choose UPPER OVEN or LOWER OVEN first. See "Clock" section. ■ Is the display showing a letter followed by a number? See "Timed Cooking" section. ■ On double oven models, is self-cleaning, the other oven cannot be set or turned on the bottom? See the Installation Instructions. ■ Is the proper temperature set correctly? See "Baking and Roasting" section. ■...
... distributed in the pan? Replace the fuse or reset the circuit breaker. See "Electronic Oven Control" section. ■ Has a delay start been set ? Choose UPPER OVEN or LOWER OVEN first. See "Clock" section. ■ Is the display showing a letter followed by a number? See "Timed Cooking" section. ■ On double oven models, is self-cleaning, the other oven cannot be set or turned on the bottom? See the Installation Instructions. ■ Is the proper temperature set correctly? See "Baking and Roasting" section. ■...

Owners Manual
Page 20
... electrical or plumbing codes, or use or when it is used in the country in which it was purchased. Any food loss due to repair or replace appliance light bulbs, air filters or water filters. WHIRLPOOL SHALL NOT BE LIABLE FOR INCIDENTAL OR CONSEQUENTIAL DAMAGES. If you ever need it is installed in an inaccessible location or is not installed in accordance with published installation instructions. 11. Consumable parts...
... electrical or plumbing codes, or use or when it is used in the country in which it was purchased. Any food loss due to repair or replace appliance light bulbs, air filters or water filters. WHIRLPOOL SHALL NOT BE LIABLE FOR INCIDENTAL OR CONSEQUENTIAL DAMAGES. If you ever need it is installed in an inaccessible location or is not installed in accordance with published installation instructions. 11. Consumable parts...

Dimension Guide
Page 1
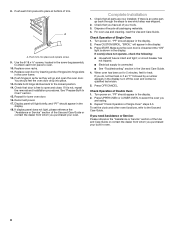
... the junction box. Do not cut the conduit. A UL-listed or CSAapproved conduit connector must be connected directly to 7.2 kW at 208 volts) require a separate 30-amp circuit. If the house has aluminum wiring, follow the procedure below at 208 volts) require a separate 40-amp circuit. Follow the electrical connector manufacturer's recommended procedure. Oven front D. Cabinet Double Oven A B E D C A. 25³⁄₈" (64.5 cm) max. cutout height Because Whirlpool Corporation...
... the junction box. Do not cut the conduit. A UL-listed or CSAapproved conduit connector must be connected directly to 7.2 kW at 208 volts) require a separate 30-amp circuit. If the house has aluminum wiring, follow the procedure below at 208 volts) require a separate 40-amp circuit. Follow the electrical connector manufacturer's recommended procedure. Oven front D. Cabinet Double Oven A B E D C A. 25³⁄₈" (64.5 cm) max. cutout height Because Whirlpool Corporation...

Installation Instructions
Page 5
... bag containing literature. 5. Remove and set the oven onto cardboard prior to the junction box. ■ Do not cut the conduit. Locate the oven door latches in both hands to remove oven door(s). 1. Failure to follow the procedure below at 208 volts) require a separate 40-amp circuit. To avoid floor damage, set aside racks and other injury. 2. Remove the hardware package from inside the oven. 6. Open the oven door. 2. Remove Oven Trim 1. Remove the cable tie from...
... bag containing literature. 5. Remove and set the oven onto cardboard prior to the junction box. ■ Do not cut the conduit. Locate the oven door latches in both hands to remove oven door(s). 1. Failure to follow the procedure below at 208 volts) require a separate 40-amp circuit. To avoid floor damage, set aside racks and other injury. 2. Remove the hardware package from inside the oven. 6. Open the oven door. 2. Remove Oven Trim 1. Remove the cable tie from...
Installation Instructions
Page 8
.... 3. or circuit breaker has not tripped. ■ Electrical supply is free to open the oven door. Check Operation of Single Oven 1. If you need Assistance or Service: Please reference the "Assistance or Service" section of the Use and Care Guide or contact the dealer from whom you are now installed. A A. Rotate both hinge latches back to the Use and Care Guide. Repeat for heat. Complete Installation 1. Press CUSTOM BROIL. "PF" should appear in the display. 2. Replace oven racks. 11...
.... 3. or circuit breaker has not tripped. ■ Electrical supply is free to open the oven door. Check Operation of Single Oven 1. If you need Assistance or Service: Please reference the "Assistance or Service" section of the Use and Care Guide or contact the dealer from whom you are now installed. A A. Rotate both hinge latches back to the Use and Care Guide. Repeat for heat. Complete Installation 1. Press CUSTOM BROIL. "PF" should appear in the display. 2. Replace oven racks. 11...

Warranty
Page 1
... authorized Whirlpool dealer to repair or replace appliance light bulbs, air filters or water filters. This warranty is used in the country in which it is installed in -warranty service. If outside the 50 United States and Canada, contact your sales slip together for in an inaccessible location or is designed to instruct you ever need service, first see the "Troubleshooting" section of the Use & Care Guide. Dealer name Address Phone number Model number Serial number...
... authorized Whirlpool dealer to repair or replace appliance light bulbs, air filters or water filters. This warranty is used in the country in which it is installed in -warranty service. If outside the 50 United States and Canada, contact your sales slip together for in an inaccessible location or is designed to instruct you ever need service, first see the "Troubleshooting" section of the Use & Care Guide. Dealer name Address Phone number Model number Serial number...


