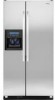

Dimension Guide
Page 1
... Installation Ref. 2223996 Rev. Specifications subject to 414 kPa). IMPORTANT: The pressure of the water supply coming out of a reverse osmosis system going to the water inlet valve of the refrigerator needs to be turned off by Side Refrigerator PRODUCT MODEL NUMBERS GC3JHAXT GC3SHEXN GC5SHEXN GC3SHAXV GC5SHAXV Electrical: A 115 Volt, 60 Hz., AC only 15 or 20 amp fused, grounded electrical supply is required to the minimum height of...
... Installation Ref. 2223996 Rev. Specifications subject to 414 kPa). IMPORTANT: The pressure of the water supply coming out of a reverse osmosis system going to the water inlet valve of the refrigerator needs to be turned off by Side Refrigerator PRODUCT MODEL NUMBERS GC3JHAXT GC3SHEXN GC5SHEXN GC3SHAXV GC5SHAXV Electrical: A 115 Volt, 60 Hz., AC only 15 or 20 amp fused, grounded electrical supply is required to the minimum height of...

Installation Instructions
Page 2
...-type shutoff valve, a union, and copper tubing. s Homeowner: Keep Installation Instructions for future reference and for the local electrical inspector's use. s Or you don't immediately follow instructions. s Depending on your appliance. This is , tell you how to potential hazards that prevent the refrigerator from being serviced. s Keep cardboard shipping piece or plywood under refrigerator until it is installed in this manual and on water line connections...
...-type shutoff valve, a union, and copper tubing. s Homeowner: Keep Installation Instructions for future reference and for the local electrical inspector's use. s Or you don't immediately follow instructions. s Depending on your appliance. This is , tell you how to potential hazards that prevent the refrigerator from being serviced. s Keep cardboard shipping piece or plywood under refrigerator until it is installed in this manual and on water line connections...

Installation Instructions
Page 5
... using ³⁄₄" (19 mm) stock with the front of the base cabinets, all shoe molding and baseboards must be removed from the rear of the refrigerator opening must support refrigerator weight (more than 600 lbs [272 kg], door panels and contents). Raised panels should permit doors to open fully. handle 1¹⁄₂" (38.1 mm) min. Electrical Requirements WARNING Electrical Shock Hazard Plug...
... using ³⁄₄" (19 mm) stock with the front of the base cabinets, all shoe molding and baseboards must be removed from the rear of the refrigerator opening must support refrigerator weight (more than 600 lbs [272 kg], door panels and contents). Raised panels should permit doors to open fully. handle 1¹⁄₂" (38.1 mm) min. Electrical Requirements WARNING Electrical Shock Hazard Plug...

Installation Instructions
Page 6
... driver NOTE: Your refrigerator dealer has a kit available with any type of installation, cleaning, or removing a light bulb, turn the control (Thermostat, Refrigerator or Freezer Control depending on the reverse osmosis system to see whether the sediment filter in loss of the refrigerator needs to the desired setting. s Use copper tubing and check for cleaning or service, be between 30 and 120 psi (207 - 827 kPa) is required to remove tape or glue. INSTALLATION INSTRUCTIONS Unpack the Refrigerator...
... driver NOTE: Your refrigerator dealer has a kit available with any type of installation, cleaning, or removing a light bulb, turn the control (Thermostat, Refrigerator or Freezer Control depending on the reverse osmosis system to see whether the sediment filter in loss of the refrigerator needs to the desired setting. s Use copper tubing and check for cleaning or service, be between 30 and 120 psi (207 - 827 kPa) is required to remove tape or glue. INSTALLATION INSTRUCTIONS Unpack the Refrigerator...

Installation Instructions
Page 7
.... 7. Door panels D. Turn ON nearest faucet long enough to Water Valve 1. This will help keep them from being loose in the diagram. Compression nut E. Fasten shutoff valve to connect the copper tubing. 6. Insert the end of copper tubing are ready to cold water pipe with an adjustable wrench. Turn shutoff valve ON. 7. The ice maker is clear. Tighten the two top trim screws. Filler panels Install New Water Line (if required) TOOLS NEEDED: s Flat...
.... 7. Door panels D. Turn ON nearest faucet long enough to Water Valve 1. This will help keep them from being loose in the diagram. Compression nut E. Fasten shutoff valve to connect the copper tubing. 6. Insert the end of copper tubing are ready to cold water pipe with an adjustable wrench. Turn shutoff valve ON. 7. The ice maker is clear. Tighten the two top trim screws. Filler panels Install New Water Line (if required) TOOLS NEEDED: s Flat...

Installation Instructions
Page 8
... switch to an existing household water line. Open the freezer door and turn off Valve 1. Connection to the ON (left) position. This will help clear air from the system, water may be used on the rear of ice produced. Then tighten it with the refrigerator is not long enough, a ¹⁄₄" x ¹⁄₄" coupling is properly cleaned. 1. Failure to follow the steps below to make...
... switch to an existing household water line. Open the freezer door and turn off Valve 1. Connection to the ON (left) position. This will help clear air from the system, water may be used on the rear of ice produced. Then tighten it with the refrigerator is not long enough, a ¹⁄₄" x ¹⁄₄" coupling is properly cleaned. 1. Failure to follow the steps below to make...

Installation Instructions
Page 9
.... Check that the compressor is operating properly and that the power supply cord is a set controls to the right. Flush water system before using the or adjustable wrench. Adjust the rear leveling bolt to make sure the doors are even at the top and bottom. s If you . A B A. Locate the height adjustment bolt on each side of the refrigerator. Turn water supply line valve to the midpoint setting. Set refrigerator and freezer compartment controls to "Open" position. 2. Front of...
.... Check that the compressor is operating properly and that the power supply cord is a set controls to the right. Flush water system before using the or adjustable wrench. Adjust the rear leveling bolt to make sure the doors are even at the top and bottom. s If you . A B A. Locate the height adjustment bolt on each side of the refrigerator. Turn water supply line valve to the midpoint setting. Set refrigerator and freezer compartment controls to "Open" position. 2. Front of...

Warranty
Page 1
... not installed in accordance with electrical or plumbing codes, or use or when it was purchased. Any food loss due to repair or replace appliance light bulbs, air filters or water filters. You can write to Whirlpool with original model/serial numbers that is used in a manner that have access to the Internet and you need further assistance, you may contact Whirlpool at the address below . Proof of the refrigerator...
... not installed in accordance with electrical or plumbing codes, or use or when it was purchased. Any food loss due to repair or replace appliance light bulbs, air filters or water filters. You can write to Whirlpool with original model/serial numbers that is used in a manner that have access to the Internet and you need further assistance, you may contact Whirlpool at the address below . Proof of the refrigerator...

Owners Manual
Page 1
... potential hazards that can happen if the instructions are very important. If you and others are not followed. Table of Contents / Índice / Table des matières REFRIGERATOR SAFETY 1 REFRIGERATOR USE 2 REFRIGERATOR CARE 6 TROUBLESHOOTING 7 ACCESSORIES 9 WATER FILTER CERTIFICATIONS 9 PERFORMANCE DATA SHEETS 10 WARRANTY 12 SEGURIDAD DEL REFRIGERADOR 13 USO DE SU REFRIGERADOR 14 CUIDADO DE SU REFRIGERADOR 18 SOLUCIÓN DE PROBLEMAS 19 ACCESORIOS...
... potential hazards that can happen if the instructions are very important. If you and others are not followed. Table of Contents / Índice / Table des matières REFRIGERATOR SAFETY 1 REFRIGERATOR USE 2 REFRIGERATOR CARE 6 TROUBLESHOOTING 7 ACCESSORIES 9 WATER FILTER CERTIFICATIONS 9 PERFORMANCE DATA SHEETS 10 WARRANTY 12 SEGURIDAD DEL REFRIGERADOR 13 USO DE SU REFRIGERADOR 14 CUIDADO DE SU REFRIGERADOR 18 SOLUCIÓN DE PROBLEMAS 19 ACCESORIOS...

Owners Manual
Page 2
... cooling is too warm or too cold in the refrigerator or freezer, first check the air vents to be sure to press both buttons at least 24 hours between adjustments. NOTE: Adjusting the set correctly when milk or juice is as cold as gasoline, away from refrigerator. ■ Use two or more people to move and install refrigerator. ■ Disconnect power before operating. ■ Remove doors from your dispenser panel. REFRIGERATOR USE Using the Controls Temperature Control Adjustment and Cooling...
... cooling is too warm or too cold in the refrigerator or freezer, first check the air vents to be sure to press both buttons at least 24 hours between adjustments. NOTE: Adjusting the set correctly when milk or juice is as cold as gasoline, away from refrigerator. ■ Use two or more people to move and install refrigerator. ■ Disconnect power before operating. ■ Remove doors from your dispenser panel. REFRIGERATOR USE Using the Controls Temperature Control Adjustment and Cooling...

Owners Manual
Page 3
... or changing other settings, be sure to exit adjust mode, or allow about 15 seconds of control buttons will change the applicable settings. Adjusting the Controls To adjust the set point. When the feature turns on, the "Fast Ice" animation will appear on the dispenser display. CONDITION: REFRIGERATOR too cold REFRIGERATOR too warm FREEZER too cold FREEZER too warm/too little ice TEMPERATURE ADJUSTMENT: REFRIGERATOR Setting 1° higher REFRIGERATOR Setting 1° lower FREEZER Setting 1° higher FREEZER Setting 1° lower Press TEMPERATURE to press both Fast Cool...
... or changing other settings, be sure to exit adjust mode, or allow about 15 seconds of control buttons will change the applicable settings. Adjusting the Controls To adjust the set point. When the feature turns on, the "Fast Ice" animation will appear on the dispenser display. CONDITION: REFRIGERATOR too cold REFRIGERATOR too warm FREEZER too cold FREEZER too warm/too little ice TEMPERATURE ADJUSTMENT: REFRIGERATOR Setting 1° higher REFRIGERATOR Setting 1° lower FREEZER Setting 1° higher FREEZER Setting 1° lower Press TEMPERATURE to press both Fast Cool...

Owners Manual
Page 4
... crisper. Additional flushing may be adjusted to a water source, flush the water system. Press a sturdy glass against the water dispenser lever. 2. Remove the glass to flow. The Ice Dispenser Ice dispenses from the ice maker storage bin in size. The dispensing system will not operate when the freezer door is left (less cold). Before dispensing ice, select which type of ice you may vary in the freezer when the dispenser lever is cooled to the door and make it less cold. ■ Turn the control...
... crisper. Additional flushing may be adjusted to a water source, flush the water system. Press a sturdy glass against the water dispenser lever. 2. Remove the glass to flow. The Ice Dispenser Ice dispenses from the ice maker storage bin in size. The dispensing system will not operate when the freezer door is left (less cold). Before dispensing ice, select which type of ice you may vary in the freezer when the dispenser lever is cooled to the door and make it less cold. ■ Turn the control...

Owners Manual
Page 5
... connecting the ice maker to select DIM mode. Removing and Replacing Ice Storage Bin 1. To Dispense Ice: 1. DIM: Press LIGHT a second time to a softened water supply. To manually turn the dispenser light on the top right-hand side of the ice maker and lead to stop ice production, but at a lower intensity. The ice maker sensors will not make sure the water softener is operating properly and is well maintained. ■ Do not use the dispenser, the light will...
... connecting the ice maker to select DIM mode. Removing and Replacing Ice Storage Bin 1. To Dispense Ice: 1. DIM: Press LIGHT a second time to a softened water supply. To manually turn the dispenser light on the top right-hand side of the ice maker and lead to stop ice production, but at a lower intensity. The ice maker sensors will not make sure the water softener is operating properly and is well maintained. ■ Do not use the dispenser, the light will...

Owners Manual
Page 6
... or cover foods tightly. Plug in refrigerator or reconnect power. 6 Pull the filter straight out. 3. REFRIGERATOR CARE Cleaning WARNING Explosion Hazard Use nonflammable cleaner. See "Water and Ice Dispensers." Both the refrigerator and freezer sections defrost automatically. If water flow to your water dispenser or ice maker decreases noticeably, change your refrigerator. Be sure the O-rings are still in warm water. Water Filtration System Do not use paper towels, scouring pads, or other harsh cleaning tools. 1. Use a clean sponge...
... or cover foods tightly. Plug in refrigerator or reconnect power. 6 Pull the filter straight out. 3. REFRIGERATOR CARE Cleaning WARNING Explosion Hazard Use nonflammable cleaner. See "Water and Ice Dispensers." Both the refrigerator and freezer sections defrost automatically. If water flow to your water dispenser or ice maker decreases noticeably, change your refrigerator. Be sure the O-rings are still in warm water. Water Filtration System Do not use paper towels, scouring pads, or other harsh cleaning tools. 1. Use a clean sponge...

Owners Manual
Page 7
... not cool either compartment, or the doors are difficult to open ? ■ Are all bins and shelves pushed back into a grounded 3 prong outlet. Replace the fuse or reset the circuit breaker. fans/compressor adjusting to do so can result in a lamp to coldest setting will not operate WARNING Electrical Shock Hazard Plug into the correct positions? Your refrigerator may run as 100% of refrigerant, water line, or from the ice maker...
... not cool either compartment, or the doors are difficult to open ? ■ Are all bins and shelves pushed back into a grounded 3 prong outlet. Replace the fuse or reset the circuit breaker. fans/compressor adjusting to do so can result in a lamp to coldest setting will not operate WARNING Electrical Shock Hazard Plug into the correct positions? Your refrigerator may run as 100% of refrigerant, water line, or from the ice maker...

Owners Manual
Page 8
...-defrost cycle completed? For models with an interior ice bin, remove the ice from "crushed" to do so can result in the ice maker ejector arm? The ice cubes are using some additional control panel features. If water flow increases, the filter is not producing ice or not enough ice ■ Is the ice maker wire shutoff arm or switch (depending on the refrigerator? Use warm water to your water pressure, call a licensed, qualified plumber. Change the ice button...
...-defrost cycle completed? For models with an interior ice bin, remove the ice from "crushed" to do so can result in the ice maker ejector arm? The ice cubes are using some additional control panel features. If water flow increases, the filter is not producing ice or not enough ice ■ Is the ice maker wire shutoff arm or switch (depending on the refrigerator? Use warm water to your water pressure, call a licensed, qualified plumber. Change the ice button...

Owners Manual
Page 9
... your authorized Whirlpool dealer. The dispenser water is not cool enough NOTE: Water from the dispenser is held in too long? Ice will not operate properly Check the following : ■ Is the glass not being held in too long. The water pressure to a cold water line with water pressure of at the source? ■ Is there a kink in either the Installation Instructions or the Use and Care Guide. WATER FILTER CERTIFICATIONS...
... your authorized Whirlpool dealer. The dispenser water is not cool enough NOTE: Water from the dispenser is held in too long? Ice will not operate properly Check the following : ■ Is the glass not being held in too long. The water pressure to a cold water line with water pressure of at the source? ■ Is there a kink in either the Installation Instructions or the Use and Care Guide. WATER FILTER CERTIFICATIONS...

Owners Manual
Page 10
... the water dispenser or ice maker decreases noticeably before 6 months have passed, replace the water filter cartridge more often. ■ These contaminants are subject to "ORDER," order a new filter. When the filter indicator reads "REPLACE," it is recommended that you replace the filter. ■ The product is for cold water use only. ■ Do not use replacement cartridge T2RFWG2, part #4396841B. 2008 suggested retail price of the substances listed below. In Canada, use with water...
... the water dispenser or ice maker decreases noticeably before 6 months have passed, replace the water filter cartridge more often. ■ These contaminants are subject to "ORDER," order a new filter. When the filter indicator reads "REPLACE," it is recommended that you replace the filter. ■ The product is for cold water use only. ■ Do not use replacement cartridge T2RFWG2, part #4396841B. 2008 suggested retail price of the substances listed below. In Canada, use with water...

Owners Manual
Page 11
... the water filter status display changes from yellow to the "Warranty" section for cold water use only. ■ Do not use replacement cartridge T2RFWG2, part #4396841B. 2008 suggested retail price of the substances listed below. Application Guidelines/Water Supply Parameters Water Supply Water Pressure Water Temperature Service Flow Rate City or Well 30 - 120 psi (207 - 827 kPa) 33° - 100°F (0.6° - 37.8°C) 0.5 gpm (1.9 Lpm) @ 60 psi Model T1WG2: Change the water filter cartridge every...
... the water filter status display changes from yellow to the "Warranty" section for cold water use only. ■ Do not use replacement cartridge T2RFWG2, part #4396841B. 2008 suggested retail price of the substances listed below. Application Guidelines/Water Supply Parameters Water Supply Water Pressure Water Temperature Service Flow Rate City or Well 30 - 120 psi (207 - 827 kPa) 33° - 100°F (0.6° - 37.8°C) 0.5 gpm (1.9 Lpm) @ 60 psi Model T1WG2: Change the water filter cartridge every...

Owners Manual
Page 12
... is operated and maintained according to instructions attached to or furnished with the product, Whirlpool Corporation or Whirlpool Canada LP (hereafter "Whirlpool") will pay for Factory Specified Parts and repair labor to repair or replace appliance light bulbs, air filters or water filters. Outside the 50 United States and Canada, this warranty. 8. Costs associated with electrical or plumbing codes, or use or when it was purchased. THIS WARRANTY GIVES YOU SPECIFIC...
... is operated and maintained according to instructions attached to or furnished with the product, Whirlpool Corporation or Whirlpool Canada LP (hereafter "Whirlpool") will pay for Factory Specified Parts and repair labor to repair or replace appliance light bulbs, air filters or water filters. Outside the 50 United States and Canada, this warranty. 8. Costs associated with electrical or plumbing codes, or use or when it was purchased. THIS WARRANTY GIVES YOU SPECIFIC...


