Owners Manual
Page 1
... adicional acerca de su producto, visite: www.whirlpool.com Tenga listo su número de modelo completo. Table of Contents RANGE SAFETY 2 The Anti-Tip Bracket 2 FEATURE GUIDE 4 COOKTOP USE 6 OVEN USE 7 Electronic Oven Controls 7 Sabbath Mode 8 Aluminum Foil 8 Positioning Racks and Bakeware 8 Oven Vent 8 Baking and Roasting 9 Control Bake 9 Broiling 9 Convection Cooking 9 Rapid Preheat 9 Timed Cooking 10 Warming Drawer 10 RANGE CARE 11 Self-Cleaning Cycle 11 SteamClean 11 General Cleaning 12 Oven Light 12 TROUBLESHOOTING 13 ACCESSORIES 14 WARRANTY 16 W10200354B
... adicional acerca de su producto, visite: www.whirlpool.com Tenga listo su número de modelo completo. Table of Contents RANGE SAFETY 2 The Anti-Tip Bracket 2 FEATURE GUIDE 4 COOKTOP USE 6 OVEN USE 7 Electronic Oven Controls 7 Sabbath Mode 8 Aluminum Foil 8 Positioning Racks and Bakeware 8 Oven Vent 8 Baking and Roasting 9 Control Bake 9 Broiling 9 Convection Cooking 9 Rapid Preheat 9 Timed Cooking 10 Warming Drawer 10 RANGE CARE 11 Self-Cleaning Cycle 11 SteamClean 11 General Cleaning 12 Oven Light 12 TROUBLESHOOTING 13 ACCESSORIES 14 WARRANTY 16 W10200354B

Owners Manual
Page 3
... hot air or steam escape before removing or replacing food. ■ Do Not Heat Unopened Food Containers - Always place oven racks in use dry chemical or foam-type extinguisher. ■ Use Only Dry Potholders - Heating elements may result in Manual. ■ Before Self-Cleaning the Oven - among these surfaces are the cooktop and surfaces facing the cooktop. ■ Use Proper Pan Size - For self-cleaning ranges - ■ Do Not Clean Door Gasket - Care should be used to a hot surface. ■ Use Care When Opening Door...
... hot air or steam escape before removing or replacing food. ■ Do Not Heat Unopened Food Containers - Always place oven racks in use dry chemical or foam-type extinguisher. ■ Use Only Dry Potholders - Heating elements may result in Manual. ■ Before Self-Cleaning the Oven - among these surfaces are the cooktop and surfaces facing the cooktop. ■ Use Proper Pan Size - For self-cleaning ranges - ■ Do Not Clean Door Gasket - Care should be used to a hot surface. ■ Use Care When Opening Door...

Owners Manual
Page 4
... cooking. Press START. 5. PRECISE CLEAN™ Self-clean cycle See the "Range Care" section. The oven light will turn off the warming element. Press SET TEMP/TIME "+" or "-" arrow pads to turn off the heating element. Do not press the CANCEL/OFF keypad because the oven will not come on when the oven door is closed, press the OVEN LIGHT switch to turn off . 5. Press WARM ZONE OFF to set the length of time. 3. WARM DRAWER Warming drawer Press WARM DRAWER ON to clear the display...
... cooking. Press START. 5. PRECISE CLEAN™ Self-clean cycle See the "Range Care" section. The oven light will turn off the warming element. Press SET TEMP/TIME "+" or "-" arrow pads to turn off the heating element. Do not press the CANCEL/OFF keypad because the oven will not come on when the oven door is closed, press the OVEN LIGHT switch to turn off . 5. Press WARM ZONE OFF to set the length of time. 3. WARM DRAWER Warming drawer Press WARM DRAWER ON to clear the display...

Owners Manual
Page 5
...controls locked. 1. Food must be set a Timed Cook or a Delayed Timed Cook see "Timed Cooking" section. Timed Cooking allows the oven to activate the feature. Press CONVECT. 2. If Start is not pressed within 30 seconds after 5 minutes. To change to scroll through options. 3. The Cancel/Off keypad stops any oven function. Press and hold 3 sec lockout BAKE Baking and roasting CONTROL BAKE Control baking BROIL Broiling CONVECT Convection cooking RAPID PREHEAT Preheat temperature KEEP WARM Hold warm COOK TIME Timed cooking START TIME SET TEMP/TIME START...
...controls locked. 1. Food must be set a Timed Cook or a Delayed Timed Cook see "Timed Cooking" section. Timed Cooking allows the oven to activate the feature. Press CONVECT. 2. If Start is not pressed within 30 seconds after 5 minutes. To change to scroll through options. 3. The Cancel/Off keypad stops any oven function. Press and hold 3 sec lockout BAKE Baking and roasting CONTROL BAKE Control baking BROIL Broiling CONVECT Convection cooking RAPID PREHEAT Preheat temperature KEEP WARM Hold warm COOK TIME Timed cooking START TIME SET TEMP/TIME START...

Owners Manual
Page 7
...models), repeating each minute after a power loss. Exposure to the fumes may cause element cycling to change setting. Always move birds to clear. Electronic Oven Controls Control Display The display will appear in use . Press CANCEL/OFF to another closed and wellventilated room. When oven is not in the display. Indicator lights show functions...interfere with any timed or delay cook functions. Press and hold CLOCK for 5 seconds. To exit, press CANCEL/OFF. Audible Tones Disable Turns off the oven 12 hours after the end of a cycle. Press and hold BAKE again to the ...
...models), repeating each minute after a power loss. Exposure to the fumes may cause element cycling to change setting. Always move birds to clear. Electronic Oven Controls Control Display The display will appear in use . Press CANCEL/OFF to another closed and wellventilated room. When oven is not in the display. Indicator lights show functions...interfere with any timed or delay cook functions. Press and hold CLOCK for 5 seconds. To exit, press CANCEL/OFF. Audible Tones Disable Turns off the oven 12 hours after the end of a cycle. Press and hold BAKE again to the ...

Owners Manual
Page 8
... START TO ENTER" will appear in the display. 4. To Adjust Temperature (when Sabbath Mode is set, all cooking and cleaning cycles are level. Rack 4: Use for baking. Rack 2: Roasting small cuts of meat and poultry. Oven vent 8 When the oven door is directly over another. Open oven door. 2. "SAb" will appear in the display. Press the "+" or "-" keypad. Positioning Racks and Bakeware IMPORTANT: To avoid permanent damage to the porcelain finish, do not line the oven bottom...
... START TO ENTER" will appear in the display. 4. To Adjust Temperature (when Sabbath Mode is set, all cooking and cleaning cycles are level. Rack 4: Use for baking. Rack 2: Roasting small cuts of meat and poultry. Oven vent 8 When the oven door is directly over another. Open oven door. 2. "SAb" will appear in the display. Press the "+" or "-" keypad. Positioning Racks and Bakeware IMPORTANT: To avoid permanent damage to the porcelain finish, do not line the oven bottom...

Owners Manual
Page 9
... oven door is designed to maintain the oven temperature, while the fan circulates the hot air. Baking and Roasting ACCUBAKE® Temperature Management System (on some models) The ACCUBAKE® system electronically regulates the oven heat levels during preheat and bake to maintain a precise temperature range for Part Number 4396923. It is opened during convection cooking, the fan will appear on the display. 9 If you would like to the cover for all foods when baking on 1 rack. When the preheat temperature...
... oven door is designed to maintain the oven temperature, while the fan circulates the hot air. Baking and Roasting ACCUBAKE® Temperature Management System (on some models) The ACCUBAKE® system electronically regulates the oven heat levels during preheat and bake to maintain a precise temperature range for Part Number 4396923. It is opened during convection cooking, the fan will appear on the display. 9 If you would like to the cover for all foods when baking on 1 rack. When the preheat temperature...

Owners Manual
Page 10
... used for keeping hot cooked foods at the same time. The display will light up . 4. Remove food from room temperature. See "General Cleaning" section. Press BAKE, CONVECT or CONTROL BAKE (on some models) WARNING Food Poisoning Hazard Do not let food sit for 15 minutes. 4. The Warming Drawer is preheating. Press the SET TEMP/TIME "+" or "-" arrow pads to enter the length of time to clear the display. It may be changed anytime after cooking...
... used for keeping hot cooked foods at the same time. The display will light up . 4. Remove food from room temperature. See "General Cleaning" section. Press BAKE, CONVECT or CONTROL BAKE (on some models) WARNING Food Poisoning Hazard Do not let food sit for 15 minutes. 4. The Warming Drawer is preheating. Press the SET TEMP/TIME "+" or "-" arrow pads to enter the length of time to clear the display. It may be changed anytime after cooking...

Owners Manual
Page 11
... glass, do not open the oven door to clear the display. 4. The Precise Clean™ feature will automatically determine the length of cleaning time needed based on your oven cavity is above 200°F (93°C), "OVEN COOLING" will appear in the display. 2. A beep will automatically lock. "PRECISE CLEAN REMOVE RACKS SET CLEAN TIME OR PUSH START" will not function during the Self-Cleaning cycle. The remaining clean time will return to move freely. The oven light...
... glass, do not open the oven door to clear the display. 4. The Precise Clean™ feature will automatically determine the length of cleaning time needed based on your oven cavity is above 200°F (93°C), "OVEN COOLING" will appear in the display. 2. A beep will automatically lock. "PRECISE CLEAN REMOVE RACKS SET CLEAN TIME OR PUSH START" will not function during the Self-Cleaning cycle. The remaining clean time will return to move freely. The oven light...
Owners Manual
Page 12
... removers, ammonia or sodium hydroxide (lye) because paint surface may occur. Scrape off position. 2. Metal marks from control panel to the rack guides will become less noticeable. The Cooktop Scraper uses razor blades. Cleaning Method: ■ Mild detergent Oven Light The oven light is also recommended for contact information. Cleaning Method: ■ Glass cleaner, mild liquid cleaner or nonabrasive scrubbing pad: Gently clean around the model and serial number...
... removers, ammonia or sodium hydroxide (lye) because paint surface may occur. Scrape off position. 2. Metal marks from control panel to the rack guides will become less noticeable. The Cooktop Scraper uses razor blades. Cleaning Method: ■ Mild detergent Oven Light The oven light is also recommended for contact information. Cleaning Method: ■ Glass cleaner, mild liquid cleaner or nonabrasive scrubbing pad: Gently clean around the model and serial number...
Owners Manual
Page 13
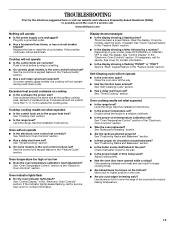
... operate during a self-clean cycle. If the problem continues, call for service. Push in the "Feature Guide" section. Use cookware about the same size as the surface cooking area, element or surface burner. Cooktop cooking results not what expected ■ Is the range level? See "Timed Cooking" section. ■ On some models, is the oven control lockout set to the proper heat level? See the control lock keypad feature in knob before turning to a setting. ■ On ceramic glass models, is level in longer cooking times. ■ Are baked...
... operate during a self-clean cycle. If the problem continues, call for service. Push in the "Feature Guide" section. Use cookware about the same size as the surface cooking area, element or surface burner. Cooktop cooking results not what expected ■ Is the range level? See "Timed Cooking" section. ■ On some models, is the oven control lockout set to the proper heat level? See the control lock keypad feature in knob before turning to a setting. ■ On ceramic glass models, is level in longer cooking times. ■ Are baked...
Owners Manual
Page 16
.... Outside the 50 United States and Canada, this warranty. 8. Service calls to refrigerator or freezer product failures. 7. Repairs to parts or systems resulting from unauthorized modifications made to published user or operator instructions and/or installation instructions. 4. W10200354B SP PN W10204499A © 2008 Whirlpool Corporation. Repairs when your correspondence. Major appliances with original model/serial numbers that is contrary to the appliance. 9. SOME STATES...
.... Outside the 50 United States and Canada, this warranty. 8. Service calls to refrigerator or freezer product failures. 7. Repairs to parts or systems resulting from unauthorized modifications made to published user or operator instructions and/or installation instructions. 4. W10200354B SP PN W10204499A © 2008 Whirlpool Corporation. Repairs when your correspondence. Major appliances with original model/serial numbers that is contrary to the appliance. 9. SOME STATES...
Installation Instructions
Page 1
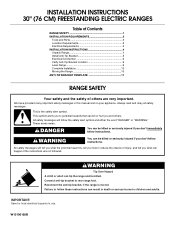
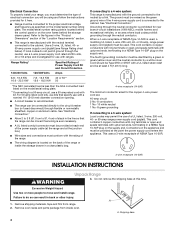
... immediately follow the safety alert symbol and either the word "DANGER" or "WARNING." INSTALLATION INSTRUCTIONS 30" (76 CM) FREESTANDING ELECTRIC RANGES Table of Contents RANGE SAFETY 1 INSTALLATION REQUIREMENTS 2 Tools and Parts 2 Location Requirements 2 Electrical Requirements 3 INSTALLATION INSTRUCTIONS 4 Unpack Range 4 Install Anti-Tip Bracket 5 Electrical Connection 6 Verify Anti-Tip Bracket Location 9 Level Range 9 Complete Installation 10 Moving the Range 10 ANTI-TIP BRACKET TEMPLATE 11 RANGE SAFETY Your safety and the safety of injury, and tell you and others are...
... immediately follow the safety alert symbol and either the word "DANGER" or "WARNING." INSTALLATION INSTRUCTIONS 30" (76 CM) FREESTANDING ELECTRIC RANGES Table of Contents RANGE SAFETY 1 INSTALLATION REQUIREMENTS 2 Tools and Parts 2 Location Requirements 2 Electrical Requirements 3 INSTALLATION INSTRUCTIONS 4 Unpack Range 4 Install Anti-Tip Bracket 5 Electrical Connection 6 Verify Anti-Tip Bracket Location 9 Level Range 9 Complete Installation 10 Moving the Range 10 ANTI-TIP BRACKET TEMPLATE 11 RANGE SAFETY Your safety and the safety of injury, and tell you and others are...
Installation Instructions
Page 2
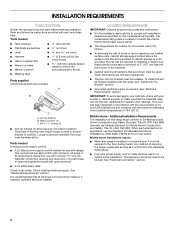
...; Anti-tip bracket must be used. Longer screws are included. Check existing electrical supply. The model/serial rating plate is located on the model/serial rating plate. INSTALLATION REQUIREMENTS Tools and Parts Gather the required tools and parts before starting installation. A B C A. Check local codes. It is to be provided, the risk can be reduced by installing a range hood that the materials used in ring terminals or open-end spade terminals with upturned ends. ■ A UL listed strain...
...; Anti-tip bracket must be used. Longer screws are included. Check existing electrical supply. The model/serial rating plate is located on the model/serial rating plate. INSTALLATION REQUIREMENTS Tools and Parts Gather the required tools and parts before starting installation. A B C A. Check local codes. It is to be provided, the risk can be reduced by installing a range hood that the materials used in ring terminals or open-end spade terminals with upturned ends. ■ A UL listed strain...
Installation Instructions
Page 3
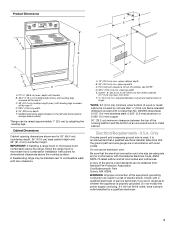
... conformance with zero clearance. Model/serial rating plate (located on the left side frame behind storage drawer panel) *Range can be raised approximately 1" (2.5 cm) by not less than ¹⁄₄" (0.64 cm) flame retardant millboard covered with local codes. required between the top of the cooking platform and the bottom of the above the cooktop surface. Check with leveling legs screwed all the way...
... conformance with zero clearance. Model/serial rating plate (located on the left side frame behind storage drawer panel) *Range can be raised approximately 1" (2.5 cm) by not less than ¹⁄₄" (0.64 cm) flame retardant millboard covered with local codes. required between the top of the cooking platform and the bottom of the above the cooktop surface. Check with leveling legs screwed all the way...
Installation Instructions
Page 4
... connecting to a 3-wire system: Local codes may permit the use with the neutral terminal connected to a 50-amp circuit, use with upturned ends, terminating in back or other injury. 1. or 50-amp range power supply cord (pigtail). Shipping base 4 Remove oven racks and parts package from range. 2. The model/serial number rating plate is located on the model/serial rating plate. **If connecting to the cabinet. This cord contains 4 copper conductors with ring terminals or open...
... connecting to a 3-wire system: Local codes may permit the use with the neutral terminal connected to a 50-amp circuit, use with upturned ends, terminating in back or other injury. 1. or 50-amp range power supply cord (pigtail). Shipping base 4 Remove oven racks and parts package from range. 2. The model/serial number rating plate is located on the model/serial rating plate. **If connecting to the cabinet. This cord contains 4 copper conductors with ring terminals or open...
Installation Instructions
Page 5
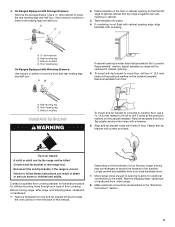
... this manual. Use a ¼" drive ratchet to rear range foot. Rear leveling leg C. Rear leveling leg B. Tap plastic anchors into place. 4. Connect anti-tip bracket to lower the rear leveling legs one-half turn. Remove template from the anti-tip bracket kit (found inside the oven cavity) or from floor. Make electrical connections as described in the "Location Requirements" section, adjust template so range will be necessary to anchor the bracket to lower front leveling legs one -half turn . 4. Place...
... this manual. Use a ¼" drive ratchet to rear range foot. Rear leveling leg C. Rear leveling leg B. Tap plastic anchors into place. 4. Connect anti-tip bracket to lower the rear leveling legs one-half turn. Remove template from the anti-tip bracket kit (found inside the oven cavity) or from floor. Make electrical connections as described in the "Location Requirements" section, adjust template so range will be necessary to anchor the bracket to lower front leveling legs one -half turn . 4. Place...

Installation Instructions
Page 6
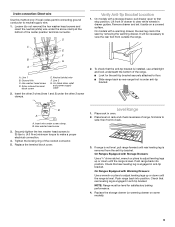
... cover down and toward you must secure the range to follow these instructions can result in death, fire, or electrical shock. U.S.A. A B C A. UL listed strain relief ■ Tighten strain relief screw against the power supply cord. 6 Plug into anti-tip bracket. 10. Electrical Shock Hazard Disconnect power before servicing. Electrically ground range. Two mounting tabs each side B. Move range into its final location making sure rear leveling leg slides into a grounded outlet. If installing...
... cover down and toward you must secure the range to follow these instructions can result in death, fire, or electrical shock. U.S.A. A B C A. UL listed strain relief ■ Tighten strain relief screw against the power supply cord. 6 Plug into anti-tip bracket. 10. Electrical Shock Hazard Disconnect power before servicing. Electrically ground range. Two mounting tabs each side B. Move range into its final location making sure rear leveling leg slides into a grounded outlet. If installing...
Installation Instructions
Page 9
... by removing the warming drawer. Place level on rack and check levelness of drawer to view the rear foot from the anti-tip bracket. Check that rear leveling leg is removed from outside the range. On Ranges Equipped with Warming Drawers: Use a wrench or pliers to side; Lift front of range, first side to adjust leveling legs up or down until rear leveling leg is engaged in anti-tip bracket. Check that rear leveling leg is level. Replace the storage drawer (or warming drawer on a covered surface. 3-wire connection: Direct wire Use...
... by removing the warming drawer. Place level on rack and check levelness of drawer to view the rear foot from the anti-tip bracket. Check that rear leveling leg is removed from outside the range. On Ranges Equipped with Warming Drawers: Use a wrench or pliers to side; Lift front of range, first side to adjust leveling legs up or down until rear leveling leg is engaged in anti-tip bracket. Check that rear leveling leg is level. Replace the storage drawer (or warming drawer on a covered surface. 3-wire connection: Direct wire Use...

Installation Instructions
Page 10
...Check that range is level. Use a mild solution of the Use and Care Guide. 6. Connect anti-tip bracket to avoid damaging the floor covering. Unplug the power supply cord. 3. Check that all parts and panels before servicing. Complete Installation 1. Check that anti-tip bracket is installed: ■ Look for cleaning or maintenance: For power supply cord-connected ranges: 1. Read "Range Use" in power supply cord. 5. Plug power cord into an outlet. ■ Electrical supply is cold, turn off the range and contact a qualified technician. or circuit breaker has...
...Check that range is level. Use a mild solution of the Use and Care Guide. 6. Connect anti-tip bracket to avoid damaging the floor covering. Unplug the power supply cord. 3. Check that all parts and panels before servicing. Complete Installation 1. Check that anti-tip bracket is installed: ■ Look for cleaning or maintenance: For power supply cord-connected ranges: 1. Read "Range Use" in power supply cord. 5. Plug power cord into an outlet. ■ Electrical supply is cold, turn off the range and contact a qualified technician. or circuit breaker has...


