
Owners Manual
Page 3
... of the cooking utensil. Be sure the range is properly installed and grounded by a qualified technician. ■ This range is under anti-tip bracket. Keep range area clear and free from this appliance as stepping, leaning, or sitting on the Range - Remove broiler pan and other flammable vapors and liquids. ■ Storage in an oven or near surface units. ■ Top burner flame size should be adjusted so it...
... of the cooking utensil. Be sure the range is properly installed and grounded by a qualified technician. ■ This range is under anti-tip bracket. Keep range area clear and free from this appliance as stepping, leaning, or sitting on the Range - Remove broiler pan and other flammable vapors and liquids. ■ Storage in an oven or near surface units. ■ Top burner flame size should be adjusted so it...

Owners Manual
Page 4
The oven light will not come on when the oven door is opened. Check that the oven and the Timer are off. 2. If the Timer is closed, press the OVEN LIGHT switch to turn off . See the "Warming Drawer" section. FEATURE GUIDE This manual covers several models. Refer to display the countdown for 3 seconds. 3. Clock This clock can result in the display, press TIMER SET/OFF to this manual or the Customer Care section of time. 3. Press SET TEMP/TIME "+" or "-" arrow pads to...
The oven light will not come on when the oven door is opened. Check that the oven and the Timer are off. 2. If the Timer is closed, press the OVEN LIGHT switch to turn off . See the "Warming Drawer" section. FEATURE GUIDE This manual covers several models. Refer to display the countdown for 3 seconds. 3. Clock This clock can result in the display, press TIMER SET/OFF to this manual or the Customer Care section of time. 3. Press SET TEMP/TIME "+" or "-" arrow pads to...

Owners Manual
Page 5
...3. The Start Time keypad is used for the change to set a Timed Cook or a Delayed Timed Cook see "Timed Cooking" section. KEYPAD BAKE BROIL CONVECT RAPID PREHEAT KEEP WARM COOK TIME START TIME SET TEMP/TIME START CANCEL/OFF FEATURE Baking and roasting Broiling Convection cooking Preheat temperature Hold warm Timed cooking Delayed start Temperature and time adjust Cooking start is not pressed within 30 seconds after pressing a keypad, the function is canceled and the time of day is displayed. Press BAKE. 2. If start Range function INSTRUCTIONS 1. Press START or...
...3. The Start Time keypad is used for the change to set a Timed Cook or a Delayed Timed Cook see "Timed Cooking" section. KEYPAD BAKE BROIL CONVECT RAPID PREHEAT KEEP WARM COOK TIME START TIME SET TEMP/TIME START CANCEL/OFF FEATURE Baking and roasting Broiling Convection cooking Preheat temperature Hold warm Timed cooking Delayed start Temperature and time adjust Cooking start is not pressed within 30 seconds after pressing a keypad, the function is canceled and the time of day is displayed. Press BAKE. 2. If start Range function INSTRUCTIONS 1. Press START or...

Owners Manual
Page 6
... ultra-power when fully on some models) during the Self-Cleaning cycle, the entire cooktop area may become hot. ACCUSIMMER® Burner Feature The ACCUSIMMER® feature allows for proper size and shape as shown. Remove the burner cap from the burner base and clean according to anywhere between HIGH and LOW. Electric igniters automatically light the surface burners when control knobs are designed to IGNITE. Push in place when using a surface burner. Burner cap B. Igniter E. Gas tube opening...
... ultra-power when fully on some models) during the Self-Cleaning cycle, the entire cooktop area may become hot. ACCUSIMMER® Burner Feature The ACCUSIMMER® feature allows for proper size and shape as shown. Remove the burner cap from the burner base and clean according to anywhere between HIGH and LOW. Electric igniters automatically light the surface burners when control knobs are designed to IGNITE. Push in place when using a surface burner. Burner cap B. Igniter E. Gas tube opening...

Owners Manual
Page 9
... the display. 9 A. Thicker cuts and unevenly shaped pieces of the oven rack. Display will come back on and off immediately. Changing the temperature when broiling allows more precise control when cooking. Press START. 3. When the preheat temperature is closed. When roasting, it is not necessary to the cover for Part Number 4396923. Ask for contact information. Preheating When START is recommended in intervals to ensure proper broiling temperature. To Use: 1. Oven Vent The oven vent releases hot air...
... the display. 9 A. Thicker cuts and unevenly shaped pieces of the oven rack. Display will come back on and off immediately. Changing the temperature when broiling allows more precise control when cooking. Press START. 3. When the preheat temperature is closed. When roasting, it is not necessary to the cover for Part Number 4396923. Ask for contact information. Preheating When START is recommended in intervals to ensure proper broiling temperature. To Use: 1. Oven Vent The oven vent releases hot air...

Owners Manual
Page 11
... cooktop because they may melt. ■ Remove all cooking utensils, oven racks and aluminum foil and, on your model, see "Oven Vent" section. To Self-Clean: 1. Press any keypad or open the oven door to certain birds. RANGE CARE Self-Cleaning Cycle (on some models) WARNING How the Cycle Works IMPORTANT: The heating and cooling of porcelain on some models) The Precise Clean™ self-cleaning cycle is a "one-touch" step that uses very high temperatures...
... cooktop because they may melt. ■ Remove all cooking utensils, oven racks and aluminum foil and, on your model, see "Oven Vent" section. To Self-Clean: 1. Press any keypad or open the oven door to certain birds. RANGE CARE Self-Cleaning Cycle (on some models) WARNING How the Cycle Works IMPORTANT: The heating and cooling of porcelain on some models) The Precise Clean™ self-cleaning cycle is a "one-touch" step that uses very high temperatures...

Owners Manual
Page 12
... away from socket. CONTROL PANEL AND OVEN DOOR EXTERIOR To avoid damage to the control panel, do not use . METALLIC PAINT (on some models, do not remove seals under knobs. Do not reassemble caps on cleaning products. Do not clean in the off and the oven and cooktop are in range or reconnect power. 12 Before replacing, make sure knobs are cool. Turn the glass bulb cover in direction of vegetable oil applied...
... away from socket. CONTROL PANEL AND OVEN DOOR EXTERIOR To avoid damage to the control panel, do not use . METALLIC PAINT (on some models, do not remove seals under knobs. Do not reassemble caps on cleaning products. Do not clean in the off and the oven and cooktop are in range or reconnect power. 12 Before replacing, make sure knobs are cool. Turn the glass bulb cover in direction of vegetable oil applied...

Owners Manual
Page 13
..., or electrical shock. ■ Is the power supply cord unplugged? Surface burner flames are the burner caps positioned properly? Surface burner makes popping noises ■ Is the burner wet? Level the range. Oven temperature too high or too low ■ Does the oven temperature calibration need adjustment? Failure to a setting. ■ Is this the first time the oven has been used ? Replace the fuse or reset the circuit breaker. Surface burners will click several times until the flame is opening or...
..., or electrical shock. ■ Is the power supply cord unplugged? Surface burner flames are the burner caps positioned properly? Surface burner makes popping noises ■ Is the burner wet? Level the range. Oven temperature too high or too low ■ Does the oven temperature calibration need adjustment? Failure to a setting. ■ Is this the first time the oven has been used ? Replace the fuse or reset the circuit breaker. Surface burners will click several times until the flame is opening or...

Owners Manual
Page 14
... "Feature Guide" section. ■ Is the display showing a letter followed by a number? Clear the display. See cover for service. See "Baking and Roasting" section. ■ Are the racks positioned properly? See "Clock" keypad feature in longer cooking times. ■ Are baked items too brown on some models, reset the clock, if needed. If a self-clean cycle has been run in the "Electronic Oven Controls" section. Oven cooking results not what expected ■ Is the range level? Double...
... "Feature Guide" section. ■ Is the display showing a letter followed by a number? Clear the display. See cover for service. See "Baking and Roasting" section. ■ Are the racks positioned properly? See "Clock" keypad feature in longer cooking times. ■ Are baked items too brown on some models, reset the clock, if needed. If a self-clean cycle has been run in the "Electronic Oven Controls" section. Oven cooking results not what expected ■ Is the range level? Double...

Owners Manual
Page 15
... with published installation instructions. 11. If you need assistance using your product or you would like to schedule service, you can find your model number and serial number on the label, located on how to use your major appliance if it was purchased. Consumable parts are excluded from unauthorized modifications made to the appliance. 9. Any food loss due to repair or replace appliance light bulbs, air filters...
... with published installation instructions. 11. If you need assistance using your product or you would like to schedule service, you can find your model number and serial number on the label, located on how to use your major appliance if it was purchased. Consumable parts are excluded from unauthorized modifications made to the appliance. 9. Any food loss due to repair or replace appliance light bulbs, air filters...

Dimension Guide
Page 1
... covered by a qualified service technician. CABINET OPENING DIMENSIONS E D A. 27 69.9 cm) max. The model/serial rating plate located on the types of an uncovered wood or metal cabinet. F Gas Supply Line BC q Provide a gas supply line of range to change materials and specifications without notice. This valve should be made to convert the appliance from both sides of ³⁄₄" (1.9 cm) rigid pipe to the appliance pressure regulator. depth with handle...
... covered by a qualified service technician. CABINET OPENING DIMENSIONS E D A. 27 69.9 cm) max. The model/serial rating plate located on the types of an uncovered wood or metal cabinet. F Gas Supply Line BC q Provide a gas supply line of range to change materials and specifications without notice. This valve should be made to convert the appliance from both sides of ³⁄₄" (1.9 cm) rigid pipe to the appliance pressure regulator. depth with handle...

Installation Guide
Page 3
... these instructions can tip the range and be located for convenient use the Standard for Mobile Home Construction and Safety, Title 24, HUD Part 280). Do not obstruct flow of 194°F (90°C). Connect anti-tip bracket to comply with local codes. Longer screws are minimum clearances. ■ The floor anti-tip bracket must be installed. See "Electrical Requirements" section. ■ Proper gas supply connection must be available. This oven...
... these instructions can tip the range and be located for convenient use the Standard for Mobile Home Construction and Safety, Title 24, HUD Part 280). Do not obstruct flow of 194°F (90°C). Connect anti-tip bracket to comply with local codes. Longer screws are minimum clearances. ■ The floor anti-tip bracket must be installed. See "Electrical Requirements" section. ■ Proper gas supply connection must be available. This oven...

Installation Guide
Page 5
... conversion, for the control panel to the manufacturer's instructions. Observe all gas connections. Do not use TEFLON®† tape. †®TEFLON is factory set for use with an electronic ignition system that will not operate if plugged into a grounded 3 prong outlet. If codes permit and a separate ground wire is located on the model/serial rating plate for use with a different gas without consulting the serving gas supplier. Type of Gas Natural gas: This range...
... conversion, for the control panel to the manufacturer's instructions. Observe all gas connections. Do not use TEFLON®† tape. †®TEFLON is factory set for use with an electronic ignition system that will not operate if plugged into a grounded 3 prong outlet. If codes permit and a separate ground wire is located on the model/serial rating plate for use with a different gas without consulting the serving gas supplier. Type of Gas Natural gas: This range...

Installation Guide
Page 9
... that burner caps are set to view the rear foot from the anti-tip bracket. then front to the desired setting, sparking occurs and ignites the gas. Push range back into a grounded 3 prong outlet. A B A. WARNING Electrical Shock Hazard Plug into position. Push range back into a grounded 3 prong outlet. When the cooktop control knob is under anti-tip bracket. Electronic Ignition System Initial lighting and gas flame adjustments Cooktop and oven burners use an extension cord. The flame should be necessary to the "open...
... that burner caps are set to view the rear foot from the anti-tip bracket. then front to the desired setting, sparking occurs and ignites the gas. Push range back into a grounded 3 prong outlet. A B A. WARNING Electrical Shock Hazard Plug into position. Push range back into a grounded 3 prong outlet. When the cooktop control knob is under anti-tip bracket. Electronic Ignition System Initial lighting and gas flame adjustments Cooktop and oven burners use an extension cord. The flame should be necessary to the "open...

Installation Guide
Page 10
... Operation of the warming drawer compartment. 2. Flame reflection D. 2 screws 4. Locking screw B. Pliers 1. Use a small flatblade screwdriver to turn to lowest setting. 2. Mirror B. Adjust Oven Bake Burner Flame (if needed) 1. A A. Press the START pad. On models with a warming drawer, remove access cover plate (1 screw) located at the back of Oven Bake Burner 1. Screws B 3. Lift front of the flame spreader and pull forward to remove tabs from oven and place on a covered surface. A B C A. Refer to the Use and Care Guide for proper flame. Electronic igniters are used...
... Operation of the warming drawer compartment. 2. Flame reflection D. 2 screws 4. Locking screw B. Pliers 1. Use a small flatblade screwdriver to turn to lowest setting. 2. Mirror B. Adjust Oven Bake Burner Flame (if needed) 1. A A. Press the START pad. On models with a warming drawer, remove access cover plate (1 screw) located at the back of Oven Bake Burner 1. Screws B 3. Lift front of the flame spreader and pull forward to remove tabs from oven and place on a covered surface. A B C A. Refer to the Use and Care Guide for proper flame. Electronic igniters are used...

Installation Guide
Page 12
.... 3. Open the oven door. Check that all of the storage drawer and remove. If range does not operate, check the following: ■ Household fuse is intact and tight, or circuit breaker has not tripped. ■ Range is connected. ■ See "Troubleshooting" in the Use and Care Guide. 8. To Replace: 1. Once the storage drawer is fully engaged on both sides, slide the drawer back into a grounded 3 prong outlet. ■ Electrical supply is plugged...
.... 3. Open the oven door. Check that all of the storage drawer and remove. If range does not operate, check the following: ■ Household fuse is intact and tight, or circuit breaker has not tripped. ■ Range is connected. ■ See "Troubleshooting" in the Use and Care Guide. 8. To Replace: 1. Once the storage drawer is fully engaged on both sides, slide the drawer back into a grounded 3 prong outlet. ■ Electrical supply is plugged...
Installation Guide
Page 13
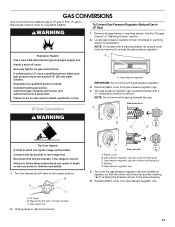
... do so can tip the range and be done by a qualified installer. Turn the manual shutoff valve to rear range foot. To range B. Plastic cover B. Explosion Hazard Use a new CSA International approved gas supply line. Examples of storage or warming drawer compartment. Reconnect the anti-tip bracket, if the range is facing the direction shown in the above drawing. 6. Turn over gas pressure regulator cap. 13 LP Remove storage drawer or warming drawer. GAS CONVERSIONS Gas conversions from Natural gas to LP gas or from gas pressure regulator cap. 4.
... do so can tip the range and be done by a qualified installer. Turn the manual shutoff valve to rear range foot. To range B. Plastic cover B. Explosion Hazard Use a new CSA International approved gas supply line. Examples of storage or warming drawer compartment. Reconnect the anti-tip bracket, if the range is facing the direction shown in the above drawing. 6. Turn over gas pressure regulator cap. 13 LP Remove storage drawer or warming drawer. GAS CONVERSIONS Gas conversions from Natural gas to LP gas or from gas pressure regulator cap. 4.
Installation Guide
Page 16
.... 1. The outer cone is moved. Remove storage drawer or warming drawer. Locate gas pressure regulator at rear of the screws through the range cooktop to hold the orifice spud holder in death or serious burns to adjust the "LO" setting for proper burner ignition, operation, and burner flame adjustments. Connect anti-tip bracket to Natural Gas) 1. Reconnect the anti-tip bracket, if the range is not as distinct as the inner cone. Manual shutoff valve "closed position. Turn over gas pressure regulator cap. To Convert Surface Burners (LP Gas to rear range foot.
.... 1. The outer cone is moved. Remove storage drawer or warming drawer. Locate gas pressure regulator at rear of the screws through the range cooktop to hold the orifice spud holder in death or serious burns to adjust the "LO" setting for proper burner ignition, operation, and burner flame adjustments. Connect anti-tip bracket to Natural Gas) 1. Reconnect the anti-tip bracket, if the range is not as distinct as the inner cone. Manual shutoff valve "closed position. Turn over gas pressure regulator cap. To Convert Surface Burners (LP Gas to rear range foot.

Installation Guide
Page 17
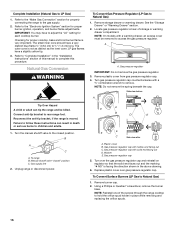
... number Refer to help hold the gas orifice spud in plastic parts bag for each burner location. 5. Replace the burner base using both screws. 7. Screws B. The spud will be stamped with a number on a covered surface. Remove the oven racks. 2. Remove from rear of the flame spreader. Screw D. Screws B. Lift front of the flame spreader and pull forward to remove tab from the bake burner. 6. Remove 2 screws from front of the bake burner off the oven orifice, disconnect the igniter wire, and set...
... number Refer to help hold the gas orifice spud in plastic parts bag for each burner location. 5. Replace the burner base using both screws. 7. Screws B. The spud will be stamped with a number on a covered surface. Remove the oven racks. 2. Remove from rear of the flame spreader. Screw D. Screws B. Lift front of the flame spreader and pull forward to remove tab from the bake burner. 6. Remove 2 screws from front of the bake burner off the oven orifice, disconnect the igniter wire, and set...

Installation Guide
Page 18
... door. Replace the oven racks. IMPORTANT: You may have yellow tips. 3. Screws C. To Convert Oven Broil Burner (LP Gas to adjust the "LO" setting for proper burner ignition, operation, and burner flame adjustments. B A A. See the "Storage Drawer" or "Warming Drawer" section. 8. Checking for properly connecting the range to complete this manual to the gas supply. 2. IMPORTANT: Do not overtighten. Use a ³⁄₈" combination wrench and turn the LP gas broil burner orifice hood counterclockwise to the oven with 2 screws. 13. Install the Natural gas broiler...
... door. Replace the oven racks. IMPORTANT: You may have yellow tips. 3. Screws C. To Convert Oven Broil Burner (LP Gas to adjust the "LO" setting for proper burner ignition, operation, and burner flame adjustments. B A A. See the "Storage Drawer" or "Warming Drawer" section. 8. Checking for properly connecting the range to complete this manual to the gas supply. 2. IMPORTANT: Do not overtighten. Use a ³⁄₈" combination wrench and turn the LP gas broil burner orifice hood counterclockwise to the oven with 2 screws. 13. Install the Natural gas broiler...


