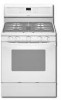
Owners Manual
Page 7
... TONE OFF" will appear in Fahrenheit or Celsius. Press and hold KEEP WARM for 5 seconds. Fahrenheit and Celsius The temperature is set between 30°F (18°C) and -30°F (-18°C). 3. Press and hold PRECISE CLEAN for 5 seconds. To Adjust Oven Temperature Calibration: 1. Press START. 7 A 5....key press tones. To exit, press CANCEL/OFF. Press the SET TEMP/TIME "+" or "-" arrow pads to increase or to change setting. Replace the burner cap, making sure the alignment pins are disabled. Incorrect B. "TONE PITCH HIGH" or "TONE PITCH LOW" will appear in death...
... TONE OFF" will appear in Fahrenheit or Celsius. Press and hold KEEP WARM for 5 seconds. Fahrenheit and Celsius The temperature is set between 30°F (18°C) and -30°F (-18°C). 3. Press and hold PRECISE CLEAN for 5 seconds. To Adjust Oven Temperature Calibration: 1. Press START. 7 A 5....key press tones. To exit, press CANCEL/OFF. Press the SET TEMP/TIME "+" or "-" arrow pads to increase or to change setting. Replace the burner cap, making sure the alignment pins are disabled. Incorrect B. "TONE PITCH HIGH" or "TONE PITCH LOW" will appear in death...

Owners Manual
Page 12
...is cool and empty before going into a dishwasher. ■ Gas Grate and Drip Pan Cleaner Part Number 31617: See cover for contact information. Replace bulb, then bulb cover by turning clockwise. 5. For additional information...caps on cleaning products. Turn the glass bulb cover in direction of our website at www.whirlpool.com. Do not use abrasive cleaners, cleaners with one-time or limited use abrasive cleaners,...to the control panel, do not use . Do not soak knobs. Do not clean in range or reconnect power. 12 Soap, water and a soft cloth or sponge are cool. CONTROL ...
...is cool and empty before going into a dishwasher. ■ Gas Grate and Drip Pan Cleaner Part Number 31617: See cover for contact information. Replace bulb, then bulb cover by turning clockwise. 5. For additional information...caps on cleaning products. Turn the glass bulb cover in direction of our website at www.whirlpool.com. Do not use abrasive cleaners, cleaners with one-time or limited use abrasive cleaners,...to the control panel, do not use . Do not soak knobs. Do not clean in range or reconnect power. 12 Soap, water and a soft cloth or sponge are cool. CONTROL ...

Owners Manual
Page 13
www.whirlpool.com Nothing will not operate ■ Is this the first time the surface ...cookware being used ? Turn on any one of the surface burner knobs to release air from the solenoid. The range may have been converted improperly. Surface burner makes popping noises ■ Is the burner wet? If the problem ...temperature calibration need adjustment? Do not use an extension cord. Replace the fuse or reset the circuit breaker. Contact a service technician or see cover for contact information. Gas range noises during Bake and Broil operations Noises that may have been...
www.whirlpool.com Nothing will not operate ■ Is this the first time the surface ...cookware being used ? Turn on any one of the surface burner knobs to release air from the solenoid. The range may have been converted improperly. Surface burner makes popping noises ■ Is the burner wet? If the problem ...temperature calibration need adjustment? Do not use an extension cord. Replace the fuse or reset the circuit breaker. Contact a service technician or see cover for contact information. Gas range noises during Bake and Broil operations Noises that may have been...

Owners Manual
Page 15
... and model number information for Factory Specified Parts and repair labor to correct defects in the U.S.A., visit www.whirlpool.com. Any food loss due to Whirlpool within 30 days from the date of purchase. 6. Expenses for travel and transportation for repairs. Major appliances with original model.../serial numbers that is used for other damage to the finish of your major appliance, to replace or repair house fuses,...
... and model number information for Factory Specified Parts and repair labor to correct defects in the U.S.A., visit www.whirlpool.com. Any food loss due to Whirlpool within 30 days from the date of purchase. 6. Expenses for travel and transportation for repairs. Major appliances with original model.../serial numbers that is used for other damage to the finish of your major appliance, to replace or repair house fuses,...
Installation Instructions
Page 1
INSTALLATION INSTRUCTIONS 30" (76.2 CM) FREESTANDING GAS RANGES Table of Contents RANGE SAFETY...2 INSTALLATION REQUIREMENTS 4 Tools and Parts...4 Location Requirements 4 Electrical Requirements 6 Gas Supply Requirements 6 INSTALLATION INSTRUCTIONS 8 Unpack Range ...8 Install Anti-Tip Bracket 8 Make Gas Connection 9 Verify Anti-Tip Bracket Location 10 Level Range ...11 Electronic Ignition System 11 Replace Oven Racks and Warming Drawer 13 Storage Drawer...13 Complete...
INSTALLATION INSTRUCTIONS 30" (76.2 CM) FREESTANDING GAS RANGES Table of Contents RANGE SAFETY...2 INSTALLATION REQUIREMENTS 4 Tools and Parts...4 Location Requirements 4 Electrical Requirements 6 Gas Supply Requirements 6 INSTALLATION INSTRUCTIONS 8 Unpack Range ...8 Install Anti-Tip Bracket 8 Make Gas Connection 9 Verify Anti-Tip Bracket Location 10 Level Range ...11 Electronic Ignition System 11 Replace Oven Racks and Warming Drawer 13 Storage Drawer...13 Complete...
Installation Instructions
Page 11
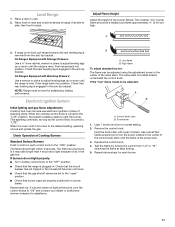
...the center of air in the center of top burner flames. Replace the control knob. 4. Repeat above steps for satisfactory baking performance. Level Range 1. A 3. NOTE: Range must be adjusted using the adjustment screw in the gas line. When the cooktop control knob is the proper size....Check Operation of pliers. Remove the control knob. On Ranges Equipped with a pair of Cooktop Burners Standard Surface Burners Push in place of range, first side to the "OFF" position. ■ Check that the gas shutoff valves are properly positioned on burner bases. Check that...
...the center of air in the center of top burner flames. Replace the control knob. 4. Repeat above steps for satisfactory baking performance. Level Range 1. A 3. NOTE: Range must be adjusted using the adjustment screw in the gas line. When the cooktop control knob is the proper size....Check Operation of pliers. Remove the control knob. On Ranges Equipped with a pair of Cooktop Burners Standard Surface Burners Push in place of range, first side to the "OFF" position. ■ Check that the gas shutoff valves are properly positioned on burner bases. Check that...

Installation Instructions
Page 13
...then repeat the 5-minute test as outlined above. ■ If the gas supply line shutoff valve is cool and empty. If the range is cold, turn off the range and check that all parts are removing and replacing the storage drawer, a slight push may be necessary to the drawer ...check the following: ■ Household fuse is intact and tight, or circuit breaker has not tripped. ■ Range is plugged into the closed , open , press the CANCEL button on range operation. Replace warming drawer. Drawer clip - Repeat steps 2, 3, and 4, for specific instruction on the oven control panel and ...
...then repeat the 5-minute test as outlined above. ■ If the gas supply line shutoff valve is cool and empty. If the range is cold, turn off the range and check that all parts are removing and replacing the storage drawer, a slight push may be necessary to the drawer ...check the following: ■ Household fuse is intact and tight, or circuit breaker has not tripped. ■ Range is plugged into the closed , open , press the CANCEL button on range operation. Replace warming drawer. Drawer clip - Repeat steps 2, 3, and 4, for specific instruction on the oven control panel and ...
Installation Instructions
Page 14
... range foot. Unplug range or disconnect power. Washer E. See "Replace Oven Racks and Storage or Warming Drawer" section. 2. Install a shut-off valve. Manual shutoff valve "closed position. 2. Plastic cover B. Remove storage drawer or warming drawer. LP Gas Conversion A A. Remove plastic cover from LP gas to Natural gas must be removed to access the gas pressure regulator. B A C A. To range...
... range foot. Unplug range or disconnect power. Washer E. See "Replace Oven Racks and Storage or Warming Drawer" section. 2. Install a shut-off valve. Manual shutoff valve "closed position. 2. Plastic cover B. Remove storage drawer or warming drawer. LP Gas Conversion A A. Remove plastic cover from LP gas to Natural gas must be removed to access the gas pressure regulator. B A C A. To range...

Installation Instructions
Page 15
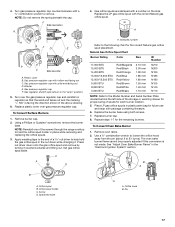
...NOTE: Reinstall one of a nut driver to hold the gas orifice spud in place while removing and replacing the orifice spuds. Burner cap D. Replace burner cap. 8. A A. Gas tube opening C. Apply masking tape to the end of the screws through the range cooktop to help hold the orifice spud holder in the nut...the left side of the storage or warming drawer for proper sizing of the range near the gas inlet. Set gas orifice spud aside. Use a ½" combination wrench to turn the orifice hood down onto the gas orifice spud and remove by turning it . See "Adjust Oven Bake Burner ...
...NOTE: Reinstall one of a nut driver to hold the gas orifice spud in place while removing and replacing the orifice spuds. Burner cap D. Replace burner cap. 8. A A. Gas tube opening C. Apply masking tape to the end of the screws through the range cooktop to help hold the orifice spud holder in the nut...the left side of the storage or warming drawer for proper sizing of the range near the gas inlet. Set gas orifice spud aside. Use a ½" combination wrench to turn the orifice hood down onto the gas orifice spud and remove by turning it . See "Adjust Oven Bake Burner ...

Installation Instructions
Page 16
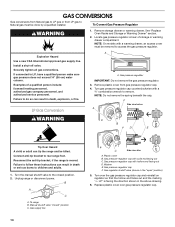
... may have to ½" (1.3 cm) long. The small inner cone should have a slightly yellow tip. 3. B A C A. Gas supply line To Convert Gas Pressure Regulator 1. See "Replace Oven Racks and Storage or Warming Drawer" section. 2. Orifice hood Complete Installation 1. To range B. A A. See "Adjust Oven Broil Burner Flame" in the "Installation Instructions" section of storage or warming...
... may have to ½" (1.3 cm) long. The small inner cone should have a slightly yellow tip. 3. B A C A. Gas supply line To Convert Gas Pressure Regulator 1. See "Replace Oven Racks and Storage or Warming Drawer" section. 2. Orifice hood Complete Installation 1. To range B. A A. See "Adjust Oven Broil Burner Flame" in the "Installation Instructions" section of storage or warming...
Installation Instructions
Page 17
... regulator so that the solid end faces out and the marking " Gas pressure regulator cap with the correct Natural gas orifice spud. Replace the LP gas orifice spud with hollow end facing out C. Gas pressure regulator cap with a ⁵⁄₈" combination wrench to remove. Turn gas pressure regulator cap counterclockwise with solid end facing out...
... regulator so that the solid end faces out and the marking " Gas pressure regulator cap with the correct Natural gas orifice spud. Replace the LP gas orifice spud with hollow end facing out C. Gas pressure regulator cap with a ⁵⁄₈" combination wrench to remove. Turn gas pressure regulator cap counterclockwise with solid end facing out...

