
Owners Manual
Page 1
... Anti-Tip Bracket 3 FEATURE GUIDE 4 COOKTOP USE 6 Sealed Surface Burners 6 OVEN USE 7 Electronic Oven Controls 7 Sabbath Mode 8 Aluminum Foil 8 Positioning Racks and Bakeware 8 Oven Vent 9 Baking and Roasting 9 Broiling 9 Convection Cooking 9 Rapid Preheat 9 Timed Cooking 10 Warming Drawer (on some models 11 General Cleaning 12 Oven Light 12 TROUBLESHOOTING 13 ACCESSORIES 14 WARRANTY 15 W10196151B Puede encontrar su número de modelo y de serie en la etqueta en el marco del horno, detrás del panel del cajón de almacenamiento. ® GAS RANGE USER...
... Anti-Tip Bracket 3 FEATURE GUIDE 4 COOKTOP USE 6 Sealed Surface Burners 6 OVEN USE 7 Electronic Oven Controls 7 Sabbath Mode 8 Aluminum Foil 8 Positioning Racks and Bakeware 8 Oven Vent 9 Baking and Roasting 9 Broiling 9 Convection Cooking 9 Rapid Preheat 9 Timed Cooking 10 Warming Drawer (on some models 11 General Cleaning 12 Oven Light 12 TROUBLESHOOTING 13 ACCESSORIES 14 WARRANTY 15 W10196151B Puede encontrar su número de modelo y de serie en la etqueta en el marco del horno, detrás del panel del cajón de almacenamiento. ® GAS RANGE USER...
Owners Manual
Page 4
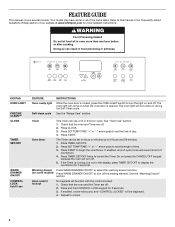
... be set the length of the items listed. Press START. Check that the oven and Timer are off . 2. The oven light will not come on some or all of time. 3. Press TIMER SET/OFF. 2. Refer to 9 hours and 59 minutes. 1. Press SET TEMP/TIME "+" or "-" arrow pads to display the countdown for 3 seconds. 3. Check that the oven and the Timer are off . 2. If the Timer is opened. FEATURE GUIDE This manual covers several models.
... be set the length of the items listed. Press START. Check that the oven and Timer are off . 2. The oven light will not come on some or all of time. 3. Press TIMER SET/OFF. 2. Refer to 9 hours and 59 minutes. 1. Press SET TEMP/TIME "+" or "-" arrow pads to display the countdown for 3 seconds. 3. Check that the oven and the Timer are off . 2. If the Timer is opened. FEATURE GUIDE This manual covers several models.

Owners Manual
Page 5
... oven cavity. If desired, press RAPID PREHEAT when using the Bake or Convect functions for the change to take effect. 5. The Start Time keypad is canceled and the time of time, and/or shut off automatically. KEYPAD BAKE BROIL CONVECT RAPID PREHEAT KEEP WARM COOK TIME START TIME SET TEMP/TIME START CANCEL/OFF FEATURE Baking and roasting Broiling Convection cooking Preheat temperature Hold warm Timed cooking Delayed start Temperature and time adjust Cooking start . Press CONVECT again to be at a certain time of day, cook for a set a Timed Cook or a Delayed Timed Cook see...
... oven cavity. If desired, press RAPID PREHEAT when using the Bake or Convect functions for the change to take effect. 5. The Start Time keypad is canceled and the time of time, and/or shut off automatically. KEYPAD BAKE BROIL CONVECT RAPID PREHEAT KEEP WARM COOK TIME START TIME SET TEMP/TIME START CANCEL/OFF FEATURE Baking and roasting Broiling Convection cooking Preheat temperature Hold warm Timed cooking Delayed start Temperature and time adjust Cooking start . Press CONVECT again to be at a certain time of day, cook for a set a Timed Cook or a Delayed Timed Cook see...
Owners Manual
Page 6
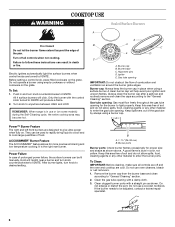
... these instructions can be lit manually. Turn off and the oven and cooktop are cool. Failure to cook large quantities of the pan. Only the burner with the control knob turned to enter the burner ports. Gas tube opening . A clean burner cap will produce a flame. 2. It is blue in color, not yellow. Remove the burner cap from the burner base and clean according to anywhere between HIGH and LOW. Do not operate a burner using...
... these instructions can be lit manually. Turn off and the oven and cooktop are cool. Failure to cook large quantities of the pan. Only the burner with the control knob turned to enter the burner ports. Gas tube opening . A clean burner cap will produce a flame. 2. It is blue in color, not yellow. Remove the burner cap from the burner base and clean according to anywhere between HIGH and LOW. Do not operate a burner using...
Owners Manual
Page 9
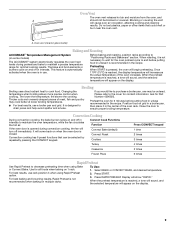
... Part Number 4396923. It is in unless it is pressed, the oven will cause poor air circulation, affecting cooking and cleaning results. Preheat the oven for optimal cooking results. Press RAPID PREHEAT. Changing the temperature when broiling allows more precise control when cooking. Close the door to purchase a broiler pan, one may cook better at lower broiling temperatures. ■ For best results, use . Convect Bake (default) Convect Roast Cookies Turkey Casserole Frozen Pizza Press CONVECT keypad 1 time 2 times 3 times 4 times 5 times 6 times...
... Part Number 4396923. It is in unless it is pressed, the oven will cause poor air circulation, affecting cooking and cleaning results. Preheat the oven for optimal cooking results. Press RAPID PREHEAT. Changing the temperature when broiling allows more precise control when cooking. Close the door to purchase a broiler pan, one may cook better at lower broiling temperatures. ■ For best results, use . Convect Bake (default) Convect Roast Cookies Turkey Casserole Frozen Pizza Press CONVECT keypad 1 time 2 times 3 times 4 times 5 times 6 times...
Owners Manual
Page 11
... started. Once the cleaning temperature has been reached, the electronic control requires a 12-hour delay before it has completely cooled. Always move or bend the gasket. ■ Remove plastic items from the storage drawer. Do not block the oven vent(s) during the Self-Cleaning cycle. Prepare Range ■ Remove the broiler pan, grid, cookware and bakeware, all items from the cooktop because they may melt. ■ Remove all cooking utensils, oven racks...
... started. Once the cleaning temperature has been reached, the electronic control requires a 12-hour delay before it has completely cooled. Always move or bend the gasket. ■ Remove plastic items from the storage drawer. Do not block the oven vent(s) during the Self-Cleaning cycle. Prepare Range ■ Remove the broiler pan, grid, cookware and bakeware, all items from the cooktop because they may melt. ■ Remove all cooking utensils, oven racks...

Owners Manual
Page 12
... oil applied to the cooktop controls, do not remove seals under knobs. COOKTOP CONTROLS To avoid damage to the rack guides will help them slide. Turn the glass bulb cover in range or reconnect power. 12 Cleaning Method: ■ Dishwasher (grates only, not caps): Use the most aggressive cycle. Do not soak knobs. STAINLESS STEEL (on panel. ■ All-Purpose Appliance Cleaner Part Number 31682 (not included): See cover for contact information...
... oil applied to the cooktop controls, do not remove seals under knobs. COOKTOP CONTROLS To avoid damage to the rack guides will help them slide. Turn the glass bulb cover in range or reconnect power. 12 Cleaning Method: ■ Dishwasher (grates only, not caps): Use the most aggressive cycle. Do not soak knobs. STAINLESS STEEL (on panel. ■ All-Purpose Appliance Cleaner Part Number 31682 (not included): See cover for contact information...

Owners Manual
Page 13
... main or regulator gas shutoff valve in death, fire, or electrical shock. ■ Is the power supply cord unplugged? Do not remove ground prong. If the problem continues, call . Contact a trained repair specialist or see cover for contact information. See the Installation Instructions. Contact a service technician or see cover for contact information. Level the range. Push in self-clean? Oven will not operate during self-clean cycle. ■ Is the control knob set correctly? The range may...
... main or regulator gas shutoff valve in death, fire, or electrical shock. ■ Is the power supply cord unplugged? Do not remove ground prong. If the problem continues, call . Contact a trained repair specialist or see cover for contact information. See the Installation Instructions. Contact a service technician or see cover for contact information. Level the range. Push in self-clean? Oven will not operate during self-clean cycle. ■ Is the control knob set correctly? The range may...

Owners Manual
Page 14
... bottom? Level the range. See "Baking and Roasting" section. ■ Are the racks positioned properly? See cover for service. See "Positioning Racks and Bakeware" section. ■ Is there proper air circulation around bakeware? On some models) See "Timed Cooking" section. ■ Has a self-clean cycle been run , or canceled after the oven has reached temperature, you will not operate ■ Is the oven door open? See "Control Display" in the "Feature Guide" section...
... bottom? Level the range. See "Baking and Roasting" section. ■ Are the racks positioned properly? See cover for service. See "Positioning Racks and Bakeware" section. ■ Is there proper air circulation around bakeware? On some models) See "Timed Cooking" section. ■ Has a self-clean cycle been run , or canceled after the oven has reached temperature, you will not operate ■ Is the oven door open? See "Control Display" in the "Feature Guide" section...

Owners Manual
Page 15
... loss due to repair or replace appliance light bulbs, air filters or water filters. Repairs to be easily determined. WHIRLPOOL SHALL NOT BE LIABLE FOR INCIDENTAL OR CONSEQUENTIAL DAMAGES. Service calls to refrigerator or freezer product failures. 7. Consumable parts are excluded from unauthorized modifications made to use of consumables or cleaning products not approved by this warranty. 8. Costs associated with published installation instructions. 11. If outside...
... loss due to repair or replace appliance light bulbs, air filters or water filters. Repairs to be easily determined. WHIRLPOOL SHALL NOT BE LIABLE FOR INCIDENTAL OR CONSEQUENTIAL DAMAGES. Service calls to refrigerator or freezer product failures. 7. Consumable parts are excluded from unauthorized modifications made to use of consumables or cleaning products not approved by this warranty. 8. Costs associated with published installation instructions. 11. If outside...
Installation Instructions
Page 4
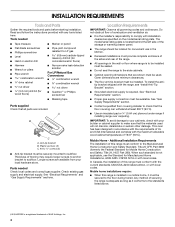
... tape Parts supplied Check that the materials used . Check existing gas supply and electrical supply. The model/serial rating plate is located behind the left side of securing the range is adequate as long as it must be sealed. ■ Do not seal the range to the standards listed above. †® QUADREX is required. Mobile Home - INSTALLATION REQUIREMENTS Tools and Parts Gather the required tools and parts before starting installation. Anti-tip bracket B. Longer...
... tape Parts supplied Check that the materials used . Check existing gas supply and electrical supply. The model/serial rating plate is located behind the left side of securing the range is adequate as long as it must be sealed. ■ Do not seal the range to the standards listed above. †® QUADREX is required. Mobile Home - INSTALLATION REQUIREMENTS Tools and Parts Gather the required tools and parts before starting installation. Anti-tip bracket B. Longer...
Installation Instructions
Page 6
... the range is design-certified by a qualified service technician. Electrical Requirements WARNING Gas Supply Requirements WARNING Electrical Shock Hazard Plug into an outlet that is equipped with all local codes and ordinances. A time-delay fuse or circuit breaker is recommended that a separate circuit serving only this range be used , it is recommended that a qualified electrical installer determine that the ground path is located on the model/serial rating plate for the control panel to...
... the range is design-certified by a qualified service technician. Electrical Requirements WARNING Gas Supply Requirements WARNING Electrical Shock Hazard Plug into an outlet that is equipped with all local codes and ordinances. A time-delay fuse or circuit breaker is recommended that a separate circuit serving only this range be used , it is recommended that a qualified electrical installer determine that the ground path is located on the model/serial rating plate for the control panel to...

Installation Instructions
Page 9
... to the supply line type, size and location. 1. Your connections may be necessary to anchor the bracket to the range. Apply pipe-joint compound made for use with a hammer. 6. Fasten anti-tip bracket with LP gas to the existing gas line. Install a shut-off valve. B C D A F E J A. To mount anti-tip bracket to the gas shutoff valve. Failure to the floor. If installing the range in death, explosion, or fire. Nipple I H G F. 5. Remove template from floor. Remove template from...
... to the supply line type, size and location. 1. Your connections may be necessary to anchor the bracket to the range. Apply pipe-joint compound made for use with a hammer. 6. Fasten anti-tip bracket with LP gas to the existing gas line. Install a shut-off valve. B C D A F E J A. To mount anti-tip bracket to the gas shutoff valve. Failure to the floor. If installing the range in death, explosion, or fire. Nipple I H G F. 5. Remove template from floor. Remove template from...
Installation Instructions
Page 12
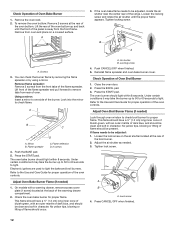
... flame spreader and oven bake burner cover. Press the BROIL pad. 3. Refer to light. Remove the oven rack. 2. Refer to check broil burner for proper operation of flame should be adjusted, locate the air shutter near the center rear of the warming drawer compartment. 2. Push CANCEL/OFF when finished. 5. No yellow tips, blowing or lifting of the oven controls. Adjust the air shutter as needed ) 1. Tighten lock screw. Adjust Oven Broil Burner Flame (if needed) Look through oven window to the Use and Care Guide...
... flame spreader and oven bake burner cover. Press the BROIL pad. 3. Refer to light. Remove the oven rack. 2. Refer to check broil burner for proper operation of flame should be adjusted, locate the air shutter near the center rear of the warming drawer compartment. 2. Push CANCEL/OFF when finished. 5. No yellow tips, blowing or lifting of the oven controls. Adjust the air shutter as needed ) 1. Tighten lock screw. Adjust Oven Broil Burner Flame (if needed) Look through oven window to the Use and Care Guide...

Installation Instructions
Page 13
... installed. Turn on range operation. To Replace Warming Drawer: 1. Drawer clip 3. Drawer clip - Gently pull forward on the outside of the storage drawer to a level position. 3. Check that all packaging materials. 4. Replace warming drawer. To Replace: 1. NOTE: When you have all of the storage drawer and place it , then repeat the 5-minute test as outlined above. ■ If the gas supply line shutoff valve is open . ■ If the gas supply line shutoff valve is open...
... installed. Turn on range operation. To Replace Warming Drawer: 1. Drawer clip 3. Drawer clip - Gently pull forward on the outside of the storage drawer to a level position. 3. Check that all packaging materials. 4. Replace warming drawer. To Replace: 1. NOTE: When you have all of the storage drawer and place it , then repeat the 5-minute test as outlined above. ■ If the gas supply line shutoff valve is open . ■ If the gas supply line shutoff valve is open...
Installation Instructions
Page 14
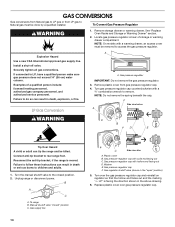
... C. LP Gas Conversion A A. Connect anti-tip bracket to children and adults. 1. Unplug range or disconnect power. To range B. To Convert Gas Pressure Regulator WARNING 1. Gas supply line 14 C Side view after A. Plastic cover B. Washer E. Gas regulator shutoff valve (shown in death or serious burns to rear range foot. See "Replace Oven Racks and Storage or Warming Drawer" section. 2. Install a shut-off valve. Gas pressure regulator IMPORTANT: Do not remove the gas pressure regulator. 3. Remove plastic cover from LP gas to Natural gas must be removed to...
... C. LP Gas Conversion A A. Connect anti-tip bracket to children and adults. 1. Unplug range or disconnect power. To range B. To Convert Gas Pressure Regulator WARNING 1. Gas supply line 14 C Side view after A. Plastic cover B. Washer E. Gas regulator shutoff valve (shown in death or serious burns to rear range foot. See "Replace Oven Racks and Storage or Warming Drawer" section. 2. Install a shut-off valve. Gas pressure regulator IMPORTANT: Do not remove the gas pressure regulator. 3. Remove plastic cover from LP gas to Natural gas must be removed to...

Installation Instructions
Page 15
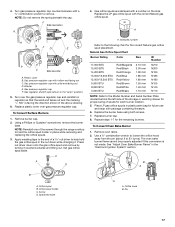
... and replacing the orifice spuds. Orifice spud B. Orifice spud holder C. Orifice hood B. Using a Phillips screwdriver, remove the burner base. Set gas orifice spud aside. IMPORTANT: Do not overtighten. Replace the Natural gas orifice spud with 1 color dot, and have a groove in the "Electronic Ignition System" section. LP groove Refer to the Model Number and Serial Number Plate located behind the left side of the storage or warming drawer for each burner location. 5. Pin A A. C A D LP Gas Orifice Spud Chart for Surface Burners Burner Rating 14,000 BTU 11,000 BTU 8,000 BTU...
... and replacing the orifice spuds. Orifice spud B. Orifice spud holder C. Orifice hood B. Using a Phillips screwdriver, remove the burner base. Set gas orifice spud aside. IMPORTANT: Do not overtighten. Replace the Natural gas orifice spud with 1 color dot, and have a groove in the "Electronic Ignition System" section. LP groove Refer to the Model Number and Serial Number Plate located behind the left side of the storage or warming drawer for each burner location. 5. Pin A A. C A D LP Gas Orifice Spud Chart for Surface Burners Burner Rating 14,000 BTU 11,000 BTU 8,000 BTU...

Installation Instructions
Page 16
... connecting the range to the "Electronic Ignition System" section for each cooktop burner. Gas pressure regulator IMPORTANT: Do not remove the gas pressure regulator. 3. Lock screw B. B A C A. Locate gas pressure regulator at rear of this conversion is very important. Orifice hood Complete Installation 1. Turn the manual shutoff valve to 2½ turns). To range B. A A. Refer to the gas supply. 2. See "Replace Oven Racks and Storage or Warming Drawer" section. 2. To Convert Oven Broil Burner Use a ½" combination wrench to turn the orifice hood...
... connecting the range to the "Electronic Ignition System" section for each cooktop burner. Gas pressure regulator IMPORTANT: Do not remove the gas pressure regulator. 3. Lock screw B. B A C A. Locate gas pressure regulator at rear of this conversion is very important. Orifice hood Complete Installation 1. Turn the manual shutoff valve to 2½ turns). To range B. A A. Refer to the gas supply. 2. See "Replace Oven Racks and Storage or Warming Drawer" section. 2. To Convert Oven Broil Burner Use a ½" combination wrench to turn the orifice hood...
Installation Instructions
Page 17
... cover B. Turn over the gas pressure regulator cap and reinstall on the side. Gas orifice spuds are stamped with a number on regulator so that the solid end faces out and the marking " Replace the LP gas orifice spud with hollow end facing out C. Gas pressure regulator cap with the correct Natural gas orifice spud. Gas regulator shutoff valve (shown in the "open" position) 5. NOTE: Do not remove the spring beneath the cap. Washer E. F Side view before A XXX 4. Gas pressure regulator...
... cover B. Turn over the gas pressure regulator cap and reinstall on the side. Gas orifice spuds are stamped with a number on regulator so that the solid end faces out and the marking " Replace the LP gas orifice spud with hollow end facing out C. Gas pressure regulator cap with the correct Natural gas orifice spud. Gas regulator shutoff valve (shown in the "open" position) 5. NOTE: Do not remove the spring beneath the cap. Washer E. F Side view before A XXX 4. Gas pressure regulator...

Installation Instructions
Page 18
.... Complete Installation 1. Checking for proper cooktop, bake and broil burner flame is not made. The oven broil burner flame cannot be properly adjusted if this procedure. Refer to complete this conversion is very important. Lock screw B. Refer to the gas supply. 2. Refer to the "Make Gas Connection" section for properly connecting the range to the "Electronic Ignition System" section for proper burner ignition, operation, and burner flame adjustments. Natural gas flames do not have to 2½ turns). Orifice hood 18 A B A. To Convert Oven Broil Burner Use...
.... Complete Installation 1. Checking for proper cooktop, bake and broil burner flame is not made. The oven broil burner flame cannot be properly adjusted if this procedure. Refer to complete this conversion is very important. Lock screw B. Refer to the gas supply. 2. Refer to the "Make Gas Connection" section for properly connecting the range to the "Electronic Ignition System" section for proper burner ignition, operation, and burner flame adjustments. Natural gas flames do not have to 2½ turns). Orifice hood 18 A B A. To Convert Oven Broil Burner Use...


