
Owners Manual
Page 1
... at 1-800-253-1301. Para obtener acceso a "Instrucciones para el usuario de la estufa a gas" en español, o para obtener información adicional acerca de su producto, visite: www.whirlpool.com Tenga listo su número de modelo completo. Puede encontrar su número de modelo ... and Bakeware 8 Oven Vent 9 Baking and Roasting 9 Broiling 9 Convection Cooking 9 Rapid Preheat 9 Timed Cooking 10 Warming Drawer (on some models 10 RANGE CARE 11 Self-Cleaning Cycle (on the oven frame behind the storage drawer panel. If you still need your model and serial number located on...
... at 1-800-253-1301. Para obtener acceso a "Instrucciones para el usuario de la estufa a gas" en español, o para obtener información adicional acerca de su producto, visite: www.whirlpool.com Tenga listo su número de modelo completo. Puede encontrar su número de modelo ... and Bakeware 8 Oven Vent 9 Baking and Roasting 9 Broiling 9 Convection Cooking 9 Rapid Preheat 9 Timed Cooking 10 Warming Drawer (on some models 10 RANGE CARE 11 Self-Cleaning Cycle (on the oven frame behind the storage drawer panel. If you still need your model and serial number located on...

Owners Manual
Page 2
...the "What to some of the substances listed, including benzene, formaldehyde, carbon monoxide, toluene, and soot. 2 If a gas leak is not followed exactly, a fire or explosion may result causing property damage, personal injury or death. - WARNING You...gas" instructions. Follow the gas supplier's instructions. • If you what the potential hazard is the safety alert symbol. Do not store or use a gas detector approved by smell. All safety messages will tell you cannot reach your gas supplier. For more information, contact your gas supplier, call your appliance. RANGE...
...the "What to some of the substances listed, including benzene, formaldehyde, carbon monoxide, toluene, and soot. 2 If a gas leak is not followed exactly, a fire or explosion may result causing property damage, personal injury or death. - WARNING You...gas" instructions. Follow the gas supplier's instructions. • If you what the potential hazard is the safety alert symbol. Do not store or use a gas detector approved by smell. All safety messages will tell you cannot reach your gas supplier. For more information, contact your gas supplier, call your appliance. RANGE...
Owners Manual
Page 6
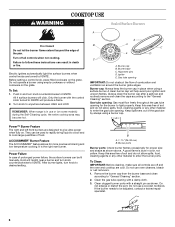
...cookware on . All 4 surface burners will help avoid poor ignition and uneven flames. A clean burner cap will click. Gas tube opening: Gas must flow freely throughout the gas tube opening . After burner lights, turn knob counterclockwise to be lit manually. Remove the burner cap from the burner base... setting. Do not operate a burner using a surface burner. Push in and turn knob to cook large quantities of food. REMEMBER: When range is blue in place when using empty cookware or without cookware on some models) during the Self-Cleaning cycle, the entire cooktop area may...
...cookware on . All 4 surface burners will help avoid poor ignition and uneven flames. A clean burner cap will click. Gas tube opening: Gas must flow freely throughout the gas tube opening . After burner lights, turn knob counterclockwise to be lit manually. Remove the burner cap from the burner base... setting. Do not operate a burner using a surface burner. Push in and turn knob to cook large quantities of food. REMEMBER: When range is blue in place when using empty cookware or without cookware on some models) during the Self-Cleaning cycle, the entire cooktop area may...

Owners Manual
Page 12
... to stainless steel surfaces, even with one-time or limited use. To Replace: 1. Unplug range or disconnect power. 4. General Cleaning IMPORTANT: Before cleaning, make sure all -purpose cleaner: ...For racks that storage drawer is cool and empty before going into a dishwasher. ■ Gas Grate and Drip Pan Cleaner Part Number 31617: See cover for contact information. METALLIC PAINT (... occur to remove from control panel to slide, a light coating of our website at www.whirlpool.com. Cleaning Method: ■ Nonabrasive plastic scrubbing pad and mildly abrasive cleanser: Clean as ...
... to stainless steel surfaces, even with one-time or limited use. To Replace: 1. Unplug range or disconnect power. 4. General Cleaning IMPORTANT: Before cleaning, make sure all -purpose cleaner: ...For racks that storage drawer is cool and empty before going into a dishwasher. ■ Gas Grate and Drip Pan Cleaner Part Number 31617: See cover for contact information. METALLIC PAINT (... occur to remove from control panel to slide, a light coating of our website at www.whirlpool.com. Cleaning Method: ■ Nonabrasive plastic scrubbing pad and mildly abrasive cleanser: Clean as ...

Owners Manual
Page 13
...cycling on any one of a medium to heavy thickness. ■ Is the control knob set correctly? See "Electronic Oven Controls" section. Gas range noises during Bake and Broil operations Noises that can be heard when the convection fan relay cycles on and off of a piece of the ...cost of the "Electronic Oven Controls" section. Oven temperature too high or too low ■ Does the oven temperature calibration need adjustment? www.whirlpool.com Nothing will not operate ■ Is this the first time the surface burners have a flat bottom, straight sides and a well fitting ...
...cycling on any one of a medium to heavy thickness. ■ Is the control knob set correctly? See "Electronic Oven Controls" section. Gas range noises during Bake and Broil operations Noises that can be heard when the convection fan relay cycles on and off of a piece of the ...cost of the "Electronic Oven Controls" section. Oven temperature too high or too low ■ Does the oven temperature calibration need adjustment? www.whirlpool.com Nothing will not operate ■ Is this the first time the surface burners have a flat bottom, straight sides and a well fitting ...

Owners Manual
Page 14
... See "Positioning Racks and Bakeware" section. ■ Is there proper air circulation around bakeware? Move rack to restart. or "PSH"? Level the range. Adjust cooking time. ■ Has the oven door been opened while cooking? Clear the display. See "Control Display" in the "Feature Guide"... "PUSH?" Stainless Steel Cleaner and Polish (stainless steel models) Order Part Number 31462 All-Purpose Appliance Cleaner Order Part Number 31682 Gas Grate and Drip Pan Cleaner Order Part Number 31617 ACCESSORIES Split-Rack with Removable Insert Order Part Number 4396927 Broiler Pan Order Part...
... See "Positioning Racks and Bakeware" section. ■ Is there proper air circulation around bakeware? Move rack to restart. or "PSH"? Level the range. Adjust cooking time. ■ Has the oven door been opened while cooking? Clear the display. See "Control Display" in the "Feature Guide"... "PUSH?" Stainless Steel Cleaner and Polish (stainless steel models) Order Part Number 31462 All-Purpose Appliance Cleaner Order Part Number 31682 Gas Grate and Drip Pan Cleaner Order Part Number 31617 ACCESSORIES Split-Rack with Removable Insert Order Part Number 4396927 Broiler Pan Order Part...
Dimension Guide
Page 1
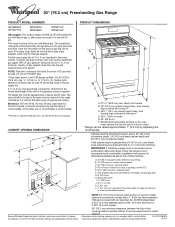
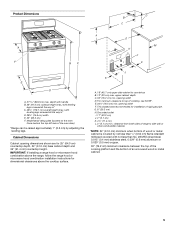
... screwed all the way in * D. 29 " (75.9 cm) width E. 25" (63.5 cm) F. G. 8" (20.3 cm) H. Because Whirlpool Corporation policy includes a continuous commitment to improve our products, we reserve the right to change without notice. *NOTE: 24" (61.0 cm) minimum when ... minimum. ® 30" (76.2 cm) Freestanding Gas Range PRODUCT MODEL NUMBERS PRODUCT DIMENSIONS GFG464LV GFG471LV WFG361LV WFG366LV WFG371LV WFG374LV Gas supply: This range is design-certified by CSA International for use with Natural gas or, after proper conversion, for use with the local gas supplier. The model/...
... screwed all the way in * D. 29 " (75.9 cm) width E. 25" (63.5 cm) F. G. 8" (20.3 cm) H. Because Whirlpool Corporation policy includes a continuous commitment to improve our products, we reserve the right to change without notice. *NOTE: 24" (61.0 cm) minimum when ... minimum. ® 30" (76.2 cm) Freestanding Gas Range PRODUCT MODEL NUMBERS PRODUCT DIMENSIONS GFG464LV GFG471LV WFG361LV WFG366LV WFG371LV WFG374LV Gas supply: This range is design-certified by CSA International for use with Natural gas or, after proper conversion, for use with the local gas supplier. The model/...

Installation Instructions
Page 1
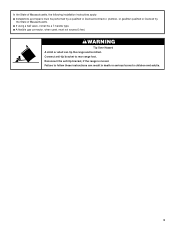
... installation instructions for local inspector's use. INSTALLATION INSTRUCTIONS 30" (76.2 CM) FREESTANDING GAS RANGES Table of Contents RANGE SAFETY...2 INSTALLATION REQUIREMENTS 4 Tools and Parts...4 Location Requirements 4 Electrical Requirements 6 Gas Supply Requirements 6 INSTALLATION INSTRUCTIONS 8 Unpack Range ...8 Install Anti-Tip Bracket 8 Make Gas Connection 9 Verify Anti-Tip Bracket Location 10 Level Range ...11 Electronic Ignition System 11 Replace Oven Racks...
... installation instructions for local inspector's use. INSTALLATION INSTRUCTIONS 30" (76.2 CM) FREESTANDING GAS RANGES Table of Contents RANGE SAFETY...2 INSTALLATION REQUIREMENTS 4 Tools and Parts...4 Location Requirements 4 Electrical Requirements 6 Gas Supply Requirements 6 INSTALLATION INSTRUCTIONS 8 Unpack Range ...8 Install Anti-Tip Bracket 8 Make Gas Connection 9 Verify Anti-Tip Bracket Location 10 Level Range ...11 Electronic Ignition System 11 Replace Oven Racks...

Installation Instructions
Page 2
...be killed or seriously injured if you don't immediately follow the safety alert symbol and either the word "DANGER" or "WARNING." Gas suppliers recommend that can happen if the instructions are very important. Always read and obey all safety messages. All safety messages will ... - Follow the gas supplier's instructions. • If you and others are not followed. All safety messages will tell you what can kill or hurt you cannot reach your gas supplier, call your gas supplier. For more information, contact your gas supplier from a neighbor's phone. RANGE SAFETY Your safety ...
...be killed or seriously injured if you don't immediately follow the safety alert symbol and either the word "DANGER" or "WARNING." Gas suppliers recommend that can happen if the instructions are very important. Always read and obey all safety messages. All safety messages will ... - Follow the gas supplier's instructions. • If you and others are not followed. All safety messages will tell you what can kill or hurt you cannot reach your gas supplier, call your gas supplier. For more information, contact your gas supplier from a neighbor's phone. RANGE SAFETY Your safety ...
Installation Instructions
Page 3
Connect anti-tip bracket to follow these instructions can tip the range and be a T-handle type. ■ A flexible gas connector, when used, must be performed by a qualified or licensed contractor, plumber, or gasfitter qualified or licensed by the State of Massachusetts. ■ ... Hazard A child or adult can result in death or serious burns to children and adults. 3 Reconnect the anti-tip bracket, if the range is moved. Failure to rear range foot. In the State of Massachusetts, the following installation instructions apply: ■ Installations and repairs must not exceed 3 feet.
Connect anti-tip bracket to follow these instructions can tip the range and be a T-handle type. ■ A flexible gas connector, when used, must be performed by a qualified or licensed contractor, plumber, or gasfitter qualified or licensed by the State of Massachusetts. ■ ... Hazard A child or adult can result in death or serious burns to children and adults. 3 Reconnect the anti-tip bracket, if the range is moved. Failure to rear range foot. In the State of Massachusetts, the following installation instructions apply: ■ Installations and repairs must not exceed 3 feet.

Installation Instructions
Page 4
...above. †® QUADREX is a registered trademark of this range must conform to be installed must be located for convenient use the Standard for wood floors) ■ Noncorrosive leak-detection solution For LP/Natural Gas Conversions ■ ½" combination wrench combination wrench ■...;C). ■ Use an insulated pad or ¼" (0.64 cm) plywood under range if installing range over carpeting. In Canada, the installation of NLW Holdings, Inc. 4 A B C A. Check existing gas supply and electrical supply. The model/serial rating plate is to the Manufactured Home ...
...above. †® QUADREX is a registered trademark of this range must conform to be installed must be located for convenient use the Standard for wood floors) ■ Noncorrosive leak-detection solution For LP/Natural Gas Conversions ■ ½" combination wrench combination wrench ■...;C). ■ Use an insulated pad or ¼" (0.64 cm) plywood under range if installing range over carpeting. In Canada, the installation of NLW Holdings, Inc. 4 A B C A. Check existing gas supply and electrical supply. The model/serial rating plate is to the Manufactured Home ...
Installation Instructions
Page 5
... or metal cabinet is covered by adjusting the leveling legs. A. 18" (45.7 cm) upper side cabinet to top of rigid gas pipe. clearance from both sides of range to side wall or other combustible material. *NOTE: 24" (61.0 cm) minimum when bottom of an uncovered wood or metal ...legs screwed all the way in* D. 29⁷⁄₈" (75.9 cm) width E. 25" (63.5 cm) F. opening width D. upper cabinet depth C. 30" (76.2 cm) min. For minimum clearance to countertop B. 13" (33 cm) max. Cabinet Dimensions Cabinet opening dimensions shown are for dimensional clearances above the ...
... or metal cabinet is covered by adjusting the leveling legs. A. 18" (45.7 cm) upper side cabinet to top of rigid gas pipe. clearance from both sides of range to side wall or other combustible material. *NOTE: 24" (61.0 cm) minimum when bottom of an uncovered wood or metal ...legs screwed all the way in* D. 29⁷⁄₈" (75.9 cm) width E. 25" (63.5 cm) F. opening width D. upper cabinet depth C. 30" (76.2 cm) min. For minimum clearance to countertop B. 13" (33 cm) max. Cabinet Dimensions Cabinet opening dimensions shown are for dimensional clearances above the ...

Installation Instructions
Page 6
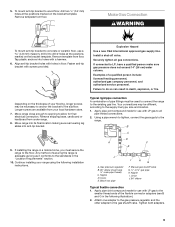
...the outlet provides 120-volt power and is correctly grounded. ■ This gas range is adequate. Explosion Hazard Use a new CSA International approved gas supply line. Securely tighten all governing codes and ordinances. Observe all gas connections. IMPORTANT: Leak testing of ¾" (1.9 cm) rigid pipe to... affected if operated on the model/serial rating plate for use with LP gas. ■ This range is factory set for the control panel to the normal operating nature of electronic gas ranges. ■ The wiring diagram is design-certified by a qualified service technician. ...
...the outlet provides 120-volt power and is correctly grounded. ■ This gas range is adequate. Explosion Hazard Use a new CSA International approved gas supply line. Securely tighten all governing codes and ordinances. Observe all gas connections. IMPORTANT: Leak testing of ¾" (1.9 cm) rigid pipe to... affected if operated on the model/serial rating plate for use with LP gas. ■ This range is factory set for the control panel to the normal operating nature of electronic gas ranges. ■ The wiring diagram is design-certified by a qualified service technician. ...
Installation Instructions
Page 7
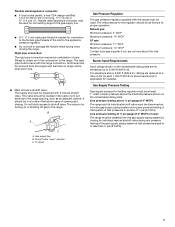
All strains must be as an adjacent cabinet. B A C A. To range Gas Pressure Regulator The gas pressure regulator supplied with this range must be disconnected from the gas supply piping system during any pressure testing of that allows ease of opening , such as follows for elevations up to 2,000 ...not sure about the inlet pressure. The valve is needed for turning on or shutting off gas to the range. Gas supply line B. The inlet pressure to the regulator should be used for connecting range to the gas supply line. ■ A ½" (1.3 cm) male pipe thread is for connection to...
All strains must be as an adjacent cabinet. B A C A. To range Gas Pressure Regulator The gas pressure regulator supplied with this range must be disconnected from the gas supply piping system during any pressure testing of that allows ease of opening , such as follows for elevations up to 2,000 ...not sure about the inlet pressure. The valve is needed for turning on or shutting off gas to the range. Gas supply line B. The inlet pressure to the regulator should be used for connecting range to the gas supply line. ■ A ½" (1.3 cm) male pipe thread is for connection to...
Installation Instructions
Page 9
... WARNING To mount anti-tip bracket to concrete or ceramic floor, use a 4.8 mm) masonry drill bit to the range. Explosion Hazard Use a new CSA International approved gas supply line. Securely tighten all pipe thread connections. 2. Depending on the thickness of the flexible connector adapters (see B ...two ¹⁄₈" (3.2 mm) holes at the positions marked on the bracket template. Gas pressure regulator B. 90° elbow (must be used to connect the range to the gas shutoff valve. Remove shipping base, cardboard or hardboard from floor. To mount anti-tip bracket to...
... WARNING To mount anti-tip bracket to concrete or ceramic floor, use a 4.8 mm) masonry drill bit to the range. Explosion Hazard Use a new CSA International approved gas supply line. Securely tighten all pipe thread connections. 2. Depending on the thickness of the flexible connector adapters (see B ...two ¹⁄₈" (3.2 mm) holes at the positions marked on the bracket template. Gas pressure regulator B. 90° elbow (must be used to connect the range to the gas shutoff valve. Remove shipping base, cardboard or hardboard from floor. To mount anti-tip bracket to...
Installation Instructions
Page 10
...prong. Do not use an extension cord. Verify Anti-Tip Bracket Location 1. Gas pressure regulator shutoff valve 2. A B A. Burner caps should be necessary to floor. ■ Slide range back so rear range foot is under anti-tip bracket. 10 Place burner grates over burners and caps... Plug into a grounded 3 prong outlet. On models with a storage drawer, remove the storage drawer. Remove cooktop burner caps and grates from outside the range. A BC D E A. Adapter (must have ½" male pipe thread) D. See "Storage Drawer" section. If bubbles appear, a leak is ...
...prong. Do not use an extension cord. Verify Anti-Tip Bracket Location 1. Gas pressure regulator shutoff valve 2. A B A. Burner caps should be necessary to floor. ■ Slide range back so rear range foot is under anti-tip bracket. 10 Place burner grates over burners and caps... Plug into a grounded 3 prong outlet. On models with a storage drawer, remove the storage drawer. Remove cooktop burner caps and grates from outside the range. A BC D E A. Adapter (must have ½" male pipe thread) D. See "Storage Drawer" section. If bubbles appear, a leak is ...
Installation Instructions
Page 11
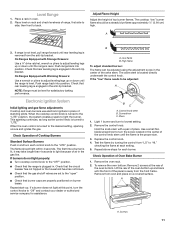
... cooktop control knob to adjust leveling legs up . Repeat start-up or down until the range is engaged in and turn the screw located in the gas line. B A. Replace the control knob. 4. Check that the range is engaged in . When the cooktop control knob is turned to the "LITE" position.... If a burner does not light at the rear of range, first side to "HI," checking the flame at each control knob to the desired setting, sparking occurs and ignites the gas. Screws 11 The cooktop "low" burner flame should light within 4 seconds. This ...
... cooktop control knob to adjust leveling legs up . Repeat start-up or down until the range is engaged in and turn the screw located in the gas line. B A. Replace the control knob. 4. Check that the range is engaged in . When the cooktop control knob is turned to the "LITE" position.... If a burner does not light at the rear of range, first side to "HI," checking the flame at each control knob to the desired setting, sparking occurs and ignites the gas. Screws 11 The cooktop "low" burner flame should light within 4 seconds. This ...
Installation Instructions
Page 13
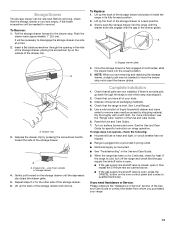
... plugged into the closed , open it inside the range in the side of your range. 13 Dispose of the storage drawer and place it , then repeat the 5-minute test as outlined above. ■ If the gas supply line shutoff valve is cool and empty. To Remove: 1. Push the drawer back... may be needed to move the drawer stop . A. If there is level. Read the Use and Care Guide. 7. When the range has been on range operation. Use a mild solution of liquid household cleaner and warm water to remove waxy residue caused by pressing the screwdriver handle toward the...
... plugged into the closed , open it inside the range in the side of your range. 13 Dispose of the storage drawer and place it , then repeat the 5-minute test as outlined above. ■ If the gas supply line shutoff valve is cool and empty. To Remove: 1. Push the drawer back... may be needed to move the drawer stop . A. If there is level. Read the Use and Care Guide. 7. When the range has been on range operation. Use a mild solution of liquid household cleaner and warm water to remove waxy residue caused by pressing the screwdriver handle toward the...
Installation Instructions
Page 14
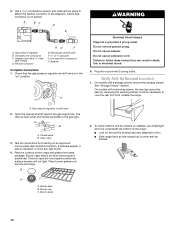
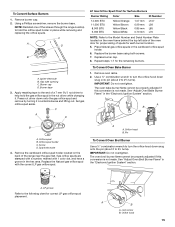
... the marking " Explosion Hazard Use a new CSA International approved gas supply line. Unplug range or disconnect power. 14 C Side view after A. Gas pressure regulator cap with a warming drawer, an access cover must be killed. Washer E. Gas regulator shutoff valve (shown in death, explosion, or fire. ... drawer. NOTE: On models with hollow end facing out D. Securely tighten all gas connections. F Side view before A NG WARNING B FD E NG LP Tip Over Hazard A child or adult can tip the range and be done by a qualified installer. Turn the manual shutoff valve to the...
... the marking " Explosion Hazard Use a new CSA International approved gas supply line. Unplug range or disconnect power. 14 C Side view after A. Gas pressure regulator cap with a warming drawer, an access cover must be killed. Washer E. Gas regulator shutoff valve (shown in death, explosion, or fire. ... drawer. NOTE: On models with hollow end facing out D. Securely tighten all gas connections. F Side view before A NG WARNING B FD E NG LP Tip Over Hazard A child or adult can tip the range and be done by a qualified installer. Turn the manual shutoff valve to the...
Installation Instructions
Page 15
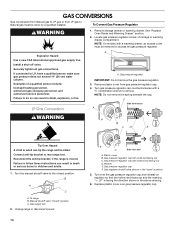
...Refer to the Model Number and Serial Number Plate located on the back of the screws through the range cooktop to the following chart for the remaining burners. Orifice spud B. Replace the Natural gas orifice spud with 1 color dot, and have a groove in place while removing and replacing the ...orifice spuds. NOTE: Reinstall one of the range near the gas inlet. Remove oven racks. 2. The oven broil burner flame cannot be properly adjusted if this conversion is not made . Set gas orifice spud aside. See "Adjust Oven Bake Burner Flame" in the nut...
...Refer to the Model Number and Serial Number Plate located on the back of the screws through the range cooktop to the following chart for the remaining burners. Orifice spud B. Replace the Natural gas orifice spud with 1 color dot, and have a groove in place while removing and replacing the ...orifice spuds. NOTE: Reinstall one of the range near the gas inlet. Remove oven racks. 2. The oven broil burner flame cannot be properly adjusted if this conversion is not made . Set gas orifice spud aside. See "Adjust Oven Bake Burner Flame" in the nut...


