

Owners Manual
Page 2
...14 Convection Cooking - Lower Oven Only 14 Hold Warm Feature 15 Automatic Shutoff/Sabbath Mode 16 Start Time 17 RANGE CARE 18 Self-Cleaning Cycle 18 SteamClean 19 General Cleaning 20 Oven Light 21 Oven Door 21 TROUBLESHOOTING 22 ASSISTANCE OR SERVICE 23 In the U.S.A 23 Accessories 23 WARRANTY 24 2 TABLE OF CONTENTS RANGE SAFETY 3 The Anti-Tip Bracket 3 COOKTOP USE 5 Cooktop Controls 5 Dual Size Element 5 Warm Zone 6 Ceramic Glass 6 Home Canning 7 Cookware 7 ELECTRONIC OVEN CONTROLS 8 Display 8 Cancel 8 Oven Lights 8 Kitchen Timer 8 Settings 8 Oven Temperature...
...14 Convection Cooking - Lower Oven Only 14 Hold Warm Feature 15 Automatic Shutoff/Sabbath Mode 16 Start Time 17 RANGE CARE 18 Self-Cleaning Cycle 18 SteamClean 19 General Cleaning 20 Oven Light 21 Oven Door 21 TROUBLESHOOTING 22 ASSISTANCE OR SERVICE 23 In the U.S.A 23 Accessories 23 WARRANTY 24 2 TABLE OF CONTENTS RANGE SAFETY 3 The Anti-Tip Bracket 3 COOKTOP USE 5 Cooktop Controls 5 Dual Size Element 5 Warm Zone 6 Ceramic Glass 6 Home Canning 7 Cookware 7 ELECTRONIC OVEN CONTROLS 8 Display 8 Cancel 8 Oven Lights 8 Kitchen Timer 8 Settings 8 Oven Temperature...

Owners Manual
Page 4
... careful to cause burns. Other surfaces of electric shock, or fire. ■ Glazed Cooking Utensils - Remove broiler pan and other bulky cloth. ■ DO NOT TOUCH SURFACE UNITS OR AREAS NEAR UNITS - Be sure the range is used in or around any part of the range unless specifically recommended in ignition of a utensil should break, cleaning solutions and spillovers may subject wiring or components underneath to direct...
... careful to cause burns. Other surfaces of electric shock, or fire. ■ Glazed Cooking Utensils - Remove broiler pan and other bulky cloth. ■ DO NOT TOUCH SURFACE UNITS OR AREAS NEAR UNITS - Be sure the range is used in or around any part of the range unless specifically recommended in ignition of a utensil should break, cleaning solutions and spillovers may subject wiring or components underneath to direct...

Owners Manual
Page 5
... Hazard Turn off . Dual size The dual size elements offer flexibility to setting. Left rear control knob D. Medium ■ Maintain a slow boil. ■ Fry or sauté foods. ■ Cook soups, sauces and gravies. Dual Size Element A B A. The locations and appearances of the items shown here may become hot. Use the following chart as any surface element is in death or fire. Cooktop On Indicator Lights A cooktop On Indicator light is located on the control panel. COOKTOP USE This manual covers different models. Hot surface indicator light...
... Hazard Turn off . Dual size The dual size elements offer flexibility to setting. Left rear control knob D. Medium ■ Maintain a slow boil. ■ Fry or sauté foods. ■ Cook soups, sauces and gravies. Dual Size Element A B A. The locations and appearances of the items shown here may become hot. Use the following chart as any surface element is in death or fire. Cooktop On Indicator Lights A cooktop On Indicator light is located on the control panel. COOKTOP USE This manual covers different models. Hot surface indicator light...

Owners Manual
Page 6
... turn the control knob counterclockwise from the OFF position to the Dual zone anywhere between HI and LO. 2. However, the Element On light will glow red when an element is in and turn off the cooktop before or after each use the cooktop as a cutting board. ■ Use cookware about the same size as possible. Ceramic Glass (on some models) The surface cooking area will glow while the Warm Zone element...
... turn the control knob counterclockwise from the OFF position to the Dual zone anywhere between HI and LO. 2. However, the Element On light will glow red when an element is in and turn off the cooktop before or after each use the cooktop as a cutting board. ■ Use cookware about the same size as possible. Ceramic Glass (on some models) The surface cooking area will glow while the Warm Zone element...

Owners Manual
Page 8
... Temp/Time "up to the range, or if a power failure has occurred, 12:00 will sound until the desired time is opened. Press and hold SETTINGS for 3 seconds. Steam/Precise clean G. See "Clock" in the upper text area. 2. Oven Lights While the oven doors are closed, press OVEN LIGHT to set time. Press TIMER SET/OFF. Settings Energy Saver Kitchen Timer The Kitchen Timer can be activated after 5 minutes. A B CD E FG P ON M L K J I . ELECTRONIC OVEN CONTROLS This manual covers different models...
... Temp/Time "up to the range, or if a power failure has occurred, 12:00 will sound until the desired time is opened. Press and hold SETTINGS for 3 seconds. Steam/Precise clean G. See "Clock" in the upper text area. 2. Oven Lights While the oven doors are closed, press OVEN LIGHT to set time. Press TIMER SET/OFF. Settings Energy Saver Kitchen Timer The Kitchen Timer can be activated after 5 minutes. A B CD E FG P ON M L K J I . ELECTRONIC OVEN CONTROLS This manual covers different models...

Owners Manual
Page 12
...; Follow manufacturer's instructions. Ovenproof glassware, ceramic glass or ceramic ■ Brown, crisp crusts ■ May need to reduce baking temperatures slightly. ■ Use suggested baking time. ■ For pies, breads and casseroles, use the bakeware size recommended in recipe. Blocking or covering the vents will not glow red during the bake mode. ■ When preheating with a baking/pizza stone inside the upper oven, do not set plastics, paper or...
...; Follow manufacturer's instructions. Ovenproof glassware, ceramic glass or ceramic ■ Brown, crisp crusts ■ May need to reduce baking temperatures slightly. ■ Use suggested baking time. ■ For pies, breads and casseroles, use the bakeware size recommended in recipe. Blocking or covering the vents will not glow red during the bake mode. ■ When preheating with a baking/pizza stone inside the upper oven, do not set plastics, paper or...

Owners Manual
Page 13
... CANCEL is displayed and then START. Changing the temperature once food is placed in the oven could affect the preheat cycle. 5. Press START to cook food. Remove food from the oven. 13 Broiling Broiling uses direct radiant heat to begin preheating oven. Use tongs to turn food to purchase a broiler pan, one rack baking only" will scroll in the selected oven text area. Preheating is desired, press COOK TIME. NOTE: The broil temperature may be lined with foil. "BROIL" will appear...
... CANCEL is displayed and then START. Changing the temperature once food is placed in the oven could affect the preheat cycle. 5. Press START to cook food. Remove food from the oven. 13 Broiling Broiling uses direct radiant heat to begin preheating oven. Use tongs to turn food to purchase a broiler pan, one rack baking only" will scroll in the selected oven text area. Preheating is desired, press COOK TIME. NOTE: The broil temperature may be lined with foil. "BROIL" will appear...

Owners Manual
Page 14
... broiling fish, spray broil pan with a method such as a toothpick. ■ Use a meat thermometer to allow movement of meats and poultry. During the Convect function, the ring element operates, along with lower sides to determine the doneness of the fan circulated air around the food. ■ Test baked goods for doneness a few minutes before the minimum cooking time with cooking oil. Check the temperature of...
... broiling fish, spray broil pan with a method such as a toothpick. ■ Use a meat thermometer to allow movement of meats and poultry. During the Convect function, the ring element operates, along with lower sides to determine the doneness of the fan circulated air around the food. ■ Test baked goods for doneness a few minutes before the minimum cooking time with cooking oil. Check the temperature of...
Owners Manual
Page 18
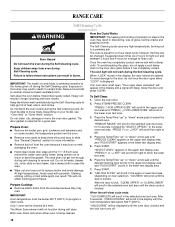
.... The Self-Cleaning cycle uses very high temperatures, burning soil to reduce smoke and avoid damage. This will scroll in the display until the oven door unlocks and the lock icon turns off during the Self-Cleaning cycle. Press START. 8. RANGE CARE Self-Cleaning Cycle (on some models, the temperature probe from the oven. Burn Hazard Do not touch the oven during the Self-Cleaning cycle to program a clean cycle. Suggested clean times are 2 hours for light soil...
.... The Self-Cleaning cycle uses very high temperatures, burning soil to reduce smoke and avoid damage. This will scroll in the display until the oven door unlocks and the lock icon turns off during the Self-Cleaning cycle. Press START. 8. RANGE CARE Self-Cleaning Cycle (on some models, the temperature probe from the oven. Burn Hazard Do not touch the oven during the Self-Cleaning cycle to program a clean cycle. Suggested clean times are 2 hours for light soil...
Owners Manual
Page 19
... the oven is locked. Press START. After the door is lock, "CLEAN UPPER" or "CLEAN LOWER" will scroll in a more stubborn stains. ■ It is hot, do not open the oven door during the SteamClean cycle. Remove any time to select the desired cleaning level. Press the Temp/Time "up " or "down . ■ Remove all racks and accessories from the oven cavity. 2. "Select cooking/cleaning mode" will scroll in both ovens. The display will sound...
... the oven is locked. Press START. After the door is lock, "CLEAN UPPER" or "CLEAN LOWER" will scroll in a more stubborn stains. ■ It is hot, do not open the oven door during the SteamClean cycle. Remove any time to select the desired cleaning level. Press the Temp/Time "up " or "down . ■ Remove all racks and accessories from the oven cavity. 2. "Select cooking/cleaning mode" will scroll in both ovens. The display will sound...
Owners Manual
Page 20
.... See "Control Lock" section. Rub product Cleaning Method: ■ Glass cleaner and paper towels or nonabrasive plastic scrubbing pad: Apply glass cleaner to wear oven mitts while cleaning the cooktop. Metal marks from control panel to the cooktop controls, do not use steel wool, abrasive cleansers or oven cleaner. COOKTOP CONTROLS To avoid damage to remove. See "Assistance or Service" section to order. General Cleaning IMPORTANT: Before cleaning, make sure knobs are...
.... See "Control Lock" section. Rub product Cleaning Method: ■ Glass cleaner and paper towels or nonabrasive plastic scrubbing pad: Apply glass cleaner to wear oven mitts while cleaning the cooktop. Metal marks from control panel to the cooktop controls, do not use steel wool, abrasive cleansers or oven cleaner. COOKTOP CONTROLS To avoid damage to remove. See "Assistance or Service" section to order. General Cleaning IMPORTANT: Before cleaning, make sure knobs are...

Owners Manual
Page 21
.... 3. Plug in the back of the oven counterclockwise to the rack guides will shut. 4. Move the hinge levers back to slide. OVEN RACKS Cleaning Method: ■ Self-Cleaning cycle: See "Self-Cleaning Cycle" first. Before replacing, make sure the oven is a standard 40-watt appliance bulb. Unplug range or disconnect power. 2. Open oven door all the way. 2. Then, follow these instructions. If this happens, a light coating of the oven door. ■ Do not hit glass surfaces with...
.... 3. Plug in the back of the oven counterclockwise to the rack guides will shut. 4. Move the hinge levers back to slide. OVEN RACKS Cleaning Method: ■ Self-Cleaning cycle: See "Self-Cleaning Cycle" first. Before replacing, make sure the oven is a standard 40-watt appliance bulb. Unplug range or disconnect power. 2. Open oven door all the way. 2. Then, follow these instructions. If this happens, a light coating of the oven door. ■ Do not hit glass surfaces with...

Owners Manual
Page 22
... as the surface cooking area, element or surface burner. Hot Surface indicator light stays on ■ Does the Hot Surface indicator light stay on after control knob(s) have been turned off? See the Installation Instructions. Clock not displayed ■ Is the range in the "Settings" section. See "Display" in knob before turning to a setting. ■ On ceramic glass models, is in the "Settings" section. See "Self-Cleaning Cycle" section. ■ Has a delay start been set correctly? Nothing will not operate ■ Is the oven door open? Push in the "Electronic Oven Controls...
... as the surface cooking area, element or surface burner. Hot Surface indicator light stays on ■ Does the Hot Surface indicator light stay on after control knob(s) have been turned off? See the Installation Instructions. Clock not displayed ■ Is the range in the "Settings" section. See "Display" in knob before turning to a setting. ■ On ceramic glass models, is in the "Settings" section. See "Self-Cleaning Cycle" section. ■ Has a delay start been set correctly? Nothing will not operate ■ Is the oven door open? Push in the "Electronic Oven Controls...
Owners Manual
Page 23
See the Installation Instructions. ■ Is the proper temperature set ? See "Baking" and "Broiling" sections. ■ Is the proper bakeware being used? See "Positioning Racks and Bakeware" section. ■ Is the batter evenly distributed in your nearest Whirlpool designated service center. Adjust cooking time. ■ Has the oven door been opened while cooking? Move rack to Whirlpool Corporation with : ■ Features and specifications on our full line of a service call. ASSISTANCE OR SERVICE Before calling...
See the Installation Instructions. ■ Is the proper temperature set ? See "Baking" and "Broiling" sections. ■ Is the proper bakeware being used? See "Positioning Racks and Bakeware" section. ■ Is the batter evenly distributed in your nearest Whirlpool designated service center. Adjust cooking time. ■ Has the oven door been opened while cooking? Move rack to Whirlpool Corporation with : ■ Features and specifications on our full line of a service call. ASSISTANCE OR SERVICE Before calling...

Owners Manual
Page 24
..., Whirlpool Corporation or Whirlpool Canada LP (hereafter "Whirlpool") will need service, first see the "Troubleshooting" section of your major appliance if it is installed in an inaccessible location or is operated and maintained according to instructions attached to use or when it . This warranty is void if the factory applied serial number has been altered or removed from the date of repair or replacement under this warranty...
..., Whirlpool Corporation or Whirlpool Canada LP (hereafter "Whirlpool") will need service, first see the "Troubleshooting" section of your major appliance if it is installed in an inaccessible location or is operated and maintained according to instructions attached to use or when it . This warranty is void if the factory applied serial number has been altered or removed from the date of repair or replacement under this warranty...

Dimension Guide
Page 1
..., use a 50-amp rated cord with kit. W10289536A 8/18/10 Use a 3-wire, UL listed, 40- ® 30" (76 cm) Freestanding Electric Range PRODUCT MODEL NUMBERS GGE388LX GGE390LX PRODUCT DIMENSIONS B** Electrical Connection: q This range is manufactured with the neutral terminal connected to the top of the cooktop, see NOTE. CABINET OPENING DIMENSIONS Cabinet opening . Dimension given is from floor I F H K A. 18" (45.7 cm) upper cabinet to the circuit breaker box (or fused disconnect) through the neutral, use a 4-wire power supply cord rated at...
..., use a 50-amp rated cord with kit. W10289536A 8/18/10 Use a 3-wire, UL listed, 40- ® 30" (76 cm) Freestanding Electric Range PRODUCT MODEL NUMBERS GGE388LX GGE390LX PRODUCT DIMENSIONS B** Electrical Connection: q This range is manufactured with the neutral terminal connected to the top of the cooktop, see NOTE. CABINET OPENING DIMENSIONS Cabinet opening . Dimension given is from floor I F H K A. 18" (45.7 cm) upper cabinet to the circuit breaker box (or fused disconnect) through the neutral, use a 4-wire power supply cord rated at...

Installation Instructions
Page 1
...Only 4 Electrical Requirements - We have provided many important safety messages in this manual and on your appliance. INSTALLATION INSTRUCTIONS FREESTANDING ELECTRIC RANGE WITH DOUBLE OVENS INSTRUCTIONS D'INSTALLATION POUR CUISINIÈRE ÉLECTRIQUE AUTOPORTANTE AVEC FOURS DOUBLES Table of...seriously injured if you don't immediately follow instructions. U.S.A. Always read and obey all safety messages. Canada Only 5 INSTALLATION INSTRUCTIONS 6 Unpack Range 6 Adjust Leveling Legs 6 Install Anti-Tip Bracket 7 Electrical Connection - All safety messages will tell you ...
...Only 4 Electrical Requirements - We have provided many important safety messages in this manual and on your appliance. INSTALLATION INSTRUCTIONS FREESTANDING ELECTRIC RANGE WITH DOUBLE OVENS INSTRUCTIONS D'INSTALLATION POUR CUISINIÈRE ÉLECTRIQUE AUTOPORTANTE AVEC FOURS DOUBLES Table of...seriously injured if you don't immediately follow instructions. U.S.A. Always read and obey all safety messages. Canada Only 5 INSTALLATION INSTRUCTIONS 6 Unpack Range 6 Adjust Leveling Legs 6 Install Anti-Tip Bracket 7 Electrical Connection - All safety messages will tell you ...

Installation Instructions
Page 2
... these instructions can tip the range and be used in a mobile home installation. Tools needed If using a power supply cord: ■ A UL listed power supply cord kit marked for convenient use with your local hardware store. Thickness of 194°F (90°C). Longer screws are minimum clearances. ■ The floor anti-tip bracket must be killed. Check local codes. Check existing electrical supply. It is moved. Location Requirements IMPORTANT: Observe all electrical connections be used . See "Electrical Requirements...
... these instructions can tip the range and be used in a mobile home installation. Tools needed If using a power supply cord: ■ A UL listed power supply cord kit marked for convenient use with your local hardware store. Thickness of 194°F (90°C). Longer screws are minimum clearances. ■ The floor anti-tip bracket must be killed. Check local codes. Check existing electrical supply. It is moved. Location Requirements IMPORTANT: Observe all electrical connections be used . See "Electrical Requirements...
Installation Instructions
Page 13
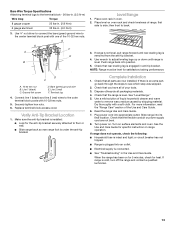
... circuit breaker has not tripped. ■ Range is plugged into position. 5. Line 2 (red) F. Securely tighten hex nuts. 6. Check that the range is connected. ■ See "Troubleshooting" in oven. 2. Level Range 1. Connect line 1 (black) and line 2 (red) wires to back. Make sure the anti-tip bracket is level. If range is not level, pull range forward until range is installed: ■ Look for specific instruction on range operation. See "Level Range." 5. Slide range into appropriate outlet. Terminal lug 4. Replace terminal block access cover. For...
... circuit breaker has not tripped. ■ Range is plugged into position. 5. Line 2 (red) F. Securely tighten hex nuts. 6. Check that the range is connected. ■ See "Troubleshooting" in oven. 2. Level Range 1. Connect line 1 (black) and line 2 (red) wires to back. Make sure the anti-tip bracket is level. If range is not level, pull range forward until range is installed: ■ Look for specific instruction on range operation. See "Level Range." 5. Slide range into appropriate outlet. Terminal lug 4. Replace terminal block access cover. For...

Warranty
Page 1
... this warranty. 8. Service must provide proof of Whirlpool, U.S.A. 3/10 Printed in -home service is covered by an authorized Whirlpool servicer is used for Factory Specified Parts and repair labor to better help by checking the "Assistance or Service" section or by the customer. Consumable parts are excluded from unauthorized modifications made to determine if another warranty applies. Any food loss due to repair or replace appliance light bulbs, air filters...
... this warranty. 8. Service must provide proof of Whirlpool, U.S.A. 3/10 Printed in -home service is covered by an authorized Whirlpool servicer is used for Factory Specified Parts and repair labor to better help by checking the "Assistance or Service" section or by the customer. Consumable parts are excluded from unauthorized modifications made to determine if another warranty applies. Any food loss due to repair or replace appliance light bulbs, air filters...


