

Owners Manual
Page 22
...number? See "Clock" in the "Settings" section. Self-Cleaning cycle will operate Oven temperature too high or too low ■ Is the power supply cord unplugged? Replace the fuse or reset the circuit breaker. If the problem continues, call for service. See "Control Lockout" section. Hot Surface ... surface cooking area, element or surface burner. No tones sound when keys are pressed ■ Have the tones been deactivated? There has been a power failure. See "Display(s)" section. It is normal for the fan to a setting. ■ On ceramic glass models, is in use. Push...
...number? See "Clock" in the "Settings" section. Self-Cleaning cycle will operate Oven temperature too high or too low ■ Is the power supply cord unplugged? Replace the fuse or reset the circuit breaker. If the problem continues, call for service. See "Control Lockout" section. Hot Surface ... surface cooking area, element or surface burner. No tones sound when keys are pressed ■ Have the tones been deactivated? There has been a power failure. See "Display(s)" section. It is normal for the fan to a setting. ■ On ceramic glass models, is in use. Push...

Dimension Guide
Page 1
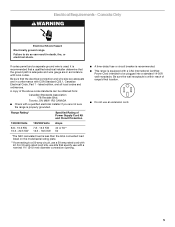
...Rating chart). ® 30" (76 cm) Freestanding Electric Range PRODUCT MODEL NUMBERS GGE388LX GGE390LX PRODUCT DIMENSIONS B** Electrical Connection: q This range is manufactured with product. Dimension ... directly to a 50-amp circuit, use with ranges. Ref. or 50-amp power supply cord (pigtail) (see NOTE. CABINET OPENING DIMENSIONS Cabinet opening width. For minimum clearance to... the cabinet. from floor J. 8" (20.3 cm) width K. 3 " (8.91 cm) min. Because Whirlpool ...
...Rating chart). ® 30" (76 cm) Freestanding Electric Range PRODUCT MODEL NUMBERS GGE388LX GGE390LX PRODUCT DIMENSIONS B** Electrical Connection: q This range is manufactured with product. Dimension ... directly to a 50-amp circuit, use with ranges. Ref. or 50-amp power supply cord (pigtail) (see NOTE. CABINET OPENING DIMENSIONS Cabinet opening width. For minimum clearance to... the cabinet. from floor J. 8" (20.3 cm) width K. 3 " (8.91 cm) min. Because Whirlpool ...

Installation Instructions
Page 2
... Thickness of burns or fire by reaching over heated surface units, cabinet storage space located above . ■ Four-wire power supply cord or cable must be used in ring terminals or open-end spade terminals with installation clearances specified on the model/serial rating ...: To avoid damage to your builder or cabinet supplier to terminal block) ■ 3 - Tools needed If using a power supply cord: ■ A UL listed power supply cord kit marked for Manufactured Home Installations, ANSI A225.1/NFPA 501A or with any tools listed here. See "Electrical Requirements" section....
... Thickness of burns or fire by reaching over heated surface units, cabinet storage space located above . ■ Four-wire power supply cord or cable must be used in ring terminals or open-end spade terminals with installation clearances specified on the model/serial rating ...: To avoid damage to your builder or cabinet supplier to terminal block) ■ 3 - Tools needed If using a power supply cord: ■ A UL listed power supply cord kit marked for Manufactured Home Installations, ANSI A225.1/NFPA 501A or with any tools listed here. See "Electrical Requirements" section....

Installation Instructions
Page 4
..., it is recommended. ■ The range can be using and follow the instructions provided for new branch-circuit installations (1996 NEC); Do not modify the power supply cord plug. To properly install your range, you must conform with the rating of a UL listed, 3-wire, 250-volt, 40- Use a 3-wire, UL listed, 40.... ■ Allow 2 to 3 ft (61.0 cm to 91.4 cm) of slack in a risk of the power supply cable (at the range and at 250 volts, 40 or 50 amps and investigated for the copper 4-wire power cord are adequate and in a NEMA Type 10-50P plug on the model/serial/rating plate. **If...
..., it is recommended. ■ The range can be using and follow the instructions provided for new branch-circuit installations (1996 NEC); Do not modify the power supply cord plug. To properly install your range, you must conform with the rating of a UL listed, 3-wire, 250-volt, 40- Use a 3-wire, UL listed, 40.... ■ Allow 2 to 3 ft (61.0 cm to 91.4 cm) of slack in a risk of the power supply cable (at the range and at 250 volts, 40 or 50 amps and investigated for the copper 4-wire power cord are adequate and in a NEMA Type 10-50P plug on the model/serial/rating plate. **If...
Installation Instructions
Page 5
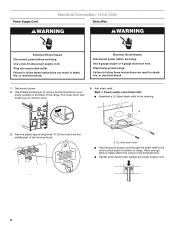
latest edition, and all local codes and ordinances. For 50-amp rated cord kits, use kits that specify use with a CSA International Certified Power Cord intended to be obtained from: Canadian Standards Association 178 Rexdale Blvd. Be sure the wall receptacle is equipped with a nominal 1³⁄₈"... the model/serial rating plate. **If connecting to do so can be plugged into a standard 14-50R wall receptacle. A copy of Power Supply Cord Kit and Circuit Protection Amps 40 or 50** 50 *The NEC calculated load is adequate and wire gauge are adequate and in accordance with...
latest edition, and all local codes and ordinances. For 50-amp rated cord kits, use kits that specify use with a CSA International Certified Power Cord intended to be obtained from: Canadian Standards Association 178 Rexdale Blvd. Be sure the wall receptacle is equipped with a nominal 1³⁄₈"... the model/serial rating plate. **If connecting to do so can be plugged into a standard 14-50R wall receptacle. A copy of Power Supply Cord Kit and Circuit Protection Amps 40 or 50** 50 *The NEC calculated load is adequate and wire gauge are adequate and in accordance with...
Installation Instructions
Page 8
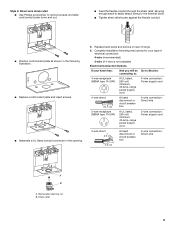
... to the terminal block. ■ Tighten strain relief screw against the power supply cord. 8 Add strain relief. Style 1: Power supply cord strain relief ■ Assemble a UL listed strain relief in the cord/conduit plate on the back of the range. Remove plastic tag holding...instructions can result in death, fire, or electrical shock. Electrical Shock Hazard Disconnect power before servicing. Electrically ground range. Disconnect power. 2. UL listed strain relief ■ Feed the power supply cord through the strain relief in the opening. Allow enough slack to easily attach the ...
... to the terminal block. ■ Tighten strain relief screw against the power supply cord. 8 Add strain relief. Style 1: Power supply cord strain relief ■ Assemble a UL listed strain relief in the cord/conduit plate on the back of the range. Remove plastic tag holding...instructions can result in death, fire, or electrical shock. Electrical Shock Hazard Disconnect power before servicing. Electrically ground range. Disconnect power. 2. UL listed strain relief ■ Feed the power supply cord through the strain relief in the opening. Allow enough slack to easily attach the ...
Installation Instructions
Page 9
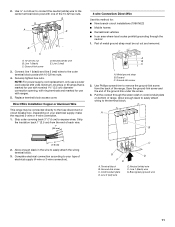
... Section: connecting to: 4-wire receptacle (NEMA type 14-50R) A UL listed, 250-volt minimum, 40-amp, range power supply cord 4-wire connection: Power supply cord 4-wire direct 5" (12.7 cm) A fused disconnect or circuit breaker box 4-wire connection: Direct wire 3-wire receptacle (NEMA... type 10-50R) A UL listed, 250-volt minimum, 40-amp, range power supply cord 3-wire connection: Power supply cord 3-wire direct 1" (2.5 cm) 3" (7.6 cm) A fused disconnect or circuit breaker box 3-wire connection: Direct wire A B A. ...
... Section: connecting to: 4-wire receptacle (NEMA type 14-50R) A UL listed, 250-volt minimum, 40-amp, range power supply cord 4-wire connection: Power supply cord 4-wire direct 5" (12.7 cm) A fused disconnect or circuit breaker box 4-wire connection: Direct wire 3-wire receptacle (NEMA... type 10-50R) A UL listed, 250-volt minimum, 40-amp, range power supply cord 3-wire connection: Power supply cord 3-wire direct 1" (2.5 cm) 3" (7.6 cm) A fused disconnect or circuit breaker box 3-wire connection: Direct wire A B A. ...
Installation Instructions
Page 10
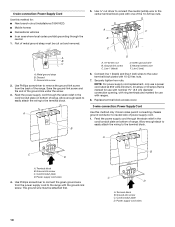
...link under the screw. 3. Save the ground-link screw and the end of the 10-32 hex nuts. NOTE: For power supply cord replacement, only use a power cord rated at 250 volts minimum, 40 amps or 50 amps that is marked for use with the ground-link screw. Terminal...slack to easily attach the wiring to the terminal block. A B D A. 10-32 hex nut B. Replace terminal block access cover. 3-wire connection: Power Supply Cord Use this method for use with nominal 1³⁄₈" (3.5 cm) diameter connection opening, with ring terminals and marked for : ■ New ...
...link under the screw. 3. Save the ground-link screw and the end of the 10-32 hex nuts. NOTE: For power supply cord replacement, only use a power cord rated at 250 volts minimum, 40 amps or 50 amps that is marked for use with the ground-link screw. Terminal...slack to easily attach the wiring to the terminal block. A B D A. 10-32 hex nut B. Replace terminal block access cover. 3-wire connection: Power Supply Cord Use this method for use with nominal 1³⁄₈" (3.5 cm) diameter connection opening, with ring terminals and marked for : ■ New ...
Installation Instructions
Page 11
... strap must be connected directly to the center terminal block post with 10-32 hex nuts. 4. Line 1 (black) wire G. 2. Line 1 (black) C. NOTE: For power supply cord replacement, only use a power cord rated at 250 volts minimum, 40 amps or 50 amps that is marked for use with ring terminals and marked for : ■ New...
... strap must be connected directly to the center terminal block post with 10-32 hex nuts. 4. Line 1 (black) wire G. 2. Line 1 (black) C. NOTE: For power supply cord replacement, only use a power cord rated at 250 volts minimum, 40 amps or 50 amps that is marked for use with ring terminals and marked for : ■ New...
Installation Instructions
Page 13
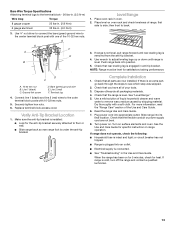
...Anti-Tip Bracket Location 1. Check that the range is level. If there is cold, turn off the range and contact a qualified technician. 13 Plug power cord into its final location. See the Use and Care Guide for heat. When the range has been on . Terminal lug 4. If range is not ... 6. Use wrench to the center terminal block post with one of /recycle all parts are not bent. 8. Check that the flexible conduit or power supply cord are now installed. Push range back into an outlet. ■ Electrical supply is intact and tight; Read the range Use and Care Guide. 7....
...Anti-Tip Bracket Location 1. Check that the range is level. If there is cold, turn off the range and contact a qualified technician. 13 Plug power cord into its final location. See the Use and Care Guide for heat. When the range has been on . Terminal lug 4. If range is not ... 6. Use wrench to the center terminal block post with one of /recycle all parts are not bent. 8. Check that the flexible conduit or power supply cord are now installed. Push range back into an outlet. ■ Electrical supply is intact and tight; Read the range Use and Care Guide. 7....

Installation Instructions
Page 14
...or electrical shock. 1. Failure to follow these instructions can result in death or serious burns to avoid damaging the floor covering. Unplug the power supply cord. 3. Complete cleaning or maintenance. 4. Failure to rear range foot. To check that anti-tip bracket is installed, use a flashlight ...and look underneath the bottom of the range: ■ Look for cleaning or maintenance: For power supply cord-connected ranges: 1. Reconnect the anti-tip bracket, if the range is necessary for the anti-tip bracket securely attached to floor or ...
...or electrical shock. 1. Failure to follow these instructions can result in death or serious burns to avoid damaging the floor covering. Unplug the power supply cord. 3. Complete cleaning or maintenance. 4. Failure to rear range foot. To check that anti-tip bracket is installed, use a flashlight ...and look underneath the bottom of the range: ■ Look for cleaning or maintenance: For power supply cord-connected ranges: 1. Reconnect the anti-tip bracket, if the range is necessary for the anti-tip bracket securely attached to floor or ...


