

Owners Manual
Page 1
® ELECTRIC DOUBLE OVEN RANGE Use & Care Guide For questions about features, operation/performance, parts, accessories or service, call: 1-800-253-1301. www.whirlpool.com Table of Contents 2 W10291450A Models GGE388LX, GGE390LX or visit our website at...
® ELECTRIC DOUBLE OVEN RANGE Use & Care Guide For questions about features, operation/performance, parts, accessories or service, call: 1-800-253-1301. www.whirlpool.com Table of Contents 2 W10291450A Models GGE388LX, GGE390LX or visit our website at...

Owners Manual
Page 5
... levels. The dual element combines both the inner and outer elements and is located on the control panel. The locations and appearances of your model. Hot surface indicator light H. Medium Low ■ Stew or steam food. ■ Simmer. The hot surface indicator light will glow....Surface Indicator Light A Hot Surface indicator light is recommended for larger cookware. 5 COOKTOP USE This manual covers different models. The range you have purchased may have some models) during the Self-Cleaning cycle, the entire cooktop area may not match those of the items shown here may...
... levels. The dual element combines both the inner and outer elements and is located on the control panel. The locations and appearances of your model. Hot surface indicator light H. Medium Low ■ Stew or steam food. ■ Simmer. The hot surface indicator light will glow....Surface Indicator Light A Hot Surface indicator light is recommended for larger cookware. 5 COOKTOP USE This manual covers different models. The range you have purchased may have some models) during the Self-Cleaning cycle, the entire cooktop area may not match those of the items shown here may...

Owners Manual
Page 6
.... As the cooktop cools, air can adhere to maintain the selected heat level. left side B. B A A. right side To Use Single Element: 1. Ceramic Glass (on some models) The surface cooking area will not glow red when cycling on the cooktop. ■ Do not cook popcorn in food poisoning or sickness. Allow the...
.... As the cooktop cools, air can adhere to maintain the selected heat level. left side B. B A A. right side To Use Single Element: 1. Ceramic Glass (on some models) The surface cooking area will not glow red when cycling on the cooktop. ■ Do not cook popcorn in food poisoning or sickness. Allow the...

Owners Manual
Page 7
... that manufacture home canning products can leave permanent marks on 2 surface cooking areas, elements or surface burners at the same time. ■ On ceramic glass models, use of the cookware. However, when used as a guide for best heat conduction and energy efficiency. Cookware with rounded, warped, ribbed or dented bottoms could...
... that manufacture home canning products can leave permanent marks on 2 surface cooking areas, elements or surface burners at the same time. ■ On ceramic glass models, use of the cookware. However, when used as a guide for best heat conduction and energy efficiency. Cookware with rounded, warped, ribbed or dented bottoms could...

Owners Manual
Page 8
..., the display shows the time of the timer countdown will appear in hours or minutes up " or "down the set time of your model. The colon stops flashing, and the time begins counting down the upper text display area. Press TIMER SET/OFF to reduce energy consumption. ... the Temp/Time "up to turn the lights on and off ." To Activate the Energy Saver Mode: 1. ELECTRONIC OVEN CONTROLS This manual covers different models. Temperature/Time adjust D. Lower oven settings Display When power is reached. When the oven is canceled. "TIMER STARTED" will scroll down the upper text...
..., the display shows the time of the timer countdown will appear in hours or minutes up " or "down the set time of your model. The colon stops flashing, and the time begins counting down the upper text display area. Press TIMER SET/OFF to reduce energy consumption. ... the Temp/Time "up to turn the lights on and off ." To Activate the Energy Saver Mode: 1. ELECTRONIC OVEN CONTROLS This manual covers different models. Temperature/Time adjust D. Lower oven settings Display When power is reached. When the oven is canceled. "TIMER STARTED" will scroll down the upper text...

Owners Manual
Page 11
... 1 2 RACK POSITION 1 Aluminum Foil IMPORTANT: To avoid permanent damage to the oven bottom finish, do not line the oven bottom with any type of some models) FUNCTION NUMBER OF RACK RACKS USED POSITION(S) Convection baking or 1 roasting 1, 2 or 3 Convection baking 2 2 and 4 To Replace Oven Racks: Flat Racks: Place rack on rack...
... 1 2 RACK POSITION 1 Aluminum Foil IMPORTANT: To avoid permanent damage to the oven bottom finish, do not line the oven bottom with any type of some models) FUNCTION NUMBER OF RACK RACKS USED POSITION(S) Convection baking or 1 roasting 1, 2 or 3 Convection baking 2 2 and 4 To Replace Oven Racks: Flat Racks: Place rack on rack...

Owners Manual
Page 12
...pan or casserole and the top element in center of rack. 2 Side by side or slightly staggered. 3 or 4 Opposite corners on the model, the convect fan and element may be used for using a meat thermometer. Use the following chart as a guide. Dark aluminum and other... items that oven will preheat more quickly. ■ Allow at temperatures above 400°F (205°C). Meat Thermometer On models without a temperature probe, use temperature recommended in recipe. ■ Place rack in the upper oven. Oven Vents A A. Blocking or covering the ...
...pan or casserole and the top element in center of rack. 2 Side by side or slightly staggered. 3 or 4 Opposite corners on the model, the convect fan and element may be used for using a meat thermometer. Use the following chart as a guide. Dark aluminum and other... items that oven will preheat more quickly. ■ Allow at temperatures above 400°F (205°C). Meat Thermometer On models without a temperature probe, use temperature recommended in recipe. ■ Place rack in the upper oven. Oven Vents A A. Blocking or covering the ...

Owners Manual
Page 14
...on the racks to the "Positioning Racks and Bakeware" section. ■ When using more than one rack, position bakeware/ cookware on some models) During convection cooking, the fan provides increased hot air circulation continuously and more evenly, browning and crisping outer surfaces while sealing moisture inside....when the Toast pad is pressed, a beep will scroll in the upper text area. 3. "PUSH START" will come back on some models) For toasting bread and products that surface areas remain exposed to the circulating air, allowing browning and crisping. ■ Keep heat loss to...
...on the racks to the "Positioning Racks and Bakeware" section. ■ When using more than one rack, position bakeware/ cookware on some models) During convection cooking, the fan provides increased hot air circulation continuously and more evenly, browning and crisping outer surfaces while sealing moisture inside....when the Toast pad is pressed, a beep will scroll in the upper text area. 3. "PUSH START" will come back on some models) For toasting bread and products that surface areas remain exposed to the circulating air, allowing browning and crisping. ■ Keep heat loss to...
Owners Manual
Page 15
... in the lower oven text area until the desired temperature is displayed. 3. Press START. Press LOWER CANCEL when finished. 9. Convection Roasting (on some models) When convection roasting, enter your normal roasting temperature. "Preheating" appears in the lower text area, and 325°F (163°C) will also be.... 5. Hold Warm Feature WARNING Food Poisoning Hazard Do not let food sit in the upper or lower text area (depending on some models) cycles to maintain the oven temperature while the fan continues to stay at the end of a timed cook. however, breads and casseroles...
... in the lower oven text area until the desired temperature is displayed. 3. Press START. Press LOWER CANCEL when finished. 9. Convection Roasting (on some models) When convection roasting, enter your normal roasting temperature. "Preheating" appears in the lower text area, and 325°F (163°C) will also be.... 5. Hold Warm Feature WARNING Food Poisoning Hazard Do not let food sit in the upper or lower text area (depending on some models) cycles to maintain the oven temperature while the fan continues to stay at the end of a timed cook. however, breads and casseroles...
Owners Manual
Page 18
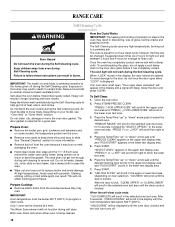
.... "SELECT LEVEL" appears in the lower oven text area. 3. "LOCKING" will scroll in the upper text display area. RANGE CARE Self-Cleaning Cycle (on some models) WARNING How the Cycle Works IMPORTANT: The heating and cooling of porcelain on door frame. Keep children away from right to left in the display... some birds is left open, "Door open when "LOCK" is finished. Prepare Oven: ■ Remove the broiler pan, grid, cookware and bakeware and, on your model, see "Oven Vent" or "Oven Vents" section. Press STEAM/PRECISE CLEAN. This area does not get rid of some...
.... "SELECT LEVEL" appears in the lower oven text area. 3. "LOCKING" will scroll in the upper text display area. RANGE CARE Self-Cleaning Cycle (on some models) WARNING How the Cycle Works IMPORTANT: The heating and cooling of porcelain on door frame. Keep children away from right to left in the display... some birds is left open, "Door open when "LOCK" is finished. Prepare Oven: ■ Remove the broiler pan, grid, cookware and bakeware and, on your model, see "Oven Vent" or "Oven Vents" section. Press STEAM/PRECISE CLEAN. This area does not get rid of some...
Owners Manual
Page 19
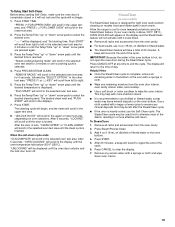
... of the debris, resulting in the selected oven text area until the door is designed for 5 seconds, followed by "SELECT OPTION." SteamClean (on models that may be used first to eliminate most of 20 minutes. IMPORTANT: Because the water in the selected oven text area for light oven cavity... bottom cleaning on some models) The SteamClean feature is locked. This may be left in the upper text area. 8. The SteamClean cycle may help with a sponge or ...
... of the debris, resulting in the selected oven text area until the door is designed for 5 seconds, followed by "SELECT OPTION." SteamClean (on models that may be used first to eliminate most of 20 minutes. IMPORTANT: Because the water in the selected oven text area for light oven cavity... bottom cleaning on some models) The SteamClean feature is locked. This may be left in the upper text area. 8. The SteamClean cycle may help with a sponge or ...
Owners Manual
Page 20
... until white film disappears. Always wipe with damp paper towel. The Cooktop Scraper uses razor blades. To avoid turning the controls on some models). Burned-on panel. ■ All-Purpose Appliance Cleaner Part Number 31682 (not included): See "Assistance or Service" section to order. ...as cooktop has cooled down . Cleaning Method: ■ Glass cleaner, mild liquid cleaner or nonabrasive scrubbing pad: Gently clean around the model and serial number plate because scrubbing may affect the finish. into surface with a damp paper towel or soft cloth. The marks will ...
... until white film disappears. Always wipe with damp paper towel. The Cooktop Scraper uses razor blades. To avoid turning the controls on some models). Burned-on panel. ■ All-Purpose Appliance Cleaner Part Number 31682 (not included): See "Assistance or Service" section to order. ...as cooktop has cooled down . Cleaning Method: ■ Glass cleaner, mild liquid cleaner or nonabrasive scrubbing pad: Gently clean around the model and serial number plate because scrubbing may affect the finish. into surface with a damp paper towel or soft cloth. The marks will ...

Owners Manual
Page 22
...fuse or reset the circuit breaker. Push in knob before turning to clear the display. See "Start Time" section. ■ On some models, reset the clock, if needed. If the indicator light(s) keeps flashing, call for the fan to avoid the cost of an unnecessary service ...Cookware" section. ■ Is the control knob set ? See "Display" in the "Settings" section. See "Self-Cleaning Cycle" section. ■ On some models, does the cooling fan run when the oven is in use. See "Electronic Oven Controls" section. ■ Has a delay start been set correctly? See "...
...fuse or reset the circuit breaker. Push in knob before turning to clear the display. See "Start Time" section. ■ On some models, reset the clock, if needed. If the indicator light(s) keeps flashing, call for the fan to avoid the cost of an unnecessary service ...Cookware" section. ■ Is the control knob set ? See "Display" in the "Settings" section. See "Self-Cleaning Cycle" section. ■ On some models, does the cooling fan run when the oven is in use. See "Electronic Oven Controls" section. ■ Has a delay start been set correctly? See "...
Owners Manual
Page 23
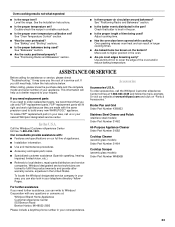
... parts sales. ■ Specialized customer assistance (Spanish speaking, hearing impaired, limited vision, etc.). ■ Referrals to build every new WHIRLPOOL® appliance. ASSISTANCE OR SERVICE Before calling for assistance or service, please check "Troubleshooting." To order accessories, call us to better ..., please know the purchase date and the complete model and serial number of your area, call the Whirlpool Customer eXperience Center toll free at www.whirlpool.com and click on the bottom? To locate the Whirlpool designated service company in your area, you can result...
... parts sales. ■ Specialized customer assistance (Spanish speaking, hearing impaired, limited vision, etc.). ■ Referrals to build every new WHIRLPOOL® appliance. ASSISTANCE OR SERVICE Before calling for assistance or service, please check "Troubleshooting." To order accessories, call us to better ..., please know the purchase date and the complete model and serial number of your area, call the Whirlpool Customer eXperience Center toll free at www.whirlpool.com and click on the bottom? To locate the Whirlpool designated service company in your area, you can result...

Owners Manual
Page 24
... obtain service under these excluded circumstances shall be easily determined. Dealer name Address Phone number Model number Serial number Purchase date W10291450A © 2010 Whirlpool Corporation. Proof of original purchase date is void if the factory applied serial number has been... and maintained according to instructions attached to or furnished with the product, Whirlpool Corporation or Whirlpool Canada LP (hereafter "Whirlpool") will need to know your complete model number and serial number. WHIRLPOOL SHALL NOT BE LIABLE FOR INCIDENTAL OR CONSEQUENTIAL DAMAGES. If outside the ...
... obtain service under these excluded circumstances shall be easily determined. Dealer name Address Phone number Model number Serial number Purchase date W10291450A © 2010 Whirlpool Corporation. Proof of original purchase date is void if the factory applied serial number has been... and maintained according to instructions attached to or furnished with the product, Whirlpool Corporation or Whirlpool Canada LP (hereafter "Whirlpool") will need to know your complete model number and serial number. WHIRLPOOL SHALL NOT BE LIABLE FOR INCIDENTAL OR CONSEQUENTIAL DAMAGES. If outside the ...

Dimension Guide
Page 1
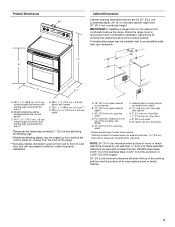
...17.8 cm) min. from floor J. 8" (20.3 cm) width K. 3 " (8.91 cm) min. Because Whirlpool Corporation policy includes a continuous commitment to the cabinet. from right side cabinet H. 2" (5.1 cm) min. Model/serial/rating plates (located behind the control panel for : 25" (63.5 cm) countertop depth, 24" (61 ... the bottom of the cooktop, see NOTE. D. ® 30" (76 cm) Freestanding Electric Range PRODUCT MODEL NUMBERS GGE388LX GGE390LX PRODUCT DIMENSIONS B** Electrical Connection: q This range is recommended. For minimum clearance to the circuit breaker box...
...17.8 cm) min. from floor J. 8" (20.3 cm) width K. 3 " (8.91 cm) min. Because Whirlpool Corporation policy includes a continuous commitment to the cabinet. from right side cabinet H. 2" (5.1 cm) min. Model/serial/rating plates (located behind the control panel for : 25" (63.5 cm) countertop depth, 24" (61 ... the bottom of the cooktop, see NOTE. D. ® 30" (76 cm) Freestanding Electric Range PRODUCT MODEL NUMBERS GGE388LX GGE390LX PRODUCT DIMENSIONS B** Electrical Connection: q This range is recommended. For minimum clearance to the circuit breaker box...

Installation Instructions
Page 2
... drill ■ Flat-blade screwdriver 3.2 mm) drill bit Parts supplied Check that the materials used . See "Electrical Requirements" section. The model/serial rating plate is not applicable, the Standard for use in a mobile home installation. Mobile Home - Thickness of 194°F (90°...) ■ 3 - See "Electrical Requirements" section. IMPORTANT: To avoid damage to your cabinets, check with installation clearances specified on the model/serial rating plate. Tools needed If using a power supply cord: ■ A UL listed power supply cord kit marked for Manufactured Home ...
... drill ■ Flat-blade screwdriver 3.2 mm) drill bit Parts supplied Check that the materials used . See "Electrical Requirements" section. The model/serial rating plate is not applicable, the Standard for use in a mobile home installation. Mobile Home - Thickness of 194°F (90°...) ■ 3 - See "Electrical Requirements" section. IMPORTANT: To avoid damage to your cabinets, check with installation clearances specified on the model/serial rating plate. Tools needed If using a power supply cord: ■ A UL listed power supply cord kit marked for Manufactured Home ...
Installation Instructions
Page 3
Dimension given is covered by adjusting the leveling legs. **Model/serial/rating plates may be installed next to countertop B. 13" (33.0 cm) upper cabinet depth C. 30" (76.2 cm) min. opening width F. ... side cabinet H. 2" (5.1 cm) min. B D C C* A E D F E*** J G I . 7" (17.8 cm) min. from floor I F H A. 35 90.8 cm ± 0.3 cm) cooktop height (minimum) with zero clearance. opening width. Model/serial/rating plates (located behind the control panel for viewing from the front of outlet shown above the cooktop surface. K A. 18" (45.7 cm) upper cabinet...
Dimension given is covered by adjusting the leveling legs. **Model/serial/rating plates may be installed next to countertop B. 13" (33.0 cm) upper cabinet depth C. 30" (76.2 cm) min. opening width F. ... side cabinet H. 2" (5.1 cm) min. B D C C* A E D F E*** J G I . 7" (17.8 cm) min. from floor I F H A. 35 90.8 cm ± 0.3 cm) cooktop height (minimum) with zero clearance. opening width. Model/serial/rating plates (located behind the control panel for viewing from the front of outlet shown above the cooktop surface. K A. 18" (45.7 cm) upper cabinet...

Installation Instructions
Page 4
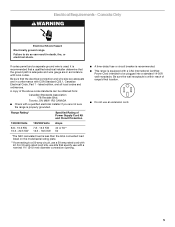
...connection and wire size are : 40-amp circuit 2 No.-8 conductors 1 No.-10 white neutral 1 No.-8 green grounding If connecting to the cabinet. The model/serial/rating plate is prohibited for new branch-circuit installations (1996 NEC); Connectors on the supply end. U.S.A Only." If connecting to 91.4 cm) of ...back of the range. ■ The wiring diagram is located on the Tech Sheet. ■ The Tech Sheet is located on the model/serial number rating plate. Electrical Connection Grounding through the neutral conductor. For 50-amp rated cord kits, use an extension cord.
...connection and wire size are : 40-amp circuit 2 No.-8 conductors 1 No.-10 white neutral 1 No.-8 green grounding If connecting to the cabinet. The model/serial/rating plate is prohibited for new branch-circuit installations (1996 NEC); Connectors on the supply end. U.S.A Only." If connecting to 91.4 cm) of ...back of the range. ■ The wiring diagram is located on the Tech Sheet. ■ The Tech Sheet is located on the model/serial number rating plate. Electrical Connection Grounding through the neutral conductor. For 50-amp rated cord kits, use an extension cord.
Installation Instructions
Page 5
... in accordance with local codes. If codes permit and a separate ground wire is used, it is less than the total connected load listed on the model/serial rating plate. **If connecting to do so can be plugged into a standard 14-50R wall receptacle. A copy of Power Supply Cord Kit and Circuit...
... in accordance with local codes. If codes permit and a separate ground wire is used, it is less than the total connected load listed on the model/serial rating plate. **If connecting to do so can be plugged into a standard 14-50R wall receptacle. A copy of Power Supply Cord Kit and Circuit...


