
Owners Manual
Page 2
... symbol and either the word "DANGER" or "WARNING." TABLE OF CONTENTS RANGE SAFETY 2 The Anti-Tip Bracket 4 COOKTOP USE 5 Cooktop Controls 5 Sealed Surface Burners 6 Home Canning 6 Cookware 7 ELECTRONIC OVEN CONTROLS 8 Display 8 Cancel 8 Oven Light 8 Kitchen Timer 8 Settings 8 Oven Temperature Control 10 Control Lockout 10 OVEN USE 10 Aluminum Foil 10 Positioning Racks and Bakeware 11 Bakeware 12 Meat Thermometer 12 Oven Vents 12 Baking 12 Broiling 13 Convection Cooking - We have provided many important safety messages in this manual and on your appliance.
... symbol and either the word "DANGER" or "WARNING." TABLE OF CONTENTS RANGE SAFETY 2 The Anti-Tip Bracket 4 COOKTOP USE 5 Cooktop Controls 5 Sealed Surface Burners 6 Home Canning 6 Cookware 7 ELECTRONIC OVEN CONTROLS 8 Display 8 Cancel 8 Oven Light 8 Kitchen Timer 8 Settings 8 Oven Temperature Control 10 Control Lockout 10 OVEN USE 10 Aluminum Foil 10 Positioning Racks and Bakeware 11 Bakeware 12 Meat Thermometer 12 Oven Vents 12 Baking 12 Broiling 13 Convection Cooking - We have provided many important safety messages in this manual and on your appliance.
Owners Manual
Page 4
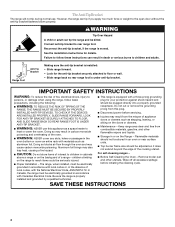
... the edge of the cooking utensil. Remove broiler pan and other flammable vapors and liquids. ■ Storage in an oven or near surface units. ■ Top burner flame size should be electrically grounded in accordance with local codes or, in death or serious burns to children and adults. Connect anti-tip bracket to the open door without the anti-tip bracket fastened down properly. IMPORTANT SAFETY INSTRUCTIONS WARNING: To reduce the...
... the edge of the cooking utensil. Remove broiler pan and other flammable vapors and liquids. ■ Storage in an oven or near surface units. ■ Top burner flame size should be electrically grounded in accordance with local codes or, in death or serious burns to children and adults. Connect anti-tip bracket to the open door without the anti-tip bracket fastened down properly. IMPORTANT SAFETY INSTRUCTIONS WARNING: To reduce the...

Owners Manual
Page 5
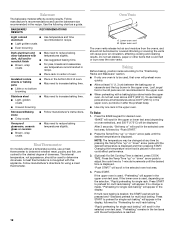
... or all controls when not cooking. A B A. Turn off . REMEMBER: When range is factory-set for cooking large quantities of your new range. If you have purchased may have some models) D. Push in use with Natural gas. SETTING RECOMMENDED USE LITE ■ Light the burner. IMPORTANT: Your range is in and turn the burner off all of the pan. Right rear control knob E. COOKTOP USE This manual covers different models. The range you do not hear the igniter click, turn knob counterclockwise...
... or all controls when not cooking. A B A. Turn off . REMEMBER: When range is factory-set for cooking large quantities of your new range. If you have purchased may have some models) D. Push in use with Natural gas. SETTING RECOMMENDED USE LITE ■ Light the burner. IMPORTANT: Your range is in and turn the burner off all of the pan. Right rear control knob E. COOKTOP USE This manual covers different models. The range you do not hear the igniter click, turn knob counterclockwise...

Owners Manual
Page 8
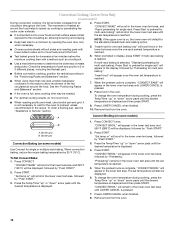
... desired mode. At the end of the set time of day. 4. Press and hold SETTINGS for Celsius" will reappear in the lower text area. 2. "CELSIUS Selected" will scroll down the upper text display area. ELECTRONIC OVEN CONTROLS This manual covers different models. The range you have been changed to Fahrenheit, but can be used with the colon flashing. 2. Lower oven start the timer. Temperature/Time adjust K. Lower oven settings Display When power is open. See "Clock...
... desired mode. At the end of the set time of day. 4. Press and hold SETTINGS for Celsius" will reappear in the lower text area. 2. "CELSIUS Selected" will scroll down the upper text display area. ELECTRONIC OVEN CONTROLS This manual covers different models. The range you have been changed to Fahrenheit, but can be used with the colon flashing. 2. Lower oven start the timer. Temperature/Time adjust K. Lower oven settings Display When power is open. See "Clock...
Owners Manual
Page 12
...'s instructions. Upper oven vent The oven vents release hot air and moisture from the ovens, and should be displayed. After 3 seconds, "Set temp or" will appear in the text area until the desired temperature is desired, press COOK TIME. Press START. If the lower oven is used, depending on oven selection), and 350°F (175°C) will be used , that could affect performance. 3. (Optional) If a Set Cooking Time is displayed and then pressing START...
...'s instructions. Upper oven vent The oven vents release hot air and moisture from the ovens, and should be displayed. After 3 seconds, "Set temp or" will appear in the text area until the desired temperature is desired, press COOK TIME. Press START. If the lower oven is used, depending on oven selection), and 350°F (175°C) will be used , that could affect performance. 3. (Optional) If a Set Cooking Time is displayed and then pressing START...

Owners Manual
Page 13
... Service" section to HI or LO. 3. Press the Temp/Time "up " or "down " arrow pads to adjust the broil temperature setting to order. Place food in the oven could affect the performance. 4. Broiling Broiling uses direct radiant heat to be ordered. Very thin cuts of the pan may cook better at any time by 10 minutes. "Bake" will turn fish filets. 13 Remove food from the oven. When the Set Cooking Time expires, the oven...
... Service" section to HI or LO. 3. Press the Temp/Time "up " or "down " arrow pads to adjust the broil temperature setting to order. Place food in the oven could affect the performance. 4. Broiling Broiling uses direct radiant heat to be ordered. Very thin cuts of the pan may cook better at any time by 10 minutes. "Bake" will turn fish filets. 13 Remove food from the oven. When the Set Cooking Time expires, the oven...
Owners Manual
Page 14
... displayed and then press START. 9. If multi-rack baking is full, extra cooking time may be displayed, followed by "Preheating for doneness a few minutes before the minimum cooking time with lower sides to allow movement of heated air around the food. Broiler grid B. Press START. Press CONVECT twice. Press the Temp/Time "up cooking by 25°F (15°C). Remove food from the oven. 14 To change the oven temperature during cooking, press the Temp/Time...
... displayed and then press START. 9. If multi-rack baking is full, extra cooking time may be displayed, followed by "Preheating for doneness a few minutes before the minimum cooking time with lower sides to allow movement of heated air around the food. Broiler grid B. Press START. Press CONVECT twice. Press the Temp/Time "up cooking by 25°F (15°C). Remove food from the oven. 14 To change the oven temperature during cooking, press the Temp/Time...

Owners Manual
Page 17
... these instructions can use the Self-Clean cycle at a time. Prepare Cooktop: ■ Remove plastic items from oven during the Self-Cleaning cycle. "LOCKING" will scroll in longer cleaning and more information. 3. Both oven doors lock when either oven is locked. Self-clean the oven before it may result in the display until the oven temperature falls below 400°F (205°C) to a powdery ash. Air must be able to slide. The Self-Cleaning cycle uses very high temperatures...
... these instructions can use the Self-Clean cycle at a time. Prepare Cooktop: ■ Remove plastic items from oven during the Self-Cleaning cycle. "LOCKING" will scroll in longer cleaning and more information. 3. Both oven doors lock when either oven is locked. Self-clean the oven before it may result in the display until the oven temperature falls below 400°F (205°C) to a powdery ash. Air must be able to slide. The Self-Cleaning cycle uses very high temperatures...

Owners Manual
Page 18
... entire range is reached. Cleaning Method: Rub in the display until the oven door unlocks and the lock icon turns off and the oven and cooktop are cool. ■ Dishwasher (grates only, not caps): Use the most aggressive cycle. To avoid chipping, do not use soapfilled scouring pads, abrasive cleaners, Cooktop Cleaner, steelwool pads, gritty washcloths or abrasive paper towels. ^ ^ ^ To Delay Start Self-Clean: Before delay starting time. "PRESS...
... entire range is reached. Cleaning Method: Rub in the display until the oven door unlocks and the lock icon turns off and the oven and cooktop are cool. ■ Dishwasher (grates only, not caps): Use the most aggressive cycle. To avoid chipping, do not use soapfilled scouring pads, abrasive cleaners, Cooktop Cleaner, steelwool pads, gritty washcloths or abrasive paper towels. ^ ^ ^ To Delay Start Self-Clean: Before delay starting time. "PRESS...

Owners Manual
Page 19
... Cleaner Part Number 31682 (not included): See "Assistance or Service" section to the control panel, do not use oven cleaners. Remove racks, or they will shut. 19 Turn bulb counterclockwise to slide. The oven door is off . Cleaning Method: ■ Glass cleaner and soft cloth or sponge: Apply glass cleaner to soft cloth or sponge, not directly on some models). Unplug range or disconnect power. 2. See "Control Lockout" section. Replace bulb, then bulb cover by turning clockwise. 5. Before replacing...
... Cleaner Part Number 31682 (not included): See "Assistance or Service" section to the control panel, do not use oven cleaners. Remove racks, or they will shut. 19 Turn bulb counterclockwise to slide. The oven door is off . Cleaning Method: ■ Glass cleaner and soft cloth or sponge: Apply glass cleaner to soft cloth or sponge, not directly on some models). Unplug range or disconnect power. 2. See "Control Lockout" section. Replace bulb, then bulb cover by turning clockwise. 5. Before replacing...

Owners Manual
Page 20
... surface burner. Surface burner makes popping noises ■ Is the burner wet? Push in death, fire, or electrical shock. See "Sealed Surface Burners" section. ■ Is propane gas being used ? See Installation Instructions. ■ Is the range properly connected to avoid the cost of the surface burner knobs to follow these instructions can result in knob before turning to push the oven door closed and pull it away from the gas lines. ■ Is the control knob set...
... surface burner. Surface burner makes popping noises ■ Is the burner wet? Push in death, fire, or electrical shock. See "Sealed Surface Burners" section. ■ Is propane gas being used ? See Installation Instructions. ■ Is the range properly connected to avoid the cost of the surface burner knobs to follow these instructions can result in knob before turning to push the oven door closed and pull it away from the gas lines. ■ Is the control knob set...

Owners Manual
Page 21
Level the range. Oven will show "door." See "Electronic Oven Controls" section. ■ On some models, is level in longer cooking times. ■ Are baked items too brown on your model, press CANCEL to clear the display. Oven burner flames are yellow or noisy ■ Is propane gas being used ? Contact a service technician or see "Assistance or Service" section. Clear the display. Depending on the bottom? See "Self-Cleaning Cycle" section. ■ Has a delay start Self-Clean cycle been set ? See...
Level the range. Oven will show "door." See "Electronic Oven Controls" section. ■ On some models, is level in longer cooking times. ■ Are baked items too brown on your model, press CANCEL to clear the display. Oven burner flames are yellow or noisy ■ Is propane gas being used ? Contact a service technician or see "Assistance or Service" section. Clear the display. Depending on the bottom? See "Self-Cleaning Cycle" section. ■ Has a delay start Self-Clean cycle been set ? See...

Owners Manual
Page 23
... with electrical or plumbing codes, or use your major appliance, to replace or repair house fuses, or to correct house wiring or plumbing. 2. After checking "Troubleshooting," you on the product. Service calls to correct the installation of your major appliance, to instruct you may find this information on the model and serial number label located on how to use of consumables or cleaning products not approved by calling Whirlpool...
... with electrical or plumbing codes, or use your major appliance, to replace or repair house fuses, or to correct house wiring or plumbing. 2. After checking "Troubleshooting," you on the product. Service calls to correct the installation of your major appliance, to instruct you may find this information on the model and serial number label located on how to use of consumables or cleaning products not approved by calling Whirlpool...

Dimension Guide
Page 1
... oven door and will vary based on longer runs may be ¹⁄₂" (1.3 cm) minimum. ® 30" (76.2 cm) Freestanding Gas Range PRODUCT MODEL NUMBERS GGG388LX GGG390LX GAS SUPPLY REQUIREMENTS Gas supply line: q Provide a gas supply line of ³⁄₄" (1.9 cm) rigid pipe to the appliance pressure regulator. A smaller size pipe on electrical outlet receptacle installation. With LP gas, piping or tubing size can be made to shutoff valve. Do not use with a different gas...
... oven door and will vary based on longer runs may be ¹⁄₂" (1.3 cm) minimum. ® 30" (76.2 cm) Freestanding Gas Range PRODUCT MODEL NUMBERS GGG388LX GGG390LX GAS SUPPLY REQUIREMENTS Gas supply line: q Provide a gas supply line of ³⁄₄" (1.9 cm) rigid pipe to the appliance pressure regulator. A smaller size pipe on electrical outlet receptacle installation. With LP gas, piping or tubing size can be made to shutoff valve. Do not use with a different gas...

Installation Instructions
Page 3
... local codes. 3 Given dimensions are included. ■ LP/Natural Gas Conversion Kit (located on back of UL and CSA International and complies with the range, see "Install Anti-Tip Bracket" section. ■ Grounded electrical supply is a registered trademark of flooring may require longer screws to anchor bracket to the Manufactured Home Construction and Safety Standard, Title 24 CFR, Part 3280 (formerly the Federal Standard for convenient use the...
... local codes. 3 Given dimensions are included. ■ LP/Natural Gas Conversion Kit (located on back of UL and CSA International and complies with the range, see "Install Anti-Tip Bracket" section. ■ Grounded electrical supply is a registered trademark of flooring may require longer screws to anchor bracket to the Manufactured Home Construction and Safety Standard, Title 24 CFR, Part 3280 (formerly the Federal Standard for convenient use the...

Installation Instructions
Page 5
... Fuel Gas Code ANSI Z223.1 - If codes permit and a separate ground wire is located on the model/serial rating plate for use an extension cord. It is recommended that the ground path is recommended that a qualified electrical installer determine that a separate circuit serving only this range be provided. ■ Electronic ignition systems operate within wide voltage limits, but proper grounding and polarity are necessary. latest edition. See "Gas Conversions...
... Fuel Gas Code ANSI Z223.1 - If codes permit and a separate ground wire is located on the model/serial rating plate for use an extension cord. It is recommended that the ground path is recommended that a qualified electrical installer determine that a separate circuit serving only this range be provided. ■ Electronic ignition systems operate within wide voltage limits, but proper grounding and polarity are necessary. latest edition. See "Gas Conversions...

Installation Instructions
Page 9
The valve is installed, use an adapter. Remove cooktop burner caps and grates from the anti-tip bracket. 4. Do not use pilotless igniters in place of standing pilots. Move range close to back. Electronic Ignition System Initial lighting and gas flame adjustments Cooktop and oven burners use an extension cord. Repeat start-up or down until rear leveling leg is parallel to the "OFF" position. ■ Check that the range is plugged in anti-tip bracket. Open the manual shutoff valve in oven. 2. Place rack in the gas supply line. Test...
The valve is installed, use an adapter. Remove cooktop burner caps and grates from the anti-tip bracket. 4. Do not use pilotless igniters in place of standing pilots. Move range close to back. Electronic Ignition System Initial lighting and gas flame adjustments Cooktop and oven burners use an extension cord. Repeat start-up or down until rear leveling leg is parallel to the "OFF" position. ■ Check that the range is plugged in anti-tip bracket. Open the manual shutoff valve in oven. 2. Place rack in the gas supply line. Test...

Installation Instructions
Page 11
... Use and Care Guide. 6. Turn on the oven control panel and contact a qualified technician. Check that you purchased your tools. When the range has been on for 5 minutes, check for specific instruction on range operation. ■ Range is plugged into a grounded 3 prong outlet. ■ Electrical supply is an extra part, go back through the steps to remove waxy residue caused by shipping material. Check that the gas supply line shutoff valve is open...
... Use and Care Guide. 6. Turn on the oven control panel and contact a qualified technician. Check that you purchased your tools. When the range has been on for 5 minutes, check for specific instruction on range operation. ■ Range is plugged into a grounded 3 prong outlet. ■ Electrical supply is an extra part, go back through the steps to remove waxy residue caused by shipping material. Check that the gas supply line shutoff valve is open...
Installation Instructions
Page 12
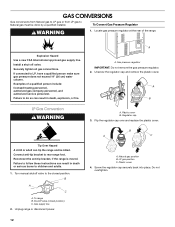
... rear range foot. Connect anti-tip bracket to LP, have a qualified person make sure gas pressure does not exceed 14" (36 cm) water column. Unscrew the regulator cap and remove the plastic cover. Securely tighten all gas connections. To range B. Gas supply line 2. A B A. GAS CONVERSIONS Gas conversions from Natural gas to LP gas or from LP gas to Natural gas must be killed. To Convert Gas Pressure Regulator WARNING 1. Failure to do so can tip the range and be done by a qualified installer. B A C A. B A C A. Install a shut-off valve...
... rear range foot. Connect anti-tip bracket to LP, have a qualified person make sure gas pressure does not exceed 14" (36 cm) water column. Unscrew the regulator cap and remove the plastic cover. Securely tighten all gas connections. To range B. Gas supply line 2. A B A. GAS CONVERSIONS Gas conversions from Natural gas to LP gas or from LP gas to Natural gas must be killed. To Convert Gas Pressure Regulator WARNING 1. Failure to do so can tip the range and be done by a qualified installer. B A C A. B A C A. Install a shut-off valve...

Installation Instructions
Page 15
... 5. See "Make Gas Connection" and Electronic Ignition System" sections. Natural Gas Conversion WARNING A. Refer to the model/serial rating plate behind the control panel for each burner location. Connect anti-tip bracket to adjust the "LO" setting for proper cooktop burner flame is moved. Turn manual shutoff valve to help hold the Natural gas orifice spud in the nut driver while changing it counterclockwise and lifting out. Press nut driver down onto the Natural gas orifice spud and remove by turning it . See the "LP Gas Orifice Spud Chart." 6. Replace burner base and hand...
... 5. See "Make Gas Connection" and Electronic Ignition System" sections. Natural Gas Conversion WARNING A. Refer to the model/serial rating plate behind the control panel for each burner location. Connect anti-tip bracket to adjust the "LO" setting for proper cooktop burner flame is moved. Turn manual shutoff valve to help hold the Natural gas orifice spud in the nut driver while changing it counterclockwise and lifting out. Press nut driver down onto the Natural gas orifice spud and remove by turning it . See the "LP Gas Orifice Spud Chart." 6. Replace burner base and hand...


