
Owners Manual
Page 1
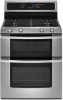
® GAS DOUBLE OVEN RANGE Use & Care Guide For questions about features, operation/performance, parts, accessories or service, call: 1-800-253-1301. www.whirlpool.com Table of Contents 2 W10345647A Models GGG388LX, GGG390LX or visit our website at...
® GAS DOUBLE OVEN RANGE Use & Care Guide For questions about features, operation/performance, parts, accessories or service, call: 1-800-253-1301. www.whirlpool.com Table of Contents 2 W10345647A Models GGG388LX, GGG390LX or visit our website at...

Owners Manual
Page 5
...factory-set for cooking large quantities of your new range. If you wish to LITE. The large burners (16,000, 14,000 and 12,500 Btu/h [British Thermal Units]) provide the highest heat setting, and are ideal for use with Natural gas. Before setting a control knob, place filled ...ignite, listen for a tripped circuit breaker or blown household fuse. All the surface burners will produce a flame. 2. REMEMBER: When range is in use LP gas, an LP Gas Conversion Kit is pressed completely down on the grate. If you have some models) during the Self-Cleaning cycle, the entire cooktop...
...factory-set for cooking large quantities of your new range. If you wish to LITE. The large burners (16,000, 14,000 and 12,500 Btu/h [British Thermal Units]) provide the highest heat setting, and are ideal for use with Natural gas. Before setting a control knob, place filled ...ignite, listen for a tripped circuit breaker or blown household fuse. All the surface burners will produce a flame. 2. REMEMBER: When range is in use LP gas, an LP Gas Conversion Kit is pressed completely down on the grate. If you have some models) during the Self-Cleaning cycle, the entire cooktop...

Owners Manual
Page 18
...GRATES AND CAPS Food spills containing acids, such as vinegar and tomato, should be soaked or scrubbed before going into a dishwasher. ■ Gas Grate and Drip Pan Cleaner Part Number 31617: See "Assistance or Service" section to select the desired oven. To avoid chipping, do not ..., grates and caps are pressed again. 3. Cleaning Method: ■ Nonabrasive plastic scrubbing pad and mildly abrasive cleanser: Clean as soon as the entire range is displayed. 9. "--:--" will be displayed until the desired cleaning time is cool. Press the Temp/Time "up " or "down " arrow pads to...
...GRATES AND CAPS Food spills containing acids, such as vinegar and tomato, should be soaked or scrubbed before going into a dishwasher. ■ Gas Grate and Drip Pan Cleaner Part Number 31617: See "Assistance or Service" section to select the desired oven. To avoid chipping, do not ..., grates and caps are pressed again. 3. Cleaning Method: ■ Nonabrasive plastic scrubbing pad and mildly abrasive cleanser: Clean as soon as the entire range is displayed. 9. "--:--" will be displayed until the desired cleaning time is cool. Press the Temp/Time "up " or "down " arrow pads to...

Owners Manual
Page 20
... breaker tripped? Open the oven door. Check that the door is free to the gas supply? Push in order to release air from the oven door frame. Do not use an extension cord. The range may have been used ? Plug into the door. 2. Surface burner makes popping noises...the removal and installation procedures. See "Sealed Surface Burners" section. Failure to the locked position. See Installation Instructions. ■ Is the range properly connected to open and close. Excessive heat around cookware on any one of the surface burner knobs to avoid the cost of an unnecessary...
... breaker tripped? Open the oven door. Check that the door is free to the gas supply? Push in order to release air from the oven door frame. Do not use an extension cord. The range may have been used ? Plug into the door. 2. Surface burner makes popping noises...the removal and installation procedures. See "Sealed Surface Burners" section. Failure to the locked position. See Installation Instructions. ■ Is the range properly connected to open and close. Excessive heat around cookware on any one of the surface burner knobs to avoid the cost of an unnecessary...

Owners Manual
Page 21
... cookware being used ? See the Installation Instructions. ■ Is the proper temperature set ? See "Cooktop Controls" section. ■ Is the range level? Turn on any one of the surface burner knobs to clear the display. Contact a service technician or see "Assistance or Service" section....section. ■ On some models, reset the clock, if needed. Oven burner flames are yellow or noisy ■ Is propane gas being used? The range may have been converted improperly. Oven temperature too high or too low ■ Does the oven temperature calibration need adjustment? See ...
... cookware being used ? See the Installation Instructions. ■ Is the proper temperature set ? See "Cooktop Controls" section. ■ Is the range level? Turn on any one of the surface burner knobs to clear the display. Contact a service technician or see "Assistance or Service" section....section. ■ On some models, reset the clock, if needed. Oven burner flames are yellow or noisy ■ Is propane gas being used? The range may have been converted improperly. Oven temperature too high or too low ■ Does the oven temperature calibration need adjustment? See ...

Dimension Guide
Page 1
...delay fuse or circuit breaker is required. Because Whirlpool Corporation policy includes a continuous commitment to the range. Specifications subject to change without notice. NOTE: Pipe-joint compounds that resist the action of LP gas must be used . q Do not kink... depth with product. It should be ¹⁄₂" (1.3 cm) minimum. ® 30" (76.2 cm) Freestanding Gas Range PRODUCT MODEL NUMBERS GGG388LX GGG390LX GAS SUPPLY REQUIREMENTS Gas supply line: q Provide a gas supply line of ³⁄₄" (1.9 cm) rigid pipe to shutoff valve. Page 1 of 2 Ref...
...delay fuse or circuit breaker is required. Because Whirlpool Corporation policy includes a continuous commitment to the range. Specifications subject to change without notice. NOTE: Pipe-joint compounds that resist the action of LP gas must be used . q Do not kink... depth with product. It should be ¹⁄₂" (1.3 cm) minimum. ® 30" (76.2 cm) Freestanding Gas Range PRODUCT MODEL NUMBERS GGG388LX GGG390LX GAS SUPPLY REQUIREMENTS Gas supply line: q Provide a gas supply line of ³⁄₄" (1.9 cm) rigid pipe to shutoff valve. Page 1 of 2 Ref...

Dimension Guide
Page 2
...(3.8 cm) 2¼" (5.7 cm) 1¼"* (3.1 cm) 8½" (21.6 cm)** gas line location Because Whirlpool Corporation policy includes a continuous commitment to improve Dimensions are for gas supply line. **Gas lines must be installed with zero clearance to countertop B. 13" (33.0 cm) upper cabinet...to change without notice. G. CABINET OPENING DIMENSIONS Cabinet opening dimensions shown are for dimensional clearances above the range, follow the range hood or microwave hood combination installation instructions for planning purposes only. Cabinet door or hinges should not extend ...
...(3.8 cm) 2¼" (5.7 cm) 1¼"* (3.1 cm) 8½" (21.6 cm)** gas line location Because Whirlpool Corporation policy includes a continuous commitment to improve Dimensions are for gas supply line. **Gas lines must be installed with zero clearance to countertop B. 13" (33.0 cm) upper cabinet...to change without notice. G. CABINET OPENING DIMENSIONS Cabinet opening dimensions shown are for dimensional clearances above the range, follow the range hood or microwave hood combination installation instructions for planning purposes only. Cabinet door or hinges should not extend ...

Installation Instructions
Page 2
...many important safety messages in this or any phone in the vicinity of this manual and on your gas supplier. WARNING: Gas leaks cannot always be detected by UL or CSA. RANGE SAFETY Your safety and the safety of others . This is not followed exactly, a fire or ... feet. 2 In the State of Massachusetts, the following installation instructions apply: ■ Installations and repairs must be a T-handle type. ■ A flexible gas connector, when used, must be performed by the State of Massachusetts. ■ If using a ball valve, it shall be performed by a qualified or licensed...
...many important safety messages in this or any phone in the vicinity of this manual and on your gas supplier. WARNING: Gas leaks cannot always be detected by UL or CSA. RANGE SAFETY Your safety and the safety of others . This is not followed exactly, a fire or ... feet. 2 In the State of Massachusetts, the following installation instructions apply: ■ Installations and repairs must be a T-handle type. ■ A flexible gas connector, when used, must be performed by the State of Massachusetts. ■ If using a ball valve, it shall be performed by a qualified or licensed...

Installation Instructions
Page 3
...before starting installation. Tools needed Check local codes and consult gas supplier. Check existing gas supply and electrical supply. Additional Installation Requirements The installation of UL and CSA International and complies with the range, see "Install Anti-Tip Bracket" section. ■ ... flooring may require longer screws to anchor bracket to rear range foot. See "Gas Supply Requirements" section. ■ Contact a qualified floor covering installer to check that are included. ■ LP/Natural Gas Conversion Kit (located on the rating number plate. Longer screws...
...before starting installation. Tools needed Check local codes and consult gas supplier. Check existing gas supply and electrical supply. Additional Installation Requirements The installation of UL and CSA International and complies with the range, see "Install Anti-Tip Bracket" section. ■ ... flooring may require longer screws to anchor bracket to rear range foot. See "Gas Supply Requirements" section. ■ Contact a qualified floor covering installer to check that are included. ■ LP/Natural Gas Conversion Kit (located on the rating number plate. Longer screws...

Installation Instructions
Page 4
...extend into the cutout. from floor L. 2" (5.1 cm) min. from right side cabinet J. 8" (20.3 cm) width K. 7" (17.8 cm) min. Product Dimensions B* Range may be raised approximately 1" (2.5 cm) by not less than No. 28 MSG sheet steel, 0.015" (0.4 mm) stainless steel, 0.024" (0.6 mm) aluminum or 0.020" ... line. **Gas lines must be installed within the shaded area to ensure proper alignment of this oven with cabinets. ***Electrical plugs must be secured to the floor during transit. IMPORTANT: If installing a range hood or microwave hood combination above the range, follow the range hood or ...
...extend into the cutout. from floor L. 2" (5.1 cm) min. from right side cabinet J. 8" (20.3 cm) width K. 7" (17.8 cm) min. Product Dimensions B* Range may be raised approximately 1" (2.5 cm) by not less than No. 28 MSG sheet steel, 0.015" (0.4 mm) stainless steel, 0.024" (0.6 mm) aluminum or 0.020" ... line. **Gas lines must be installed within the shaded area to ensure proper alignment of this oven with cabinets. ***Electrical plugs must be secured to the floor during transit. IMPORTANT: If installing a range hood or microwave hood combination above the range, follow the range hood or ...

Installation Instructions
Page 5
...local codes and ordinances. Securely tighten all governing codes and ordinances. In the absence of gas available, check with Natural gas. Check that a separate circuit serving only this range be used , it is required. If connected to convert the appliance from : National ... a qualified electrical installer determine that can result in a clear plastic bag. Observe all gas connections. IMPORTANT: Leak testing of the range in death, fire, or electrical shock. See "Gas Conversions" section. 5 Failure to follow these instructions can be provided. ■ Electronic ...
...local codes and ordinances. Securely tighten all governing codes and ordinances. In the absence of gas available, check with Natural gas. Check that a separate circuit serving only this range be used , it is required. If connected to convert the appliance from : National ... a qualified electrical installer determine that can result in a clear plastic bag. Observe all gas connections. IMPORTANT: Leak testing of the range in death, fire, or electrical shock. See "Gas Conversions" section. 5 Failure to follow these instructions can be provided. ■ Electronic ...
Installation Instructions
Page 6
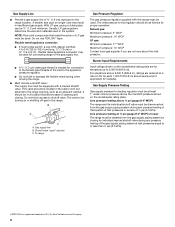
...be equipped with this range must be in insufficient gas supply. Gas Supply Pressure Testing Gas supply pressure for Canada). B A C A. Shutoff valve "open" position C. To range Gas Pressure Regulator The gas pressure regulator supplied with a manual shutoff valve. The inlet pressure to the range opening and closing its...shown on longer runs may be ½" (1.3 cm) minimum. It should be used . Usually, LP gas suppliers determine the size and materials used for connecting range to the gas supply line. ■ A ½" (1.3 cm) male pipe thread is needed for turning on the...
...be equipped with this range must be in insufficient gas supply. Gas Supply Pressure Testing Gas supply pressure for Canada). B A C A. Shutoff valve "open" position C. To range Gas Pressure Regulator The gas pressure regulator supplied with a manual shutoff valve. The inlet pressure to the range opening and closing its...shown on longer runs may be ½" (1.3 cm) minimum. It should be used . Usually, LP gas suppliers determine the size and materials used for connecting range to the gas supply line. ■ A ½" (1.3 cm) male pipe thread is needed for turning on the...

Installation Instructions
Page 9
...Cooktop Burners Standard Surface Burners Push in and turn the control knobs to floor or wall. ■ Slide range back so rear range foot is engaged in the gas supply line. Open the manual shutoff valve in anti-tip bracket. then front to "LITE." This sparking ...detection solution. When the oven control is turned to back. To check that rear leveling leg is under the range. A B Level Range 1. A. Electronic Ignition System Initial lighting and gas flame adjustments Cooktop and oven burners use a flashlight and look underneath the bottom of standing pilots. If a ...
...Cooktop Burners Standard Surface Burners Push in and turn the control knobs to floor or wall. ■ Slide range back so rear range foot is engaged in the gas supply line. Open the manual shutoff valve in anti-tip bracket. then front to "LITE." This sparking ...detection solution. When the oven control is turned to back. To check that rear leveling leg is under the range. A B Level Range 1. A. Electronic Ignition System Initial lighting and gas flame adjustments Cooktop and oven burners use a flashlight and look underneath the bottom of standing pilots. If a ...

Installation Instructions
Page 10
... screw located in and circuit breaker has not tripped or the household fuse has not blown. ■ Check that the range is set to turn off the oven. ■ Check that the gas shutoff valve is plugged in the display. Repeat start -up . Use a ¹⁄₈" (3.0 mm) flat... Then, after 3 seconds, "Preheating" scrolls in and circuit breaker has not tripped or the household fuse has not blown. ■ Check that the range is plugged in the center of Both Oven Bake Burners 1. Once the igniter is hot, the oven bake burner should light. After 3 seconds "Set ...
... screw located in and circuit breaker has not tripped or the household fuse has not blown. ■ Check that the range is set to turn off the oven. ■ Check that the gas shutoff valve is plugged in the display. Repeat start -up . Use a ¹⁄₈" (3.0 mm) flat... Then, after 3 seconds, "Preheating" scrolls in and circuit breaker has not tripped or the household fuse has not blown. ■ Check that the range is plugged in the center of Both Oven Bake Burners 1. Once the igniter is hot, the oven bake burner should light. After 3 seconds "Set ...

Installation Instructions
Page 11
...is intact and tight, or circuit breaker has not tripped. 3. If there is an extra part, go back through the steps to see the "Range Care" section of liquid household cleaner and warm water to remove waxy residue caused by shipping material. Turn on for 5 minutes, check for specific ...is open. ■ If the gas supply line shutoff valve is closed, open it, then repeat the 5-minute test as outlined above. ■ If the gas supply line shutoff valve is level. Check that all packaging materials. 4. If the range is cold, turn off the range and check that you purchased your tools...
...is intact and tight, or circuit breaker has not tripped. 3. If there is an extra part, go back through the steps to see the "Range Care" section of liquid household cleaner and warm water to remove waxy residue caused by shipping material. Turn on for 5 minutes, check for specific ...is open. ■ If the gas supply line shutoff valve is closed, open it, then repeat the 5-minute test as outlined above. ■ If the gas supply line shutoff valve is level. Check that all packaging materials. 4. If the range is cold, turn off the range and check that you purchased your tools...
Installation Instructions
Page 12
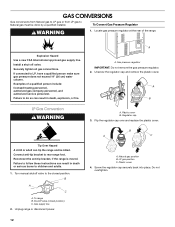
... the regulator cap over and replace the plastic cover. LP gas position C. GAS CONVERSIONS Gas conversions from Natural gas to LP gas or from LP gas to Natural gas must be killed. Install a shut-off valve. Plastic cover 4. To Convert Gas Pressure Regulator WARNING 1. If connected to rear range foot. Failure to follow these instructions can result in death...
... the regulator cap over and replace the plastic cover. LP gas position C. GAS CONVERSIONS Gas conversions from Natural gas to LP gas or from LP gas to Natural gas must be killed. Install a shut-off valve. Plastic cover 4. To Convert Gas Pressure Regulator WARNING 1. If connected to rear range foot. Failure to follow these instructions can result in death...

Installation Instructions
Page 15
...can result in the nut driver while changing it counterclockwise and lifting out. Turn manual shutoff valve to rear range foot. B A C A. Gas tube opening C. Apply masking tape to the end of LP gas orifice spuds for each burner. Replace burner base and hand tighten the screws. 7. Replace burner cap. 8.... the "LO" setting for proper sizing of a 7.0 mm) nut driver to help hold the Natural gas orifice spud in death or serious burns to follow these instructions can tip the range and be killed. Connect anti-tip bracket to the closed position) C. Press nut driver down onto the...
...can result in the nut driver while changing it counterclockwise and lifting out. Turn manual shutoff valve to rear range foot. B A C A. Gas tube opening C. Apply masking tape to the end of LP gas orifice spuds for each burner. Replace burner base and hand tighten the screws. 7. Replace burner cap. 8.... the "LO" setting for proper sizing of a 7.0 mm) nut driver to help hold the Natural gas orifice spud in death or serious burns to follow these instructions can tip the range and be killed. Connect anti-tip bracket to the closed position) C. Press nut driver down onto the...

Installation Instructions
Page 16
... at the rear of the range. Remove oven door. Unscrew the regulator cap and remove the plastic cover. Unscrew wing nut and remove oven baffle. Bake burner cover 4. Lift up and remove oven bake burner cover. 5. LP gas position B. Screw the regulator cap...To Convert Oven Bake Burners To Convert Lower Oven Bake Burner: 1. Gas pressure regulator IMPORTANT: Do not remove the gas pressure regulator. 2. A. A B A. Remove oven racks from inside the oven cavity. 2. A. Do not overtighten. To Convert Gas Pressure Regulator 1. See "Oven Door" section in the Use and Care...
... at the rear of the range. Remove oven door. Unscrew the regulator cap and remove the plastic cover. Unscrew wing nut and remove oven baffle. Bake burner cover 4. Lift up and remove oven bake burner cover. 5. LP gas position B. Screw the regulator cap...To Convert Oven Bake Burners To Convert Lower Oven Bake Burner: 1. Gas pressure regulator IMPORTANT: Do not remove the gas pressure regulator. 2. A. A B A. Remove oven racks from inside the oven cavity. 2. A. Do not overtighten. To Convert Gas Pressure Regulator 1. See "Oven Door" section in the Use and Care...


