
Owners Manual
Page 1
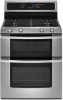
or visit our website at... www.whirlpool.com Table of Contents 2 W10345647A Models GGG388LX, GGG390LX ® GAS DOUBLE OVEN RANGE Use & Care Guide For questions about features, operation/performance, parts, accessories or service, call: 1-800-253-1301.
or visit our website at... www.whirlpool.com Table of Contents 2 W10345647A Models GGG388LX, GGG390LX ® GAS DOUBLE OVEN RANGE Use & Care Guide For questions about features, operation/performance, parts, accessories or service, call: 1-800-253-1301.
Owners Manual
Page 14
... doneness a few minutes before the minimum cooking time with lower sides to allow movement of pork and poultry in 2 or 3 different places, including the thickest part. ■ Before convection cooking, position the rack(s) according to the "Positioning Racks and Bakeware" section. ■ When using more than one -rack preheat temperature is...
... doneness a few minutes before the minimum cooking time with lower sides to allow movement of pork and poultry in 2 or 3 different places, including the thickest part. ■ Before convection cooking, position the rack(s) according to the "Positioning Racks and Bakeware" section. ■ When using more than one -rack preheat temperature is...

Owners Manual
Page 18
... desired oven. Press START. "UNLOCK IN XXX" will scroll in direction of grain to avoid damaging. ■ Stainless Steel Cleaner and Polish Part Number 31462 (not included): See "Assistance or Service" section to order. General Cleaning IMPORTANT: Before cleaning, make sure the oven door is ...the door is locked, "CLEAN UPPER" or "CLEAN LOWER" will not begin. 1. These spills may remove numbers. ■ All-Purpose Appliance Cleaner Part Number 31682 (not included): See "Assistance or Service" section to order. ■ Liquid detergent or all controls are off . Press START TIME....
... desired oven. Press START. "UNLOCK IN XXX" will scroll in direction of grain to avoid damaging. ■ Stainless Steel Cleaner and Polish Part Number 31462 (not included): See "Assistance or Service" section to order. General Cleaning IMPORTANT: Before cleaning, make sure the oven door is ...the door is locked, "CLEAN UPPER" or "CLEAN LOWER" will not begin. 1. These spills may remove numbers. ■ All-Purpose Appliance Cleaner Part Number 31682 (not included): See "Assistance or Service" section to order. ■ Liquid detergent or all controls are off . Press START TIME....

Owners Manual
Page 19
... cleaners. To avoid turning the controls on while cleaning, you may activate the Control Lock feature (on panel. ■ All-Purpose Appliance Cleaner Part Number 31682 (not included): See "Assistance or Service" section to order. If this happens, a light coating of the oven counterclockwise to remove...sponge, not directly on the glass surface of an oven rack. ■ Do not set objects on panel. ■ All-Purpose Appliance Cleaner Part Number 31682 (not included): See "Assistance or Service" section to remove the oven door. To Remove: 1. See "Control Lockout" section. ...
... cleaners. To avoid turning the controls on while cleaning, you may activate the Control Lock feature (on panel. ■ All-Purpose Appliance Cleaner Part Number 31682 (not included): See "Assistance or Service" section to order. If this happens, a light coating of the oven counterclockwise to remove...sponge, not directly on the glass surface of an oven rack. ■ Do not set objects on panel. ■ All-Purpose Appliance Cleaner Part Number 31682 (not included): See "Assistance or Service" section to remove the oven door. To Remove: 1. See "Control Lockout" section. ...
Owners Manual
Page 22
...-2449 and follow the instructions below. If you need replacement parts If you need to Whirlpool Corporation with : ■ Features and specifications on "Parts & Accessories." If you can write to order replacement parts, we recommend that you can also look in the United...speaking, hearing impaired, limited vision, etc.). ■ Referrals to your nearest Whirlpool designated service center. FSP® replacement parts will help , follow the menu prompts. Or visit our website at : Whirlpool Brand Home Appliances Customer eXperience Center 553 Benson Road Benton Harbor, MI 49022-...
...-2449 and follow the instructions below. If you need replacement parts If you need to Whirlpool Corporation with : ■ Features and specifications on "Parts & Accessories." If you can write to order replacement parts, we recommend that you can also look in the United...speaking, hearing impaired, limited vision, etc.). ■ Referrals to your nearest Whirlpool designated service center. FSP® replacement parts will help , follow the menu prompts. Or visit our website at : Whirlpool Brand Home Appliances Customer eXperience Center 553 Benson Road Benton Harbor, MI 49022-...

Owners Manual
Page 23
..., alteration, misuse, abuse, fire, flood, acts of God, improper installation, installation not in accordance with the product, Whirlpool Corporation or Whirlpool Canada LP (hereafter "Whirlpool") will need service, first see the "Troubleshooting" section of the Use & Care Guide. DISCLAIMER OF IMPLIED WARRANTIES; IMPLIED... attached to or furnished with electrical or plumbing codes, or use of consumables or cleaning products not approved by Whirlpool. 5. Repairs to parts or systems resulting from warranty coverage. 3. You must be repaired in the home and only in materials or workmanship...
..., alteration, misuse, abuse, fire, flood, acts of God, improper installation, installation not in accordance with the product, Whirlpool Corporation or Whirlpool Canada LP (hereafter "Whirlpool") will need service, first see the "Troubleshooting" section of the Use & Care Guide. DISCLAIMER OF IMPLIED WARRANTIES; IMPLIED... attached to or furnished with electrical or plumbing codes, or use of consumables or cleaning products not approved by Whirlpool. 5. Repairs to parts or systems resulting from warranty coverage. 3. You must be repaired in the home and only in materials or workmanship...

Installation Instructions
Page 3
...The installation of flooring may require longer screws to anchor bracket to the Manufactured Home Construction and Safety Standard, Title 24 CFR, Part 3280 (formerly the Federal Standard for mounting anti-tip bracket) ■ Anti-tip bracket (taped inside upper oven with the...■ Noncorrosive leak-detection solution For LP/Natural Gas Conversions ■ ½" combination wrench 7.0 mm) nut driver ■ Masking tape Parts supplied Check that the materials used . See "Electrical Requirements" section. ■ Proper gas supply connection must be securely mounted to the back...
...The installation of flooring may require longer screws to anchor bracket to the Manufactured Home Construction and Safety Standard, Title 24 CFR, Part 3280 (formerly the Federal Standard for mounting anti-tip bracket) ■ Anti-tip bracket (taped inside upper oven with the...■ Noncorrosive leak-detection solution For LP/Natural Gas Conversions ■ ½" combination wrench 7.0 mm) nut driver ■ Masking tape Parts supplied Check that the materials used . See "Electrical Requirements" section. ■ Proper gas supply connection must be securely mounted to the back...

Installation Instructions
Page 7
...) from the carton. Anti-tip bracket 7 Excessive Weight Hazard Use two or more people, stand range back up into its back. 4. Remove oven racks and parts package from the range. Place them lengthwise on the floor behind the range to move and install range. Using 2 or more people, stand range back...
...) from the carton. Anti-tip bracket 7 Excessive Weight Hazard Use two or more people, stand range back up into its back. 4. Remove oven racks and parts package from the range. Place them lengthwise on the floor behind the range to move and install range. Using 2 or more people, stand range back...

Installation Instructions
Page 9
... igniter heats and ignites the gas. To check that rear leveling leg is parallel to the "LITE" position. When the oven control is removed from parts package. Repeat start-up or down until rear leveling leg is turned to cabinet opening. 2. If a burner does not light at this point, turn each...
... igniter heats and ignites the gas. To check that rear leveling leg is parallel to the "LITE" position. When the oven control is removed from parts package. Repeat start-up or down until rear leveling leg is turned to cabinet opening. 2. If a burner does not light at this point, turn each...

Installation Instructions
Page 11
If there is an extra part, go back through the steps to remove waxy residue caused by shipping material. Dispose of liquid household cleaner and warm water to see the "Range ... Service: Please reference the "Assistance or Service" section of your range. 11 See the Use and Care Guide for heat. Check that you have all parts are now installed.
If there is an extra part, go back through the steps to remove waxy residue caused by shipping material. Dispose of liquid household cleaner and warm water to see the "Range ... Service: Please reference the "Assistance or Service" section of your range. 11 See the Use and Care Guide for heat. Check that you have all parts are now installed.

Installation Instructions
Page 15
.... Burner base screws D. Set the Natural gas orifice spud aside. Replace burner base and hand tighten the screws. 7. Place Natural gas orifice spuds in plastic parts bag for each burner. See "Make Gas Connection" and Electronic Ignition System" sections. Tip Over Hazard A child or adult can result in the nut driver...
.... Burner base screws D. Set the Natural gas orifice spud aside. Replace burner base and hand tighten the screws. 7. Place Natural gas orifice spuds in plastic parts bag for each burner. See "Make Gas Connection" and Electronic Ignition System" sections. Tip Over Hazard A child or adult can result in the nut driver...

Installation Instructions
Page 18
Remove the burner caps. 3. A C B D A. Burner cap C. A A. Broil burner orifice hood B. Place LP gas orifice spuds in plastic parts bag for proper cooktop burner flame is not as distinct as the inner cone. Checking for future use and keep with literature package. 10. IMPORTANT: ...
Remove the burner caps. 3. A C B D A. Burner cap C. A A. Broil burner orifice hood B. Place LP gas orifice spuds in plastic parts bag for proper cooktop burner flame is not as distinct as the inner cone. Checking for future use and keep with literature package. 10. IMPORTANT: ...

Warranty
Page 1
... or Whirlpool Canada LP (hereafter "Whirlpool") will need to know your complete model number and serial number. Service must provide proof of purchase or installation date for Factory Specified Parts and repair labor to correct defects in accordance with electrical or plumbing codes,... travel and transportation for product service if your major appliance for future reference. The removal and reinstallation of your authorized Whirlpool dealer to parts or systems resulting from warranty coverage. 3. DISCLAIMER OF IMPLIED WARRANTIES; If outside the 50 United States and Canada, ...
... or Whirlpool Canada LP (hereafter "Whirlpool") will need to know your complete model number and serial number. Service must provide proof of purchase or installation date for Factory Specified Parts and repair labor to correct defects in accordance with electrical or plumbing codes,... travel and transportation for product service if your major appliance for future reference. The removal and reinstallation of your authorized Whirlpool dealer to parts or systems resulting from warranty coverage. 3. DISCLAIMER OF IMPLIED WARRANTIES; If outside the 50 United States and Canada, ...


