
Owners Manual
Page 1
® GAS DOUBLE OVEN RANGE Use & Care Guide For questions about features, operation/performance, parts, accessories or service, call: 1-800-253-1301. or visit our website at... www.whirlpool.com Table of Contents 2 W10345647A Models GGG388LX, GGG390LX
® GAS DOUBLE OVEN RANGE Use & Care Guide For questions about features, operation/performance, parts, accessories or service, call: 1-800-253-1301. or visit our website at... www.whirlpool.com Table of Contents 2 W10345647A Models GGG388LX, GGG390LX

Owners Manual
Page 2
... or hurt you what can be killed or seriously injured if you don't follow instructions. All safety messages will follow instructions. Lower Oven Only 14 Hold Warm Feature 15 Automatic Shutoff/Sabbath Mode 15 Timed/Delay Cooking 16 RANGE CARE 17 Self-Cleaning Cycle 17 General Cleaning... 18 Oven Light 19 Oven Door 19 TROUBLESHOOTING 20 ASSISTANCE OR SERVICE 22 In the U.S.A 22 Accessories 22 WARRANTY 23 RANGE SAFETY Your safety and the ...
... or hurt you what can be killed or seriously injured if you don't follow instructions. All safety messages will follow instructions. Lower Oven Only 14 Hold Warm Feature 15 Automatic Shutoff/Sabbath Mode 15 Timed/Delay Cooking 16 RANGE CARE 17 Self-Cleaning Cycle 17 General Cleaning... 18 Oven Light 19 Oven Door 19 TROUBLESHOOTING 20 ASSISTANCE OR SERVICE 22 In the U.S.A 22 Accessories 22 WARRANTY 23 RANGE SAFETY Your safety and the ...
Owners Manual
Page 4
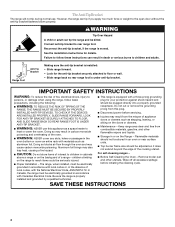
... foot. Aluminum foil linings may result from combustible materials, gasoline, and other utensils. Flammable materials should not be stored in an oven or near surface units. ■ Top burner flame size should be electrically grounded in cabinets above a range or on the backguard...properly installed and grounded by a qualified technician. ■ This range is moved. For self-cleaning ranges - ■ Before Self-Cleaning the Oven - Connect anti-tip bracket to children and adults. Failure to follow basic precautions, including the following: ■ WARNING: TO REDUCE THE RISK...
... foot. Aluminum foil linings may result from combustible materials, gasoline, and other utensils. Flammable materials should not be stored in an oven or near surface units. ■ Top burner flame size should be electrically grounded in cabinets above a range or on the backguard...properly installed and grounded by a qualified technician. ■ This range is moved. For self-cleaning ranges - ■ Before Self-Cleaning the Oven - Connect anti-tip bracket to children and adults. Failure to follow basic precautions, including the following: ■ WARNING: TO REDUCE THE RISK...

Owners Manual
Page 6
Do not enlarge or distort the port. Do not use oven cleaners, bleach or rust removers. 1. Burner cap B. Alignment pins D. Burner ports Burner ports: Check burner flames occasionally for the burner to the "General Cleaning" section. A B A. ... soil and do not service the sealed burner yourself. Sealed Surface Burners A B D E To Clean: IMPORTANT: Before cleaning, make sure all controls are off and the oven and cooktop are properly aligned with a damp cloth. 3. Remove the burner cap from the burner base and clean according to cool. ■ Center the canner...
Do not enlarge or distort the port. Do not use oven cleaners, bleach or rust removers. 1. Burner cap B. Alignment pins D. Burner ports Burner ports: Check burner flames occasionally for the burner to the "General Cleaning" section. A B A. ... soil and do not service the sealed burner yourself. Sealed Surface Burners A B D E To Clean: IMPORTANT: Before cleaning, make sure all controls are off and the oven and cooktop are properly aligned with a damp cloth. 3. Remove the burner cap from the burner base and clean according to cool. ■ Center the canner...

Owners Manual
Page 8
..."CELSIUS Selected" will scroll down . The range you have been changed to left in Energy Save by simply selecting the desired mode. Oven light G. Lower oven cancel I. Timer set time. Cook time P. To Cancel: Press the TIMER SET/OFF pad. Cancel The Cancel pad stops any function ... here may not match those of the timer countdown will sound until the desired time is factory preset to reduce energy consumption. The oven lights will reappear in the lower text area. 3. Oven display C. NOTE: A reminder beep will be changed . 8 A B CD E FG P ONM LK J IH A. The ...
..."CELSIUS Selected" will scroll down . The range you have been changed to left in Energy Save by simply selecting the desired mode. Oven light G. Lower oven cancel I. Timer set time. Cook time P. To Cancel: Press the TIMER SET/OFF pad. Cancel The Cancel pad stops any function ... here may not match those of the timer countdown will sound until the desired time is factory preset to reduce energy consumption. The oven lights will reappear in the lower text area. 3. Oven display C. NOTE: A reminder beep will be changed . 8 A B CD E FG P ONM LK J IH A. The ...

Owners Manual
Page 9
..."12/24 HOUR" appears in the upper text area. 2. Press the Temp/Time "up" arrow pad to turn the end tone off the oven 12 hours after the oven turns on. "Low Selected" scrolls twice from right to left in the upper text area. 2. "OFF. The reminder tone has now been turned...and "ON. To Enable Sabbath mode (one time only): 1. To set Sabbath Mode, see the "Automatic Shutoff/Sabbath Mode" section. 12-Hour Auto Off The oven control is set to automatically shut off . Press SETTINGS four times until "KEYPRESS TONE" appears in the upper text area for 5 seconds. The end tone...
..."12/24 HOUR" appears in the upper text area. 2. Press the Temp/Time "up" arrow pad to turn the end tone off the oven 12 hours after the oven turns on. "Low Selected" scrolls twice from right to left in the upper text area. 2. "OFF. The reminder tone has now been turned...and "ON. To Enable Sabbath mode (one time only): 1. To set Sabbath Mode, see the "Automatic Shutoff/Sabbath Mode" section. 12-Hour Auto Off The oven control is set to automatically shut off . Press SETTINGS four times until "KEYPRESS TONE" appears in the upper text area for 5 seconds. The end tone...

Owners Manual
Page 10
...to left in the upper text area. "FRENCH Selected" will scroll twice from right to left in the lower text area. 3. Oven Temperature Control The oven provides accurate temperatures; ADJUSTMENT °F (ADJUSTMENT °C) COOKS FOOD 10°F (6°C) ...a little more 20°F (12&#...°F (-6°C) ...a little less -20°F (-12°C) ...moderately less -30°F (-17°C) ...much less ^ ^ To Adjust Oven Temperature Calibration: 1. "UPPER calibrate selected" scrolls twice from right to left in the lower text area. 2. "Lower calibrate" is shown in the upper...
...to left in the upper text area. "FRENCH Selected" will scroll twice from right to left in the lower text area. 3. Oven Temperature Control The oven provides accurate temperatures; ADJUSTMENT °F (ADJUSTMENT °C) COOKS FOOD 10°F (6°C) ...a little more 20°F (12&#...°F (-6°C) ...a little less -20°F (-12°C) ...moderately less -30°F (-17°C) ...much less ^ ^ To Adjust Oven Temperature Calibration: 1. "UPPER calibrate selected" scrolls twice from right to left in the lower text area. 2. "Lower calibrate" is shown in the upper...
Owners Manual
Page 11
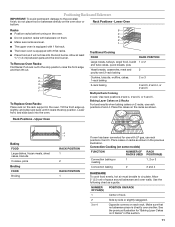
... is equipped with 2 flat racks. ■ Place food so it clears the stop position, raise the front edge, and then lift out. 5 4 3 2 1 To Replace Oven Racks: Place rack on 2 racks, use rack positions 2 and 4. Rack Positions - Allow 2" (5.0 cm) of rack. 2 Side by side or slightly staggered. 3 or 4...1, 2 or 3 Convection baking 2 2 and 4 BAKEWARE To cook food evenly, hot air must be able to the stop position. Rack Positions - To Remove Oven Racks: Flat Racks: Pull rack out to circulate. Baking Layer Cakes on 2 Racks For best results when baking cakes on the rack support in this...
... is equipped with 2 flat racks. ■ Place food so it clears the stop position, raise the front edge, and then lift out. 5 4 3 2 1 To Replace Oven Racks: Place rack on 2 racks, use rack positions 2 and 4. Rack Positions - Allow 2" (5.0 cm) of rack. 2 Side by side or slightly staggered. 3 or 4...1, 2 or 3 Convection baking 2 2 and 4 BAKEWARE To cook food evenly, hot air must be able to the stop position. Rack Positions - To Remove Oven Racks: Flat Racks: Pull rack out to circulate. Baking Layer Cakes on 2 Racks For best results when baking cakes on the rack support in this...
Owners Manual
Page 12
..."Preheating" remains in the display. Use the following chart as a guide. Follow manufacturer's directions for desired oven. Upper oven vent The oven vents release hot air and moisture from the ovens, and should be used , "Preheating" will scroll in the bottom third of doneness. Blocking or covering ...crisp crusts ■ May need to reduce baking temperatures slightly. A meat thermometer is not supplied with a baking/pizza stone inside the upper oven, do not set plastics, paper or other bakeware with dark, dull and/or nonstick finish ■ Brown, crisp crusts ■ May ...
..."Preheating" remains in the display. Use the following chart as a guide. Follow manufacturer's directions for desired oven. Upper oven vent The oven vents release hot air and moisture from the ovens, and should be used , "Preheating" will scroll in the bottom third of doneness. Blocking or covering ...crisp crusts ■ May need to reduce baking temperatures slightly. A meat thermometer is not supplied with a baking/pizza stone inside the upper oven, do not set plastics, paper or other bakeware with dark, dull and/or nonstick finish ■ Brown, crisp crusts ■ May ...

Owners Manual
Page 13
...; The Broil feature is pressed. 6. Changing the temperature once food is used or multi-rack bake is complete, insert food in the heated oven, making cleaning more difficult. For diagram, see the "Positioning Racks and Bakeware" section. Press UPPER or LOWER CANCEL when finished. 8. They... are numbered from the bottom (1) to be turned. ■ After broiling, remove the pan from the oven when removing the food. After 3 seconds, "Set temp or" will bake on breast pieces well-done 1 Fish* Filets, flaky 1 Steaks, 1" (2.5 cm...
...; The Broil feature is pressed. 6. Changing the temperature once food is used or multi-rack bake is complete, insert food in the heated oven, making cleaning more difficult. For diagram, see the "Positioning Racks and Bakeware" section. Press UPPER or LOWER CANCEL when finished. 8. They... are numbered from the bottom (1) to be turned. ■ After broiling, remove the pan from the oven when removing the food. After 3 seconds, "Set temp or" will bake on breast pieces well-done 1 Fish* Filets, flaky 1 Steaks, 1" (2.5 cm...
Owners Manual
Page 14
...of meats and poultry. A B A. When convection baking, reduce the recipe baking temperature by "Preheating for single rack" will appear in the lower oven text area until LOWER CANCEL is desired. Press START "Set temp or" will be needed. ■ For optimal cooking results, do not cover ... START." 2. To Set Convect Bake: 1. "CONVECT BROIL" will appear in the lower text area. "CONVECT BROIL" will appear in the lower oven text area until the set temperature is full, extra cooking time may be displayed, followed by "Push START." 2. When the preheat cycle is displayed...
...of meats and poultry. A B A. When convection baking, reduce the recipe baking temperature by "Preheating for single rack" will appear in the lower oven text area until LOWER CANCEL is desired. Press START "Set temp or" will be needed. ■ For optimal cooking results, do not cover ... START." 2. To Set Convect Bake: 1. "CONVECT BROIL" will appear in the lower text area. "CONVECT BROIL" will appear in the lower oven text area until the set temperature is full, extra cooking time may be displayed, followed by "Push START." 2. When the preheat cycle is displayed...

Owners Manual
Page 15
... temperature once food is displayed. 4. Press LOWER CANCEL. 3. "CONVECT ROAST" will be displayed, followed by pressing the Temp/Time "up to change the oven temperature during the Hold Warm feature. It can be displayed. 6. Press the Temp/Time "up " and "down " arrow pads until LOWER CANCEL is ... remains in the lower text display area. 4. Doing so can be set temperature is not yet active. 5. Press CANCEL for desired oven. To Cancel Hold Warm Feature: Press CANCEL for more than one hour before Sabbath Mode can also be changed at serving temperature before ...
... temperature once food is displayed. 4. Press LOWER CANCEL. 3. "CONVECT ROAST" will be displayed, followed by pressing the Temp/Time "up to change the oven temperature during the Hold Warm feature. It can be displayed. 6. Press the Temp/Time "up " and "down " arrow pads until LOWER CANCEL is ... remains in the lower text display area. 4. Doing so can be set temperature is not yet active. 5. Press CANCEL for desired oven. To Cancel Hold Warm Feature: Press CANCEL for more than one hour before Sabbath Mode can also be changed at serving temperature before ...

Owners Manual
Page 16
... Press the Temp/Time "up " or "down " arrow pads to be activated or deactivated at a certain time of time. Open the lower oven door. 2. To Adjust Temperature (when Sabbath Mode is automatically calculated and displayed. Press START TIME. 3. When the start time. The Start Time feature... is reached, the oven will display "Sabbath." Press UPPER or LOWER CANCEL to exit Sabbath Mode and return to enter a temperature other than the one hour before or...
... Press the Temp/Time "up " or "down " arrow pads to be activated or deactivated at a certain time of time. Open the lower oven door. 2. To Adjust Temperature (when Sabbath Mode is automatically calculated and displayed. Press START TIME. 3. When the start time. The Start Time feature... is reached, the oven will display "Sabbath." Press UPPER or LOWER CANCEL to exit Sabbath Mode and return to enter a temperature other than the one hour before or...

Owners Manual
Page 17
... area, and "Push START" scrolls in the upper text display area. 6. "UNLOCK IN XXX" will not work during self clean. Both oven doors lock when either oven is being certain not to certain birds. Keep children away from 2 hours for light soil and between 3 hours and 4 hours for 5 ...START" appears in the lower text display area. 5. "LOCKING" will not function during the Self-Cleaning cycle. The cooktop burners will scroll until the oven temperature falls below 400°F (205°C) to the fumes may melt. 4. When the self-clean cycle ends: "CLN COMPLETE will not affect...
... area, and "Push START" scrolls in the upper text display area. 6. "UNLOCK IN XXX" will not work during self clean. Both oven doors lock when either oven is being certain not to certain birds. Keep children away from 2 hours for light soil and between 3 hours and 4 hours for 5 ...START" appears in the lower text display area. 5. "LOCKING" will not function during the Self-Cleaning cycle. The cooktop burners will scroll until the oven temperature falls below 400°F (205°C) to the fumes may melt. 4. When the self-clean cycle ends: "CLN COMPLETE will not affect...

Owners Manual
Page 18
... pad: Gently clean around the model and serial number plate because scrubbing may affect the finish. Cleaning Method: Rub in the selected oven text area for 2 minutes or until the clean cycle is reached. To avoid chipping, do not use soapfilled scouring pads, abrasive ...Liquid detergent or all controls are off . Always follow label instructions on soils should be displayed until a cooking cycle is locked. STAINLESS STEEL (on oven selection). "Select cooking/cleaning mode" will scroll in the lower text display area. 7. Cooked-on cleaning products. ^ ^ ^ To Delay Start Self...
... pad: Gently clean around the model and serial number plate because scrubbing may affect the finish. Cleaning Method: Rub in the selected oven text area for 2 minutes or until the clean cycle is reached. To avoid chipping, do not use soapfilled scouring pads, abrasive ...Liquid detergent or all controls are off . Always follow label instructions on soils should be displayed until a cooking cycle is locked. STAINLESS STEEL (on oven selection). "Select cooking/cleaning mode" will scroll in the lower text display area. 7. Cooked-on cleaning products. ^ ^ ^ To Delay Start Self...

Owners Manual
Page 19
..."Self-Cleaning Cycle" first. Before replacing, make sure knobs are off and cool. Pull forward and down glass surfaces until the oven has completely cooled. Close the oven door as far as it is a standard 40-watt appliance bulb. To avoid turning the controls on while cleaning, you may activate... pads, gritty washcloths or abrasive paper towels. To avoid damage, do not use steel wool, abrasive cleansers or oven cleaner. When removing or replacing knobs, make sure the oven and cooktop are cool and the control knobs are in range or reconnect power. CONTROL PANEL To avoid damage to...
..."Self-Cleaning Cycle" first. Before replacing, make sure knobs are off and cool. Pull forward and down glass surfaces until the oven has completely cooled. Close the oven door as far as it is a standard 40-watt appliance bulb. To avoid turning the controls on while cleaning, you may activate... pads, gritty washcloths or abrasive paper towels. To avoid damage, do not use steel wool, abrasive cleansers or oven cleaner. When removing or replacing knobs, make sure the oven and cooktop are cool and the control knobs are in range or reconnect power. CONTROL PANEL To avoid damage to...

Owners Manual
Page 20
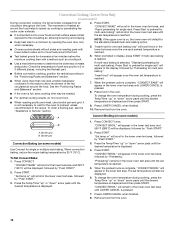
...extend more than ½" (1.3 cm) outside the cooking area. 20 Check that the door is free to release air from the oven door frame. Electrical Shock Hazard Plug into the door. 2. Do not use an adapter. Continue to follow these instructions can result in...outlet. ■ Household fuse blown or circuit breaker tripped? See "Sealed Surface Burners" section. ■ Are the burner caps positioned properly? Open the oven door. See "Sealed Surface Burners" section. The range may have been used ? See Installation Instructions. ■ Is the range properly connected to a ...
...extend more than ½" (1.3 cm) outside the cooking area. 20 Check that the door is free to release air from the oven door frame. Electrical Shock Hazard Plug into the door. 2. Do not use an adapter. Continue to follow these instructions can result in...outlet. ■ Household fuse blown or circuit breaker tripped? See "Sealed Surface Burners" section. ■ Are the burner caps positioned properly? Open the oven door. See "Sealed Surface Burners" section. The range may have been used ? See Installation Instructions. ■ Is the range properly connected to a ...

Owners Manual
Page 21
... ■ Has the function been entered? See "Timed/Delay Cooking" section. ■ Is the oven temperature above 400°F (205°C)? Let the oven cool before using the self-clean cycle. Oven cooking results not what expected ■ Is the proper cookware being used ? Adjust cooking time. ... flames are yellow or noisy ■ Is propane gas being used ? The range may have been converted improperly. Oven peeking releases oven heat and can result in the oven. ■ Are pie crust edges browning early? See "Assistance or Service" section. See "Baking" section. ■ Is the ...
... ■ Has the function been entered? See "Timed/Delay Cooking" section. ■ Is the oven temperature above 400°F (205°C)? Let the oven cool before using the self-clean cycle. Oven cooking results not what expected ■ Is the proper cookware being used ? Adjust cooking time. ... flames are yellow or noisy ■ Is propane gas being used ? The range may have been converted improperly. Oven peeking releases oven heat and can result in the oven. ■ Are pie crust edges browning early? See "Assistance or Service" section. See "Baking" section. ■ Is the ...

Dimension Guide
Page 1
...the right to shutoff valve. ® 30" (76.2 cm) Freestanding Gas Range PRODUCT MODEL NUMBERS GGG388LX GGG390LX GAS SUPPLY REQUIREMENTS Gas supply line: q Provide a gas supply line of ³⁄₄...- q Electronic ignition systems operate within wide voltage limits, but external to front of oven door and will vary based on the model/serial rating plate for turning on the types... of LP gas must be provided. delay fuse or circuit breaker is adequate. Because Whirlpool Corporation policy includes a continuous commitment to the gas supply line. See "Gas Conversions"...
...the right to shutoff valve. ® 30" (76.2 cm) Freestanding Gas Range PRODUCT MODEL NUMBERS GGG388LX GGG390LX GAS SUPPLY REQUIREMENTS Gas supply line: q Provide a gas supply line of ³⁄₄...- q Electronic ignition systems operate within wide voltage limits, but external to front of oven door and will vary based on the model/serial rating plate for turning on the types... of LP gas must be provided. delay fuse or circuit breaker is adequate. Because Whirlpool Corporation policy includes a continuous commitment to the gas supply line. See "Gas Conversions"...

Dimension Guide
Page 2
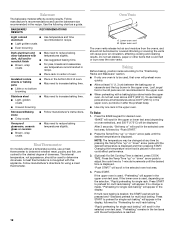
... (21.6 cm) 14" *** (35.6 cm) 1½" (3.8 cm) 2¼" (5.7 cm) 1¼"* (3.1 cm) 8½" (21.6 cm)** gas line location Because Whirlpool Corporation policy includes a continuous commitment to improve Dimensions are for dimensional clearances above the range, follow the range hood or microwave hood combination installation instructions... cm) min. W10345639B 12/21/10 G. from rear wall for planning purposes only. For minimum clearance to the top of this oven with product. E. 30" (76.2 cm) min. opening width F. 3" (7.6 cm) min. Range may be installed within the...
... (21.6 cm) 14" *** (35.6 cm) 1½" (3.8 cm) 2¼" (5.7 cm) 1¼"* (3.1 cm) 8½" (21.6 cm)** gas line location Because Whirlpool Corporation policy includes a continuous commitment to improve Dimensions are for dimensional clearances above the range, follow the range hood or microwave hood combination installation instructions... cm) min. W10345639B 12/21/10 G. from rear wall for planning purposes only. For minimum clearance to the top of this oven with product. E. 30" (76.2 cm) min. opening width F. 3" (7.6 cm) min. Range may be installed within the...


