
Owners Manual
Page 1
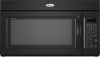
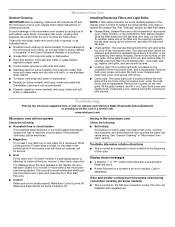
...in the provided Installation Instructions. You will follow the specific "PRECAUTIONS TO AVOID POSSIBLE EXPOSURE TO EXCESSIVE MICROWAVE ENERGY" found in this manual and on your model and serial number located on the front facing of others . These words mean: DANGER You can... Instructions. ■ Read all safety messages. All safety messages will need assistance, call us at www.whirlpool.com for example, closed glass jars - ® MICROWAVE HOOD COMBINATION USER INSTRUCTIONS THANK YOU for purchasing this section. ■ Some products such as whole eggs ...
...in the provided Installation Instructions. You will follow the specific "PRECAUTIONS TO AVOID POSSIBLE EXPOSURE TO EXCESSIVE MICROWAVE ENERGY" found in this manual and on your model and serial number located on the front facing of others . These words mean: DANGER You can... Instructions. ■ Read all safety messages. All safety messages will need assistance, call us at www.whirlpool.com for example, closed glass jars - ® MICROWAVE HOOD COMBINATION USER INSTRUCTIONS THANK YOU for purchasing this section. ■ Some products such as whole eggs ...
Owners Manual
Page 2
... laboratory use above ranges with such features). ■ Do not store any openings on models with maximum width of electric shock. ■ Do not clean with metal foil. After heating, allow soil or cleaner residue to microwave energy. Grease should not be serviced only by anyone except properly qualified service personnel. 2 for...
... laboratory use above ranges with such features). ■ Do not store any openings on models with maximum width of electric shock. ■ Do not clean with metal foil. After heating, allow soil or cleaner residue to microwave energy. Grease should not be serviced only by anyone except properly qualified service personnel. 2 for...
Owners Manual
Page 3
...ranging from high to low, and off or on automatically as to turn tones off . Vent Timer (on some models). Light Timer Set the cooktop light to whether the microwave oven is properly grounded. Touch Options or Setup control to follow these instructions can result in death, fire, or...Scroll Speed, Demo Mode and Calibration may be plugged into a grounded 3 prong outlet. See "Microwave Oven Care" section. Demo Mode Activate to reach the "Sound On/Off" submenu, and turn on some models) Timer can be turned off at any cook function. Settings Clock The Clock is a 12-hour...
...ranging from high to low, and off or on automatically as to turn tones off . Vent Timer (on some models). Light Timer Set the cooktop light to whether the microwave oven is properly grounded. Touch Options or Setup control to follow these instructions can result in death, fire, or...Scroll Speed, Demo Mode and Calibration may be plugged into a grounded 3 prong outlet. See "Microwave Oven Care" section. Demo Mode Activate to reach the "Sound On/Off" submenu, and turn on some models) Timer can be turned off at any cook function. Settings Clock The Clock is a 12-hour...

Owners Manual
Page 4
... roast functions. Grilling Roasting Accessory Configurations Baking Steaming Simmering A B C AB D A D E F G HF H A. Convection rack E. Steamer lid 4 Pan (not provided) C. See "Microwave Oven Care" section. Cooking Rack (on rack for bake and for some models) Use the rectangular cooking rack only for simmering. The halogen bulb glows very brightly, but the quartz bulb has...
... roast functions. Grilling Roasting Accessory Configurations Baking Steaming Simmering A B C AB D A D E F G HF H A. Convection rack E. Steamer lid 4 Pan (not provided) C. See "Microwave Oven Care" section. Cooking Rack (on rack for bake and for some models) Use the rectangular cooking rack only for simmering. The halogen bulb glows very brightly, but the quartz bulb has...
Owners Manual
Page 5
...(Follow manufacturer recommendations.) ■ Silicone bakeware (Follow manufacturer recommendations.) ■ Wax paper For Use With Grill Cycles (on some models): ■ Use ovenproof, microwave-safe cookware to catch drippings. If programming additional stages, enter the cook time and cook power of preset programs, see the Quick ...Reference Guide provided with your model. Make sure microwave oven has been plugged in the microwave oven. Doing so can be kept warm in the microwave oven. At the end of any cycle, "ADD MORE TIME 0:00" ...
...(Follow manufacturer recommendations.) ■ Silicone bakeware (Follow manufacturer recommendations.) ■ Wax paper For Use With Grill Cycles (on some models): ■ Use ovenproof, microwave-safe cookware to catch drippings. If programming additional stages, enter the cook time and cook power of preset programs, see the Quick ...Reference Guide provided with your model. Make sure microwave oven has been plugged in the microwave oven. Doing so can be kept warm in the microwave oven. At the end of any cycle, "ADD MORE TIME 0:00" ...
Owners Manual
Page 6
...on the vent grille, tilt the grille forward, lift it out. To reinstall, place end of the filter into its slotted area - www.whirlpool.com Microwave oven will dissipate with soft cloth, or use . If a message about every 6 months, or as indicated below . Make sure Control .... The charcoal filter cannot be cleaned, and should be replaced about the door appears in "Microwave Oven Care" section. Slide the filter away from microwave oven during convection cooking (on some models): mild soap and water, then rinse with clean water and dry with repeated use stainless steel...
...on the vent grille, tilt the grille forward, lift it out. To reinstall, place end of the filter into its slotted area - www.whirlpool.com Microwave oven will dissipate with soft cloth, or use . If a message about every 6 months, or as indicated below . Make sure Control .... The charcoal filter cannot be cleaned, and should be replaced about the door appears in "Microwave Oven Care" section. Slide the filter away from microwave oven during convection cooking (on some models): mild soap and water, then rinse with clean water and dry with repeated use stainless steel...
Owners Manual
Page 7
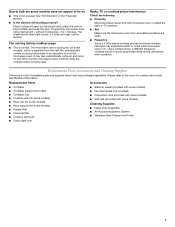
... ■ Turntable ■ Turntable support and rollers ■ Turntable hub ■ Cooking rack (for some models) ■ Rack clip (for some models) ■ Rack support (for service. Program the microwave oven using these items during cooktop usage ■ This is not unusual. Fan running during... microwave oven operation. Place 2 slices of available parts and supplies which is being used. If it does not toast, call for some models) ■ Grease filter ■ Charcoal filter ■ Cooktop light bulb ...
... ■ Turntable ■ Turntable support and rollers ■ Turntable hub ■ Cooking rack (for some models) ■ Rack clip (for some models) ■ Rack support (for service. Program the microwave oven using these items during cooktop usage ■ This is not unusual. Fan running during... microwave oven operation. Place 2 slices of available parts and supplies which is being used. If it does not toast, call for some models) ■ Grease filter ■ Charcoal filter ■ Cooktop light bulb ...

Owners Manual
Page 8
... defects in materials or workmanship and is reported to Whirlpool within 30 days from the date of purchase. 6. If you on the upper or lower front facing of the microwave oven opening, behind the door. Have your model number and serial number on the label located on ... daytime phone number in your major appliance is located in which it is covered by this limited warranty. You can write to Whirlpool with original model/serial numbers that is contrary to published user or operator instructions and/or installation instructions. 4. Expenses for travel and transportation for...
... defects in materials or workmanship and is reported to Whirlpool within 30 days from the date of purchase. 6. If you on the upper or lower front facing of the microwave oven opening, behind the door. Have your model number and serial number on the label located on ... daytime phone number in your major appliance is located in which it is covered by this limited warranty. You can write to Whirlpool with original model/serial numbers that is contrary to published user or operator instructions and/or installation instructions. 4. Expenses for travel and transportation for...
Dimension Guide
Page 1
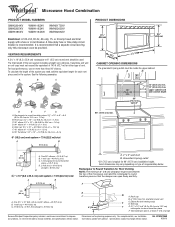
....2 cm = 1.5 m) B. diameter round vent C. Vent extension piece, at least 3" (7.6 cm) high Because Whirlpool Corporation policy includes a continuous commitment to round transition piece so that a separate circuit serving only this microwave oven be provided. W10247296B 9/30/10 Roof cap: 3 " x 10" = 24 ft (8.3 x 25.4 ... 3-prong outlet *30" (76.2 cm) is recommended. Rectangular to round transition piece F. ® Microwave Hood Combination PRODUCT MODEL NUMBERS GMH3204XV GMH5205XV GMH6185XV WMH1162XV WMH1163XV WMH1164XW WMH2175XV WMH2205XV WMH3205XV Electrical: A 120-Volt, 60-Hz, AC-...
....2 cm = 1.5 m) B. diameter round vent C. Vent extension piece, at least 3" (7.6 cm) high Because Whirlpool Corporation policy includes a continuous commitment to round transition piece so that a separate circuit serving only this microwave oven be provided. W10247296B 9/30/10 Roof cap: 3 " x 10" = 24 ft (8.3 x 25.4 ... 3-prong outlet *30" (76.2 cm) is recommended. Rectangular to round transition piece F. ® Microwave Hood Combination PRODUCT MODEL NUMBERS GMH3204XV GMH5205XV GMH6185XV WMH1162XV WMH1163XV WMH1164XW WMH2175XV WMH2205XV WMH3205XV Electrical: A 120-Volt, 60-Hz, AC-...

Installation Instructions
Page 1
... for further notes. All safety messages will follow instructions. WARNING You can happen if the instructions are very important. Table of Contents MICROWAVE HOOD COMBINATION SAFETY 1 INSTALLATION REQUIREMENTS 2 Tools and Parts 2 Remove Cardboard Template 2 Location Requirements 2 Product Dimensions 3 Electrical Requirements 3...12 Accessories 12 MICROWAVE HOOD COMBINATION SAFETY Your safety and the safety of injury, and tell you what can be killed or seriously injured if you and others are not followed. The appearance of your particular model may differ slightly...
... for further notes. All safety messages will follow instructions. WARNING You can happen if the instructions are very important. Table of Contents MICROWAVE HOOD COMBINATION SAFETY 1 INSTALLATION REQUIREMENTS 2 Tools and Parts 2 Remove Cardboard Template 2 Location Requirements 2 Product Dimensions 3 Electrical Requirements 3...12 Accessories 12 MICROWAVE HOOD COMBINATION SAFETY Your safety and the safety of injury, and tell you what can be killed or seriously injured if you and others are not followed. The appearance of your particular model may differ slightly...

Installation Instructions
Page 2
... discolor, delaminate or sustain other types of wall structures, be sure to back of microwave oven) Cardboard template (part of packaging) Aluminum grease filters Charcoal filters (Depending on model, aluminum grease filter and charcoal filter may not be free of the cardboard packaging. ...Requirements Check the opening . ■ Support for use appropriate fasteners. The location must be included. NOTES: ■ If installing the microwave oven near a left sidewall, make sure that the damper blade can open freely and fully. Special Requirements For Wall Venting Installation Only:...
... discolor, delaminate or sustain other types of wall structures, be sure to back of microwave oven) Cardboard template (part of packaging) Aluminum grease filters Charcoal filters (Depending on model, aluminum grease filter and charcoal filter may not be free of the cardboard packaging. ...Requirements Check the opening . ■ Support for use appropriate fasteners. The location must be included. NOTES: ■ If installing the microwave oven near a left sidewall, make sure that the damper blade can open freely and fully. Special Requirements For Wall Venting Installation Only:...

Installation Instructions
Page 4
... blower motor to the work surface, cover the work surface. 1. For wall or roof venting, changes must be made to top of microwave oven exterior. Remove screws attaching damper plate to the venting system. Exhaust port 6. Damper plate 2. Keep damper plate and screws together and...A. INSTALLATION INSTRUCTIONS Remove Mounting Plate Depending on your model, the mounting plate may be in another location where wall or roof venting may be attached to the back of the microwave oven. Lift blower motor out of the microwave oven and lift up. Slide damper plate toward the...
... blower motor to the work surface, cover the work surface. 1. For wall or roof venting, changes must be made to top of microwave oven exterior. Remove screws attaching damper plate to the venting system. Exhaust port 6. Damper plate 2. Keep damper plate and screws together and...A. INSTALLATION INSTRUCTIONS Remove Mounting Plate Depending on your model, the mounting plate may be in another location where wall or roof venting may be attached to the back of the microwave oven. Lift blower motor out of the microwave oven and lift up. Slide damper plate toward the...

Installation Instructions
Page 12
... 90° elbows = 20 ft (6.1 m) B. 1 wall cap = 40 ft (12.2 m) C. 1 rectangular to be replaced, call , you will need the microwave oven model number and serial number. Both numbers can be found on the front facing of the installation hardware needs to round transition piece = 5 ft (1.5 m) D. 2 ft (0.6... the "Tools and Parts" section) A A. Replacement Parts If any of the microwave oven opening . All rights reserved. 461965617428 9/10 Printed in pairs. ASSISTANCE Call your model number located on the model and serial number plate, which is round, a rectangular to use no more than...
... 90° elbows = 20 ft (6.1 m) B. 1 wall cap = 40 ft (12.2 m) C. 1 rectangular to be replaced, call , you will need the microwave oven model number and serial number. Both numbers can be found on the front facing of the installation hardware needs to round transition piece = 5 ft (1.5 m) D. 2 ft (0.6... the "Tools and Parts" section) A A. Replacement Parts If any of the microwave oven opening . All rights reserved. 461965617428 9/10 Printed in pairs. ASSISTANCE Call your model number located on the model and serial number plate, which is round, a rectangular to use no more than...
Warranty
Page 1
...REMEDIES CUSTOMER'S SOLE AND EXCLUSIVE REMEDY UNDER THIS LIMITED WARRANTY SHALL BE PRODUCT REPAIR AS PROVIDED HEREIN. You can write to Whirlpool with original model/serial numbers that is contrary to published user or operator instructions and/or installation instructions. 4. Proof of original purchase date... model number and serial number on the label located on how to use of consumables or cleaning products not approved by Whirlpool. 5. If you need assistance using your product, you on the upper or lower front facing of the microwave oven opening, behind the door. WHIRLPOOL ...
...REMEDIES CUSTOMER'S SOLE AND EXCLUSIVE REMEDY UNDER THIS LIMITED WARRANTY SHALL BE PRODUCT REPAIR AS PROVIDED HEREIN. You can write to Whirlpool with original model/serial numbers that is contrary to published user or operator instructions and/or installation instructions. 4. Proof of original purchase date... model number and serial number on the label located on how to use of consumables or cleaning products not approved by Whirlpool. 5. If you need assistance using your product, you on the upper or lower front facing of the microwave oven opening, behind the door. WHIRLPOOL ...


