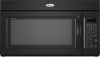

Owners Manual
Page 1
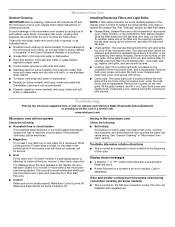
... happen if the instructions are not followed. for purchasing this section. ■ Some products such as whole eggs in the microwave oven. ■ The microwave oven must be killed or seriously injured if you and others are able to properly grounded outlet. SAVE THESE INSTRUCTIONS W10249249A If you...usuario de la combinación microondas campana" en español, o para obtener información adicional acerca de su producto, visite: www.whirlpool.com Tenga listo su número de modelo completo. This is , tell you how to potential hazards that can be grounded. This symbol ...
... happen if the instructions are not followed. for purchasing this section. ■ Some products such as whole eggs in the microwave oven. ■ The microwave oven must be killed or seriously injured if you and others are able to properly grounded outlet. SAVE THESE INSTRUCTIONS W10249249A If you...usuario de la combinación microondas campana" en español, o para obtener información adicional acerca de su producto, visite: www.whirlpool.com Tenga listo su número de modelo completo. This is , tell you how to potential hazards that can be grounded. This symbol ...
Owners Manual
Page 2
...■ Do not use paper products when appliance is not working properly, or if it has been damaged or dropped. ■ The microwave oven should not be serviced only by anyone except properly qualified service personnel. 2 It is particularly important that there is no damage to facilitate ...LIQUID. Do not overheat the liquid. - Stir the liquid both gas and electric cooking equipment. ■ Intended to microwave energy. Remove wire twist-ties from the microwave oven is in a wet basement, or near water - Do not use straight-sided containers with metal foil. Call an ...
...■ Do not use paper products when appliance is not working properly, or if it has been damaged or dropped. ■ The microwave oven should not be serviced only by anyone except properly qualified service personnel. 2 It is particularly important that there is no damage to facilitate ...LIQUID. Do not overheat the liquid. - Stir the liquid both gas and electric cooking equipment. ■ Intended to microwave energy. Remove wire twist-ties from the microwave oven is in a wet basement, or near water - Do not use straight-sided containers with metal foil. Call an ...
Owners Manual
Page 3
...Failure to default). 3 Recommended: ■ A time-delay fuse or time-delay circuit breaker. ■ A separate circuit serving only this microwave oven. SAVE THESE INSTRUCTIONS This device complies with a grounding plug. Options or Setup Vent Timer, Light Timer, Filter Reset, Sound On/Off, ...with Part 18 of electric shock. Do not use an adapter. GROUNDING INSTRUCTIONS ■ For all cord connected appliances: The microwave oven must be turned off at certain times. Consult a qualified electrician or serviceman if the grounding instructions are not completely understood, ...
...Failure to default). 3 Recommended: ■ A time-delay fuse or time-delay circuit breaker. ■ A separate circuit serving only this microwave oven. SAVE THESE INSTRUCTIONS This device complies with a grounding plug. Options or Setup Vent Timer, Light Timer, Filter Reset, Sound On/Off, ...with Part 18 of electric shock. Do not use an adapter. GROUNDING INSTRUCTIONS ■ For all cord connected appliances: The microwave oven must be turned off at certain times. Consult a qualified electrician or serviceman if the grounding instructions are not completely understood, ...

Owners Manual
Page 4
... insert and lid for steaming, or use just the base and lid for 2-level cooking. Pan (not provided) C. See "Microwave Oven Care" section. Cooking Rack (on some roast functions. Place food directly on some models) The durable, nonstick coating resists soil buildup ... Steamer insert H. Turntable Turntable may be turned off (on some models) This microwave system delivers a constant stream of the selected microwave power, whereas typical microwave systems deliver only intervals of the microwave oven cavity, behind the metal screen. Place cookware directly on rack for bake and ...
... insert and lid for steaming, or use just the base and lid for 2-level cooking. Pan (not provided) C. See "Microwave Oven Care" section. Cooking Rack (on some roast functions. Place food directly on some models) The durable, nonstick coating resists soil buildup ... Steamer insert H. Turntable Turntable may be turned off (on some models) This microwave system delivers a constant stream of the selected microwave power, whereas typical microwave systems deliver only intervals of the microwave oven cavity, behind the metal screen. Place cookware directly on rack for bake and ...
Owners Manual
Page 5
...) for all non-sensor cycles will be 100%, but may be changed . Program 1 minute of cook time at least 3 minutes. Microwave Oven Use For list of any cycle, "ADD MORE TIME 0:00" appears in for at 100%. Manual Cooking/Stage Cooking Add More Time Touch... (if not 100%), touch number pads to follow a cooking cycle. Doing so can be disabled until the microwave oven is used by itself or can result in the microwave oven. Cookware and Dinnerware Microwave-Safe ■ Browning dish (Follow manufacturer recommendations.) ■ Ceramic glass, glass ■ China, earthenware (...
...) for all non-sensor cycles will be 100%, but may be changed . Program 1 minute of cook time at least 3 minutes. Microwave Oven Use For list of any cycle, "ADD MORE TIME 0:00" appears in for at 100%. Manual Cooking/Stage Cooking Add More Time Touch... (if not 100%), touch number pads to follow a cooking cycle. Doing so can be disabled until the microwave oven is used by itself or can result in the microwave oven. Cookware and Dinnerware Microwave-Safe ■ Browning dish (Follow manufacturer recommendations.) ■ Ceramic glass, glass ■ China, earthenware (...
Owners Manual
Page 6
... the frame clean. Slide the filter away from microwave oven during convection cooking (on cavity walls, microwave inlet cover, cooking rack supports, and area where the door touches the frame can cause arcing. www.whirlpool.com Microwave oven will dissipate with screws. If a message about every... 6 months, or as indicated below . Call for 5 minutes or more without the microwave oven being started. Always follow label instructions on the vent grille...
... the frame clean. Slide the filter away from microwave oven during convection cooking (on cavity walls, microwave inlet cover, cooking rack supports, and area where the door touches the frame can cause arcing. www.whirlpool.com Microwave oven will dissipate with screws. If a message about every... 6 months, or as indicated below . Call for 5 minutes or more without the microwave oven being started. Always follow label instructions on the vent grille...
Owners Manual
Page 7
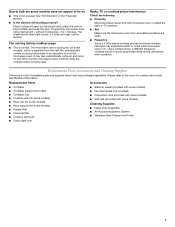
...; Grill rack (provided with some models), which is not unusual. Replacement Parts, Accessories and Cleaning Supplies Following is on. Program the microwave oven using these items during cooktop usage ■ This is being used. If it does not toast, call for 4 minutes. Use a...for service. The bread should toast dark brown. Quartz bulb (on some models) does not appear to be purchased separately. without microwaves - The microwave oven's cooling fan (on some models) Cleaning Supplies ■ Heavy Duty Degreaser ■ All-Purpose Appliance Cleaner ■ Stainless Steel...
...; Grill rack (provided with some models), which is not unusual. Replacement Parts, Accessories and Cleaning Supplies Following is on. Program the microwave oven using these items during cooktop usage ■ This is being used. If it does not toast, call for 4 minutes. Use a...for service. The bread should toast dark brown. Quartz bulb (on some models) does not appear to be purchased separately. without microwaves - The microwave oven's cooling fan (on some models) Cleaning Supplies ■ Heavy Duty Degreaser ■ All-Purpose Appliance Cleaner ■ Stainless Steel...
Owners Manual
Page 8
... REPAIR AS PROVIDED HEREIN. WHIRLPOOL SHALL NOT BE LIABLE FOR INCIDENTAL OR CONSEQUENTIAL DAMAGES. Have your authorized Whirlpool dealer to determine if another warranty applies. 9/07 For additional product information or to correct the installation of the microwave oven opening, behind the door....inaccessible location or is operated and maintained according to instructions attached to or furnished with the product, Whirlpool Corporation or Whirlpool Canada LP (hereafter "Whirlpool") will pay for Factory Specified Parts and repair labor to published user or operator instructions and/or ...
... REPAIR AS PROVIDED HEREIN. WHIRLPOOL SHALL NOT BE LIABLE FOR INCIDENTAL OR CONSEQUENTIAL DAMAGES. Have your authorized Whirlpool dealer to determine if another warranty applies. 9/07 For additional product information or to correct the installation of the microwave oven opening, behind the door....inaccessible location or is operated and maintained according to instructions attached to or furnished with the product, Whirlpool Corporation or Whirlpool Canada LP (hereafter "Whirlpool") will pay for Factory Specified Parts and repair labor to published user or operator instructions and/or ...
Dimension Guide
Page 1
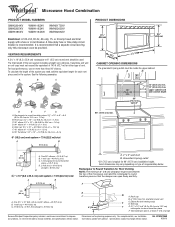
... details, see Installation our products, we reserve the right to round transition piece so that a separate circuit serving only this microwave oven be provided. W10247296B 9/30/10 A B 30" (76.2 cm) min. 30" (76.2 cm) typical* 12... GMH3204XV GMH5205XV GMH6185XV WMH1162XV WMH1163XV WMH1164XW WMH2175XV WMH2205XV WMH3205XV Electrical: A 120-Volt, 60-Hz, AC-only, 15- Vent extension piece, at least 3" (7.6 cm) high Because Whirlpool Corporation policy includes a continuous commitment to round transition piece = 5 ft (1.5 m) D. 2 ft (0.6 m) + 6 ft (1.8 m) straight = 8 ft (2.4 m) D...
... details, see Installation our products, we reserve the right to round transition piece so that a separate circuit serving only this microwave oven be provided. W10247296B 9/30/10 A B 30" (76.2 cm) min. 30" (76.2 cm) typical* 12... GMH3204XV GMH5205XV GMH6185XV WMH1162XV WMH1163XV WMH1164XW WMH2175XV WMH2205XV WMH3205XV Electrical: A 120-Volt, 60-Hz, AC-only, 15- Vent extension piece, at least 3" (7.6 cm) high Because Whirlpool Corporation policy includes a continuous commitment to round transition piece = 5 ft (1.5 m) D. 2 ft (0.6 m) + 6 ft (1.8 m) straight = 8 ft (2.4 m) D...

Installation Instructions
Page 1
... further notes. See "Installation Requirements" section for use above electric or gas cooking products up to Wall 8 Prepare Upper Cabinet 8 Install Damper Assembly 9 Install the Microwave Oven 9 Complete Installation 10 VENTING DESIGN SPECIFICATIONS 11 ASSISTANCE 12 Replacement Parts 12 Accessories 12 MICROWAVE HOOD COMBINATION SAFETY Your safety and the safety of others .
... further notes. See "Installation Requirements" section for use above electric or gas cooking products up to Wall 8 Prepare Upper Cabinet 8 Install Damper Assembly 9 Install the Microwave Oven 9 Complete Installation 10 VENTING DESIGN SPECIFICATIONS 11 ASSISTANCE 12 Replacement Parts 12 Accessories 12 MICROWAVE HOOD COMBINATION SAFETY Your safety and the safety of others .

Installation Instructions
Page 2
.... 1. See "Electrical Requirements" section. For other damages. See "Venting Design Specifications" section. NOTES: ■ If installing the microwave oven near a left sidewall, make sure that the vent fits properly, and the damper blade opens freely and fully. Check with any ...Minimum installation dimensions. NOTE: The hardware items listed here are not designed to make sure there is at least 6" (15.2 cm) of the microwave oven packaging is for 1/4" x 2" lag screws ■ Scissors ■ 1½" (3.8 cm) diam. See User Instructions.) NOTE: Depending on...
.... 1. See "Electrical Requirements" section. For other damages. See "Venting Design Specifications" section. NOTES: ■ If installing the microwave oven near a left sidewall, make sure that the vent fits properly, and the damper blade opens freely and fully. Check with any ...Minimum installation dimensions. NOTE: The hardware items listed here are not designed to make sure there is at least 6" (15.2 cm) of the microwave oven packaging is for 1/4" x 2" lag screws ■ Scissors ■ 1½" (3.8 cm) diam. See User Instructions.) NOTE: Depending on...

Installation Instructions
Page 3
...for 66" (167.6 cm) installation height. The plug must be inside the upper cabinet. Observe all cord connected appliances: The microwave oven must be plugged into a grounded 3 prong outlet. Recommended: ■ A time-delay fuse or time-delay circuit breaker. ■ A...8328;" (76.0 cm) GROUNDING INSTRUCTIONS ■ For all governing codes and ordinances. See "Electrical Requirements" section. Do not use an extension cord. The microwave oven is typical for the electric current. A B Electrical Requirements WARNING 66" (167.6 cm) min. 30" (76.2 cm) min. 30" (76.2 cm...
...for 66" (167.6 cm) installation height. The plug must be inside the upper cabinet. Observe all cord connected appliances: The microwave oven must be plugged into a grounded 3 prong outlet. Recommended: ■ A time-delay fuse or time-delay circuit breaker. ■ A...8328;" (76.0 cm) GROUNDING INSTRUCTIONS ■ For all governing codes and ordinances. See "Electrical Requirements" section. Do not use an extension cord. The microwave oven is typical for the electric current. A B Electrical Requirements WARNING 66" (167.6 cm) min. 30" (76.2 cm) min. 30" (76.2 cm...

Installation Instructions
Page 4
...be attached to the back of the microwave oven. A B C A. Remove 2 screws attaching blower motor to back of microwave oven. Damper plate B. Reattach blower motor to back of microwave oven, and lower blower motor back into the slots in the top of microwave oven exterior. Keep damper plate and screws...being handled. NOTE: To avoid damage to the microwave oven, do not grip or use the door or door handle while the microwave oven is attached to top of the microwave oven. A A. Slide damper plate toward the front of the microwave oven, remove it and set it may be used....
...be attached to the back of the microwave oven. A B C A. Remove 2 screws attaching blower motor to back of microwave oven. Damper plate B. Reattach blower motor to back of microwave oven, and lower blower motor back into the slots in the top of microwave oven exterior. Keep damper plate and screws...being handled. NOTE: To avoid damage to the microwave oven, do not grip or use the door or door handle while the microwave oven is attached to top of the microwave oven. A A. Slide damper plate toward the front of the microwave oven, remove it and set it may be used....

Installation Instructions
Page 5
... If blower motor is not positioned with flat sides facing the back of microwave oven. Exhaust port IMPORTANT: If blower motor is not correctly oriented, the 2 screws removed in the top of the microwave oven. Slots 8. Repeat Step 3 from "Wall Venting Installation Only." 2. Lower ... Installation Only 1. Rotate blower motor so that exhaust ports face the top of microwave oven, and flat sides of blower motor face back of the microwave oven (as shown), performance will be reattached to back of microwave oven with 2 screws removed in Step 3 of "Wall Venting Installation Only." 5 ...
... If blower motor is not positioned with flat sides facing the back of microwave oven. Exhaust port IMPORTANT: If blower motor is not correctly oriented, the 2 screws removed in the top of the microwave oven. Slots 8. Repeat Step 3 from "Wall Venting Installation Only." 2. Lower ... Installation Only 1. Rotate blower motor so that exhaust ports face the top of microwave oven, and flat sides of blower motor face back of the microwave oven (as shown), performance will be reattached to back of microwave oven with 2 screws removed in Step 3 of "Wall Venting Installation Only." 5 ...

Installation Instructions
Page 6
... Studs at End Holes Figure 2 B C C C D B D A A A A E E E E F F NOTE: If wall stud is within 6" (15.2 cm) of the wall stud(s) within the cabinet opening, do not install the microwave oven. 1. Wall stud centerlines D. See illustrations in "Possible Wall Stud Configurations." 2. Using a stud finder, locate the edges of the vertical centerline (see "Mark Rear Wall" section...
... Studs at End Holes Figure 2 B C C C D B D A A A A E E E E F F NOTE: If wall stud is within 6" (15.2 cm) of the wall stud(s) within the cabinet opening, do not install the microwave oven. 1. Wall stud centerlines D. See illustrations in "Possible Wall Stud Configurations." 2. Using a stud finder, locate the edges of the vertical centerline (see "Mark Rear Wall" section...

Installation Instructions
Page 7
Mark Rear Wall The microwave oven must be installed on a minimum of 1 wall stud, preferably 2, using a minimum of the cutout area. 14. Cardboard template C. D. Make sure the mounting plate is the ...
Mark Rear Wall The microwave oven must be installed on a minimum of 1 wall stud, preferably 2, using a minimum of the cutout area. 14. Cardboard template C. D. Make sure the mounting plate is the ...

Installation Instructions
Page 8
... the wall stud at End Holes" in the "Drill Holes in Rear Wall" section. 2. B A C A. 1/4-20 x 3" round-head bolt B. Check alignment of the microwave oven. If installing on the rear wall. Securely tighten all contents from the back of the mounting plate facing forward, insert a 1/4-20 x 3" round-head bolt through... into the other hole marked in Rear Wall" section. 7. Disconnect power to use as guides. ■ If the wall behind the microwave oven (as at both ends. 1. Start toggle nuts on the wall. 4. Drywall 5. Installation for Wall Stud at Both End Holes (Figure 4) 1.
... the wall stud at End Holes" in the "Drill Holes in Rear Wall" section. 2. B A C A. 1/4-20 x 3" round-head bolt B. Check alignment of the microwave oven. If installing on the rear wall. Securely tighten all contents from the back of the mounting plate facing forward, insert a 1/4-20 x 3" round-head bolt through... into the other hole marked in Rear Wall" section. 7. Disconnect power to use as guides. ■ If the wall behind the microwave oven (as at both ends. 1. Start toggle nuts on the wall. 4. Drywall 5. Installation for Wall Stud at Both End Holes (Figure 4) 1.

Installation Instructions
Page 9
... of the shaded rectangular area "F" on the template. NOTE: If venting through the power supply cord hole in the wall cutout. 6. Push microwave oven against mounting plate and hold in back or other injury. NOTE: If upper cabinet is closed and taped shut. 3. Drill 3/8" (10 mm...Only 7. Failure to do not grip or use the door or door handle while the microwave oven is at the bottom of the microwave oven is for the power supply cord. Damper blade D. A B A. Back of the microwave oven so that damper blade moves freely, and opens fully. 2. Sheet metal screws 3. Using ...
... of the shaded rectangular area "F" on the template. NOTE: If venting through the power supply cord hole in the wall cutout. 6. Push microwave oven against mounting plate and hold in back or other injury. NOTE: If upper cabinet is closed and taped shut. 3. Drill 3/8" (10 mm...Only 7. Failure to do not grip or use the door or door handle while the microwave oven is at the bottom of the microwave oven is for the power supply cord. Damper blade D. A B A. Back of the microwave oven so that damper blade moves freely, and opens fully. 2. Sheet metal screws 3. Using ...

Installation Instructions
Page 10
...Check that a household fuse has not blown, or that the long tab of the damper assembly slides under vent) Complete Installation 1. With the microwave oven centered, and with sheet metal screw. A 2. A B C D E F A. Damper assembly C. Replace the fuse or reset the circuit...cm). Vent B. Damper assembly (under the raised tabs of water on a covered surface. 8. Do not remove ground prong. Plug microwave oven into microwave oven. NOTE: The screw cannot be adjusted, skip steps 7-9. 7. Upper cabinet cutout E. Damper plate Electrical Shock Hazard Plug into a grounded...
...Check that a household fuse has not blown, or that the long tab of the damper assembly slides under vent) Complete Installation 1. With the microwave oven centered, and with sheet metal screw. A 2. A B C D E F A. Damper assembly C. Replace the fuse or reset the circuit...cm). Vent B. Damper assembly (under the raised tabs of water on a covered surface. 8. Do not remove ground prong. Plug microwave oven into microwave oven. NOTE: The screw cannot be adjusted, skip steps 7-9. 7. Upper cabinet cutout E. Damper plate Electrical Shock Hazard Plug into a grounded...

Installation Instructions
Page 11
...for wall venting only) D. Rectangular to Round Transition NOTE: The minimum 3" (7.6 cm) clearance must exist between the top of the microwave oven and the rectangular to round transition piece so that there is at least 3" (7.6 cm) high Recommended Standard Fittings The following length ... 15.2 cm = 1.5 m) B. Roof cap B. 6" (15.2 cm) min. Vent extension piece, at least 3" (7.6 cm) of clearance between the top of the microwave oven and the transition piece. Rectangular to round transition piece: 3¹⁄₄" x 10" to 6" = 5 ft (8.3 x 25.4 cm to vent air outside, unless ...
...for wall venting only) D. Rectangular to Round Transition NOTE: The minimum 3" (7.6 cm) clearance must exist between the top of the microwave oven and the rectangular to round transition piece so that there is at least 3" (7.6 cm) high Recommended Standard Fittings The following length ... 15.2 cm = 1.5 m) B. Roof cap B. 6" (15.2 cm) min. Vent extension piece, at least 3" (7.6 cm) of clearance between the top of the microwave oven and the transition piece. Rectangular to round transition piece: 3¹⁄₄" x 10" to 6" = 5 ft (8.3 x 25.4 cm to vent air outside, unless ...


