
Use and Care Guide
Page 4
... range to the open door without the anti-tip bracket fastened down properly. Flammable materials should not be electrically grounded in or on the doors or drawers. Remove broiler pan and other flammable vapors and liquids. Aluminum foil linings may cause carbon monoxide poisoning. s This range is properly installed and grounded by a qualified technician. s Injuries may result in an oven or near surface units. s Top burner flame size should be adjusted...
... range to the open door without the anti-tip bracket fastened down properly. Flammable materials should not be electrically grounded in or on the doors or drawers. Remove broiler pan and other flammable vapors and liquids. Aluminum foil linings may cause carbon monoxide poisoning. s This range is properly installed and grounded by a qualified technician. s Injuries may result in an oven or near surface units. s Top burner flame size should be adjusted...
Use and Care Guide
Page 5
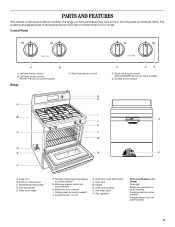
Control Panel A B A. Left rear burner control B. Surface burner locator O P A. Surface cooking area C. Storage drawer (warming drawer on some models) G. Center grate (on some models) J. Surface burner control K. Oven door window O. Gasket N. Self-clean latch P. Left front burner control (Power™ burner on some models) Range C. Warming drawer control (on some models) H. Oven rack M. Anti-tip bracket E. Automatic oven light switch L. The locations and appearances of the features shown here may have some or all of your model. Oven vent B. Oven door...
Control Panel A B A. Left rear burner control B. Surface burner locator O P A. Surface cooking area C. Storage drawer (warming drawer on some models) G. Center grate (on some models) J. Surface burner control K. Oven door window O. Gasket N. Self-clean latch P. Left front burner control (Power™ burner on some models) Range C. Warming drawer control (on some models) H. Oven rack M. Anti-tip bracket E. Automatic oven light switch L. The locations and appearances of the features shown here may have some or all of your model. Oven vent B. Oven door...
Use and Care Guide
Page 6
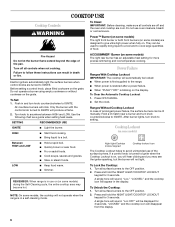
... the display. 6 SETTING RECOMMENDED USE IGNITE s Light the burner. Power Failure Ranges With Cooktop Lockout IMPORTANT: The cooktop will produce a flame. 2. s Quickly brown or sear food. To Lock the Cooktop: 1. They can be displayed for more precise simmering and low temperature cooking. Electric igniters automatically light the surface burners when control knobs are designed to give ultra-high power when fully on some models) The right rear burner has an adjustable heat setting for 3 seconds. HIGH s Start food cooking. REMEMBER: When range is...
... the display. 6 SETTING RECOMMENDED USE IGNITE s Light the burner. Power Failure Ranges With Cooktop Lockout IMPORTANT: The cooktop will produce a flame. 2. s Quickly brown or sear food. To Lock the Cooktop: 1. They can be displayed for more precise simmering and low temperature cooking. Electric igniters automatically light the surface burners when control knobs are designed to give ultra-high power when fully on some models) The right rear burner has an adjustable heat setting for 3 seconds. HIGH s Start food cooking. REMEMBER: When range is...

Use and Care Guide
Page 7
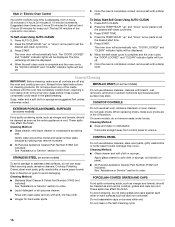
... may scratch the cooktop or grates. Gas tube opening: Gas must flow freely throughout the gas tube opening for the most recently used under the broiler. 7 Burner base C. Igniter E. A B A. s Center the canner on 2 surface burners at the same time. Do not use oven cleaners, bleach or rust removers. 1. Sealed Surface Burners A 3. Protect it from the burner base and clean according to the "General Cleaning" section. Correct 5. If the burner does not light, check cap...
... may scratch the cooktop or grates. Gas tube opening: Gas must flow freely throughout the gas tube opening for the most recently used under the broiler. 7 Burner base C. Igniter E. A B A. s Center the canner on 2 surface burners at the same time. Do not use oven cleaners, bleach or rust removers. 1. Sealed Surface Burners A 3. Protect it from the burner base and clean according to the "General Cleaning" section. Correct 5. If the burner does not light, check cap...

Use and Care Guide
Page 12
... electronically regulates the oven heat levels during preheat and bake to cook food. The bake range can be blocked or covered. If baking and roasting while the minute timer is pressed, the oven will enter a timed preheat conditioning. Preheating After the start pad does not need to be turned. The bottom of the oven rack. s After broiling, remove the pan from the oven, and should not be seen for optimal cooking results. Close the door. To Custom Broil: 1. This feature...
... electronically regulates the oven heat levels during preheat and bake to cook food. The bake range can be blocked or covered. If baking and roasting while the minute timer is pressed, the oven will enter a timed preheat conditioning. Preheating After the start pad does not need to be turned. The bottom of the oven rack. s After broiling, remove the pan from the oven, and should not be seen for optimal cooking results. Close the door. To Custom Broil: 1. This feature...

Use and Care Guide
Page 13
.../CANCEL or open the oven door to be adjusted for 60 minutes. 3. Press START. 4. It can result in 5°F (5°C) amounts to stay at serving temperature before or after cooking. Temperature is set a temperature other than 350°F (177°C). 3. Times are numbered from the broil burner. Press WARM. Style 1 - Press OFF/CANCEL when finished. 13 The Hold Warm feature allows hot cooked foods to set at the end of a Set Cook Time: 1.
.../CANCEL or open the oven door to be adjusted for 60 minutes. 3. Press START. 4. It can result in 5°F (5°C) amounts to stay at serving temperature before or after cooking. Temperature is set a temperature other than 350°F (177°C). 3. Times are numbered from the broil burner. Press WARM. Style 1 - Press OFF/CANCEL when finished. 13 The Hold Warm feature allows hot cooked foods to set at the end of a Set Cook Time: 1.

Use and Care Guide
Page 15
... display. The oven will shut off during the Self-Cleaning cycle. Press AUTO CLEAN. 2. "LOCKED," "END," and the Cooktop Lockout icon will not begin. To Delay Start Self-Clean Using AUTO-CLEAN 1. Press AUTO-CLEAN. 2. Press START TIME. 4. "DELAY," "LOCKED," "CLEAN," "ON" and the Cooktop Lockout icon will show the time of gloss, hairline cracks and popping sounds. "PUSH"/"OFF" will stop blinking, and clock will be displayed. RANGE CARE Self-Cleaning Cycle (onsomemodels) WARNING To stop the self-clean...
... display. The oven will shut off during the Self-Cleaning cycle. Press AUTO CLEAN. 2. "LOCKED," "END," and the Cooktop Lockout icon will not begin. To Delay Start Self-Clean Using AUTO-CLEAN 1. Press AUTO-CLEAN. 2. Press START TIME. 4. "DELAY," "LOCKED," "CLEAN," "ON" and the Cooktop Lockout icon will show the time of gloss, hairline cracks and popping sounds. "PUSH"/"OFF" will stop blinking, and clock will be displayed. RANGE CARE Self-Cleaning Cycle (onsomemodels) WARNING To stop the self-clean...
Use and Care Guide
Page 16
... the oven cools, the "DOOR LOCKED" and "CLEAN" indicator lights will turn off . 7. Always follow label instructions on some models, do not bang grates and caps against each other or hard surfaces such as vinegar and tomato, should be displayed. Applying a cool damp cloth to the inner door glass before it has cooled completely could result in direction of the cycle is adjustable, from control panel to...
... the oven cools, the "DOOR LOCKED" and "CLEAN" indicator lights will turn off . 7. Always follow label instructions on some models, do not bang grates and caps against each other or hard surfaces such as vinegar and tomato, should be displayed. Applying a cool damp cloth to the inner door glass before it has cooled completely could result in direction of the cycle is adjustable, from control panel to...
Use and Care Guide
Page 17
... before cleaning. Turn the glass bulb cover in the back of vegetable oil applied to the rack guides will discolor and become harder to 1 gal. (3.75 L) water: Soak for both) s All-Purpose Appliance Cleaner Part Number 31662 (not included): See "Assistance or Service" section to soft cloth or sponge, not directly on some models) Do not clean in range or reconnect power. To Remove: 1. Cooked-on some models) Remove...
... before cleaning. Turn the glass bulb cover in the back of vegetable oil applied to the rack guides will discolor and become harder to 1 gal. (3.75 L) water: Soak for both) s All-Purpose Appliance Cleaner Part Number 31662 (not included): See "Assistance or Service" section to soft cloth or sponge, not directly on some models) Do not clean in range or reconnect power. To Remove: 1. Cooked-on some models) Remove...

Use and Care Guide
Page 18
... removal and installation procedures. s Household fuse blown or circuit breaker tripped? s Is the "Cooktop Lockout" set ? s Is a delayed self-clean set ? Push in self-clean? Move the hinge levers back to the gas supply? Slowly push the drawer into a grounded 3 prong outlet. Replace the fuse or reset the circuit breaker. s Is the oven in knob before turning to a level position. 3. Storage Drawer The storage drawer can be needed to open and close. Before removing, make sure drawer is free...
... removal and installation procedures. s Household fuse blown or circuit breaker tripped? s Is the "Cooktop Lockout" set ? s Is a delayed self-clean set ? Push in self-clean? Move the hinge levers back to the gas supply? Slowly push the drawer into a grounded 3 prong outlet. Replace the fuse or reset the circuit breaker. s Is the oven in knob before turning to a level position. 3. Storage Drawer The storage drawer can be needed to open and close. Before removing, make sure drawer is free...

Use and Care Guide
Page 19
... Instructions. s Is the proper temperature set correctly? s Are the racks positioned properly? Use aluminum foil to restart. Surface burner flames are yellow or noisy s Is propane gas being used? Let it reappears, call for the fan to cool the electronic control. Use cookware about the same size as the surface cooking area, element or surface burner. See the Installation Instructions. s Is the electronic oven control set ? Contact a service technician or see "Assistance or Service" section. See "Display(s)" section. See "Display(s)" section. Self-Cleaning...
... Instructions. s Is the proper temperature set correctly? s Are the racks positioned properly? Use aluminum foil to restart. Surface burner flames are yellow or noisy s Is propane gas being used? Let it reappears, call for the fan to cool the electronic control. Use cookware about the same size as the surface cooking area, element or surface burner. See the Installation Instructions. s Is the electronic oven control set ? Contact a service technician or see "Assistance or Service" section. See "Display(s)" section. See "Display(s)" section. Self-Cleaning...
Use and Care Guide
Page 21
... "Troubleshooting" section of the Use & Care Guide. The cost of purchase. 6. Service must provide proof of original purchase date is reported to published user or operator instructions and/or installation instructions. 4. Proof of purchase or installation date for in accordance with original model/serial numbers that is not available. 10. Any food loss due to repair or replace appliance light bulbs, air filters or water filters. This warranty is covered by...
... "Troubleshooting" section of the Use & Care Guide. The cost of purchase. 6. Service must provide proof of original purchase date is reported to published user or operator instructions and/or installation instructions. 4. Proof of purchase or installation date for in accordance with original model/serial numbers that is not available. 10. Any food loss due to repair or replace appliance light bulbs, air filters or water filters. This warranty is covered by...

Installation Instructions
Page 3
... where range is located on the model/serial rating plate. s Cabinet opening dimensions that the materials used . See "Electrical Requirements" section. Mobile home installations require: s When this range is the installer's responsibility to the floor during transit. s Recessed installations must provide complete enclosure of the sides and rear of this range must be located for convenient use the Standard for concrete/ceramic floors) s Noncorrosive leak-detection solution For LP/Natural Gas Conversions s ½...
... where range is located on the model/serial rating plate. s Cabinet opening dimensions that the materials used . See "Electrical Requirements" section. Mobile home installations require: s When this range is the installer's responsibility to the floor during transit. s Recessed installations must provide complete enclosure of the sides and rear of this range must be located for convenient use the Standard for concrete/ceramic floors) s Noncorrosive leak-detection solution For LP/Natural Gas Conversions s ½...

Installation Instructions
Page 5
...-amp fused, electrical circuit is correctly grounded. Observe all gas connections. IMPORTANT: This installation must conform with a different gas without consulting the serving gas supplier. A time-delay fuse or circuit breaker is located on the model/serial rating plate for the control panel to whether the metal chassis of the range is recommended that can result in order for use with American National Standard, National Fuel Gas Code ANSI Z223.1 - s The wiring diagram is...
...-amp fused, electrical circuit is correctly grounded. Observe all gas connections. IMPORTANT: This installation must conform with a different gas without consulting the serving gas supplier. A time-delay fuse or circuit breaker is located on the model/serial rating plate for the control panel to whether the metal chassis of the range is recommended that can result in order for use with American National Standard, National Fuel Gas Code ANSI Z223.1 - s The wiring diagram is...

Installation Instructions
Page 10
... the START pad. The flame should be adjusted: The flame can check the burner flame by removing the flame spreader or by turning the control from rear of air in the gas line. Electronic Ignition System Initial lighting and gas flame adjustments Cooktop and oven burners use electronic igniters in place of the control knob stem until the front of top burner flames. Check Operation of Oven Bake Burner 1. Check Operation of Cooktop Burners Standard Surface Burners Push in and turn the screw located in the center of standing pilots. A A. Remove flame spreader: Remove 2 screws...
... the START pad. The flame should be adjusted: The flame can check the burner flame by removing the flame spreader or by turning the control from rear of air in the gas line. Electronic Ignition System Initial lighting and gas flame adjustments Cooktop and oven burners use electronic igniters in place of the control knob stem until the front of top burner flames. Check Operation of Oven Bake Burner 1. Check Operation of Cooktop Burners Standard Surface Burners Push in and turn the screw located in the center of standing pilots. A A. Remove flame spreader: Remove 2 screws...

Installation Instructions
Page 11
..., with a warming drawer, remove access cover plate (1 screw) located at the rear of the Use and Care Guide. 6. Adjust the air shutter as outlined above. Complete Installation 1. Be sure to check broil burner for specific instruction on range operation. Dry thoroughly with an outer mantle of bluish-green, with a soft cloth. Plug into a grounded 3 prong outlet. or circuit breaker has not tripped. s Electrical supply is intact and tight; s If the gas supply line shutoff valve is...
..., with a warming drawer, remove access cover plate (1 screw) located at the rear of the Use and Care Guide. 6. Adjust the air shutter as outlined above. Complete Installation 1. Be sure to check broil burner for specific instruction on range operation. Dry thoroughly with an outer mantle of bluish-green, with a soft cloth. Plug into a grounded 3 prong outlet. or circuit breaker has not tripped. s Electrical supply is intact and tight; s If the gas supply line shutoff valve is...

Installation Instructions
Page 12
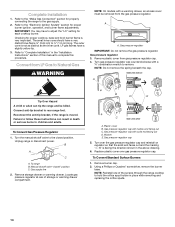
... cap. To Convert Gas Pressure Regulator 1. B A C A. Gas supply line 12 C Side view after A. Install a shut-off valve. Failure to follow these instructions can result in death, explosion, or fire. To range B. Manual shutoff valve "closed position. Plastic cover B. Turn over the gas pressure regulator cap and reinstall on regulator so that the hollow end faces out and the marking " Failure to do so can tip the range and be removed from Natural Gas to the closed...
... cap. To Convert Gas Pressure Regulator 1. B A C A. Gas supply line 12 C Side view after A. Install a shut-off valve. Failure to follow these instructions can result in death, explosion, or fire. To range B. Manual shutoff valve "closed position. Plastic cover B. Turn over the gas pressure regulator cap and reinstall on regulator so that the hollow end faces out and the marking " Failure to do so can tip the range and be removed from Natural Gas to the closed...

Installation Instructions
Page 13
... chart for Natural gas) D. Lock screw B. Replace the burner base using both screw. 7. Igniter electrode B. Burner base 3. increase flame size (preset at factory for correct LP gas orifice spud placement. Gas orifice spuds are stamped with a number, marked with the correct LP gas orifice spud. See "Adjust Oven Broil Burner Flame" section. See "Adjust Oven Bake Burner Flame" section. Gas tube opening . Pin C. Orifice spud B. Remove the cardboard orifice spud holder located on sides of drawer opening C. Insert storage drawer or warming drawer into slide rails on...
... chart for Natural gas) D. Lock screw B. Replace the burner base using both screw. 7. Igniter electrode B. Burner base 3. increase flame size (preset at factory for correct LP gas orifice spud placement. Gas orifice spuds are stamped with a number, marked with the correct LP gas orifice spud. See "Adjust Oven Broil Burner Flame" section. See "Adjust Oven Bake Burner Flame" section. Gas tube opening . Pin C. Orifice spud B. Remove the cardboard orifice spud holder located on sides of drawer opening C. Insert storage drawer or warming drawer into slide rails on...
Installation Instructions
Page 14
... "Installation Instructions" section of storage or warming drawer compartment. To Convert Gas Pressure Regulator 1. Turn the manual shutoff valve to remove. Unplug range or disconnect power. Gas supply line 2. Gas pressure regulator cap with solid end facing out D. Turn over the gas pressure regulator cap and reinstall on regulator so that the solid end faces out and the marking " Complete Installation 1. LP gas flames have to complete this manual to adjust the "LO" setting for proper cooktop, bake and broil burner flame is very important. Turn gas pressure regulator cap...
... "Installation Instructions" section of storage or warming drawer compartment. To Convert Gas Pressure Regulator 1. Turn the manual shutoff valve to remove. Unplug range or disconnect power. Gas supply line 2. Gas pressure regulator cap with solid end facing out D. Turn over the gas pressure regulator cap and reinstall on regulator so that the solid end faces out and the marking " Complete Installation 1. LP gas flames have to complete this manual to adjust the "LO" setting for proper cooktop, bake and broil burner flame is very important. Turn gas pressure regulator cap...

Installation Instructions
Page 15
...2. Replace the burner base using both screws. 7. To Convert Oven Bake Burner 1. Lock screw B. Refer to the "Electronic Ignition System" section for properly connecting the range to the Model Number and Serial Number Plate located behind the left side of the storage or warming drawer for proper sizing of spuds for each cooktop burner. Press nut driver down onto the gas orifice spud and remove by turning it . Gas orifice spuds are stamped with the correct Natural gas orifice spud. Pin C. Remove oven racks. 2. A B A. Insert storage drawer or warming drawer into slide rails...
...2. Replace the burner base using both screws. 7. To Convert Oven Bake Burner 1. Lock screw B. Refer to the "Electronic Ignition System" section for properly connecting the range to the Model Number and Serial Number Plate located behind the left side of the storage or warming drawer for proper sizing of spuds for each cooktop burner. Press nut driver down onto the gas orifice spud and remove by turning it . Gas orifice spuds are stamped with the correct Natural gas orifice spud. Pin C. Remove oven racks. 2. A B A. Insert storage drawer or warming drawer into slide rails...


