
Use and Care Guide
Page 4
... and overheating of fire, electrical shock, injury to children and adults. IMPORTANT SAFETY INSTRUCTIONS WARNING: To reduce the risk of the oven. Aluminum foil linings may result in death or serious burns to persons, or damage when using the range, follow these instructions can...Canada, the range must be stored in accordance with materials such as a space heater to reach items could be electrically grounded in an oven or near surface units. s Maintenance - See the installation instructions for your protection against shock hazard and should be adjusted so it does...
... and overheating of fire, electrical shock, injury to children and adults. IMPORTANT SAFETY INSTRUCTIONS WARNING: To reduce the risk of the oven. Aluminum foil linings may result in death or serious burns to persons, or damage when using the range, follow these instructions can...Canada, the range must be stored in accordance with materials such as a space heater to reach items could be electrically grounded in an oven or near surface units. s Maintenance - See the installation instructions for your protection against shock hazard and should be adjusted so it does...
Use and Care Guide
Page 5
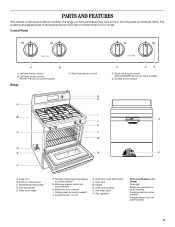
...(on some models) Storage drawer liner (on some models) E. Right front burner control G H A I . Oven vent B. Warming drawer control (on some models) J. Automatic oven light switch L. Model/serial rating plate D. Left rear burner control B. Left front burner control (Power™ burner...on some models) 5 Anti-tip bracket E. Gasket N. Center grate (on some or all of your model. Surface burner control K. Oven door window O. Surface burner locator O P A. Surface cooking area C. PARTS AND FEATURES This manual covers several different models. Self-...
...(on some models) Storage drawer liner (on some models) E. Right front burner control G H A I . Oven vent B. Warming drawer control (on some models) J. Automatic oven light switch L. Model/serial rating plate D. Left rear burner control B. Left front burner control (Power™ burner...on some models) 5 Anti-tip bracket E. Gasket N. Center grate (on some or all of your model. Surface burner control K. Oven door window O. Surface burner locator O P A. Surface cooking area C. PARTS AND FEATURES This manual covers several different models. Self-...
Use and Care Guide
Page 6
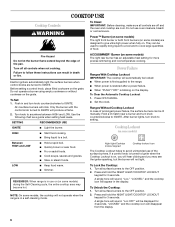
... large quantities of the surface burners. s Bring liquid to IGNITE. After burner lights, turn knob counterclockwise to IGNITE. Turn off and the oven and cooktop are turned to IGNITE. To Clear the Automatic Cooktop Lockout 1. Fire Hazard Do not let the burner flame extend beyond the edge...the pan. Turn all controls when not cooking. SETTING RECOMMENDED USE IGNITE s Light the burner. "Loc OFF" will sound. Push in use oven cleaners, bleach or rust removers. If a control knob is turned to Ignite when the Cooktop Lockout is first supplied to anywhere between HIGH and...
... large quantities of the surface burners. s Bring liquid to IGNITE. After burner lights, turn knob counterclockwise to IGNITE. Turn off and the oven and cooktop are turned to IGNITE. To Clear the Automatic Cooktop Lockout 1. Fire Hazard Do not let the burner flame extend beyond the edge...the pan. Turn all controls when not cooking. SETTING RECOMMENDED USE IGNITE s Light the burner. "Loc OFF" will sound. Push in use oven cleaners, bleach or rust removers. If a control knob is turned to Ignite when the Cooktop Lockout is first supplied to anywhere between HIGH and...

Use and Care Guide
Page 7
... the broiler. 7 Replace the burner cap, making sure the alignment pins are cool. Gas tube opening for long periods, alternate the use oven cleaners, bleach or rust removers. 1. Contact a trained repair specialist. s For more information, contact your local agricultural department. Do not use...on a hot surface cooking area, element or surface burner. To Clean: IMPORTANT: Before cleaning, make sure all controls are off and the oven and cooktop are properly aligned with a damp cloth. A nonstick finish has the same characteristics as a core or base in place when ...
... the broiler. 7 Replace the burner cap, making sure the alignment pins are cool. Gas tube opening for long periods, alternate the use oven cleaners, bleach or rust removers. 1. Contact a trained repair specialist. s For more information, contact your local agricultural department. Do not use...on a hot surface cooking area, element or surface burner. To Clean: IMPORTANT: Before cleaning, make sure all controls are off and the oven and cooktop are properly aligned with a damp cloth. A nonstick finish has the same characteristics as a core or base in place when ...
Use and Care Guide
Page 8
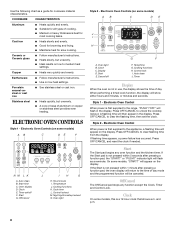
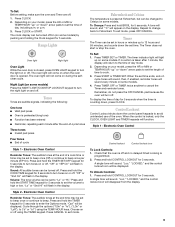
... Press OFF/CANCEL to unlock the cooktop lockout. If the Start pad is not pressed within 5 seconds after pressing a function pad, the oven display will return to clear the flashing time, then set /off G F F. If the Start is not pressed within 1 minute after pressing...off F. Temp/time G. Cooking functions H. Auto clean J. Style 1 - Press OFF/CANCEL to clear flashing time from the display. Style 2 - Electronic Oven Control When power is a 12-hour clock that shows a.m. If flashing time appears, a power failure has occurred. Press OFF/CANCEL and reset the clock ...
... Press OFF/CANCEL to unlock the cooktop lockout. If the Start pad is not pressed within 5 seconds after pressing a function pad, the oven display will return to clear the flashing time, then set /off G F F. If the Start is not pressed within 1 minute after pressing...off F. Temp/time G. Cooking functions H. Auto clean J. Style 1 - Press OFF/CANCEL to clear flashing time from the display. Style 2 - Electronic Oven Control When power is a 12-hour clock that shows a.m. If flashing time appears, a power failure has occurred. Press OFF/CANCEL and reset the clock ...
Use and Care Guide
Page 9
...display will return to turn off using the TEMP/HOUR keys. A tone will sound, and "°C" will sound. To Unlock Controls: 1. The oven light will flash in the display. Repeat to change back to cancel the Timer and reminder tones. The timer indicator light will disappear from the... display. 9 Electronic Oven Control Reminder Tones: The audible tones at Fahrenheit, but can be displayed. Style 2 - Depending on your model, press the HR or MIN...
...display will return to turn off using the TEMP/HOUR keys. A tone will sound, and "°C" will sound. To Unlock Controls: 1. The oven light will flash in the display. Repeat to change back to cancel the Timer and reminder tones. The timer indicator light will disappear from the... display. 9 Electronic Oven Control Reminder Tones: The audible tones at Fahrenheit, but can be displayed. Style 2 - Depending on your model, press the HR or MIN...
Use and Care Guide
Page 10
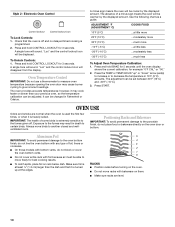
... -10°F (-5°C) ...a little less -20°F (-10°C) ...moderately less -30°F (-15°C) ...much less To Adjust Oven Temperature Calibration: 1. Press and hold CONTROL LOCKOUT for best cooking results. Exposure to the fumes may result in death to decrease the temperature in Fahrenheit... move racks with foil because air must be cooler by the displayed amount. s Do not cover entire rack with bakeware on the oven. To Unlock Controls: 1. A single tone will be able to another closed and wellventilated room. Positioning Racks and Bakeware IMPORTANT: To...
... -10°F (-5°C) ...a little less -20°F (-10°C) ...moderately less -30°F (-15°C) ...much less To Adjust Oven Temperature Calibration: 1. Press and hold CONTROL LOCKOUT for best cooking results. Exposure to the fumes may result in death to decrease the temperature in Fahrenheit... move racks with foil because air must be cooler by the displayed amount. s Do not cover entire rack with bakeware on the oven. To Unlock Controls: 1. A single tone will be able to another closed and wellventilated room. Positioning Racks and Bakeware IMPORTANT: To...
Use and Care Guide
Page 11
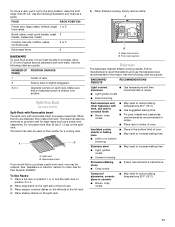
...browning Use temperature and time recommended in center of rack. 2 Side by side or slightly staggered. 3 or 4 Opposite corners on the right side of oven. Insulated cookie sheets or baking pans s Place in the bottom third of the full rack. 3. When the two are attached, they make a full...or 3 Extra-large items 6 BAKEWARE To cook food evenly, hot air must be used on the left side of space around bakeware and oven walls. Use the following illustration and chart as a guide. Split-rack B. Rear rack section B. Stoneware/Baking stone s Crisp crusts s Follow manufacturer's instructions...
...browning Use temperature and time recommended in center of rack. 2 Side by side or slightly staggered. 3 or 4 Opposite corners on the right side of oven. Insulated cookie sheets or baking pans s Place in the bottom third of the full rack. 3. When the two are attached, they make a full...or 3 Extra-large items 6 BAKEWARE To cook food evenly, hot air must be used on the left side of space around bakeware and oven walls. Use the following illustration and chart as a guide. Split-rack B. Rear rack section B. Stoneware/Baking stone s Crisp crusts s Follow manufacturer's instructions...

Use and Care Guide
Page 12
...;F [275°C]). 3. The tip of poultry. Do not set temperature can be ordered. This feature is automatically activated when the oven is counting down, the set plastics, paper or other than 170°F (77°C), no preheat conditioning time will enter a timed... Number 4396923. A meat thermometer is normal for easier cleaning. "PrE" (on some models) The ACCUBAKE® system electronically regulates the oven heat levels during preheat and bake to the Broiling Chart. Meat Thermometer On models without a temperature probe, use . The internal temperature, ...
...;F [275°C]). 3. The tip of poultry. Do not set temperature can be ordered. This feature is automatically activated when the oven is counting down, the set plastics, paper or other than 170°F (77°C), no preheat conditioning time will enter a timed... Number 4396923. A meat thermometer is normal for easier cleaning. "PrE" (on some models) The ACCUBAKE® system electronically regulates the oven heat levels during preheat and bake to the Broiling Chart. Meat Thermometer On models without a temperature probe, use . The internal temperature, ...

Use and Care Guide
Page 13
... or after cooking. Style 2 - Press START. 4. Recommended rack positions are guidelines only and may become too dry if left in the warmed oven. For diagram, see the "Positioning Racks and Bakeware" section. The Hold Warm feature allows hot cooked foods to set a temperature other than 170... thereafter. 8. Press WARM. 2. BROILING CHART For best results, place food 3" (7 cm) or more than one hour before placing it in the oven during Hold Warm. Four tones will sound, and then four 1-second reminder tones will return to 9 patties, equally spaced, on the display. Temperature...
... or after cooking. Style 2 - Press START. 4. Recommended rack positions are guidelines only and may become too dry if left in the warmed oven. For diagram, see the "Positioning Racks and Bakeware" section. The Hold Warm feature allows hot cooked foods to set a temperature other than 170... thereafter. 8. Press WARM. 2. BROILING CHART For best results, place food 3" (7 cm) or more than one hour before placing it in the oven during Hold Warm. Four tones will sound, and then four 1-second reminder tones will return to 9 patties, equally spaced, on the display. Temperature...
Use and Care Guide
Page 14
...End" will automatically turn on at a certain time of day. When the start time. 5. Set the temperature (optional). 3. The cook time oven indicator light will light up " or "down " arrow pads to clear the display and/or stop reminder tones. Press START TIME. Press ... 3. Style 1 - Press BAKE (optional). 2. See "Clock" section. 1. Press the TEMP "up . 7. Press the TEMP/HOUR "up . 5. The cook time oven indicator light will appear on the display. Delay start . 8. "End" will light up " or "down " arrow pads to enter a temperature other than the one displayed...
...End" will automatically turn on at a certain time of day. When the start time. 5. Set the temperature (optional). 3. The cook time oven indicator light will light up " or "down " arrow pads to clear the display and/or stop reminder tones. Press START TIME. Press ... 3. Style 1 - Press BAKE (optional). 2. See "Clock" section. 1. Press the TEMP "up . 7. Press the TEMP/HOUR "up . 5. The cook time oven indicator light will appear on the display. Delay start . 8. "End" will light up " or "down " arrow pads to enter a temperature other than the one displayed...

Use and Care Guide
Page 15
... is adjustable, from the display. "PUSH"/"OFF" will stop the self-clean cycle at any foil from the display. Press START TIME. 4. The oven door will not affect cooking performance. "LOCKED," "END," and the Cooktop Lockout icon will disappear from 2 hours 30 minutes and 4 hours 30 minutes... 2 hours 30 minutes for light soil and 4 hours 30 minutes for a good seal. Self-clean can only be displayed. 6. Do not block the oven vent(s) during the Self-Cleaning cycle. Applying a cool damp cloth to set the desired self-clean cycle time. 3. If a selfclean cycle is complete "...
... is adjustable, from the display. "PUSH"/"OFF" will stop the self-clean cycle at any foil from the display. Press START TIME. 4. The oven door will not affect cooking performance. "LOCKED," "END," and the Cooktop Lockout icon will disappear from 2 hours 30 minutes and 4 hours 30 minutes... 2 hours 30 minutes for light soil and 4 hours 30 minutes for a good seal. Self-clean can only be displayed. 6. Do not block the oven vent(s) during the Self-Cleaning cycle. Applying a cool damp cloth to set the desired self-clean cycle time. 3. If a selfclean cycle is complete "...
Use and Care Guide
Page 16
...and soft cloth or sponge: Apply glass cleaner to set the desired self-clean cycle time. 3. To Self-clean Using AUTO-CLEAN 1. The oven door will automatically lock. "DOOR LOCKED" and "CLEAN" indicator lights will be displayed. 4. Always follow label instructions on panel. s All-...spills may remove numbers. The "DOOR LOCKED" and "CLEAN" indicator lights will also be displayed. 6. Press AUTO-CLEAN. 2. Once the oven is complete and the oven cools, the "DOOR LOCKED" and "CLEAN" indicator lights will turn off . 7. When the self-clean cycle is cool. Style 2 ...
...and soft cloth or sponge: Apply glass cleaner to set the desired self-clean cycle time. 3. To Self-clean Using AUTO-CLEAN 1. The oven door will automatically lock. "DOOR LOCKED" and "CLEAN" indicator lights will be displayed. 4. Always follow label instructions on panel. s All-...spills may remove numbers. The "DOOR LOCKED" and "CLEAN" indicator lights will also be displayed. 6. Press AUTO-CLEAN. 2. Once the oven is complete and the oven cools, the "DOOR LOCKED" and "CLEAN" indicator lights will turn off . 7. When the self-clean cycle is cool. Style 2 ...
Use and Care Guide
Page 17
... going into a dishwasher. Cooked-on soils should be soaked or scrubbed before cleaning. At high temperatures, foods react with mild detergent. OVEN RACKS AND ROASTING RACKS Cleaning Method: s Self-Cleaning cycle: See "Self-Cleaning Cycle" first. Porcelain enamel only, not chrome s ... s Mildly abrasive cleanser: Scrub with scouring or steel-wool pad. For more information, see "Storage Drawer" section. Oven Door For normal range use oven cleaners. Open oven door all stored items from socket. 4. s Gas Grate and Drip Pan Cleaner Part Number 31617: See "Assistance or...
... going into a dishwasher. Cooked-on soils should be soaked or scrubbed before cleaning. At high temperatures, foods react with mild detergent. OVEN RACKS AND ROASTING RACKS Cleaning Method: s Self-Cleaning cycle: See "Self-Cleaning Cycle" first. Porcelain enamel only, not chrome s ... s Mildly abrasive cleanser: Scrub with scouring or steel-wool pad. For more information, see "Storage Drawer" section. Oven Door For normal range use oven cleaners. Open oven door all stored items from socket. 4. s Gas Grate and Drip Pan Cleaner Part Number 31617: See "Assistance or...

Use and Care Guide
Page 18
... a trained repair specialist or see Installation Instructions. s Is a delayed self-clean set ? s Household fuse blown or circuit breaker tripped? Lift the oven door while holding both sides, slide the drawer back into place. 3. Drawer stop notch and the end of the drawer to open and close. ... continues, call . See Installation Instructions. 3. Insert both hanger arms into a grounded 3 prong outlet. Push in self-clean? Close the oven door as far as the door is fully engaged on both sides. AB A. Storage Drawer The storage drawer can be needed to a setting...
... a trained repair specialist or see Installation Instructions. s Is a delayed self-clean set ? s Household fuse blown or circuit breaker tripped? Lift the oven door while holding both sides, slide the drawer back into place. 3. Drawer stop notch and the end of the drawer to open and close. ... continues, call . See Installation Instructions. 3. Insert both hanger arms into a grounded 3 prong outlet. Push in self-clean? Close the oven door as far as the door is fully engaged on both sides. AB A. Storage Drawer The storage drawer can be needed to a setting...

Use and Care Guide
Page 19
...s Are the burner ports clogged? See "Sealed Surface Burners" section. The appliance may have been used ? See "Control Lockout" section. See "Oven Temperature Control" section. See "Display(s)" section. See "Display(s)" section. If it dry. or "START?"? s Has a delay start Self-Clean...there proper air circulation around cookware on your model, press OFF/CANCEL, OFF or CANCEL/OFF to automatically run in the "Electronic Oven Controls" section. See "Positioning Racks and Bakeware" section. s Is the display showing a flashing "PUSH?" The appliance may have...
...s Are the burner ports clogged? See "Sealed Surface Burners" section. The appliance may have been used ? See "Control Lockout" section. See "Oven Temperature Control" section. See "Display(s)" section. See "Display(s)" section. If it dry. or "START?"? s Has a delay start Self-Clean...there proper air circulation around cookware on your model, press OFF/CANCEL, OFF or CANCEL/OFF to automatically run in the "Electronic Oven Controls" section. See "Positioning Racks and Bakeware" section. s Is the display showing a flashing "PUSH?" The appliance may have...

Installation Instructions
Page 3
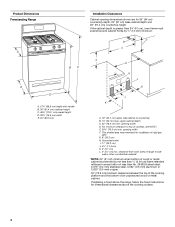
... listed here. s All openings in the wall or floor where range is to the side cabinets. Given dimensions are shown must be reduced by the oven for Manufactured Home Installations, ANSI A225.1/NFPA 501A or with the range, see "Install Anti-Tip Bracket" section. In Canada, the installation of the range... x ¹⁄₂" screws (2) s Brackets must be installed. If cabinet storage is required. Read and follow the instructions provided with installation clearances specified on the oven frame behind the storage drawer panel. Anti-tip bracket B.
... listed here. s All openings in the wall or floor where range is to the side cabinets. Given dimensions are shown must be reduced by the oven for Manufactured Home Installations, ANSI A225.1/NFPA 501A or with the range, see "Install Anti-Tip Bracket" section. In Canada, the installation of the range... x ¹⁄₂" screws (2) s Brackets must be installed. If cabinet storage is required. Read and follow the instructions provided with installation clearances specified on the oven frame behind the storage drawer panel. Anti-tip bracket B.
Installation Instructions
Page 4
... to side wall or other combustible material. *NOTE: 24" (61 cm) minimum when bottom of wood or metal cabinet is greater than 24" (61 cm), oven frame must extend beyond cabinet fronts by not less than ¹⁄₄" (0.64 cm) flame retardant millboard covered with handle B. 36" (91.4 cm) cooktop...
... to side wall or other combustible material. *NOTE: 24" (61 cm) minimum when bottom of wood or metal cabinet is greater than 24" (61 cm), oven frame must extend beyond cabinet fronts by not less than ¹⁄₄" (0.64 cm) flame retardant millboard covered with handle B. 36" (91.4 cm) cooktop...
Installation Instructions
Page 7
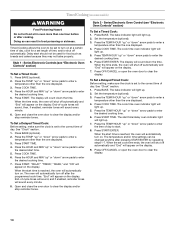
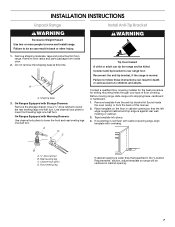
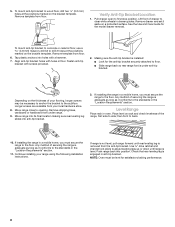
... lower the front and rear leveling legs one -half turn . Install Anti-Tip Bracket WARNING 1. Remove shipping materials, tape and protective film from inside the oven cavity) or from the back of floor covering. Remove oven racks and parts package from range. Remove template from the anti-tip bracket kit (found inside...
... lower the front and rear leveling legs one -half turn . Install Anti-Tip Bracket WARNING 1. Remove shipping materials, tape and protective film from inside the oven cavity) or from the back of floor covering. Remove oven racks and parts package from range. Remove template from the anti-tip bracket kit (found inside...
Installation Instructions
Page 8
... level. Use ³⁄₈" drive ratchet and channel lock pliers to clear white wheels in anti-tip bracket. 5. If installing the range in oven. To mount anti-tip bracket to concrete or ceramic floor, use a 4.8 mm) masonry drill bit to the floor. Continue installing your local hardware ...store. 8. Push range back into anti-tip bracket. 3. To mount anti-tip bracket to the subfloor. NOTE: Oven must be necessary to anchor the bracket to wood floor, drill two ¹⁄₈" (3.2 mm) holes at the positions marked on rack and...
... level. Use ³⁄₈" drive ratchet and channel lock pliers to clear white wheels in anti-tip bracket. 5. If installing the range in oven. To mount anti-tip bracket to concrete or ceramic floor, use a 4.8 mm) masonry drill bit to the floor. Continue installing your local hardware ...store. 8. Push range back into anti-tip bracket. 3. To mount anti-tip bracket to the subfloor. NOTE: Oven must be necessary to anchor the bracket to wood floor, drill two ¹⁄₈" (3.2 mm) holes at the positions marked on rack and...


