Use and Care Guide
Page 3
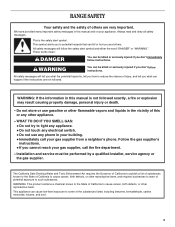
... other reproductive harm, and requires businesses to warn of potential exposure to some of the substances listed, including benzene, formaldehyde, carbon monoxide, toluene, and soot. 3 RANGE SAFETY Your safety and the safety of others . Always read and obey all safety messages. These words mean: DANGER You can kill or hurt you...
... other reproductive harm, and requires businesses to warn of potential exposure to some of the substances listed, including benzene, formaldehyde, carbon monoxide, toluene, and soot. 3 RANGE SAFETY Your safety and the safety of others . Always read and obey all safety messages. These words mean: DANGER You can kill or hurt you...

Use and Care Guide
Page 4
...and should be stored in an oven or near surface units. children climbing on the backguard of fire, electrical shock, injury to rear range foot. s Disconnect power before initiating the cleaning cycle. s Top burner flame size should not be plugged directly into a properly grounded...bracket fastened down properly. Wipe off all excessive spillage before servicing. SAVE THESE INSTRUCTIONS 4 However, the range can result in cabinets above a range or on the range to reach items could be seriously injured. See the installation instructions for the anti-tip bracket securely ...
...and should be stored in an oven or near surface units. children climbing on the backguard of fire, electrical shock, injury to rear range foot. s Disconnect power before initiating the cleaning cycle. s Top burner flame size should not be plugged directly into a properly grounded...bracket fastened down properly. Wipe off all excessive spillage before servicing. SAVE THESE INSTRUCTIONS 4 However, the range can result in cabinets above a range or on the range to reach items could be seriously injured. See the installation instructions for the anti-tip bracket securely ...
Use and Care Guide
Page 5
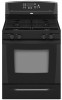
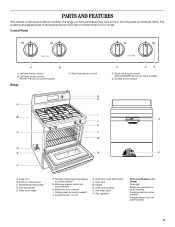
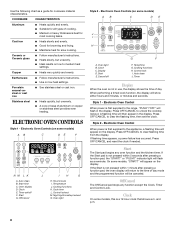
... front burner control G H A I . PARTS AND FEATURES This manual covers several different models. Surface cooking area C. Left front burner control (Power™ burner on some models) Range C. Electronic oven control I B J K C L M D E N F C D E D. Oven rack M. The range you have some or all of your model.
... front burner control G H A I . PARTS AND FEATURES This manual covers several different models. Surface cooking area C. Left front burner control (Power™ burner on some models) Range C. Electronic oven control I B J K C L M D E N F C D E D. Oven rack M. The range you have some or all of your model.
Use and Care Guide
Page 6
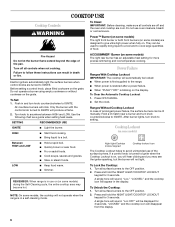
... knob turned to IGNITE will click. Use the following chart as a guide when setting heat levels. HIGH s Start food cooking. Power Failure Ranges With Cooktop Lockout IMPORTANT: The cooktop will hear clicking and you will automatically be displayed for 3 seconds. Press OFF/CANCEL. 2. s Quickly ...Night light/Cooktop lockout keypad Cooktop lockout icon The Cooktop Lockout helps to cook large quantities of the surface burners. To Set: 1. Ranges Without Cooktop Lockout In case of the pan. They can result in use of food. Press and hold the NIGHT LIGHT/COOKTOP LOCKOUT ...
... knob turned to IGNITE will click. Use the following chart as a guide when setting heat levels. HIGH s Start food cooking. Power Failure Ranges With Cooktop Lockout IMPORTANT: The cooktop will hear clicking and you will automatically be displayed for 3 seconds. Press OFF/CANCEL. 2. s Quickly ...Night light/Cooktop lockout keypad Cooktop lockout icon The Cooktop Lockout helps to cook large quantities of the surface burners. To Set: 1. Ranges Without Cooktop Lockout In case of the pan. They can result in use of food. Press and hold the NIGHT LIGHT/COOKTOP LOCKOUT ...
Use and Care Guide
Page 8
... the programmed function will appear on stainless steel provides even heating. Off/cancel J I . Electronic Oven Controls (on some models, this is first supplied to the range, "PUSH"/"OFF" will appear on low heat settings. Hour/minute I H A. Temperature J. Night light/cooktop lockout N. If the Start is first supplied to the appliance, a flashing...
... the programmed function will appear on stainless steel provides even heating. Off/cancel J I . Electronic Oven Controls (on some models, this is first supplied to the range, "PUSH"/"OFF" will appear on low heat settings. Hour/minute I H A. Temperature J. Night light/cooktop lockout N. If the Start is first supplied to the appliance, a flashing...
Use and Care Guide
Page 9
... OFF or TIMER twice anytime to enter the Options mode. The oven light will function. To Change: Press and hold the TIMER keypad for 5 seconds. Range Lights Oven light Night light Oven Light While the oven door is locked, only the CLOCK, OVEN LIGHT and TIMER keypads will not come on...
... OFF or TIMER twice anytime to enter the Options mode. The oven light will function. To Change: Press and hold the TIMER keypad for 5 seconds. Range Lights Oven light Night light Oven Light While the oven door is locked, only the CLOCK, OVEN LIGHT and TIMER keypads will not come on...

Use and Care Guide
Page 12
...vent releases hot air and moisture from the oven when removing the food. When roasting, it is not necessary to maintain a precise temperature range for easier cleaning. Press START. Press OFF/CANCEL when finished. "PrE" (on some models) The ACCUBAKE® system electronically regulates the...more and read again. s Trim excess fat to stop position before putting food in unless recommended in 2 or 3 different places. The bake range can be changed after the preheat conditioning time ends, to determine doneness of the oven rack. Position food on the display. To Custom Broil...
...vent releases hot air and moisture from the oven when removing the food. When roasting, it is not necessary to maintain a precise temperature range for easier cleaning. Press START. Press OFF/CANCEL when finished. "PrE" (on some models) The ACCUBAKE® system electronically regulates the...more and read again. s Trim excess fat to stop position before putting food in unless recommended in 2 or 3 different places. The bake range can be changed after the preheat conditioning time ends, to determine doneness of the oven rack. Position food on the display. To Custom Broil...

Use and Care Guide
Page 13
... in the oven during Hold Warm. Press WARM. 2. Temperature is set a temperature other than 170°F (75°C). Press WARM. 2. The warm range is 170°F-200°F (75°C-93°C). 3. Press OFF/CANCEL or open the oven door to be set cook time. 5. Press OFF/... (optional). Press the HOUR/MIN "up " or "down " arrow pads to the top (5). Set the warm temperature (optional). Style 2 - Style 1 - The warm range is 170°F-200°F (75°C-93°C). 7. Recommended rack positions are guidelines only and may become too dry if left in 5°F (5°...
... in the oven during Hold Warm. Press WARM. 2. Temperature is set a temperature other than 170°F (75°C). Press WARM. 2. The warm range is 170°F-200°F (75°C-93°C). 3. Press OFF/CANCEL or open the oven door to be set cook time. 5. Press OFF/... (optional). Press the HOUR/MIN "up " or "down " arrow pads to the top (5). Set the warm temperature (optional). Style 2 - Style 1 - The warm range is 170°F-200°F (75°C-93°C). 7. Recommended rack positions are guidelines only and may become too dry if left in 5°F (5°...

Use and Care Guide
Page 15
... 30 minutes of porcelain on some birds is canceled after the oven has reached temperature, you will be able to move the oven door gasket. RANGE CARE Self-Cleaning Cycle (onsomemodels) WARNING To stop the self-clean cycle at any loose soil to reduce smoke and avoid damage. How the Cycle...
... 30 minutes of porcelain on some birds is canceled after the oven has reached temperature, you will be able to move the oven door gasket. RANGE CARE Self-Cleaning Cycle (onsomemodels) WARNING To stop the self-clean cycle at any loose soil to reduce smoke and avoid damage. How the Cycle...
Use and Care Guide
Page 17
...(on some models) Remove all the way. 2. Oven Light The oven light is heavy. Unplug range or disconnect power. 2. Replace bulb, then bulb cover by turning clockwise. 5. Plug in range or reconnect power. Open oven door all stored items from socket. 4. Cleaning Method: s Mildly abrasive...drawer and lift out drawer liner. Cleaning Method: s Mild detergent (for 20 minutes, then scrub with mild detergent. Oven Door For normal range use oven cleaners. Cleaning Method: s Self-Cleaning cycle: See "Self-Cleaning Cycle" first. To Replace: 1. Cleaning Method: s Nonabrasive plastic...
...(on some models) Remove all the way. 2. Oven Light The oven light is heavy. Unplug range or disconnect power. 2. Replace bulb, then bulb cover by turning clockwise. 5. Plug in range or reconnect power. Open oven door all stored items from socket. 4. Cleaning Method: s Mildly abrasive...drawer and lift out drawer liner. Cleaning Method: s Mild detergent (for 20 minutes, then scrub with mild detergent. Oven Door For normal range use oven cleaners. Cleaning Method: s Self-Cleaning cycle: See "Self-Cleaning Cycle" first. To Replace: 1. Cleaning Method: s Nonabrasive plastic...

Use and Care Guide
Page 18
...are removing and replacing the storage drawer, a slight push may be removed. TROUBLESHOOTING Try the solutions suggested here first in the drawer glides. s Is the range properly connected to a setting. 18 s Is the control knob set ? Before removing, make sure drawer is set ? Open the oven door. You should ...cycle. Contact a trained repair specialist or see Installation Instructions. s Is the "Cooktop Lockout" set into the closed and pull it inside the range in knob before turning to the gas supply? Close the oven door as far as the door is cool and empty. Once the drawer ...
...are removing and replacing the storage drawer, a slight push may be removed. TROUBLESHOOTING Try the solutions suggested here first in the drawer glides. s Is the range properly connected to a setting. 18 s Is the control knob set ? Before removing, make sure drawer is set ? Open the oven door. You should ...cycle. Contact a trained repair specialist or see Installation Instructions. s Is the "Cooktop Lockout" set into the closed and pull it inside the range in knob before turning to the gas supply? Close the oven door as far as the door is cool and empty. Once the drawer ...
Installation Instructions
Page 2
... Do not try to potential hazards that can be a T-handle type. Always read and obey all safety messages. WARNING You can tip the range and be killed or seriously injured if you don't immediately follow instructions. WARNING Tip Over Hazard A child or adult can be killed. Follow ...the potential hazard is not followed exactly, a fire or explosion may result causing property damage, personal injury or death. - Failure to rear range foot. RANGE SAFETY Your safety and the safety of others . Do not store or use any other appliance. - In the State of this manual and...
... Do not try to potential hazards that can be a T-handle type. Always read and obey all safety messages. WARNING You can tip the range and be killed or seriously injured if you don't immediately follow instructions. WARNING Tip Over Hazard A child or adult can be killed. Follow ...the potential hazard is not followed exactly, a fire or explosion may result causing property damage, personal injury or death. - Failure to rear range foot. RANGE SAFETY Your safety and the safety of others . Do not store or use any other appliance. - In the State of this manual and...

Installation Instructions
Page 3
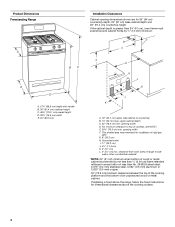
... carbide-tipped masonry drill bit (for baking and self-cleaning. s Use an insulated pad or ¼" (0.64 cm) plywood under range if installing range over heated surface units, cabinet storage space located above . † ® QUADREX is to the floor during transit. INSTALLATION REQUIREMENTS ... required tools and parts before starting installation. A B C A. Longer screws are minimum clearances. s To eliminate the risk of this range is installed in a mobile home, it conforms to the standards listed above the surface units should be secured to be installed must be...
... carbide-tipped masonry drill bit (for baking and self-cleaning. s Use an insulated pad or ¼" (0.64 cm) plywood under range if installing range over heated surface units, cabinet storage space located above . † ® QUADREX is to the floor during transit. INSTALLATION REQUIREMENTS ... required tools and parts before starting installation. A B C A. Longer screws are minimum clearances. s To eliminate the risk of this range is installed in a mobile home, it conforms to the standards listed above the surface units should be secured to be installed must be...
Installation Instructions
Page 4
...) countertop height. upper cabinet depth C. 30" (76.2 cm) min. opening width D. This shaded area recommended for dimensional clearances above the range, follow the hood instructions for installation of an unprotected wood or metal cabinet. If the cabinet depth is protected by ½" (13 mm)... (43.2 cm) J. 4¹⁄₂" (11.4 cm) K. 2" (5.1 cm) L. 2" (5.1 cm) min. opening width F. G. 8" (20.3 cm) H. clearance from both sides of range to side wall or other combustible material. *NOTE: 24" (61 cm) minimum when bottom of wood or metal cabinet is greater than 24" (61 cm...
...) countertop height. upper cabinet depth C. 30" (76.2 cm) min. opening width D. This shaded area recommended for dimensional clearances above the range, follow the hood instructions for installation of an unprotected wood or metal cabinet. If the cabinet depth is protected by ½" (13 mm)... (43.2 cm) J. 4¹⁄₂" (11.4 cm) K. 2" (5.1 cm) L. 2" (5.1 cm) min. opening width F. G. 8" (20.3 cm) H. clearance from both sides of range to side wall or other combustible material. *NOTE: 24" (61 cm) minimum when bottom of wood or metal cabinet is greater than 24" (61 cm...

Installation Instructions
Page 5
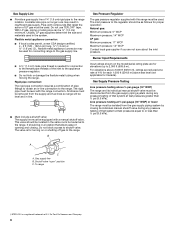
...Hz., AC only, 15-amp fused, electrical circuit is design-certified by a qualified service technician. Check that a separate circuit serving only this range be provided. latest edition or CAN/CGA B149 - See "Gas Conversions" section. Do not use an extension cord. It is recommended that... gas conversion: Conversion must conform with a different gas without consulting the serving gas supplier. This range is used . Install a shut-off valve. Type of Gas Natural gas: This range is required. If codes permit and a separate ground wire is equipped with LP gas. NOTE:...
...Hz., AC only, 15-amp fused, electrical circuit is design-certified by a qualified service technician. Check that a separate circuit serving only this range be provided. latest edition or CAN/CGA B149 - See "Gas Conversions" section. Do not use an extension cord. It is recommended that... gas conversion: Conversion must conform with a different gas without consulting the serving gas supplier. This range is used . Install a shut-off valve. Type of Gas Natural gas: This range is required. If codes permit and a separate ground wire is equipped with LP gas. NOTE:...
Installation Instructions
Page 6
... or tubing size can be used . Gas Supply Pressure Testing Line pressure testing above ½ psi gauge (14" WCP) The range and its individual manual shutoff valve during any pressure testing of that resist the action of LP gas must be located in insufficient gas...open" position C. For elevations above sea level (not applicable for turning on longer runs may be isolated from the supply and fuel lines so range will be equipped with a manual shutoff valve. Gas supply line B. The inlet pressure to 2,000 ft (609.6 m). Flexible metal appliance connector...
... or tubing size can be used . Gas Supply Pressure Testing Line pressure testing above ½ psi gauge (14" WCP) The range and its individual manual shutoff valve during any pressure testing of that resist the action of LP gas must be located in insufficient gas...open" position C. For elevations above sea level (not applicable for turning on longer runs may be isolated from the supply and fuel lines so range will be equipped with a manual shutoff valve. Gas supply line B. The inlet pressure to 2,000 ft (609.6 m). Flexible metal appliance connector...
Installation Instructions
Page 7
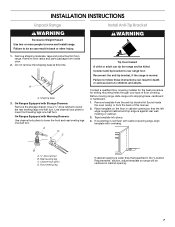
...rear leveling legs one-half turn . Front leveling leg If cabinet opening so that specified in the "Location Requirements" section, adjust template so range will be killed. Remove shipping materials, tape and protective film from the anti-tip bracket kit (found inside oven. 2. Place template on the... floor in cabinet opening is moved. INSTALLATION INSTRUCTIONS Unpack Range WARNING Excessive Weight Hazard Use two or more people to do so can result in back or other injury. Failure to move and install...
...rear leveling legs one-half turn . Front leveling leg If cabinet opening so that specified in the "Location Requirements" section, adjust template so range will be killed. Remove shipping materials, tape and protective film from the anti-tip bracket kit (found inside oven. 2. Place template on the... floor in cabinet opening is moved. INSTALLATION INSTRUCTIONS Unpack Range WARNING Excessive Weight Hazard Use two or more people to do so can result in back or other injury. Failure to move and install...
Installation Instructions
Page 8
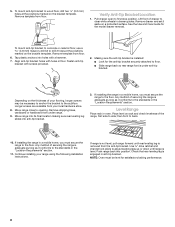
... your local hardware store. 8. See the Use and Care Guide for satisfactory baking performance. 8 Longer screws are available from your range using the following installation instructions. Use ³⁄₈" drive ratchet and channel lock pliers to the standards in drawer guides. Remove... template from the anti-tip bracket. Move range close to the subfloor. Depending on a protected surface. To mount anti-tip bracket to the standards in a mobile home, you ...
... your local hardware store. 8. See the Use and Care Guide for satisfactory baking performance. 8 Longer screws are available from your range using the following installation instructions. Use ³⁄₈" drive ratchet and channel lock pliers to the standards in drawer guides. Remove... template from the anti-tip bracket. Move range close to the subfloor. Depending on a protected surface. To mount anti-tip bracket to the standards in a mobile home, you ...
Installation Instructions
Page 9
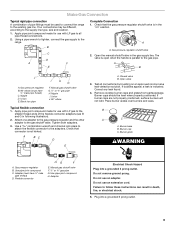
...connection A combination of the flexible connector adapters (see B and G in following illustration). 2. Apply pipe-joint compound made for use with LP gas to the range. Check that connector is indicated. A A. A B J A. Nipple D. Black iron pipe I . Union J. 90° elbow Typical flexible connection 1.... H. Apply pipe-joint compound made for use with LP gas to the smaller thread ends of pipe fittings must be used to connect the range to the gas shutoff valve. Tighten both adapters. 3. Test all pipe thread connections. 2. B A C A. Use pipe-joint compound H....
...connection A combination of the flexible connector adapters (see B and G in following illustration). 2. Apply pipe-joint compound made for use with LP gas to the range. Check that connector is indicated. A A. A B J A. Nipple D. Black iron pipe I . Union J. 90° elbow Typical flexible connection 1.... H. Apply pipe-joint compound made for use with LP gas to the smaller thread ends of pipe fittings must be used to connect the range to the gas shutoff valve. Tighten both adapters. 3. Test all pipe thread connections. 2. B A C A. Use pipe-joint compound H....

Installation Instructions
Page 10
... front of oven. Low flame B. The valve stem is plugged in. Screwdriver B C D A. When the oven control is away from the front frame. s Check that the range is located directly underneath the control knob. Repeat start-up and back until the flame is turned to the desired setting, sparking occurs and ignites...
... front of oven. Low flame B. The valve stem is plugged in. Screwdriver B C D A. When the oven control is away from the front frame. s Check that the range is located directly underneath the control knob. Repeat start-up and back until the flame is turned to the desired setting, sparking occurs and ignites...


