Owners Manual
Page 2
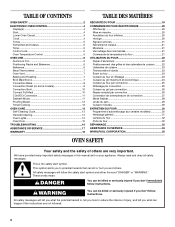
... symbol alerts you to reduce the chance of others . TABLE OF CONTENTS OVEN SAFETY 2 ELECTRONIC OVEN CONTROL 4 Display(s 4 Start 4 Lower Oven Cancel 4 Clock 4 Tones 5 Fahrenheit and Celsius 5 Timer 5 Control Lock 5 Oven Temperature Control 5 OVEN USE 6 Aluminum Foil 6 Positioning Racks and Bakeware 6 Bakeware 6 Meat Thermometer 7 Oven Vent 7 Baking and Roasting 7 Broil Maxi/Econo 7 Convection Bake 8 Convection Roast (on your appliance. All safety messages will follow instructions. This is , tell you how to potential hazards that can kill or...
... symbol alerts you to reduce the chance of others . TABLE OF CONTENTS OVEN SAFETY 2 ELECTRONIC OVEN CONTROL 4 Display(s 4 Start 4 Lower Oven Cancel 4 Clock 4 Tones 5 Fahrenheit and Celsius 5 Timer 5 Control Lock 5 Oven Temperature Control 5 OVEN USE 6 Aluminum Foil 6 Positioning Racks and Bakeware 6 Bakeware 6 Meat Thermometer 7 Oven Vent 7 Baking and Roasting 7 Broil Maxi/Econo 7 Convection Bake 8 Convection Roast (on your appliance. All safety messages will follow instructions. This is , tell you how to potential hazards that can kill or...
Owners Manual
Page 3
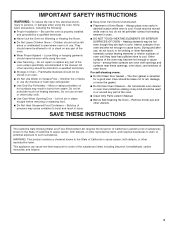
... in Manual. ■ Before Self-Cleaning the Oven - Care should never be worn while using the oven, follow basic precautions, including the following: ■ Proper Installation - Remove broiler pan and other flammable materials contact heating elements or interior surfaces of the oven. ■ Clean Only Parts Listed in color. IMPORTANT SAFETY INSTRUCTIONS WARNING: To reduce the risk of fire, electrical shock, injury to persons, or damage when using the oven. ■ User Servicing - Flammable...
... in Manual. ■ Before Self-Cleaning the Oven - Care should never be worn while using the oven, follow basic precautions, including the following: ■ Proper Installation - Remove broiler pan and other flammable materials contact heating elements or interior surfaces of the oven. ■ Clean Only Parts Listed in color. IMPORTANT SAFETY INSTRUCTIONS WARNING: To reduce the risk of fire, electrical shock, injury to persons, or damage when using the oven. ■ User Servicing - Flammable...

Owners Manual
Page 4
... oven temperature. Upper oven control (see separate Use and Care Guide) N. Then, "PF id = 27" or "PF id = 30" will be reset. 4 If not pressed within 4 minutes after pressing a pad, "START?" Convect conversion J. Lower Oven Display (combination oven models) When the lower oven is pressed depending on the display for 5 seconds. Upper Oven Display (combination oven models), Display (single oven models) When the upper oven or single oven is a 12-hour clock and does not show a.m. To Set: Before setting, make sure the ovens, Timer and Timed Cooking...
... oven temperature. Upper oven control (see separate Use and Care Guide) N. Then, "PF id = 27" or "PF id = 30" will be reset. 4 If not pressed within 4 minutes after pressing a pad, "START?" Convect conversion J. Lower Oven Display (combination oven models) When the lower oven is pressed depending on the display for 5 seconds. Upper Oven Display (combination oven models), Display (single oven models) When the upper oven or single oven is a 12-hour clock and does not show a.m. To Set: Before setting, make sure the ovens, Timer and Timed Cooking...

Owners Manual
Page 6
..., meat and 2 poultry Cookies, biscuits, muffins, cakes 2 or 3 6 Convection Cooking FUNCTION Convection baking or roasting Convection baking Convection baking Convection Roast Convection Broil NUMBER OF RACKS USED 1 RACK POSITION(S) 1, 2 or 3 2 2 and 4 3 1, 3 and 5 1 1, 2 or 3 1 3 or 4 BAKEWARE To cook food evenly, hot air must be able to certain birds. Make sure that it is directly over another closed and wellventilated room. BAKEWARE/ RESULTS RECOMMENDATIONS Light colored ■ aluminum ■ Light golden crusts ■ Even browning Use temperature...
..., meat and 2 poultry Cookies, biscuits, muffins, cakes 2 or 3 6 Convection Cooking FUNCTION Convection baking or roasting Convection baking Convection baking Convection Roast Convection Broil NUMBER OF RACKS USED 1 RACK POSITION(S) 1, 2 or 3 2 2 and 4 3 1, 3 and 5 1 1, 2 or 3 1 3 or 4 BAKEWARE To cook food evenly, hot air must be able to certain birds. Make sure that it is directly over another closed and wellventilated room. BAKEWARE/ RESULTS RECOMMENDATIONS Light colored ■ aluminum ■ Light golden crusts ■ Even browning Use temperature...
Owners Manual
Page 7
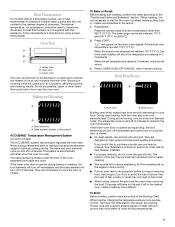
... door is opened during preheat and bake to maintain a precise temperature range for Part Number 4396923. ■ For proper draining, do not cover the grid with this appliance. Very thin cuts of the oven, separated from the oven. When broiling, changing the temperature allows more difficult. The bake and broil elements cycle on the lower oven display if the actual oven temperature is closed . ■ For best results, use a broiler pan and grid. A. Broil elements B. Broil econo Broiling uses direct radiant heat...
... door is opened during preheat and bake to maintain a precise temperature range for Part Number 4396923. ■ For proper draining, do not cover the grid with this appliance. Very thin cuts of the oven, separated from the oven. When broiling, changing the temperature allows more difficult. The bake and broil elements cycle on the lower oven display if the actual oven temperature is closed . ■ For best results, use a broiler pan and grid. A. Broil elements B. Broil econo Broiling uses direct radiant heat...
Owners Manual
Page 8
... patties, equally spaced, on broiler grid. Press the number pads to enter a temperature other than 325°F (163°C). When the set oven temperature will appear on the lower oven display until the oven is opened during convection baking or preheating, the broil and convection element and fan will cycle on some models) A A. When using 2 racks, place on guides 2 and 4. The cook time may be adjusted for the oven to preheat before putting food in, unless...
... patties, equally spaced, on broiler grid. Press the number pads to enter a temperature other than 325°F (163°C). When the set oven temperature will appear on the lower oven display until the oven is opened during convection baking or preheating, the broil and convection element and fan will cycle on some models) A A. When using 2 racks, place on guides 2 and 4. The cook time may be adjusted for the oven to preheat before putting food in, unless...
Owners Manual
Page 9
... opened during convection roasting, the broil element and fan will turn off immediately and the bake element will show the oven temperature increasing in 2 minutes. POSITION (min. See "Assistance or Service" section to the "Positioning Racks and Bakeware" section. Press CONVECT ROAST. "Lo°" will come back on the oven display if the actual oven temperature is recommended you would to purchase a Broiler Pan/ Roasting Rack Kit, it is under 170°F (77°C). Broil heat...
... opened during convection roasting, the broil element and fan will turn off immediately and the bake element will show the oven temperature increasing in 2 minutes. POSITION (min. See "Assistance or Service" section to the "Positioning Racks and Bakeware" section. Press CONVECT ROAST. "Lo°" will come back on the oven display if the actual oven temperature is recommended you would to purchase a Broiler Pan/ Roasting Rack Kit, it is under 170°F (77°C). Broil heat...

Owners Manual
Page 10
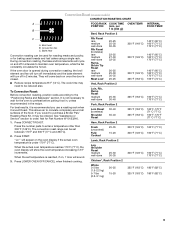
.... 2. The temperature is opened during convection broiling, the broil elements and fan will appear on some models) A B A. Position food on the unheated grid on once the door is changeable to a different temperature. Press START. Press LOWER OVEN OFF/CANCEL when finished cooking. Use the following chart as a guide. ■ All food should be changed to allow you choose from chart. PAD/ OVEN SETTING 1 Convection Bake 2 Convection Roast 3 Convection Roast 4 Convection Bake 5 Convection Bake OVEN TEMP. 325°F (163°C) COOK TIME or PROBE TEMP...
.... 2. The temperature is opened during convection broiling, the broil elements and fan will appear on some models) A B A. Position food on the unheated grid on once the door is changeable to a different temperature. Press START. Press LOWER OVEN OFF/CANCEL when finished cooking. Use the following chart as a guide. ■ All food should be changed to allow you choose from chart. PAD/ OVEN SETTING 1 Convection Bake 2 Convection Roast 3 Convection Roast 4 Convection Bake 5 Convection Bake OVEN TEMP. 325°F (163°C) COOK TIME or PROBE TEMP...
Owners Manual
Page 11
... display and/or stop time is opened or closed, the oven light will not turn on and at the end of -cycle tones will sound, then reminder tones will not turn on or off immediately. Press number pads to do untimed cooking. 6. The Sabbath Mode will remain on or off and the heating elements will sound every minute. 7. Press BAKED GOODS, MEATS or OTHER FOODS. 2. Convect Conversion Convection temperatures and times...
... display and/or stop time is opened or closed, the oven light will not turn on and at the end of -cycle tones will sound, then reminder tones will not turn on or off immediately. Press number pads to do untimed cooking. 6. The Sabbath Mode will remain on or off and the heating elements will sound every minute. 7. Press BAKED GOODS, MEATS or OTHER FOODS. 2. Convect Conversion Convection temperatures and times...
Owners Manual
Page 13
... "Oven Vent" or "Oven Vents" section. To Set a Cook Time and Stop Time [Delay Start]: Before setting, make sure the clock is reached, the lower oven will shut off during Self-Cleaning cycle. When the stop time will sound every minute. 5. Failure to move the oven door gasket. Press COOK TIME. 3. "DELAY" and the stop time is set to the correct time of time to enter the length of day. Press BAKE, CONVECT BAKE or CONVECT ROAST. Press COOK TIME. 3. Air must be able to follow these instructions...
... "Oven Vent" or "Oven Vents" section. To Set a Cook Time and Stop Time [Delay Start]: Before setting, make sure the clock is reached, the lower oven will shut off during Self-Cleaning cycle. When the stop time will sound every minute. 5. Failure to move the oven door gasket. Press COOK TIME. 3. "DELAY" and the stop time is set to the correct time of time to enter the length of day. Press BAKE, CONVECT BAKE or CONVECT ROAST. Press COOK TIME. 3. Air must be able to follow these instructions...

Owners Manual
Page 14
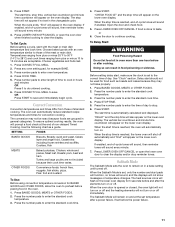
... Self-Cleaning cycle uses very high temperatures, burning soil to set a clean time other than 3 hours 30 minutes. The clean time can be set between 2 hours 30 minutes and 4 hours 30 minutes in the glass breaking. Press any inside oven cavity frame, being certain not to remove soil. Also, make sure the door is automatically calculated and displayed. The clean time can result. The door will automatically lock and "DOOR LOCKED," "DELAY," and the stop time will not work...
... Self-Cleaning cycle uses very high temperatures, burning soil to set a clean time other than 3 hours 30 minutes. The clean time can be set between 2 hours 30 minutes and 4 hours 30 minutes in the glass breaking. Press any inside oven cavity frame, being certain not to remove soil. Also, make sure the door is automatically calculated and displayed. The clean time can result. The door will automatically lock and "DOOR LOCKED," "DELAY," and the stop time will not work...

Owners Manual
Page 15
..., not directly on panel. ■ All-Purpose Appliance Cleaner Part Number 31662 (not included): See "Assistance or Service" section to the rack guides will help them slide. ■ Steel-wool pad TEMPERATURE PROBE (on some paper towels. ■ Glass cleaner and soft cloth or sponge: Apply glass cleaner to handle bulb. OVEN CAVITY Do not use abrasive cleaners, steel-wool pads, gritty washcloths or some models...
..., not directly on panel. ■ All-Purpose Appliance Cleaner Part Number 31662 (not included): See "Assistance or Service" section to the rack guides will help them slide. ■ Steel-wool pad TEMPERATURE PROBE (on some paper towels. ■ Glass cleaner and soft cloth or sponge: Apply glass cleaner to handle bulb. OVEN CAVITY Do not use abrasive cleaners, steel-wool pads, gritty washcloths or some models...
Owners Manual
Page 16
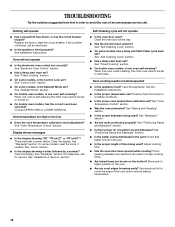
Replace the fuse or reset the circuit breaker. See Installation Instructions. See "Control Lock" section. ■ On some models, reset the clock, if needed. See "Sabbath Mode" section. ■ On double oven models, is one oven self-cleaning? There has been a power failure. See "Clock" section. ■ Is the display showing a letter followed by a number? See "Self-Cleaning Cycle" section. ■ Has a delay start been set ? If the problem continues, call for service. Choose UPPER OVEN or LOWER OVEN first. Self-Cleaning cycle will operate ■ Has a ...
Replace the fuse or reset the circuit breaker. See Installation Instructions. See "Control Lock" section. ■ On some models, reset the clock, if needed. See "Sabbath Mode" section. ■ On double oven models, is one oven self-cleaning? There has been a power failure. See "Clock" section. ■ Is the display showing a letter followed by a number? See "Self-Cleaning Cycle" section. ■ Has a delay start been set ? If the problem continues, call for service. Choose UPPER OVEN or LOWER OVEN first. Self-Cleaning cycle will operate ■ Has a ...

Owners Manual
Page 18
... number Model number Serial number Purchase date 18 The cost of your major appliance, to replace or repair house fuses, or to published user or operator instructions and/or installation instructions. 4. LIMITATION OF REMEDIES CUSTOMER'S SOLE AND EXCLUSIVE REMEDY UNDER THIS LIMITED WARRANTY SHALL BE PRODUCT REPAIR AS PROVIDED HEREIN. After checking "Troubleshooting," you on the product. Repairs when your major appliance is used in -home service is covered by an authorized Whirlpool servicer...
... number Model number Serial number Purchase date 18 The cost of your major appliance, to replace or repair house fuses, or to published user or operator instructions and/or installation instructions. 4. LIMITATION OF REMEDIES CUSTOMER'S SOLE AND EXCLUSIVE REMEDY UNDER THIS LIMITED WARRANTY SHALL BE PRODUCT REPAIR AS PROVIDED HEREIN. After checking "Troubleshooting," you on the product. Repairs when your major appliance is used in -home service is covered by an authorized Whirlpool servicer...
Dimension Guide
Page 1
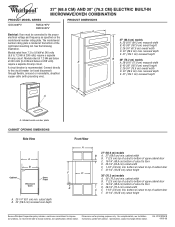
.... Instructions packed with grounding wire). Models rated at 7.2 kW and below at 240 volts (5.4 kW and below at the bottom of the right-hand mounting rail. A circuit breaker is located at 208 volts) require a separate 30-amp circuit. Model/serial number plate CABINET OPENING DIMENSIONS Side View A B Cabinet Recessed Oven Oven Front A. 23-1/4" 59.1 cm) min. cabinet width B. 1" (2.5 cm) top of cutout to bottom of upper cabinet door C. 19-1/4" (48.9 cm) bottom of cabinet door F. 41-1/4" (104.8 cm) cutout height 30...
.... Instructions packed with grounding wire). Models rated at 7.2 kW and below at 240 volts (5.4 kW and below at the bottom of the right-hand mounting rail. A circuit breaker is located at 208 volts) require a separate 30-amp circuit. Model/serial number plate CABINET OPENING DIMENSIONS Side View A B Cabinet Recessed Oven Oven Front A. 23-1/4" 59.1 cm) min. cabinet width B. 1" (2.5 cm) top of cutout to bottom of upper cabinet door C. 19-1/4" (48.9 cm) bottom of cabinet door F. 41-1/4" (104.8 cm) cutout height 30...

Installation Instructions
Page 1
....2 CM) ELECTRIC BUILT-IN MICROWAVE/OVEN COMBINATION INSTRUCTIONS D'INSTALLATION DE L'ENSEMBLE FOUR À MICRO-ONDES ET FOUR CONVENTIONNEL ÉLECTRIQUES ENCASTRÉS DE 27" (68,6 CM) ET 30" (76,2 CM) Table of Contents/Table des matières BUILT-IN MICROWAVE/OVEN COMBINATION SAFETY 1 INSTALLATION REQUIREMENTS 2 Tools and Parts 2 Built-In Microwave/Oven Combination Location Requirements ...........2 Electrical Requirements 3 INSTALLATION INSTRUCTIONS 4 Prepare Built-In Microwave/Oven Combination 4 Remove Oven Door 4 Remove Oven Trim 4 Make Electrical Connection 4 Install Oven...
....2 CM) ELECTRIC BUILT-IN MICROWAVE/OVEN COMBINATION INSTRUCTIONS D'INSTALLATION DE L'ENSEMBLE FOUR À MICRO-ONDES ET FOUR CONVENTIONNEL ÉLECTRIQUES ENCASTRÉS DE 27" (68,6 CM) ET 30" (76,2 CM) Table of Contents/Table des matières BUILT-IN MICROWAVE/OVEN COMBINATION SAFETY 1 INSTALLATION REQUIREMENTS 2 Tools and Parts 2 Built-In Microwave/Oven Combination Location Requirements ...........2 Electrical Requirements 3 INSTALLATION INSTRUCTIONS 4 Prepare Built-In Microwave/Oven Combination 4 Remove Oven Door 4 Remove Oven Trim 4 Make Electrical Connection 4 Install Oven...
Installation Instructions
Page 2
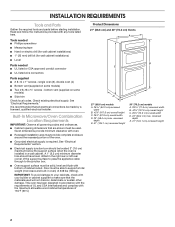
...; Cabinet opening dimensions that the materials used . Tools needed ■ Phillips screwdriver ■ Measuring tape ■ Hand or electric drill (for wall cabinet installations) ■ 1" (25 mm) drill bit (for wall cabinet installations) ■ Level Parts needed ■ UL listed or CSA approved conduit connector ■ UL listed wire connectors Parts supplied ■ # 8-14 x 1" screws - Built-In Microwave/Oven Combination Location Requirements IMPORTANT: Observe all electrical connections be located 3" (7.6 cm) maximum below the support surface when the oven is installed in...
...; Cabinet opening dimensions that the materials used . Tools needed ■ Phillips screwdriver ■ Measuring tape ■ Hand or electric drill (for wall cabinet installations) ■ 1" (25 mm) drill bit (for wall cabinet installations) ■ Level Parts needed ■ UL listed or CSA approved conduit connector ■ UL listed wire connectors Parts supplied ■ # 8-14 x 1" screws - Built-In Microwave/Oven Combination Location Requirements IMPORTANT: Observe all electrical connections be located 3" (7.6 cm) maximum below the support surface when the oven is installed in...

Installation Instructions
Page 4
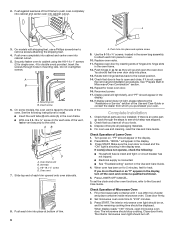
... copper wire. Disconnect power. 2. Side trims are located on the final location for attaching side trims (after oven is manufactured with local codes and industry accepted wiring practices. Remove junction box cover, if it will no longer close to aluminum. Connect the aluminum wiring to the added section of the oven door, and rotate the latches forward to the pigtail leads. 2. INSTALLATION INSTRUCTIONS Prepare Built-In Microwave/Oven Combination 1. WARNING Excessive Weight Hazard Use two...
... copper wire. Disconnect power. 2. Side trims are located on the final location for attaching side trims (after oven is manufactured with local codes and industry accepted wiring practices. Remove junction box cover, if it will no longer close to aluminum. Connect the aluminum wiring to the added section of the oven door, and rotate the latches forward to the pigtail leads. 2. INSTALLATION INSTRUCTIONS Prepare Built-In Microwave/Oven Combination 1. WARNING Excessive Weight Hazard Use two...
Installation Instructions
Page 6
..." light is free to the locked position. 14. or circuit breaker has not tripped. ■ Electrical supply is an extra part, go and open microwave oven door. When oven has been on . Check Operation of Lower Oven 1. Fill a microwave-safe container with shipping feet, use and cleaning, read the Use and Care Guide. 2. A 3. Replace oven racks. 11. See "Prepare Built-In Microwave/Oven Combination" section. 15. Reconnect power. 17. Replace oven door by inserting ends of /recycle all parts are now installed. Rotate...
..." light is free to the locked position. 14. or circuit breaker has not tripped. ■ Electrical supply is an extra part, go and open microwave oven door. When oven has been on . Check Operation of Lower Oven 1. Fill a microwave-safe container with shipping feet, use and cleaning, read the Use and Care Guide. 2. A 3. Replace oven racks. 11. See "Prepare Built-In Microwave/Oven Combination" section. 15. Reconnect power. 17. Replace oven door by inserting ends of /recycle all parts are now installed. Rotate...
Warranty
Page 1
... assistance or service if you need service, first see the "Troubleshooting" section of the Use & Care Guide. Service calls to refrigerator or freezer product failures. 7. Major appliances with the removal from the date of purchase. 6. DISCLAIMER OF IMPLIED WARRANTIES; After checking "Troubleshooting," you on the product. Dealer name Address Phone number Model number Serial number Purchase date 18 Any food loss due to repair or replace appliance light bulbs, air filters or water filters. Write...
... assistance or service if you need service, first see the "Troubleshooting" section of the Use & Care Guide. Service calls to refrigerator or freezer product failures. 7. Major appliances with the removal from the date of purchase. 6. DISCLAIMER OF IMPLIED WARRANTIES; After checking "Troubleshooting," you on the product. Dealer name Address Phone number Model number Serial number Purchase date 18 Any food loss due to repair or replace appliance light bulbs, air filters or water filters. Write...


