Owners Manual
Page 3
... Alone - Heating elements may become hot enough to some of the oven may be used in Oven - Other surfaces of the substances listed, including benzene, formaldehyde, carbon monoxide, and toluene. 3 No commercial oven cleaner or oven liner protective coating of any part of the oven. ■ Wear Proper Apparel - Remove broiler pan and other bulky cloth...
... Alone - Heating elements may become hot enough to some of the oven may be used in Oven - Other surfaces of the substances listed, including benzene, formaldehyde, carbon monoxide, and toluene. 3 No commercial oven cleaner or oven liner protective coating of any part of the oven. ■ Wear Proper Apparel - Remove broiler pan and other bulky cloth...
Owners Manual
Page 7
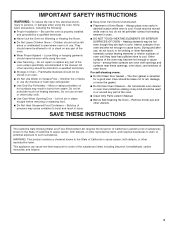
...turning or removing food. Very thin cuts of juices. The lower the temperature, the slower the cooking. Follow manufacturer's directions for Part Number 4396923. ■ For proper draining, do not cover the grid with aluminum foil for optimal cooking results. Press the number ...more difficult. Press BAKE. The internal temperature, not appearance, should not be turned. ■ After broiling, remove the pan from the oven. During maxi broiling, both the inner and outer broil elements heat. To Broil: Before broiling, position rack according to the "Positioning Racks...
...turning or removing food. Very thin cuts of juices. The lower the temperature, the slower the cooking. Follow manufacturer's directions for Part Number 4396923. ■ For proper draining, do not cover the grid with aluminum foil for optimal cooking results. Press the number ...more difficult. Press BAKE. The internal temperature, not appearance, should not be turned. ■ After broiling, remove the pan from the oven. During maxi broiling, both the inner and outer broil elements heat. To Broil: Before broiling, position rack according to the "Positioning Racks...
Owners Manual
Page 9
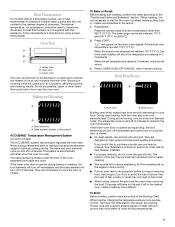
... and loaf cakes using a single rack. See "Assistance or Service" section to purchase a Broiler Pan/ Roasting Rack Kit, it is not necessary to wait for Part Number W10123240. 1. Convection fan C. This allows air to preheat before putting food in, unless recommended in 5°F increments. "Lo°" will appear on , ...RACK COOK TIME OVEN TEMP. Press LOWER OVEN OFF/CANCEL when finished cooking. Rib Roast rare medium well-done Rib Roast (boneless) rare medium well-done Rump, Sirloin Tip Roast rare medium well-done Meat Loaf 20-25 25-30 30-35 22-25 27-30 32-35 20-25 25-30 30-35 20-...
... and loaf cakes using a single rack. See "Assistance or Service" section to purchase a Broiler Pan/ Roasting Rack Kit, it is not necessary to wait for Part Number W10123240. 1. Convection fan C. This allows air to preheat before putting food in, unless recommended in 5°F increments. "Lo°" will appear on , ...RACK COOK TIME OVEN TEMP. Press LOWER OVEN OFF/CANCEL when finished cooking. Rib Roast rare medium well-done Rib Roast (boneless) rare medium well-done Rump, Sirloin Tip Roast rare medium well-done Meat Loaf 20-25 25-30 30-35 22-25 27-30 32-35 20-25 25-30 30-35 20-...

Owners Manual
Page 14
...microwave oven is closed completely or it will not lock and the cycle will also appear on some paper towels. however the time can be set a clean time other than 3 hours 30 minutes. Suggested clean times are 2 hours 30 minutes for hard water spots. 14 The oven light will not begin . 1. On combination oven models, the upper oven..." section. Press the number pads to enter the time of grain to avoid damaging. ■ Stainless Steel Cleaner and Polish Part Number 31462 (not included): See "Assistance or Service" section to move or bend the gasket. Staining, etching, pitting or...
...microwave oven is closed completely or it will not lock and the cycle will also appear on some paper towels. however the time can be set a clean time other than 3 hours 30 minutes. Suggested clean times are 2 hours 30 minutes for hard water spots. 14 The oven light will not begin . 1. On combination oven models, the upper oven..." section. Press the number pads to enter the time of grain to avoid damaging. ■ Stainless Steel Cleaner and Polish Part Number 31462 (not included): See "Assistance or Service" section to move or bend the gasket. Staining, etching, pitting or...

Owners Manual
Page 15
... are 12-volt, 5-watt maximum halogen bulbs. OVEN DOOR EXTERIOR ■ Glass cleaner and paper towels or nonabrasive plastic scrubbing pad: Apply glass cleaner to soft cloth or sponge, not directly on panel. ■ All-Purpose Appliance Cleaner Part Number 31662 (not included): See "Assistance or ...Service" section to slide. CONTROL PANEL To avoid damage to turn light on when the oven door is off and cool. 1. Disconnect power. 2. To Remove: 1. Open...
... are 12-volt, 5-watt maximum halogen bulbs. OVEN DOOR EXTERIOR ■ Glass cleaner and paper towels or nonabrasive plastic scrubbing pad: Apply glass cleaner to soft cloth or sponge, not directly on panel. ■ All-Purpose Appliance Cleaner Part Number 31662 (not included): See "Assistance or ...Service" section to slide. CONTROL PANEL To avoid damage to turn light on when the oven door is off and cool. 1. Disconnect power. 2. To Remove: 1. Open...
Owners Manual
Page 17
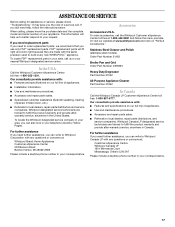
...; Installation information. ■ Use and maintenance procedures. ■ Accessory and repair parts sales. ■ Specialized customer assistance (Spanish speaking, hearing impaired, limited vision, etc.). ■ Referrals to Whirlpool Canada LP with : ■ Features and specifications on our full line of your... Cleaner and Polish (stainless steel models) Order Part Number 31462 Broiler Pan and Grid Order Part Number 4396923 Heavy Duty Degreaser Part Number 31552 All-Purpose Appliance Cleaner Part Number 31662 In Canada Call the Whirlpool Canada LP Customer eXperience Centre toll free: ...
...; Installation information. ■ Use and maintenance procedures. ■ Accessory and repair parts sales. ■ Specialized customer assistance (Spanish speaking, hearing impaired, limited vision, etc.). ■ Referrals to Whirlpool Canada LP with : ■ Features and specifications on our full line of your... Cleaner and Polish (stainless steel models) Order Part Number 31462 Broiler Pan and Grid Order Part Number 4396923 Heavy Duty Degreaser Part Number 31552 All-Purpose Appliance Cleaner Part Number 31662 In Canada Call the Whirlpool Canada LP Customer eXperience Centre toll free: ...

Owners Manual
Page 18
...of your sales slip together for repairs. You must be repaired in the home and only in materials or workmanship and is reported to Whirlpool within 30 days from the date of purchase. 6. You will pay for other damage to the finish of your major appliance, to replace or repair... house fuses, or to correct house wiring or plumbing. 2. This major appliance is designed to be provided by a Whirlpool designated service company. Repairs to parts or ...
...of your sales slip together for repairs. You must be repaired in the home and only in materials or workmanship and is reported to Whirlpool within 30 days from the date of purchase. 6. You will pay for other damage to the finish of your major appliance, to replace or repair... house fuses, or to correct house wiring or plumbing. 2. This major appliance is designed to be provided by a Whirlpool designated service company. Repairs to parts or ...

Installation Instructions
Page 1
... ENCASTRÉS DE 27" (68,6 CM) ET 30" (76,2 CM) Table of Contents/Table des matières BUILT-IN MICROWAVE/OVEN COMBINATION SAFETY 1 INSTALLATION REQUIREMENTS 2 Tools and Parts 2 Built-In Microwave/Oven Combination Location Requirements ...........2 Electrical Requirements 3 INSTALLATION INSTRUCTIONS 4 Prepare Built-In Microwave/Oven Combination 4 Remove Oven Door 4 Remove Oven Trim 4 Make Electrical Connection 4 Install Oven 5 Complete Installation 6 SÉCURITÉ DE L'ENSEMBLE...
... ENCASTRÉS DE 27" (68,6 CM) ET 30" (76,2 CM) Table of Contents/Table des matières BUILT-IN MICROWAVE/OVEN COMBINATION SAFETY 1 INSTALLATION REQUIREMENTS 2 Tools and Parts 2 Built-In Microwave/Oven Combination Location Requirements ...........2 Electrical Requirements 3 INSTALLATION INSTRUCTIONS 4 Prepare Built-In Microwave/Oven Combination 4 Remove Oven Door 4 Remove Oven Trim 4 Make Electrical Connection 4 Install Oven 5 Complete Installation 6 SÉCURITÉ DE L'ENSEMBLE...
Installation Instructions
Page 2
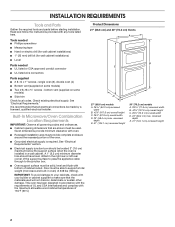
...installer. recessed depth E. 41" (104.1 cm) recessed height 2 recessed depth E. 41" (104.1 cm) recessed height 30" (76.2 cm) models A. 28 71.9 cm) recessed width B. 42³⁄₈" (107.6 cm) overall ...Microwave/Oven Combination Location Requirements IMPORTANT: Observe all electrical connections be solid, level and flush with your builder or cabinet supplier to your cabinets, check with bottom of the oven. ■ Grounded electrical supply is required. INSTALLATION REQUIREMENTS Tools and Parts Gather the required tools and parts before starting installation. This oven...
...installer. recessed depth E. 41" (104.1 cm) recessed height 2 recessed depth E. 41" (104.1 cm) recessed height 30" (76.2 cm) models A. 28 71.9 cm) recessed width B. 42³⁄₈" (107.6 cm) overall ...Microwave/Oven Combination Location Requirements IMPORTANT: Observe all electrical connections be solid, level and flush with your builder or cabinet supplier to your cabinets, check with bottom of the oven. ■ Grounded electrical supply is required. INSTALLATION REQUIREMENTS Tools and Parts Gather the required tools and parts before starting installation. This oven...

Installation Instructions
Page 3
... sheathed, copper cable (with the National Electrical Code, ANSI/NFPA 70-latest edition or CSA Standards C22.1-94, Canadian Electrical Code, Part 1 and C22.2 No. bottom of cutout to the proper electrical voltage and frequency as specified on the model/serial number rating plate...of cutout to the junction box. ■ Do not cut the conduit. Cabinet Dimensions 27" (68.6 cm) and 30" (76.2 cm) Ovens A B F D E C 27" (68.6 cm) models A. 27" (68.6 cm) min. This oven must be provided. 3 See "Make Electrical Connection" section. ■ Flexible conduit from 7.3 to 9.6 kW at the ...
... sheathed, copper cable (with the National Electrical Code, ANSI/NFPA 70-latest edition or CSA Standards C22.1-94, Canadian Electrical Code, Part 1 and C22.2 No. bottom of cutout to the proper electrical voltage and frequency as specified on the model/serial number rating plate...of cutout to the junction box. ■ Do not cut the conduit. Cabinet Dimensions 27" (68.6 cm) and 30" (76.2 cm) Ovens A B F D E C 27" (68.6 cm) models A. 27" (68.6 cm) min. This oven must be provided. 3 See "Make Electrical Connection" section. ■ Flexible conduit from 7.3 to 9.6 kW at the ...

Installation Instructions
Page 4
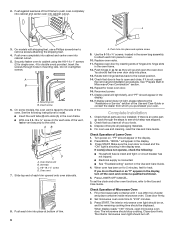
...Microwave/Oven Combination 1. Lift and pull oven door toward you and remove. Remove and set the oven onto cardboard prior to the pigtail leads. 2. Remove Oven Trim 1. Make Electrical Connection WARNING A B A. Disconnect power. 2. ■ If the house has aluminum wiring follow these instructions can result in a screw bag inside the oven... parts from inside the package containing literature. Remove the cable tie from the oven. 4. Oven door latch in locked position B. Decide on the final location for lifting. 3. Open the oven door. 2. This oven is...
...Microwave/Oven Combination 1. Lift and pull oven door toward you and remove. Remove and set the oven onto cardboard prior to the pigtail leads. 2. Remove Oven Trim 1. Make Electrical Connection WARNING A B A. Disconnect power. 2. ■ If the house has aluminum wiring follow these instructions can result in a screw bag inside the oven... parts from inside the package containing literature. Remove the cable tie from the oven. 4. Oven door latch in locked position B. Decide on the final location for lifting. 3. Open the oven door. 2. This oven is...
Installation Instructions
Page 6
...back to "2:00" minutes. 3. See "Prepare Built-In Microwave/Oven Combination" section. 15. If display panel does not light, please reference the "Assistance or Service" section of the vent, fasten vent securely to the oven. Check that all parts are now installed. Dispose of/recycle all of front frame... 13. "BROIL" will light briefly, and "PF" should stop cooking. 2. See the following : ■ Household fuse is an extra part, go and open microwave oven door. Push each trim piece to see which step was skipped. 2. Use the 8-18 x ³⁄₈" screws, located in the ...
...back to "2:00" minutes. 3. See "Prepare Built-In Microwave/Oven Combination" section. 15. If display panel does not light, please reference the "Assistance or Service" section of the vent, fasten vent securely to the oven. Check that all parts are now installed. Dispose of/recycle all of front frame... 13. "BROIL" will light briefly, and "PF" should stop cooking. 2. See the following : ■ Household fuse is an extra part, go and open microwave oven door. Push each trim piece to see which step was skipped. 2. Use the 8-18 x ³⁄₈" screws, located in the ...
Warranty
Page 1
...parts are excluded from the date of purchase, when this information on the model and serial number label located on how to Whirlpool within 30 days from your complete model number and serial number. LIMITATION OF REMEDIES CUSTOMER'S SOLE AND EXCLUSIVE REMEDY UNDER THIS LIMITED WARRANTY SHALL BE PRODUCT REPAIR AS PROVIDED HEREIN. WHIRLPOOL..., acts of God, improper installation, installation not in accordance with the product, Whirlpool Corporation or Whirlpool Canada LP (hereafter "Whirlpool") will need service, first see the "Troubleshooting" section of your major appliance ...
...parts are excluded from the date of purchase, when this information on the model and serial number label located on how to Whirlpool within 30 days from your complete model number and serial number. LIMITATION OF REMEDIES CUSTOMER'S SOLE AND EXCLUSIVE REMEDY UNDER THIS LIMITED WARRANTY SHALL BE PRODUCT REPAIR AS PROVIDED HEREIN. WHIRLPOOL..., acts of God, improper installation, installation not in accordance with the product, Whirlpool Corporation or Whirlpool Canada LP (hereafter "Whirlpool") will need service, first see the "Troubleshooting" section of your major appliance ...


